Hello, lovely crafter! Welcome to the pattern for my Quarter-Mandala Square, part of the Gloria Blanket. I have written this pattern specifically with Scheepjes Catona in mind just to avoid confusion with so many yarn options.
For the Gloria Blanket CAL, please look for your yarn choice on the Week 9post. You will find specific yarn colors for each square, gauge, motif measurements, hook size, and lots more info on that post. In that post, scroll to your yarn choice and follow the steps to complete this week’s CAL work. You will refer back to this pattern to create the square.
The pattern is in US Terms and UK Terms (This post), and I provide step by step photos as well as a video which will release on Monday, Oct 5th on my YouTube channel.
Gloria Blanket PDF PatternRavelry / Etsy/ My Shop – As usual, the CAL will be released free every week here on my website, but I will offer the full blanket pattern in PDF form as soon as I write it up (I’ll have a date soon!)
Instagram Sharing – I’m on Insta as @CypressTextiles. Hashtag your WIP and FO pics with #GloriaBlanket and #CypressTextiles so I can share and save them in my story highlights!
CypressTextiles Tree Huggers Facebook Group – This is my main FB group (join!). Share your progress pics in this group if you like, and I will share CAL highlights there as well.
Social Media Hashtags: #GloriaBlanket and #CypressTextiles
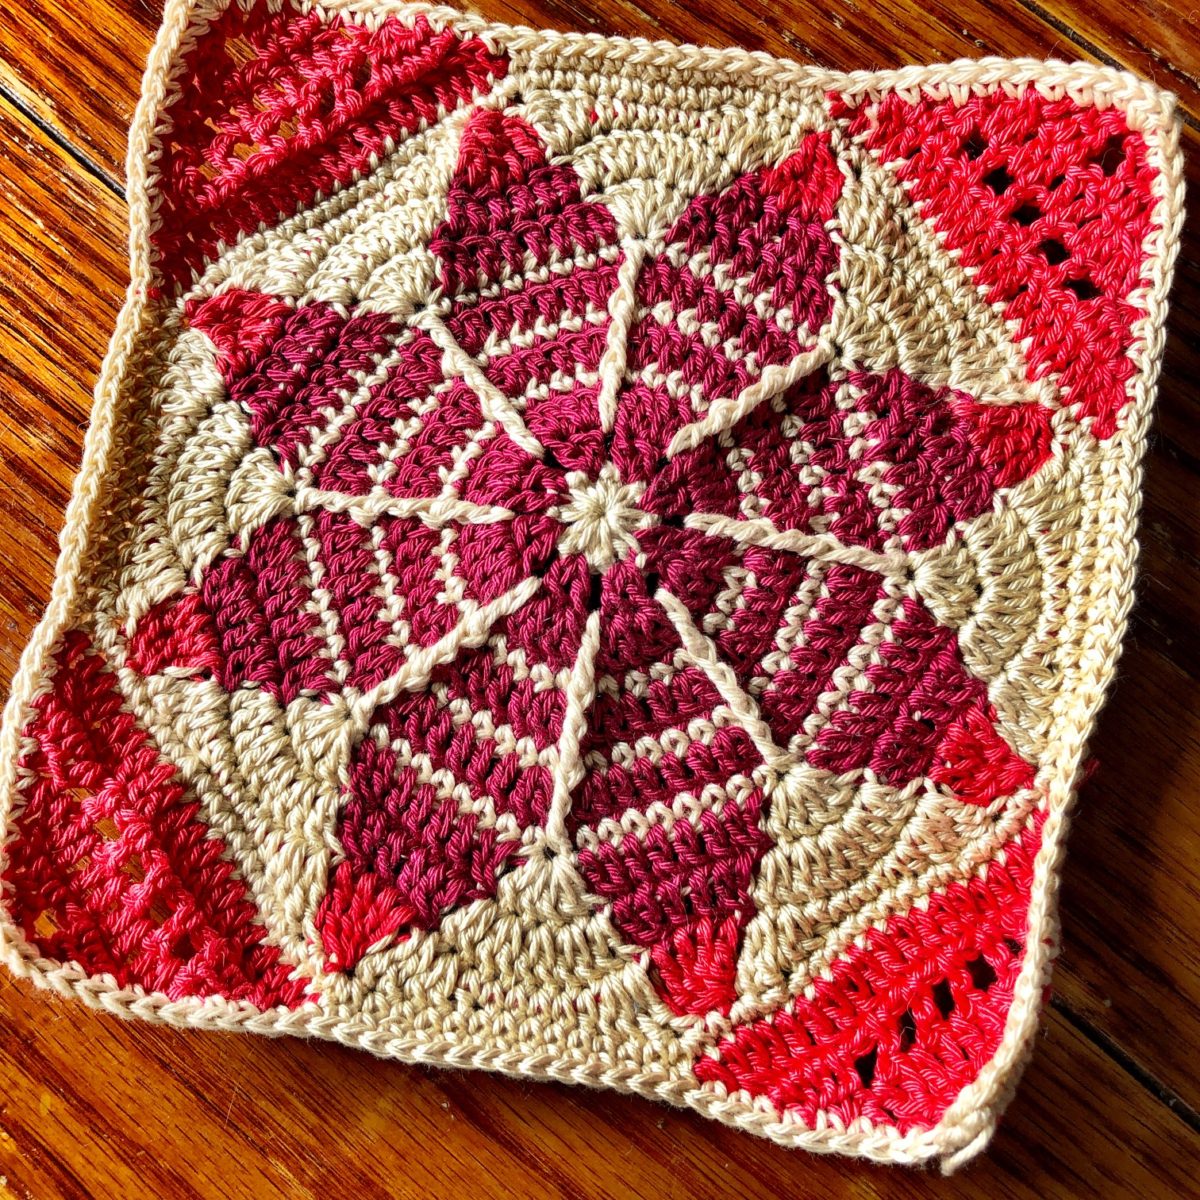
Snowflake Square
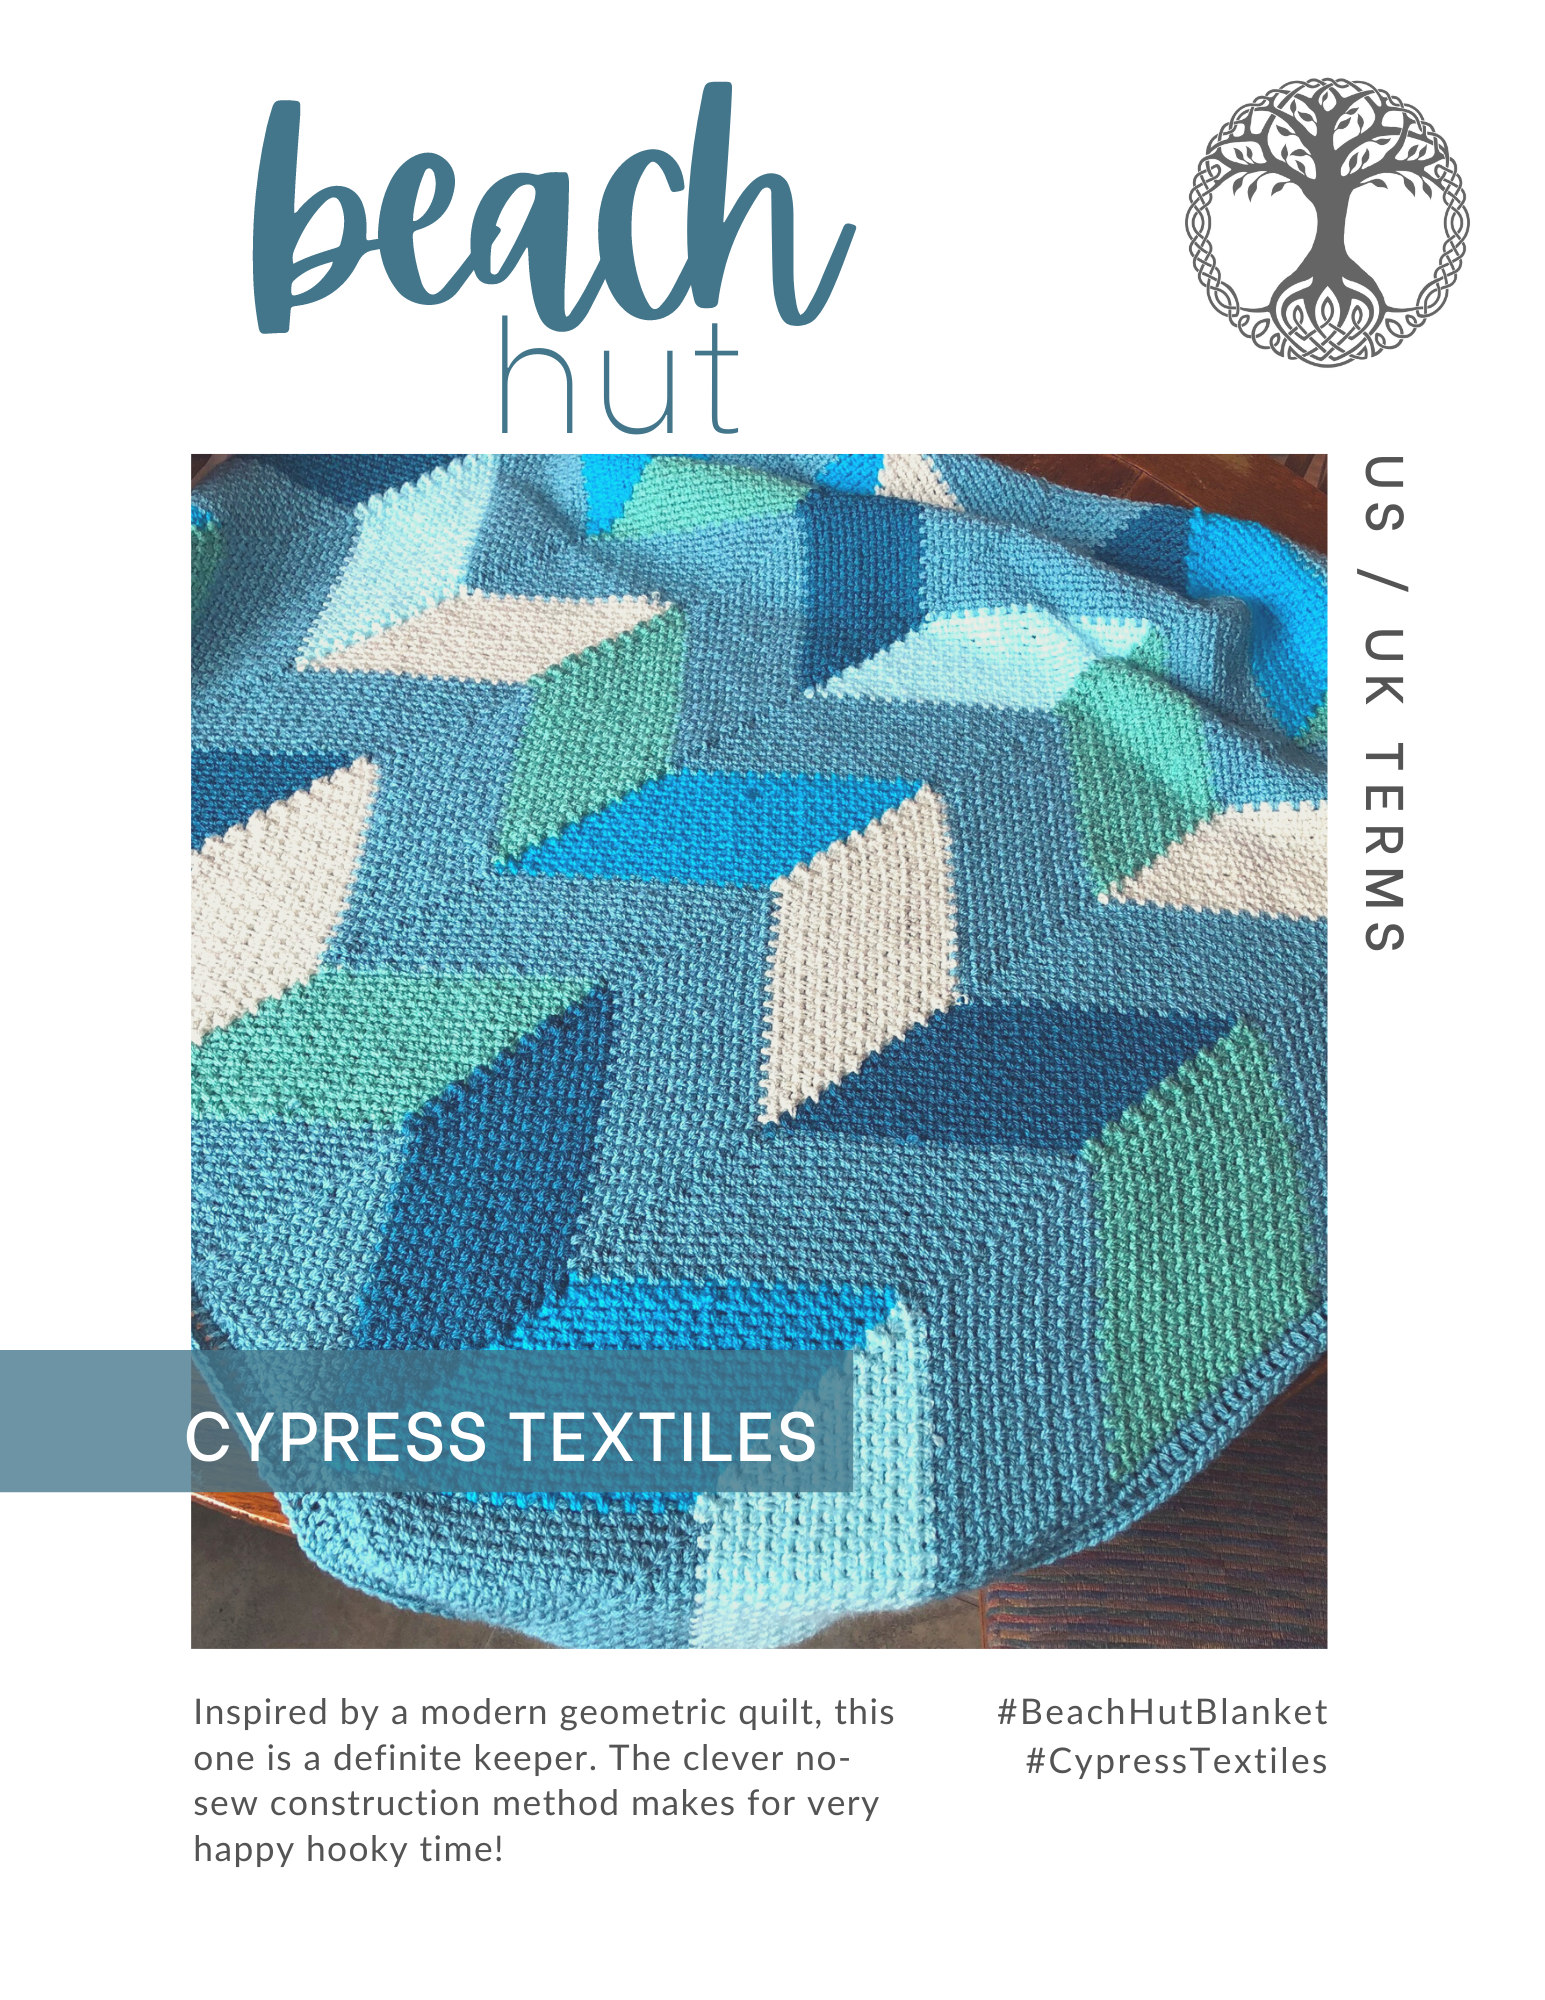
This square was inspired by a photo of floor tiles that I saw in 2016 on the incredible Instagram account, @ihavethisthingwithfloors. After I saw that photo, I got to work designing the two motifs that are featured in this Gloria Blanket. The Snowflake Square will make a wonderful blanket on its own, but it is used in the Gloria Blanket as a foil to the Quarter-Mandala Square to break it up and add visual interest. Your first few motifs will require concentration, but after that, you should be able to sail through them in front of the telly.
You can use any amount of colors, one or many, to make this square. Here in this pattern, I use a background color plus two contrast colors, which I think you will really enjoy. Any color combination till be glorious – hence the name, Gloria! Hope you love the pattern! – Rachele C.
Details and Materials
Note: These details and materials are written for Catona yarn in general. Refer to the Week 9 CAL Post and find your yarn choice if you are using different yarn. Some notes for other versions will be given within the pattern, but please check the week 9 post first.
Square measures 8in in Scheepjes Catona with a size 3mm hook, unblocked (I recommend blocking your squares before you join them.)
To make each square, you need 8g each of 2 contrast colors (CC1 and CC2), plus 20g of main color (MC) (Ordering info below)
3mm hook
4 Stitch markers – Or use a small length of yarn, bobby pins, etc.
Order Yarn
For a variety of color, order the Scheepjes Catona 10g Colour Pack at the following shops. These are affiliate links, so shopping through them will help support CypressTextiles at no additional cost to you.
tr2tog (yoh, insert hook in next st, yoh, pull up lp, yoh, draw yarn through 2 lps on hook) 2 times, yoh, draw yarn through all 3 lps on hook
tr3tog (yoh, insert hook in next st, yoh, pull up lp, yoh, draw yarn through 2 lps on hook) 3 times, yoh, draw yarn through all 4 lps on hook
tr4tog (yoh, insert hook in next st, yoh, pull up lp, yoh, draw yarn through 2 lps on hook) 4 times, yoh, draw yarn through all 5 lps on hook
dtr double treble crochet
FPdtr Front Post double treble crochet
htr half treble crochet
lp loop
MR (make ring) ch3, ss in third ch from hook
rem remaining
rep repeat
RS right side
ss slip stitch
sk skip
sp space
st stitch
tr treble crochet
dtr4tog * yoh 2 times, insert hook in next st, (yoh, pull up lp, yoh, draw yarn through 2 lps on hook) 2 times, rep from * 3 times, yoh, draw yarn through all 4 lps on hook
WS wrong side
yoh yarn over hook
Instructions
Tips and Notes:
To avoid having a lot of work when you are finished with the square, weave your ends after each time you cut the yarn. Please read the stitch guide for any abbreviations.
Written instruction is followed by step-by-step photos with the respective snippet of instruction added above the photo for clarity.
To get a neater result, I do not “chain up” for the first dc of the round/row; rather, I just jump straight into the first sc.
Color Notes for the different CAL versions are added in where necessary. If you aren’t making this square for the Gloria Blanket CAL, just ignore these Color Notes.
Round 1
Rnd 1(RS) Using MC, MR, (dc, ch1) 8 times, join round and change color by inserting hook in first dc and drawing CC1 (See color note below) through as if completing a slip st. [8 dc, 8 sp]
Gloria Blanket CAL Color Note
Catona 10g Colour PackVersion – Use CC1.
Cahlista 15g Colour PackVersion – Use CC1.
Stone Washed / River Washed 10g Colour Pack Version – Use CC1.
Metropolis 10g Colour Pack Version – Use CC throughout.
Whirl + Whirlette Version – Use CC throughout.
All other versions – Use CC throughout.
Step-by-step Photos
Using MC, MR, (dc, ch1) 8 times,
change color by inserting hook in first dc and drawing CC1 (See color note below) through as if completing a slip st.
Round 2
Rnd 2 (Beg tr, tr) in first ch-sp, (ch1, 2tr in next ch-sp) 7 times, ch1, ss in beg tr. [16 tr, 8 sp]
Step-by-step Photos
(Beg tr, tr) in first ch-sp,
(ch1, 2tr in next ch-sp) 7 times, ch1,
ss in beg tr.
Round 3
Rnd 3 Continuing with CC1, (beg tr, tr) in next st, (ch1, 2tr in next 2 tr sts) 7 times, ch1, 2tr in next st, close round and change color by inserting hook in beg tr and drawing MC through as if to complete the slip st. [32 tr, 8 sp]
Step-by-step Photos
Continuing with CC1, (beg tr, tr) in next st,
(ch1, 2tr in next 2 tr sts) 7 times, ch1,
2tr in next st, close round and change color by inserting hook in beg tr and drawing MC through as if to complete the slip st.
Round 4
Rnd 4 Continuing in MC, dc in next st, (dtr in ch-sp from Rnd 1, dc in next 4 sts) 8 times omitting final dc, ss in first dc, changing color to CC1 using same method as before. [8 dtr, 32 dc]
Step-by-step Photos
Continuing in MC, dc in next st,
(dtr in ch-sp from Rnd 1, dc in next 4 sts) 8 times omitting final dc,
ss in first dc, changing color to CC1 using same method as before.
Round 5
Rnd 5 Continuing with CC1, ss in next st, (beg tr, tr) in next st, (tr in next 2 sts, 2tr in next st, ch1, 2tr in next st) 8 times omitting final 2tr, ss in beg tr changing color to MC as before. [48 tr, 8 sp]
Step-by-step Photos
Continuing with CC1, ss in next st,
(beg tr, tr) in next st,
(tr in next 2 sts, 2tr in next st, ch1, 2tr in next st) 8 times omitting final 2tr, ss in beg tr changing color to MC as before.
Round 6
Rnd 6 Continuing with MC, (dc in next 5 sts, FPdtr around dtr from Row 4, dc in next st) 8 times, ss in first dc changing to CC1 as before. [8 FPdtr, 48 dc]
Step-by-step Photos
Continuing with MC, (dc in next 5 sts, FPdtr around dtr from Row 4, dc in next st) 8 times,
ss in first dc changing to CC1 as before.
Round 7
Rnd 7 Continuing with CC1, beg tr in next st, (tr in next 2 sts, 2tr in next st, ch1, 2tr in next st, tr in next 2 sts) 8 times omitting final tr, ss in beg tr changing color to MC as before. [64 tr, 8 sp]
Step-by-step Photos
Continuing with CC1, beg tr in next st,
(tr in next 2 sts, 2tr in next st, ch1, 2tr in next st, tr in next 2 sts) 8 times omitting final tr,
ss in beg tr changing color to MC as before.
Round 8
Rnd 8 Continuing in MC, (dc in next 4 sts, FPdtr around FPdtr from Row 6, dc in next 4 sts) 8 times, ss in first dc changing to CC1 as before. [8 FPdtr, 64 dc]
Step-by-step Photos
Continuing in MC, (dc in next 4 sts, FPdtr around FPdtr from Row 6, dc in next 4 sts) 8 times,
ss in first dc changing to CC1 as before.
Round 9
Note: For rounds 9-11, be sure to work over the dropped color.
Rnd 9 Continuing with CC1, beg tr in next st, (tr2tog changing color to MC on final step of tr2tog, using MC, 5tr in FPdtr changing color back to CC1 on final step of fifth tr, using CC1, tr2tog, tr in next 4 sts) 8 times omitting final tr, do not join round. [16 tr2tog, 72 tr]
Step-by-step Photos
Continuing with CC1 and this time working over MC, beg tr in next st,
(tr2tog changing color to MC on final step of tr2tog, working over CC1 make 5tr in FPdtr changing color back to CC1 on final step of fifth tr, working over MC tr2tog, tr in next 4 sts) 8 times omitting final tr,
do not join round.
Round 10
Rnd 10 Beg tr straight into beg tr st, tr in next st changing to MC on final step – these 2 sts count as 1 tr2tog, (using MC, 2tr in next 5 tr changing to CC1 in final step of tenth tr, using CC1, tr2tog, tr in next 2 sts, tr2tog changing to MC on final step) 8 times omitting final tr2tog, sk beg tr, ss in tr changing color to MC as before, cut CC1 unless instructed not to in color note below. [16 tr2tog, 96 tr]
Gloria Blanket CAL Color Note
Catona 10g Colour PackVersion – Cut CC1.
Cahlista 15g Colour PackVersion – Cut CC1.
Stone Washed / River Washed 10g Colour Pack Version – Cut CC1.
Metropolis 10g Colour Pack Version – Do not cut CC.
Whirl + Whirlette Version – Do not cut CC.
All other versions – Do not cut CC.
Step-by-step Photos
Working over MC make beg tr straight into beg tr st, tr in next st changing to MC on final step – these 2 sts count as 1 tr2tog,
(working over CC1 2tr in next 5 tr changing to CC1 in final step of tenth tr, working over MC tr2tog, tr in next 2 sts, tr2tog changing to MC on final step) 8 times omitting final tr2tog,
sk beg tr, ss in tr changing color to MC as before.
Round 11
Rnd 11 Continuing with MC, beg dtr in next st, dtr in same st, (2tr in next st, htr, dc in 4 sts, htr, 2tr in next st, 2dtr in next st changing to CC2 (see color note below) on final step of second dtr, using CC/CC2 dtr4tog changing to MC on final step of dtr4tog, using MC, 2dtr in next st) 8 times omitting final 2 dtr, using MC, ss in beg dtr, cut CC/CC2. [8 dtr4tog, 32 dtr, 32 tr, 16 htr, 32 dc]
Gloria Blanket CAL Color Note
Catona 10g Colour PackVersion – Change to CC2.
Cahlista 15g Colour PackVersion – Change to CC2.
Stone Washed / River Washed 10g Colour Pack Version – Change to CC2.
Metropolis 10g Colour Pack Version – Carry up CC – Use same CC throughout.
Whirl + Whirlette Version – Carry up CC – Use same CC throughout.
All other versions – Carry up CC – Use same CC throughout.
Step-by-step Photos
Continuing with MC, beg dtr in next st, dtr in same st,
(2tr in next st, htr, dc in 4 sts, htr, 2tr in next st, 2dtr in next st changing to CC2 (see color note below) on final step of second dtr, using CC/CC2 dtr4tog changing to MC on final step of dtr4tog, using MC, 2dtr in next st) 8 times omitting final 2 dtr,
using MC, ss in beg dtr.
Round 12
Rnd 12 (Dc in next 12 sts, 2dc in next st, dc in dtr4tog, 2dc in next st) 8 times, ss in first dc, cut MC. [136 dc]
Step-by-step Photos
(Dc in next 12 sts, 2dc in next st, dc in dtr4tog, 2dc in next st) 8 times,
ss in first dc.
Make Corner Triangle Fill
Row 1 Count 4 dc back on dc sts from Rnd 12, insert hook and bring CC/CC2 through, ss to secure lp, beg tr in same st, tr2tog – beg tr and tr2tog count as 1 tr3tog, tr in next 14 sts, tr3tog, turn. [2 tr3tog, 14 tr]
Step by step photos
Count 4 dc back on dc sts from Rnd 12, insert hook and bring CC/CC2 through,
ss to secure lp,
beg tr in same st,
tr2tog – beg tr and tr2tog count as 1 tr3tog,
tr in next 14 sts, tr3tog.
Row 2 Beg tr in tr3tog, tr2tog – counts as 1 tr3tog as before, (ch1, sk1, tr) 4 times, ch1, tr4tog, turn. [1 tr4tog, 1 tr3tog, 4 tr, 5 sp]
Step by step photos
Beg tr in tr3tog,
tr2tog – counts as 1 tr3tog as before,
(ch1, sk1, tr) 4 times, ch1, tr4tog.
Row 3 Beg tr in tr4tog, tr2tog – counts as 1 tr3tog as before, tr in next 5 sts/sps, tr3tog, turn. [2 tr3tog, 5 tr]
Step by step photos
Beg tr in tr4tog,
tr2tog – counts as 1 tr3tog as before,
tr in next 5 sts/sps, tr3tog.
Row 4 Beg tr in tr3tog, tr2tog – counts as 1 tr3tog as before, ch1, tr3tog, turn. [2 tr3tog, 1 sp]
Step by step photos
Beg tr in tr3tog, tr2tog – counts as 1 tr3tog as before,
ch1,tr3tog.
Row 5 Insert hook in tr3tog, yoh, pull up lp, rep in ch-sp and next tr3tog, yoh and draw yarn through all 4 lps on hook, cut yarn and weave ends.
Step by step photos
Insert hook in tr3tog, yoh, pull up lp, rep in ch-sp and next tr3tog,
yoh and draw yarn through all 4 lps on hook.
cut yarn and weave ends.
Using CC/CC2, repeat Corner Triangle Fill at other 3 corners of motif.
Square Border
Join MC in any corner, (3dc in corner, dc 34 evenly across) 4 times, ss in first dc, cut yarn and weave ends. [148 dc]
Finishing
Block square to same dimensions as your Quarter-Mandala Square.
The end! Give yourself a fist bump!
Hope you enjoy this square, and I can’t wait to see your WIP pics with all the awesome colors the community has picked. See you in the FB group and on IG!
Hello, lovely crafter! Welcome to the pattern for my Quarter-Mandala Square, part of the Gloria Blanket. I have written this pattern specifically with Scheepjes Catona in mind just to avoid confusion with so many yarn options.
For the Gloria Blanket CAL, please look for your yarn choice on the Week 9 post. You will find specific yarn colors for each square, gauge, motif measurements, hook size, and lots more info on that post. In that post, scroll to your yarn choice and follow the steps to complete this week’s CAL work. You will refer back to this pattern to create the square.
The pattern is in US Terms (This post) and UK Terms, and I provide step by step photos as well as a video which will release on Monday, Oct 5th on my YouTube channel.
Gloria Blanket PDF PatternRavelry / Etsy/ My Shop– As usual, the CAL will be released free every week here on my website, but I will offer the full blanket pattern in PDF form as soon as I write it up (I’ll have a date soon!)
Instagram Sharing – I’m on Insta as @CypressTextiles. Hashtag your WIP and FO pics with #GloriaBlanket and #CypressTextiles so I can share and save them in my story highlights!
CypressTextiles Tree Huggers Facebook Group – This is my main FB group (join!). Share your progress pics in this group if you like, and I will share CAL highlights there as well.
Social Media Hashtags: #GloriaBlanket and #CypressTextiles
Snowflake Square
This square was inspired by a photo of floor tiles that I saw in 2016 on the incredible Instagram account, @ihavethisthingwithfloors. After I saw that photo, I got to work designing the two motifs that are featured in this Gloria Blanket. The Snowflake Square will make a wonderful blanket on its own, but it is used in the Gloria Blanket as a foil to the Quarter-Mandala Square to break it up and add visual interest. Your first few motifs will require concentration, but after that, you should be able to sail through them in front of the telly.
You can use any amount of colors, one or many, to make this square. Here in this pattern, I use a background color plus two contrast colors, which I think you will really enjoy. Any color combination till be glorious – hence the name, Gloria! Hope you love the pattern! – Rachele C.
Details and Materials
Note: These details and materials are written for Catona yarn in general. Refer to the Week 9 CAL Post and find your yarn choice if you are using different yarn. Some notes for other versions will be given within the pattern, but please check the week 9 post first.
Square measures 8in in Scheepjes Catona with a size 3mm hook, unblocked (I recommend blocking your squares before you join them.)
To make each square, you need 8g each of 2 contrast colors (CC1 and CC2), plus 20g of main color (MC) (Ordering info below)
3mm hook
4 Stitch markers – Or use a small length of yarn, bobby pins, etc.
Order Yarn
For a variety of color, order the Scheepjes Catona 10g Colour Pack at the following shops. These are affiliate links, so shopping through them will help support CypressTextiles at no additional cost to you.
dc2tog (yoh, insert hook in next st, yoh, pull up lp, yoh, draw yarn through 2 lps on hook) 2 times, yoh, draw yarn through all 3 lps on hook
dc3tog (yoh, insert hook in next st, yoh, pull up lp, yoh, draw yarn through 2 lps on hook) 3 times, yoh, draw yarn through all 4 lps on hook
dc4tog (yoh, insert hook in next st, yoh, pull up lp, yoh, draw yarn through 2 lps on hook) 4 times, yoh, draw yarn through all 5 lps on hook
FPtr Front Post treble crochet
hdc half double crochet
lp loop
MR (make ring) ch3, ss in third ch from hook
rem remaining
rep repeat
RS right side
sc single crochet
ss slip stitch
sk skip
sp space
st stitch
tr treble crochet
tr4tog * yoh 2 times, insert hook in next st, (yoh, pull up lp, yoh, draw yarn through 2 lps on hook) 2 times, rep from * 3 times, yoh, draw yarn through all 4 lps on hook
WS wrong side
yoh yarn over hook
Instructions
Tips and Notes:
To avoid having a lot of work when you are finished with the square, weave your ends after each time you cut the yarn. Please read the stitch guide for any abbreviations.
Written instruction is followed by step-by-step photos with the respective snippet of instruction added above the photo for clarity.
To get a neater result, I do not “chain up” for the first sc of the round/row; rather, I just jump straight into the first sc.
Color Notes for the different CAL versions are added in where necessary. If you aren’t making this square for the Gloria Blanket CAL, just ignore these Color Notes.
Round 1
Rnd 1(RS) Using MC, MR, (sc, ch1) 8 times, join round and change color by inserting hook in first sc and drawing CC1 (See color note below) through as if completing a slip st. [8 sc, 8 sp]
Gloria Blanket CAL Color Note
Catona 10g Colour PackVersion – Use CC1.
Cahlista 15g Colour PackVersion – Use CC1.
Stone Washed / River Washed 10g Colour Pack Version – Use CC1.
Metropolis 10g Colour Pack Version – Use CC throughout.
Whirl + Whirlette Version – Use CC throughout.
All other versions – Use CC throughout.
Step-by-step Photos
Using MC, MR, (sc, ch1) 8 times,
change color by inserting hook in first sc and drawing CC1 (See color note below) through as if completing a slip st.
Round 2
Rnd 2 (Beg dc, dc) in first ch-sp, (ch1, 2dc in next ch-sp) 7 times, ch1, ss in beg dc. [16 dc, 8 sp]
Step-by-step Photos
(Beg dc, dc) in first ch-sp,
(ch1, 2dc in next ch-sp) 7 times, ch1,
ss in beg dc.
Round 3
Rnd 3 Continuing with CC1, (beg dc, dc) in next st, (ch1, 2dc in next 2 dc sts) 7 times, ch1, 2dc in next st, close round and change color by inserting hook in beg dc and drawing MC through as if to complete the slip st.. [32 dc, 8 sp]
Step-by-step Photos
Continuing with CC1, (beg dc, dc) in next st,
(ch1, 2dc in next 2 dc sts) 7 times, ch1,
2dc in next st, close round and change color by inserting hook in beg dc and drawing MC through as if to complete the slip st.
Round 4
Rnd 4 Continuing in MC, sc in next st, (tr in ch-sp from Rnd 1, sc in next 4 sts) 8 times omitting final sc, ss in first sc, changing color to CC1 using same method as before. [8 tr, 32 sc]
Step-by-step Photos
Continuing in MC, sc in next st,
(tr in ch-sp from Rnd 1, sc in next 4 sts) 8 times omitting final sc,
ss in first sc, changing color to CC1 using same method as before.
Round 5
Rnd 5 Continuing with CC1, ss in next st, (beg dc, dc) in next st, (dc in next 2 sts, 2dc in next st, ch1, 2dc in next st) 8 times omitting final 2dc, ss in beg dc changing color to MC as before. [48 dc, 8 sp]
Step-by-step Photos
Continuing with CC1, ss in next st,
(beg dc, dc) in next st,
(dc in next 2 sts, 2dc in next st, ch1, 2dc in next st) 8 times omitting final 2dc, ss in beg dc changing color to MC as before.
Round 6
Rnd 6 Continuing with MC, (sc in next 5 sts, FPtr around tr from Row 4, sc in next st) 8 times, ss in first sc changing to CC1 as before. [8 FPtr, 48 sc]
Step-by-step Photos
Continuing with MC, (sc in next 5 sts, FPtr around tr from Row 4, sc in next st) 8 times,
ss in first sc changing to CC1 as before.
Round 7
Rnd 7 Continuing with CC1, beg dc in next st, (dc in next 2 sts, 2dc in next st, ch1, 2dc in next st, dc in next 2 sts) 8 times omitting final dc, ss in beg dc changing color to MC as before. [64 dc, 8 sp]
Step-by-step Photos
Continuing with CC1, beg dc in next st,
(dc in next 2 sts, 2dc in next st, ch1, 2dc in next st, dc in next 2 sts) 8 times omitting final dc,
ss in beg dc changing color to MC as before.
Round 8
Rnd 8 Continuing in MC, (sc in next 4 sts, FPtr around FPtr from Row 6, sc in next 4 sts) 8 times, ss in first sc changing to CC1 as before. [8 FPtr, 64 sc]
Step-by-step Photos
Continuing in MC, (sc in next 4 sts, FPtr around FPtr from Row 6, sc in next 4 sts) 8 times,
ss in first sc changing to CC1 as before.
Round 9
Note: For rounds 9-11, be sure to work over the dropped color.
Rnd 9 Continuing with CC1, beg dc in next st, (dc2tog changing color to MC on final step of dc2tog, using MC, 5dc in FPtr changing color back to CC1 on final step of fifth dc, using CC1, dc2tog, dc in next 4 sts) 8 times omitting final dc, do not join round. [16 dc2tog, 72 dc]
Step-by-step Photos
Continuing with CC1 and this time working over MC, beg dc in next st,
(dc2tog changing color to MC on final step of dc2tog, working over CC1 make 5dc in FPtr changing color back to CC1 on final step of fifth dc, working over MC dc2tog, dc in next 4 sts) 8 times omitting final dc,
do not join round.
Round 10
Rnd 10 Beg dc straight into beg dc st, dc in next st changing to MC on final step – these 2 sts count as 1 dc2tog, (using MC, 2dc in next 5 dc changing to CC1 in final step of tenth dc, using CC1, dc2tog, dc in next 2 sts, dc2tog changing to MC on final step) 8 times omitting final dc2tog, sk beg dc, ss in dc changing color to MC as before, cut CC1 unless instructed not to in color note below. [16 dc2tog, 96 dc]
Gloria Blanket CAL Color Note
Catona 10g Colour PackVersion – Cut CC1.
Cahlista 15g Colour PackVersion – Cut CC1.
Stone Washed / River Washed 10g Colour Pack Version – Cut CC1.
Metropolis 10g Colour Pack Version – Do not cut CC.
Whirl + Whirlette Version – Do not cut CC.
All other versions – Do not cut CC.
Step-by-step Photos
Working over MC make beg dc straight into beg dc st, dc in next st changing to MC on final step – these 2 sts count as 1 dc2tog,
(working over CC1 2dc in next 5 dc changing to CC1 in final step of tenth dc, working over MC dc2tog, dc in next 2 sts, dc2tog changing to MC on final step) 8 times omitting final dc2tog,
sk beg dc, ss in dc changing color to MC as before.
Round 11
Rnd 11 Continuing with MC, beg tr in next st, tr in same st, (2dc in next st, hdc, sc in 4 sts, hdc, 2dc in next st, 2tr in next st changing to CC2 (see color note below) on final step of second tr, using tr4tog changing to MC on final step of tr4tog, using MC, 2tr in next st) 8 times omitting final 2 tr, using MC, ss in beg tr, cut CC/CC2. [8 tr4tog, 32 tr, 32 dc, 16 hdc, 32 sc]
Gloria Blanket CAL Color Note
Catona 10g Colour PackVersion – Change to CC2.
Cahlista 15g Colour PackVersion – Change to CC2.
Stone Washed / River Washed 10g Colour Pack Version – Change to CC2.
Metropolis 10g Colour Pack Version – Carry up CC – Use same CC throughout.
Whirl + Whirlette Version – Carry up CC – Use same CC throughout.
All other versions – Carry up CC – Use same CC throughout.
Step-by-step Photos
Continuing with MC, beg tr in next st, tr in same st,
(2dc in next st, hdc, sc in 4 sts, hdc, 2dc in next st, 2tr in next st changing to CC2 (see color note below) on final step of second tr, using tr4tog changing to MC on final step of tr4tog, using MC, 2tr in next st) 8 times omitting final 2 tr,
using MC, ss in beg tr.
Round 12
Rnd 12 (Sc in next 12 sts, 2sc in next st, sc in tr4tog, 2sc in next st) 8 times, ss in first sc, cut MC. [136 sc]
Step-by-step Photos
(Sc in next 12 sts, 2sc in next st, sc in tr4tog, 2sc in next st) 8 times,
ss in first sc.
Make Corner Triangle Fill
Row 1 Count 4 sc back on sc sts from Rnd 12, insert hook and bring CC/CC2 through, ss to secure lp, beg dc in same st, dc2tog – beg dc and dc2tog count as 1 dc3tog, dc in next 14 sts, dc3tog, turn. [2 dc3tog, 14 dc]
Step by step photos
Count 4 sc back on sc sts from Rnd 12, insert hook and bring CC/CC2 through,
ss to secure lp,
beg dc in same st,
dc2tog – beg dc and dc2tog count as 1 dc3tog,
dc in next 14 sts, dc3tog.
Row 2 Beg dc in dc3tog, dc2tog – counts as 1 dc3tog as before, (ch1, sk1, dc) 4 times, ch1, dc4tog, turn. [1 dc4tog, 1 dc3tog, 4 dc, 5 sp]
Step by step photos
Beg dc in dc3tog,
dc2tog – counts as 1 dc3tog as before,
(ch1, sk1, dc) 4 times, ch1, dc4tog.
Row 3 Beg dc in dc4tog, dc2tog – counts as 1 dc3tog as before, dc in next 5 sts/sps, dc3tog, turn. [2 dc3tog, 5 dc]
Step by step photos
Beg dc in dc4tog,
dc2tog – counts as 1 dc3tog as before,
dc in next 5 sts/sps, dc3tog.
Row 4 Beg dc in dc3tog, dc2tog – counts as 1 dc3tog as before, ch1, dc3tog, turn. [2 dc3tog, 1 sp]
Step by step photos
Beg dc in dc3tog, dc2tog – counts as 1 dc3tog as before,
ch1, dc3tog.
Row 5 Insert hook in dc3tog, yoh, pull up lp, rep in ch-sp and next dc3tog, yoh and draw yarn through all 4 lps on hook, cut yarn and weave ends.
Step by step photos
Insert hook in dc3tog, yoh, pull up lp, rep in ch-sp and next dc3tog,
yoh and draw yarn through all 4 lps on hook.
cut yarn and weave ends.
Using CC/CC2, repeat Corner Triangle Fill at other 3 corners of motif.
Square Border
Join MC in any corner, (3sc in corner, sc 34 evenly across) 4 times, ss in first sc, cut yarn and weave ends. [148 sc]
Finishing
Block square to same dimensions as your Quarter-Mandala Square.
The end! Give yourself a fist bump!
Hope you enjoy this square, and I can’t wait to see your WIP pics with all the awesome colors the community has picked. See you in the FB group and on IG!
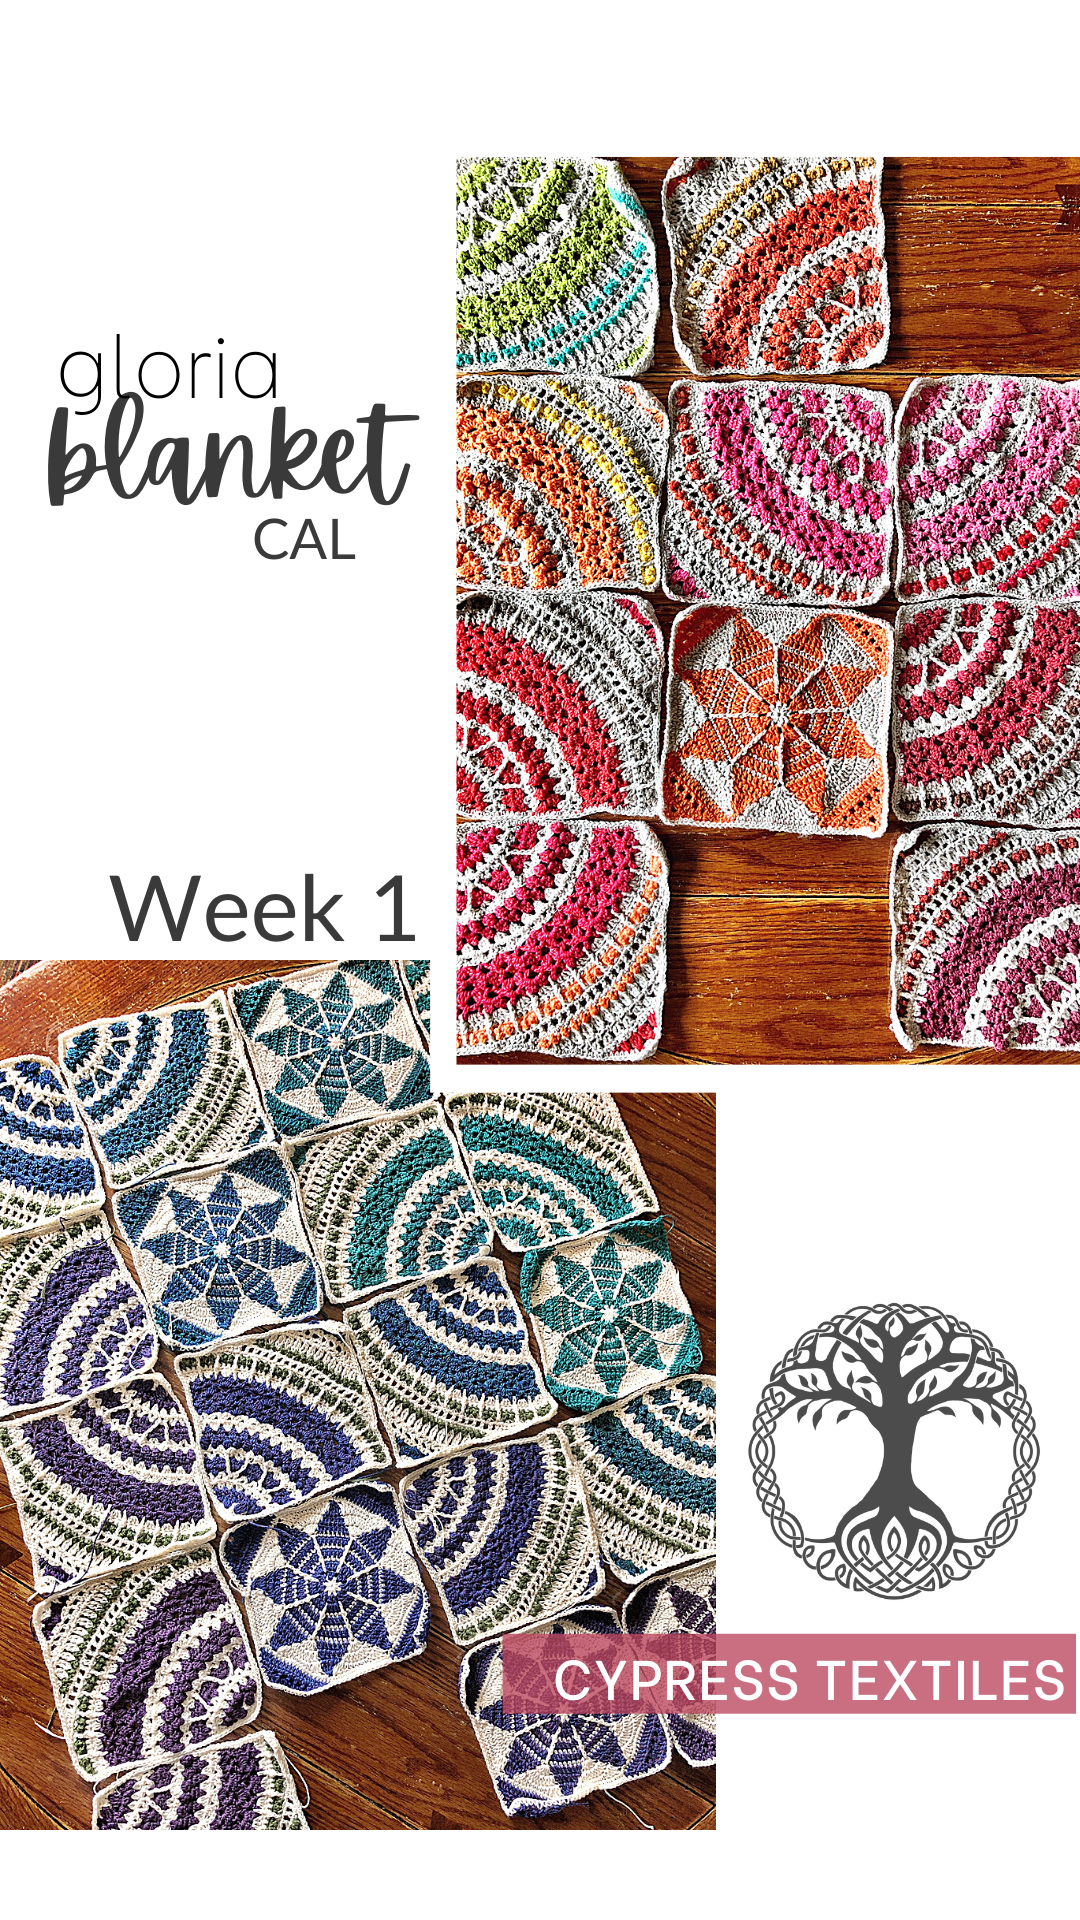
Hello, and welcome to the second week of my Gloria Blanket Crochet-Along! This week we will make a mix of Quarter Mandala Squares and Snowflake Squares. I am so pumped to get started and I’m very thankful that you’re joining me for this CAL. Have fun and share pics!
Gloria Blanket PDF PatternRavelry / Etsy/ My Shop– As usual, the CAL will be released free every week here on my website, but I will offer the full blanket pattern in PDF form as soon as I write it up (I’ll have a date soon!)
Instagram Sharing – I’m on Insta as @CypressTextiles. Hashtag your WIP and FO pics with #GloriaBlanket and #CypressTextiles so I can share and save them in my story highlights!
CypressTextiles Tree Huggers Facebook Group – This is my main FB group (join!). Share your progress pics in this group if you like, and I will share CAL highlights there as well.
YouTube Channel (Subscribe!) – Here I will be posting Gloria Blanket CAL pattern videos releasing shortly after the Friday CAL release. Yay!
Social Media Hashtags: #GloriaBlanket and #CypressTextiles
How This CAL Works
Find your chosen yarn down below. I list separate instruction for each of the yarns that I discussed in the main info post. If you aren’t working any of the listed yarns, you can check out the Stash Yarn Version section, or go completely rogue! I often say that’s my favorite part of hosting a CAL, the variety of blankets that everyone presents in the Facebook group or on Instagram.
There are 3 suggested yarns for which I am making a sample blanket during the CAL. These yarns have a full CAL schedule for the 12 weeks. You can see that schedule on the Main Info Post. (Scroll all the way down on that post.) There are some yarns for which I am not making a sample blanket, but I do give advice on them below to help you.
Under each Gloria Blanket version section below, you will find the following information:
How to organize your yarn into groups by color, if applicable
How many squares to make this week, in which color (MC, CC1, CC2), plus link to pattern for Quarter-Mandala Motif (US and UK Terms)
Where to share pics
If you need yarn quantity info and yarn ordering info, please refer to the Main Info Post.
Once you make your squares, you can take pics and share them in my Facebook Group, or on Instagram with hashtags #GloriaBlanket and #CypressTextiles
Now begin the yarn sections with instructions for Week 2 – read everything carefully – and have fun!!
Metropolis 10g Colour Pack Version
This version uses one Scheepjes Metropolis 10g Colour Pack and 14 x 50g balls of Metropolis, with a size 3mm hook. For more yarn info and where to order, head to the Main Info Page.
Follow the steps below to complete your work for Week 2.
Step 1: Organize your yarn for this week
Color Group 1 – Pull the Color Group 2 colors from Week 1: 044, 065, 066, 057, 064, 075, and 074.
Color Group 2 – Pull colors 034, 077, 036, 076, 046, 047, and 037 from the Colour Pack and store them together.
I am storing my separate color groups in reusable zip-lock bags. There are 9 total color groups just in case that helps you sort out your storage system.
Step 2: Make 6 Quarter-Mandala Squares
The Quarter-Mandala Square Pattern will note when to change colors between MC (Main Color), CC1 (Contrast Color 1), and CC2 (Contrast Color 2). Follow the Color Notes in the pattern.
For this version, CC1 colors are from Color Group 2, and CC2 colors are from Color Group 3 (see below). Save all remnants in an organized fashion with their ball bands, as we will use the colors again in the following weeks. FYI, the CC1 and CC2 colors will vary week to week, but the MC and the color groups will always be the same.
For Week 2, use the following yarn colors for your 6 squares.
MC for all = Metropolis Color No. 025
Square 1: CC1 = 044, CC2 = 034
Square 2: CC1 = 065, CC2 = 077
Square 3: CC1 = 066, CC2 = 036
Square 4: CC1 = 057, CC2 = 076
Square 5: CC1 = 064, CC2 = 046
Square 6: CC1 = 075, CC2 = 047
Here is a sample Quarter-Mandala Square labeled with the CC1 and CC2 color placement. This sample is a Whirl + Whirlette square, but the CC1/CC2 placement is the same for the Metropolis Version.
Here is the Quarter-Mandala Square Pattern: US Terms // UK Terms
Gauge
Check your gauge! The first 8 Rows of the Quarter Mandala pattern measure 3in on either straight side with Metropolis and a 3mm hook.
If your motif is taller, but still makes a 90 degree angle at the corner, then going down a hook size will help.
If your motif is taller and narrow, or if you know yourself to make very tall dc sts, please check out this Golden Loop video. If you are a “lifter” your square will be elongated into a diamond. Changing hook size won’t help much. Working on controlling your Golden Loop will be your solution to having a nice square shape.
Note: The square needs a light blocking to make straight, neat edges and open the lace; however, if the square is too much of a diamond due to very tall dc sts, focus on the Golden Loop may be required.
Step 3: Make 2 Snowflake Squares
The Snowflake Square Pattern will note when to change colors between MC (Main Color), and CC (Contrast Color). Follow the Color Notes in the pattern.
Save all remnants in an organized fashion with their ball bands, as we will use the colors again in the following weeks. FYI, the CC1 and CC2 colors will vary week to week, but the MC and the color groups will always be the same.
For Week 2, use the following yarn colors for your 2 squares.
MC for all = Metropolis Color No. 025
Square 1: CC = 045
Square 2: CC = 074
Here is a sample Snowflake Square labeled with the MC and CC color placement. This sample is a Whirl + Whirlette square, but the MC/CC placement is the same for the Metropolis Version.
Instagram Sharing – I’m on Insta as @CypressTextiles. Hashtag your WIP and FO pics with #GloriaBlanket and #CypressTextiles so I can share and save them in my story highlights!
CypressTextiles Tree Huggers Facebook Group – This is my main FB group (join!). Share your progress pics in this group if you like, and I will share CAL highlights there as well.
Whirl+Whirlette Version
This version uses two Scheepjes Whirl and 6 x 100g balls of Whirlette OR 12 x 50g of Scheepjes Cotton 8, with a size 3mm hook. For more yarn info and where to order, head to the Main Info Page.
Follow the steps below to complete your work for Week 2.
Step 1: Organize your yarn for this week
This week, we will be working from the inside of one Whirl, and the outside of the other Whirl. During Week 1, you labeled one Whirl “A” and the other Whirl “B”.
Here is the diagram for CC1/CC2 for WEEK 2
You can see that for Week 2, we are switching CC1 to B and CC2 to A. Basically, you will pull from the center of the other Whirl this week, and for the next few weeks as well. I will always let you know which one is CC1 and which is CC2.
Step 2: Make 7 Squares in Order as Instructed
The Quarter-Mandala and Snowflake Square Patterns will note when to change colors between MC (Main Color), CC1 (Contrast Color 1), and CC2 (Contrast Color 2) – see below. Follow the Color Notes in the pattern. The label “Whirl A” and “Whirl B” will not change throughout the CAL, but the CC1 and CC2 will vary week to week. The MC will be the same throughout the CAL.
For Week 2, use the following yarn colors for your Quarter Mandala squares.
MC for all = Scheepjes Whirlette in Ice, OR Scheepjes Cotton 8 in preferred background color
Squares 1-7: CC1 = Whirl B, pulled from inside, CC2 = Whirl A, pulled from outside
Note: For this Yarn Version, the Snowflake Square only uses MC and CC1.
In order to create a flow of color and spread the Snowflake Square evenly throughout the blanket, we need to work the squares in a certain order, dispersing the Snowflake Square evenly through the Whirl. Follow this sequence when making your squares. This will also break up the monotony of working the Quarter-Mandala Squares.
Work your squares in the following order:
Square 1: Quarter-Mandala
Square 2: Quarter-Mandala
Square 3: Snowflake
Square 4: Quarter-Mandala
Square 5: Quarter-Mandala
Square 6: Snowflake
Square 7: Quarter-Mandala
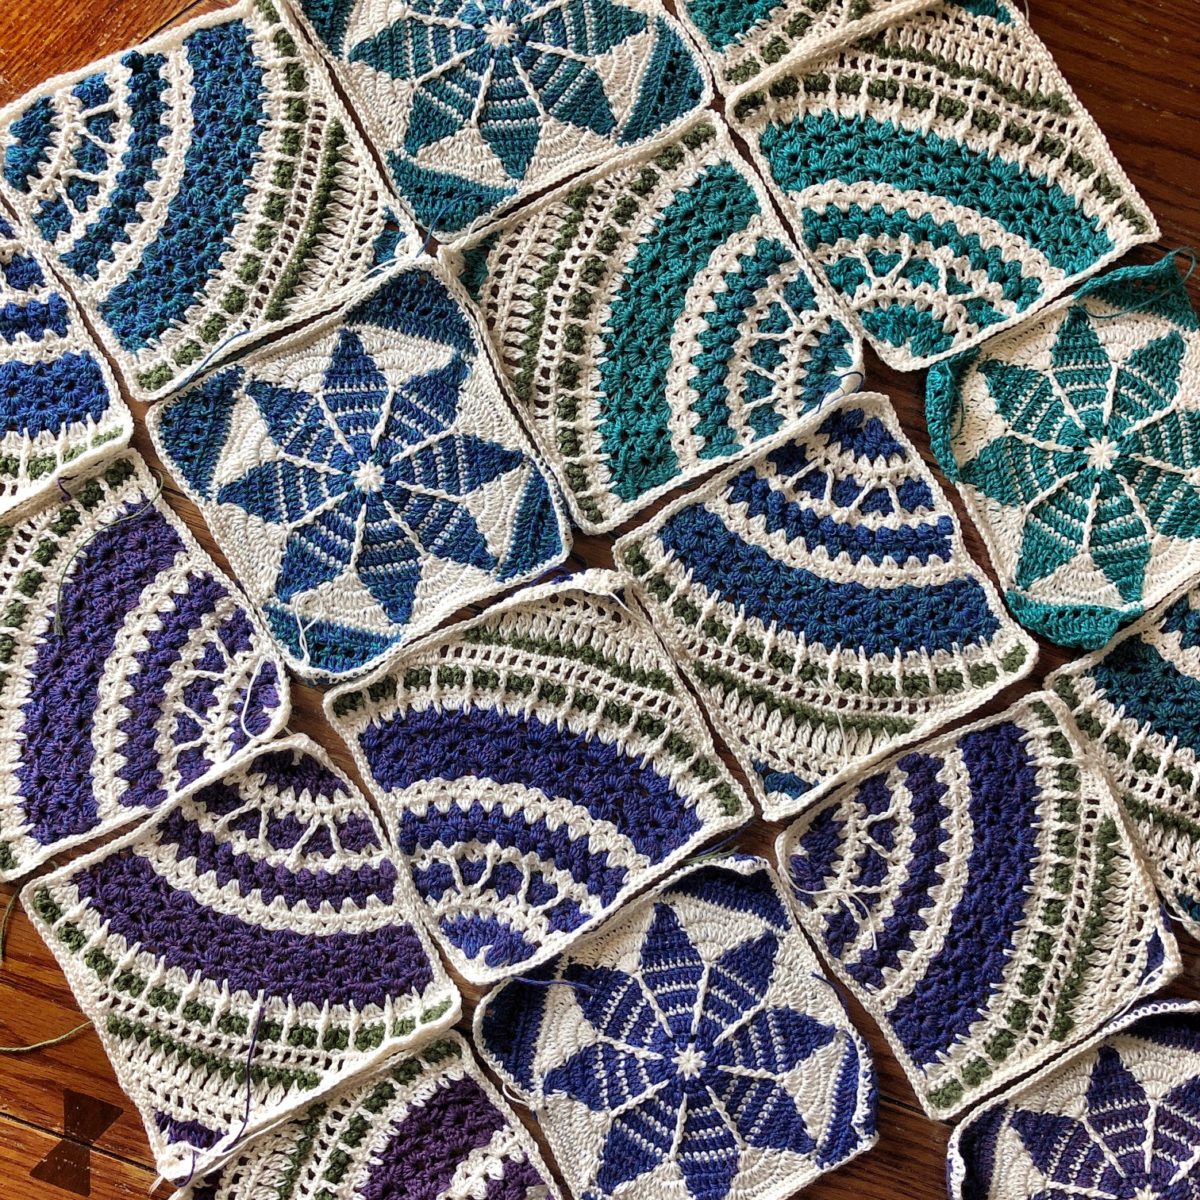
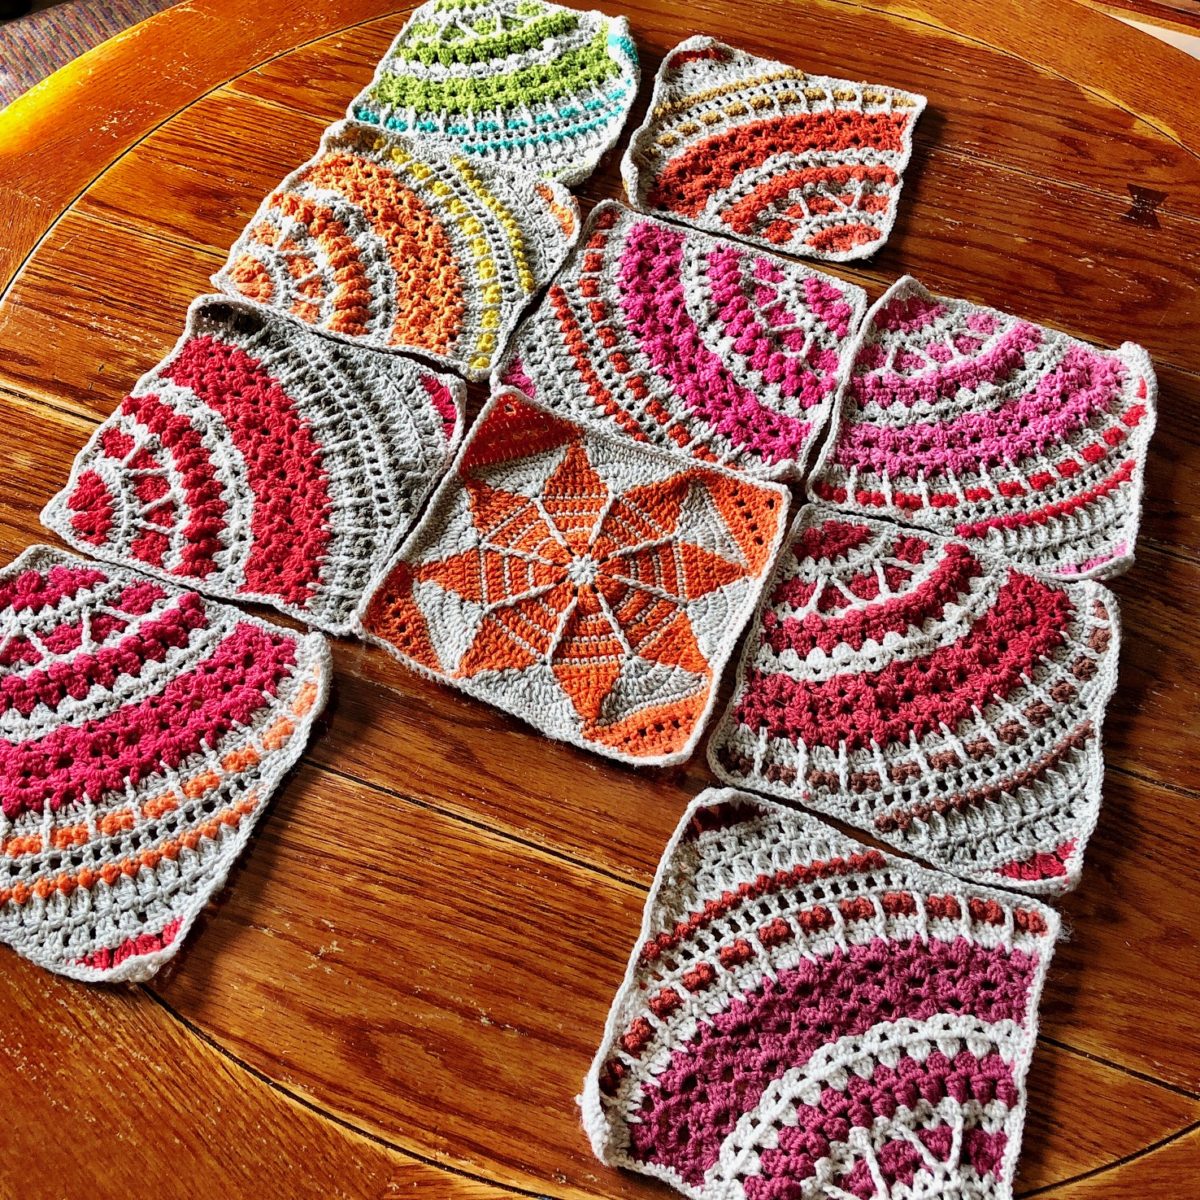
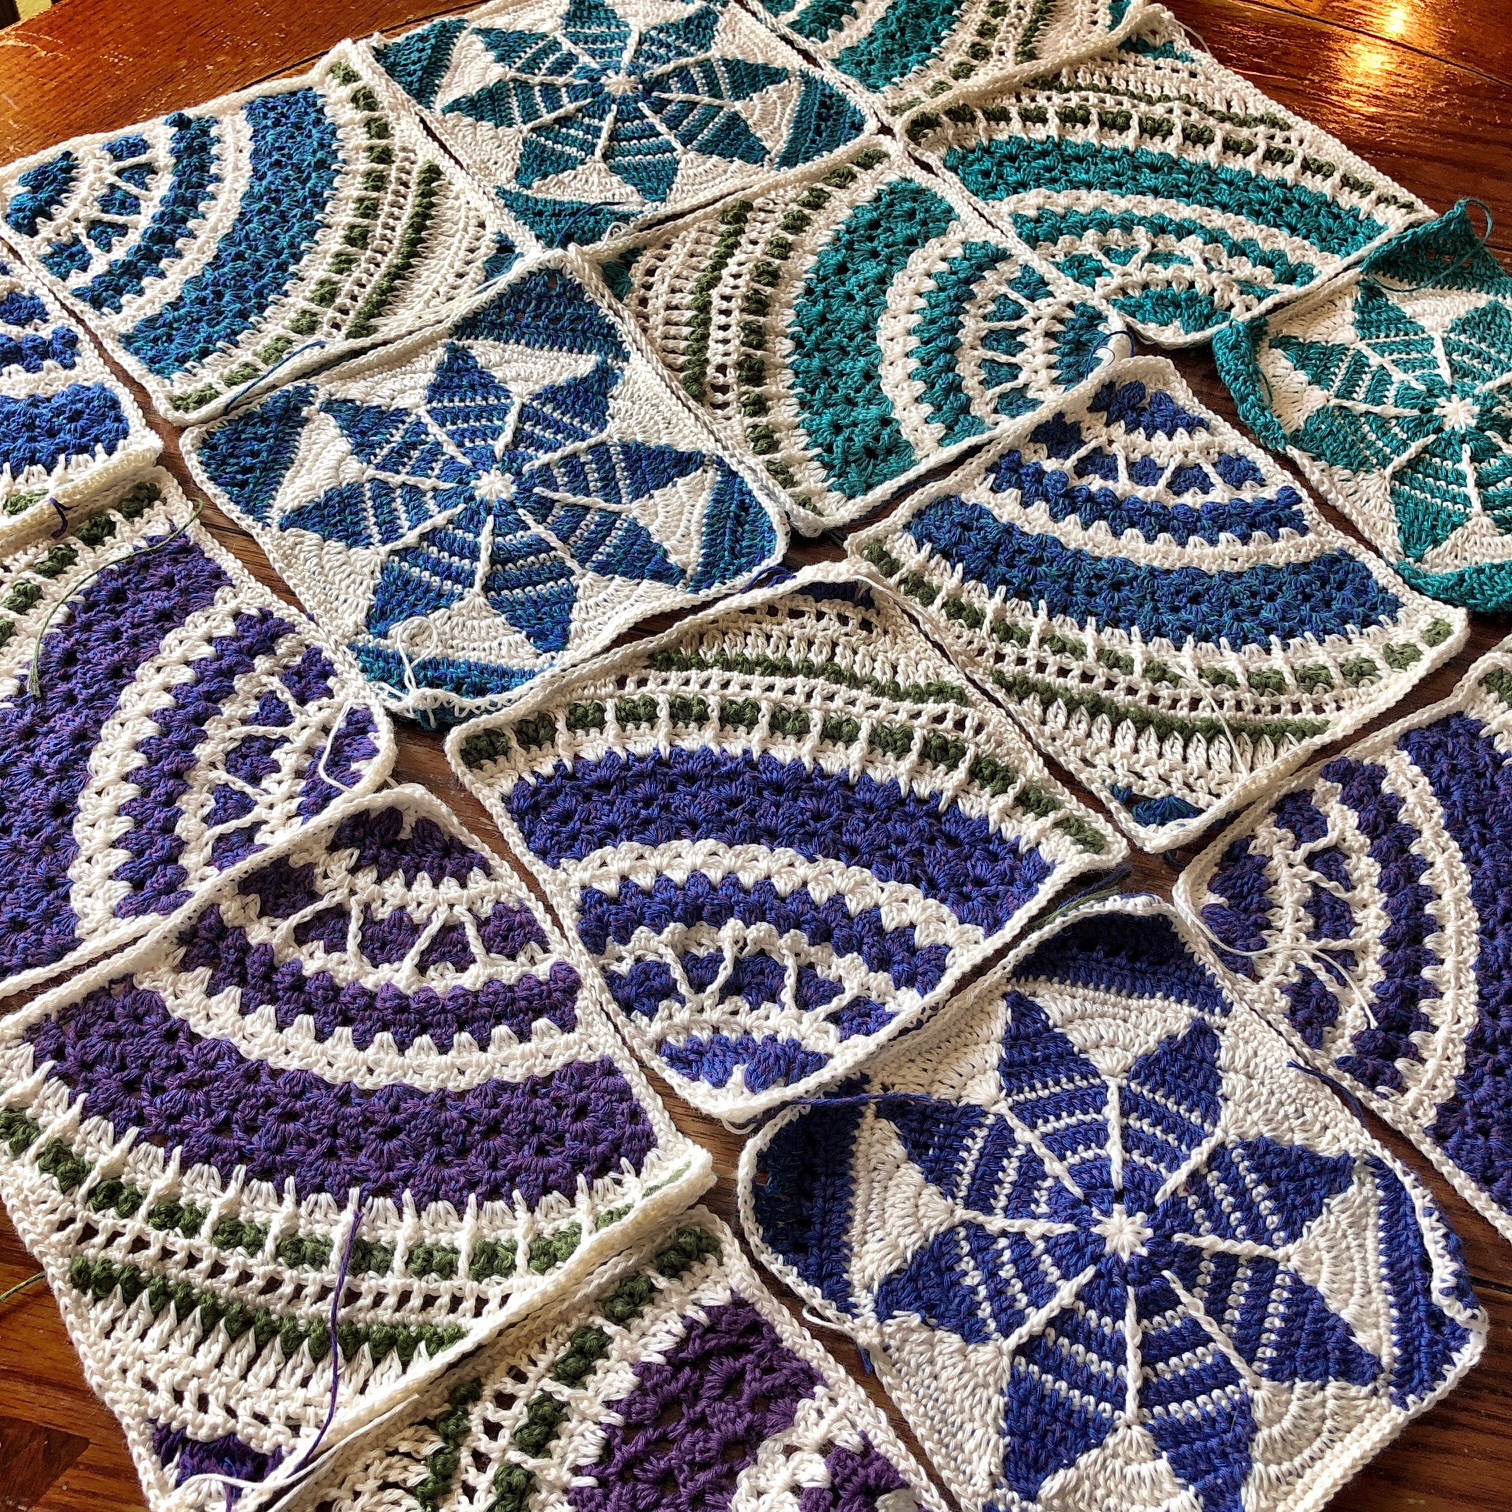
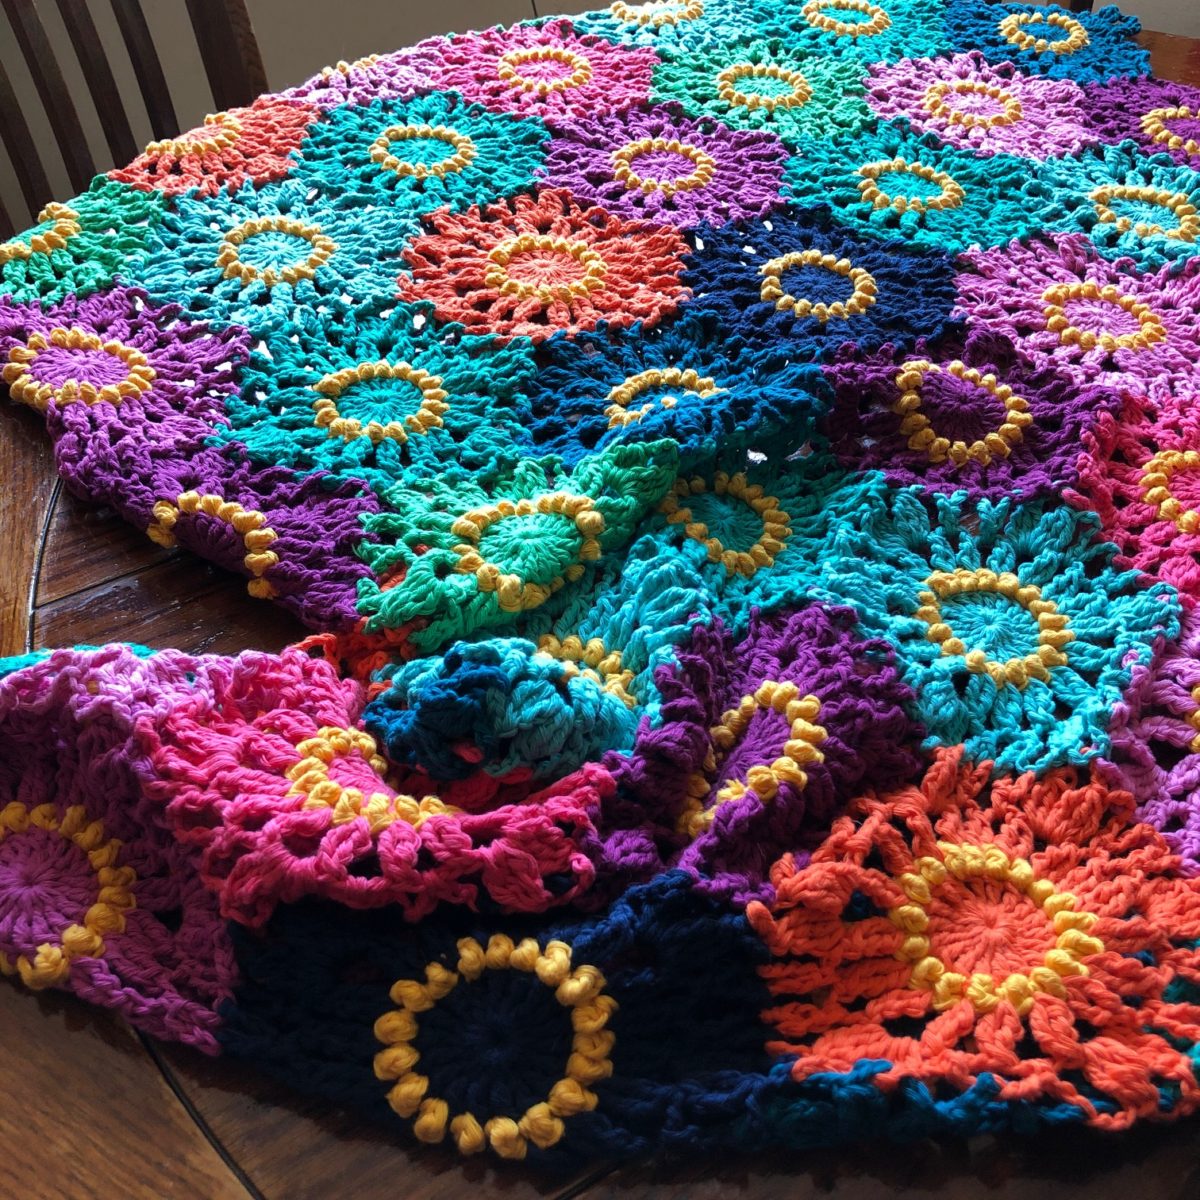
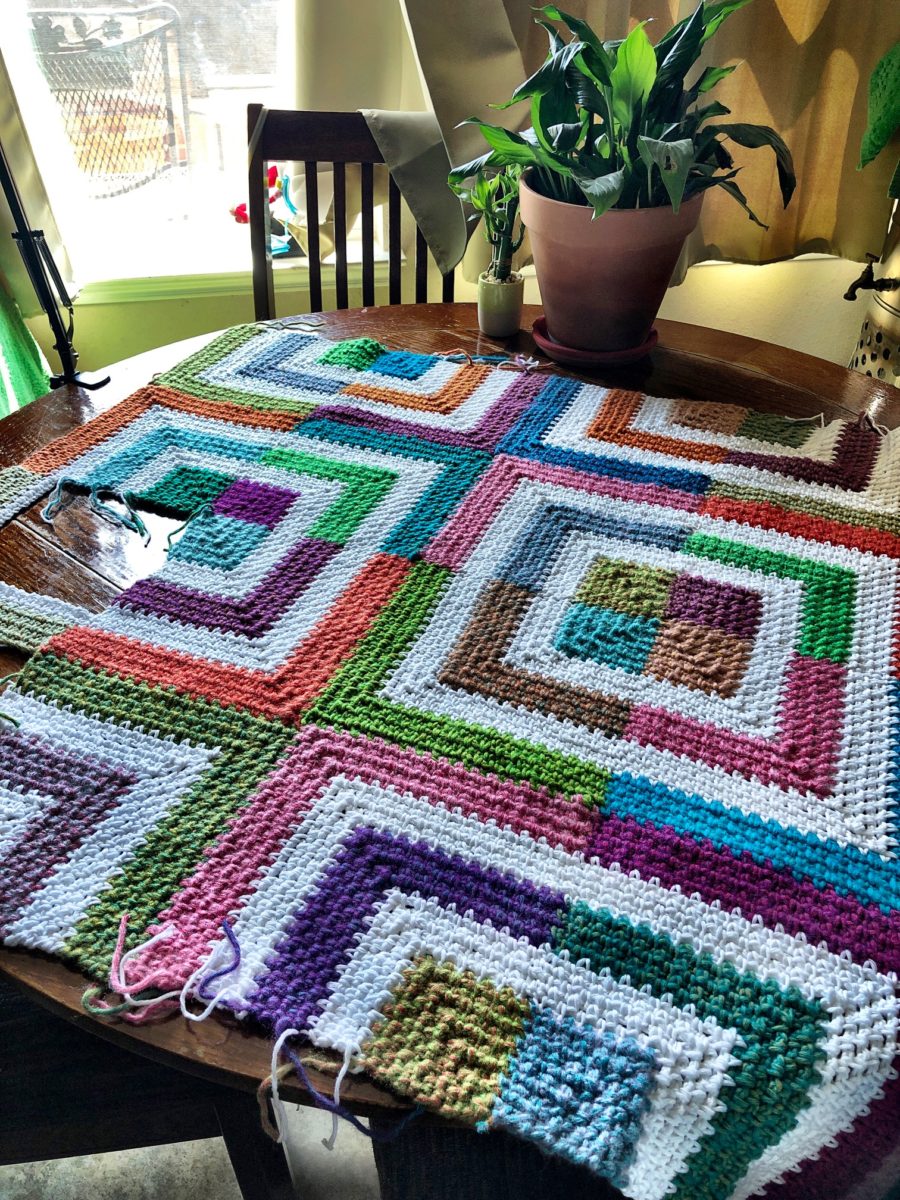
In the photo below, if you look closely at the squares, you can see how they fade beautifully and they are organized in the QM, QM, S, QM, QM, S, order.
Here is a diagram of how the placement of CC1 and CC2 look for the squares.
Check your gauge! The first 8 Rows of the Quarter-Mandala pattern measure 2.5in on either straight side with Whirl/Whirlette and a 3mm hook.
If your motif is taller, but still makes a 90 degree angle at the corner, then going down a hook size will help.
If your motif is taller and narrow, or if you know yourself to make very tall dc sts, please check out this Golden Loop video. If you are a “lifter” your square will be elongated into a diamond. Changing hook size won’t help much. Working on controlling your Golden Loop will be your solution to having a nice square shape.
Note: The square needs a light blocking to make straight, neat edges and open the lace; however, if the square is too much of a diamond due to very tall dc sts, focus on the Golden Loop may be required.
Step 3: Share pics!
Instagram Sharing – I’m on Insta as @CypressTextiles. Hashtag your WIP and FO pics with #GloriaBlanket and #CypressTextiles so I can share and save them in my story highlights!
CypressTextiles Tree Huggers Facebook Group – This is my main FB group (join!). Share your progress pics in this group if you like, and I will share CAL highlights there as well.
Catona 10g Colour Pack Version
This version uses one Scheepjes Catona 10g Colour Pack and 20 x 50g balls of Catona, with a size 3mm hook. For more yarn info and where to order, head to the Main Info Page.
Follow the steps below to complete your work for Week 2.
Step 1: Organize your yarn for this week
Color Group 1 – Pull colors 208, 249, 386, 189, 255, 414, 524, 410, 264, 388, 411, and 281, from the Colour Pack and store them together. You will also need 516 and 517 this week as they will be used for a Snowflake Square, but they belong with Color Group 1.
I am storing my separate color groups in reusable zip-lock bags. There are 9 total color groups just in case that helps you sort out your storage system.
Step 2: Make 5 Quarter-Mandala Squares
The Quarter-Mandala Square Pattern will note when to change colors between MC (Main Color), CC1 (Contrast Color 1), and CC2 (Contrast Color 2) – see below. Follow the Color Notes in the pattern. The CC1 and CC2 will vary week to week. The MC will be the same throughout the CAL.
For this version, CC1 and CC2 colors are all from Color Group 2. Save all remnants in an organized fashion with their ball bands, as we may use the colors again in the following weeks.
For Week 2, use the following yarn colors for your 5 squares.
MC for all = Catona Color No. 404
Square 1: CC1 = 208, CC2 = 249
Square 2: CC1 = 386, CC2 = 189
Square 3: CC1 = 255, CC2 = 414
Square 4: CC1 = 524, CC2 = 410
Square 5: CC1 = 264, CC2 = 388
Here is a sample Quarter-Mandala Square labeled with the CC1 and CC2 color placement for this version.
Check your gauge! The first 8 Rows of the Quarter Mandala pattern measure 2.75in on either straight side with Catona and a 3mm hook.
If your motif is taller, but still makes a 90 degree angle at the corner, then going down a hook size will help.
If your motif is taller and narrow, or if you know yourself to make very tall dc sts, please check out this Golden Loop video. If you are a “lifter” your square will be elongated into a diamond. Changing hook size won’t help much. Working on controlling your Golden Loop will be your solution to having a nice square shape.
Note: The square needs a light blocking to make straight, neat edges and open the lace; however, if the square is too much of a diamond due to very tall dc sts, focus on the Golden Loop may be required.
Step 3: Make 2 Snowflake Squares
The Snowflake Square Pattern will note when to change colors between MC (Main Color), and CC1/CC2 (Contrast Color). Follow the Color Notes in the pattern.
Save all remnants in an organized fashion with their ball bands, as we will use the colors again in the following weeks. FYI, the CC1 and CC2 colors will vary week to week, but the MC and the color groups will always be the same.
For Week 2, use the following yarn colors for your 2 squares.
MC for all = Catona No. 404
Square 1: CC1 = 517, CC2 = 516
Square 2: CC1 = 281, CC2 = 411
Here is a sample Snowflake Square labeled with the CC1/CC2 color placement.
Instagram Sharing – I’m on Insta as @CypressTextiles. Hashtag your WIP and FO pics with #GloriaBlanket and #CypressTextiles so I can share and save them in my story highlights!
CypressTextiles Tree Huggers Facebook Group – This is my main FB group (join!). Share your progress pics in this group if you like, and I will share CAL highlights there as well.
**Suggested Yarns Without a Sample Blanket**
Here is some advice on these yarn versions for this week. Feel free to follow along with one of the versions above!
Stone Washed / River Washed 10g Colour Pack Version
For this yarn, if you are making 30 squares, you can make 3 of the Quarter-Mandala Squares this week and 1 Snowflake Square. Pick 2 similar contrast colors for CC1 and CC2 or even use 2 completely different colors! It will look amazing.
You can follow along with the Catona 10g colour pack version above if you like. Just make fewer squares. MC will remain the same week to week, but the CC1 and CC2 will be unique to each square.
Here is an example of how your square will look if you follow the Catona 10g pack version:
Catona 50g Skeins Version
For this yarn, if you are making 56 squares, you should make 5 Quarter-Mandala Squares this week. CC1 and CC2 follow the Whirl + Whirlette Version.
Make 2 Snowflake Squares as well. CC1 and CC2 follow the Whirl/Whirlette version.
For this yarn, I gave several layout options on the Main Info Page. You can follow the color combos CC1 and CC2 for the Catona 10g Colour Pack Version as the colors are the same for these 2 packs, but the quantity of squares will depend on how many will be in your blanket.
Here is the Quarter-Mandala Square Pattern: US Terms // UK Terms
If you are going rogue (YAY!) you can make anywhere between 5-7 Quarter-Mandala Squares this week and 2 Snowflake Squares, depending how many squares your blanket will be. I can’t wait to see the fun color combos!
Here is the Quarter-Mandala Square Pattern: US Terms // UK Terms
Have fun making your squares this week! Be sure to share progress pics as we love them in the FB group and IG. I share them in my IG story highlights as well if you post them and add the hashtags.
THANK YOU for joining me in the Gloria Blanket CAL!
Hello, lovely crafter! Welcome to the pattern for my Quarter-Mandala Square, part of the Gloria Blanket. I have written this pattern specifically with Scheepjes Catona in mind just to avoid confusion with so many yarn options.
For the Gloria Blanket CAL, please look for your yarn choice on the Week 9 post. You will find specific yarn colors for each square, gauge, motif measurements, hook size, and lots more info on that post. In that post, scroll to your yarn choice and follow the steps to complete this week’s CAL work. You will refer back to this pattern to create the square.
The pattern is in US Terms and UK Terms (This post), and I provide step by step photos as well as a video which will release on Saturday, Sept 26th on my YouTube channel.
Gloria Blanket PDF PatternRavelry / Etsy/ My Shop As usual, the CAL will be released free every week here on my website, but I will offer the full blanket pattern in PDF form as soon as I write it up (I’ll have a date soon!)
Instagram Sharing – I’m on Insta as @CypressTextiles. Hashtag your WIP and FO pics with #GloriaBlanket and #CypressTextiles so I can share and save them in my story highlights!
CypressTextiles Tree Huggers Facebook Group – This is my main FB group (join!). Share your progress pics in this group if you like, and I will share CAL highlights there as well.
Social Media Hashtags: #GloriaBlanket and #CypressTextiles
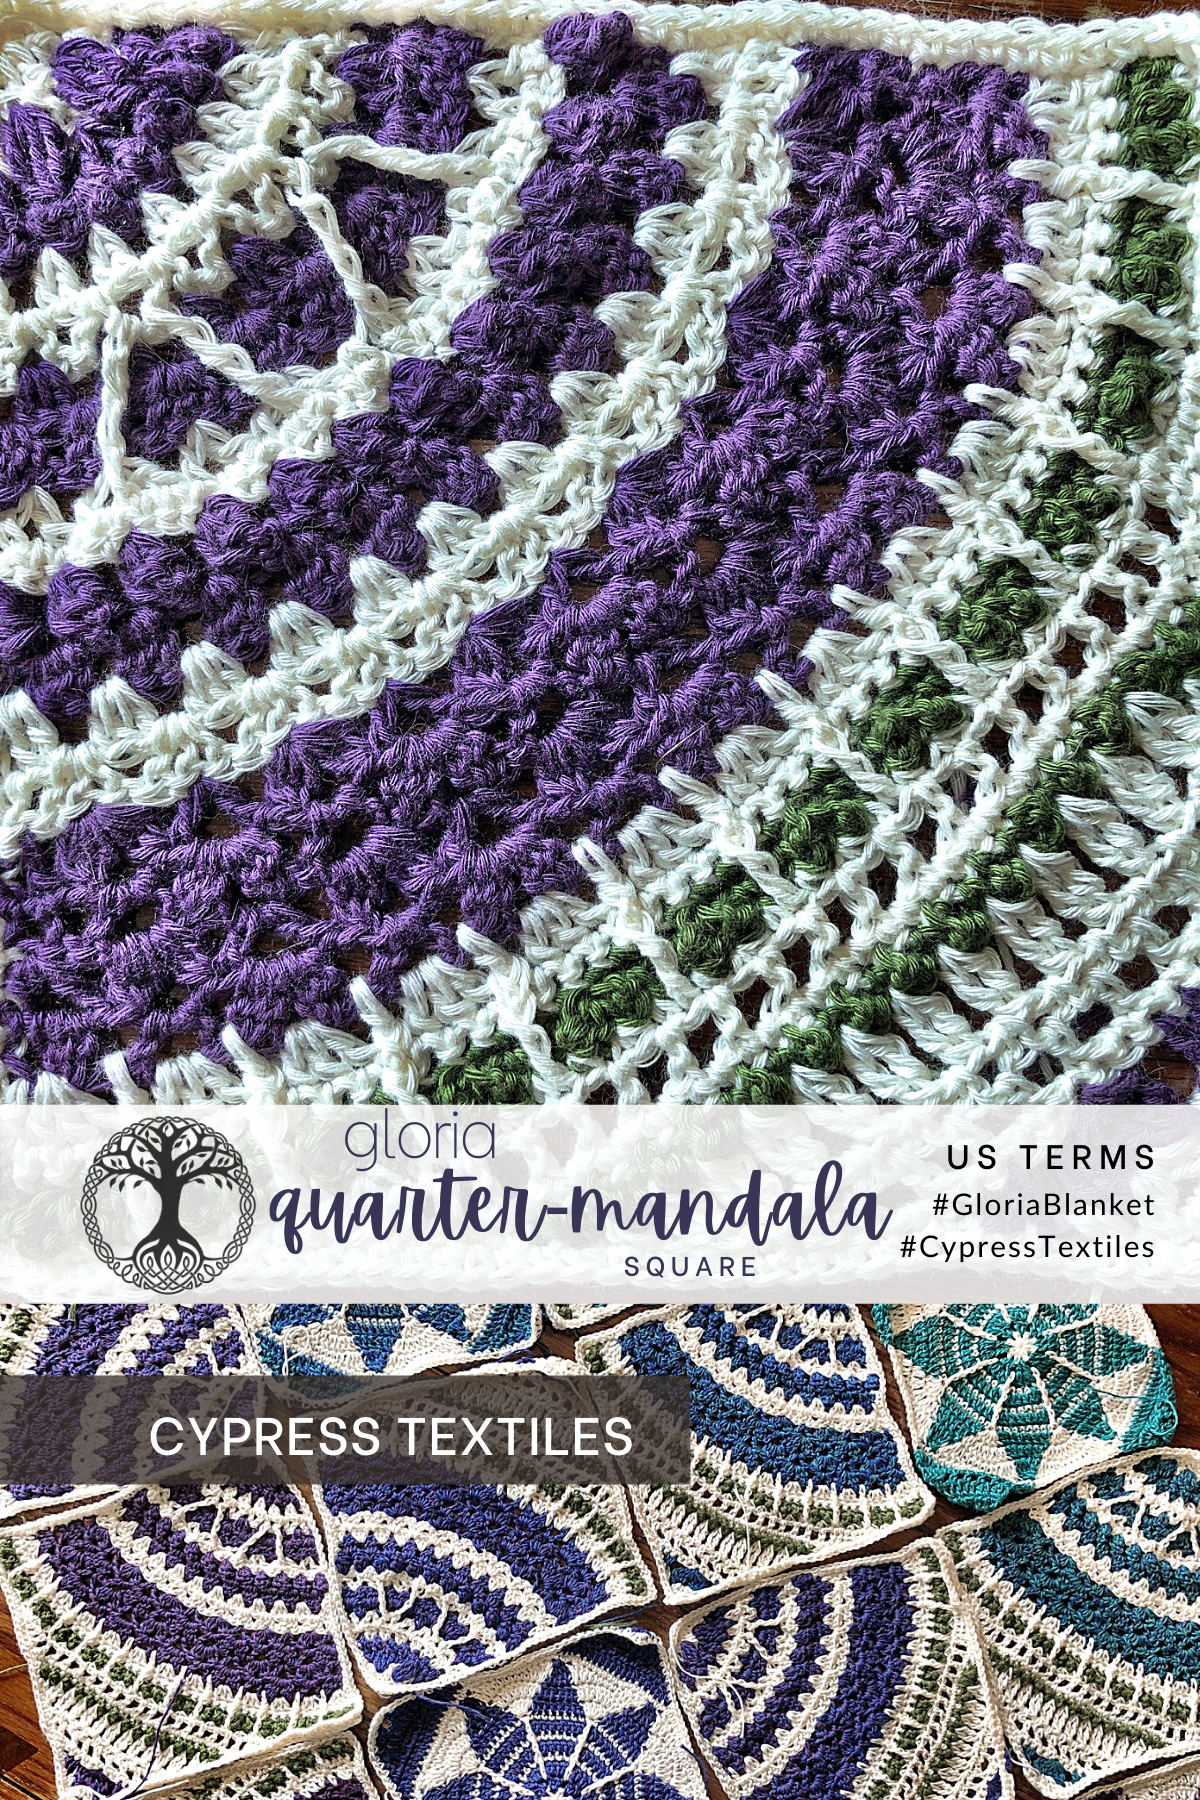
Quarter-Mandala Square
This square was inspired by a photo of floor tiles that I saw in 2016 on the incredible Instagram account, @ihavethisthingwithfloors. After I saw that photo, I got to work designing the two motifs that are featured in this Gloria Blanket. The Quarter-Mandala Square looks intricate, but the individual stitches are pretty simple. It’s just the way the stitches come together, and working the square corner to corner that gives it that complex look. Your first few motifs will require concentration, but after that, you should be able to sail through them in front of the telly.
You can use any amount of colors, one or many, to make this square. Here in this pattern, I use a background color plus two contrast colors, which I think you will really enjoy. Any color combination till be glorious – hence the name, Gloria! Hope you love the pattern! – Rachele C.
Details and Materials
Note: These details and materials are written for Catona yarn in general. Refer to the Week 9 CAL Post and find your yarn choice if you are using different yarn. Some notes for other versions will be given within the pattern, but please check the week 9 page first.
Square measures 8in in Scheepjes Catona with a size 3mm hook, unblocked (I recommend blocking your squares before you join them.)
To make each square, you need 8g each of 2 contrast colors (CC1 and CC2), plus 20g of main color (MC) (Ordering info below)
3mm hook
4 Stitch markers – Or use a small length of yarn, bobby pins, etc.
Order Yarn
For a variety of color, order the Scheepjes Catona 10g Colour Pack at the following shops. These are affiliate links, so shopping through them will help support CypressTextiles at no additional cost to you.
2trcl (yoh, insert hook in st indicated, yoh, pull up lp, yoh, draw yarn through 2 lps on hook) 2 times, yoh, draw yarn through all 3 lps on hook
2dtrcl * yoh 2 times, insert hook in st indicated, (yoh, pull up lp, yoh, draw yarn through 2 lps on hook) 2 times, rep from * 1 time, yoh, draw yarn through all 3 lps on hook
3trcl (yoh, insert hook in st indicated, yoh, pull up lp, yoh, draw yarn through 2 lps on hook) 3 times, yoh, draw yarn through all 4 lps on hook
3dtrcl * yoh 2 times, insert hook in st indicated, (yoh, pull up lp, yoh, draw yarn through 2 lps on hook) 2 times, rep from * 2 times, yoh, draw yarn through all 4 lps on hook
4tr-popcorn 4dc in st/sp indicated release lp from hook, insert hook front to back through first dc, grab lp, pull lp to front to close popcorn
beg 4tr-popcorn (beg dc, 3dc) in st/sp indicated release lp from hook, insert hook front to back through beg dc, grab lp, pull lp to front to close popcorn
beg tr (dc, ch1) – counts as 1 tr
beg dtr (dc, ch2) – counts as 1 dtr
BPtr Back Post treble crochet
ch chain
dc double crochet
FPttr Front Post triple treble crochet
FPdtr Front Post double treble crochet
htr half treble crochet
lp loop
MR (make ring) ch3, ss in third ch from hook
rem remaining
rep repeat
RS right side
ss slip stitch
sk skip
sp space
st stitch
tr treble crochet
ttr triple treble crochet
WS wrong side
yoh yarn over hook
Instructions
Tips and Notes:
To avoid having a lot of work when you are finished with the square, weave your ends after each time you cut the yarn. Please read the stitch guide for any abbreviations.
Written instruction is followed by step-by-step photos with the respective snippet of instruction added above the photo for clarity.
To get a neater result, I do not “chain up” for the first dc of the round/row; rather, I just jump straight into the first dc.
Color Notes for the different CAL versions are added in where necessary. If you aren’t making this square for the Gloria Blanket CAL, just ignore these Color Notes.
Row 1
Row 1(RS) Using MC, MR, beg tr, 4tr, turn. [5 tr]
Step-by-step Photos
MR, beg tr,
4tr.
Row 2
Row 2 Beg tr in first st, ch1, tr in same st, (ch1, sk1, tr) 2 times, ch1, tr in same st changing to CC1 by drawing it through on the final step of the st, cross working yarn of MC over working yarn of CC1 to carry it up, turn. [5 tr, 4 sp]
Step-by-step Photos
Beg tr in first st,
ch1, tr in same st, (ch1, sk1, tr) 2 times, ch1, tr in same st changing to CC1 by drawing it through on the final step of the st,
cross working yarn of MC over working yarn of CC1 to carry it up.
Row 3
Row 3 Continuing with CC1, beg tr in first st, ch1, tr in same st, ch1, 3dtrcl in first skipped tr from Row 1, ch1, (tr, ch1, tr) in next tr, ch1, 3dtrcl in second skipped tr from Row 1, ch1, (tr, ch1, tr) in final tr, turn. [2 3dtrcl, 6 tr, 7 sp]
Step-by-step Photos
Continuing with CC1, beg tr in first st,
ch1, tr in same st, ch1, 3dtrcl in first skipped tr from Row 1, ch1,
(tr, ch1, tr) in next tr, ch1,
3dtrcl in second skipped tr from Row 1, ch1, (tr, ch1, tr) in final tr.
Row 4
Row 4 Dc in first st, (dtr, dc) in next 6 ch-sps, dtr in next ch-sp, dc in final st changing to MC by drawing it through on the final step of the st, cross working yarn of CC1 over working yarn of MC to carry it up, turn. [7 dtr, 8 dc]
Notes: Dtr sts will make tiny bobbles on the RS of the work. Also, when drawing yarn through final st to change color, always be sure not to pull too tight on it. Leave enough slack that the yarn naturally lays against the side of the motif. See photos for reference.
Step-by-step Photos
Dc in first st,
(dtr, dc) in next 6 ch-sps,
dtr in next ch-sp,
dc in final st changing to MC by drawing it through on the final step of the st.
Note in the photo below, the MC yarn is carried up the side at a natural tension. Not too loose, not too tight.
cross working yarn of CC1 over working yarn of MC to carry it up.
Row 5
Row 5 Continuing with MC, beg tr in first st, tr in same st, (ch1, 2tr in next dc) 7 times, turn. [16 tr, 7 sp]
Step-by-step Photos
Continuing with MC, beg tr in first st,
tr in same st, (ch1, 2tr in next dc) 7 times.
Row 6
Row 6 Beg tr in first st, (tr, ch1, tr) in next 7 ch-sps, tr in final st changing to CC1 by drawing it through on the final step of the st, cross working yarn of MC over working yarn of CC1 to carry it up, turn. [16 tr, 7 sp]
Step-by-step Photos
Beg tr in first st,
(tr, ch1, tr) in next 7 ch-sps, tr in final st changing to CC1 by drawing it through on the final step of the st,
cross working yarn of MC over working yarn of CC1 to carry it up.
Row 7
Row 7 Continuing with CC1, beg tr in first st, 3tr in next 7 ch-sps, tr in final st, turn. [23 tr]
Step-by-step Photos
Continuing with CC1, beg tr in first st,
3tr in next 7 ch-sps, tr in final st.
Row 8
Row 8 Beg tr in first st, 3tr between first and second st working into the space between them – not working into any st or ch-sp, 3tr between next 2 3-tr groups 6 times, 3tr between last 3-tr group and final st, tr in final st changing to MC by drawing it through on the final step of the st, cross working yarn of CC1 over working yarn of MC to carry it up, turn. [26 tr]
Step-by-step Photos
Beg tr in first st,
3tr between first and second st, 3tr between next 2 3-tr groups 6 times, 3tr between last 3-tr group and final st, tr in final st changing to MC by drawing it through on the final step of the st,
cross working yarn of CC1 over working yarn of MC to carry it up.
Row 9
Row 9 Continuing with MC, beg tr in first st, sk1, (tr, ch1, tr) in next st, sk2, tr in next st, ch1, FPttr around fifth tr from Row 6, ch1, tr in same st as previous tr, sk2, (tr, ch1, tr) in next st, sk2, tr in next st, ch1, FPttr around sixth tr from Row 6, ch1, tr in same st as previous tr, sk2, tr in next st, ch1, FPttr around eleventh tr from Row 6, ch1, tr in same st as previous tr, sk2, (tr, ch1, tr) in next st, sk2, tr in next st, ch1, FPttr around twelfth tr from Row 6, ch1, tr in same st as previous tr, sk2, (tr, ch1, tr) in next st, tr in final st, turn. [4 FPttr, 18 tr, 12 sp]
Step-by-step Photos
Continuing with MC, beg tr in first st,
(tr, ch1, tr) in next st, sk2, tr in next st, ch1,
FPttr around fifth tr from Row 6,
ch1, tr in same st as previous tr, sk2, (tr, ch1, tr) in next st, sk2, tr in next st, ch1,
FPttr around sixth tr from Row 6, ch1, tr in same st as previous tr, sk2, tr in next st, ch1, FPttr around eleventh tr from Row 6, ch1, tr in same st as previous tr, sk2, (tr, ch1, tr) in next st, sk2, tr in next st, ch1, FPttr around twelfth tr from Row 6, ch1, tr in same st as previous tr, sk2, (tr, ch1, tr) in next st, tr in final st.
Row 10
Row 10 Dc in 34 sts/sps across, changing to CC1 in final dc by drawing CC1 through on the final step of the st, cross working yarn of MC over working yarn of CC1 to carry it up, turn. [34 dc]
Step-by-step Photos
Dc in 34 sts/sps across, changing to CC1 in final dc by drawing CC1 through on the final step of the st,
cross working yarn of MC over working yarn of CC1 to carry it up.
Row 11
Row 11 Continuing with CC1, beg 4tr-popcorn in first st, (ch2, sk2, 4tr-popcorn) 11 times, turn. [12 4tr-popcorn, 11 sp]
Step-by-step Photos
Continuing with CC1, beg 4tr-popcorn in first st,
(ch2, sk2, 4tr-popcorn) 11 times.
Row 12
Row 12 Beg tr in first 4tr-popcorn, 3tr in 11 ch-sps, tr in final st changing to MC by drawing it through on the final step of the st, cross working yarn of CC1 over working yarn of MC to carry it up, cut CC1 yarn unless instructed not to in the Color Note below, turn. [35 tr]
Gloria Blanket CAL Color Note:
Catona 10g Colour PackVersion – Cut your CC1 yarn now and weave the end in. Save the remainder of CC1 for Rows 21 and 22
Cahlista 15g Colour PackVersion – Cut your CC1 yarn now and weave the end in. Save the remainder of CC1 for Rows 21 and 22
Stone Washed / River Washed 10g Colour Pack Version – Cut your CC1 yarn now and weave the end in. Save the remainder of CC1 for Rows 21 and 22
Metropolis 10g Colour Pack Version – Do NOT cut your CC1 yarn yet.
Whirl + Whirlette Version – Do NOT cut your CC1 yarn yet.
All other versions – Do NOT cut your CC1 yarn yet.
Step-by-step Photos
Beg tr in first 4tr-popcorn,
3tr in 11 ch-sps, tr in final st changing to MC by drawing it through on the final step of the st,
cross working yarn of CC1 over working yarn of MC to carry it up, cut CC1 yarn unless instructed not to in the color note above.
Row 13
Row 13 Continuing in MC, beg tr in first st, tr between first and second st working into the space between them – not working into any st or ch-sp, 3tr between next 2 3-tr groups 10 times, tr between last 3-tr group and final st, tr in final st, turn. [34 tr]
Step-by-step Photos
Continuing in MC, beg tr in first st,
tr between first and second st working into the space between them – not working into any st or ch-sp, 3tr between next 2 3-tr groups 10 times, tr between last 3-tr group and final st, tr in final st.
Row 14
Row 14 Beg tr in first st, 3tr between second tr and third tr as before, 3tr between next 2 3-tr groups 9 times, 3tr between last 3-tr group and final 2 tr, tr in final tr changing to CC2 (see Color Note below) by drawing it through on the final step of the st, cross working yarn of MC over working yarn of CC2 to carry it up, turn. [35 tr]
Gloria Blanket CAL Color Note
Catona 10g Colour PackVersion – Change to CC2.
Cahlista 15g Colour PackVersion – Change to CC2.
Stone Washed / River Washed 10g Colour Pack Version – Change to CC2.
Metropolis 10g Colour Pack Version – Change back to CC1; do not use CC2 yet.
Whirl + Whirlette Version – Change back to CC1; do not use CC2 yet.
All other versions – Change back to CC1; do not use CC2 yet.
Step-by-step Photos
Beg tr in first st,
3tr between second tr and third tr as before, 3tr between next 2 3-tr groups 9 times, 3tr between last 3-tr group and final 2 tr, tr in final tr changing to CC2 (see color note above) by drawing it through on the final step of the st, cross working yarn of MC over working yarn of CC2 to carry it up.
Row 15
Row 15 Continuing with CC2 (See Color Note below) beg tr in first st, ch1, tr in same st, sk1, * (3trcl, ch2, 3trcl) in next st, sk2, (tr, ch2, tr) in next st, sk2, rep from * 4 times, (3trcl, ch2, 3trcl) in next st, (tr, ch1, tr) in final st, turn. [12 3trcl, 14 tr, 13 sp]
Gloria Blanket CAL Color Note
Catona 10g Colour PackVersion – Continue with CC2.
Cahlista 15g Colour PackVersion – Continue with CC2.
Stone Washed / River Washed 10g Colour Pack Version – Continue with CC2.
Metropolis 10g Colour Pack Version – Continue with CC1.
Whirl + Whirlette Version – Continue with CC1.
All other versions – Continue with CC1.
Step-by-step Photos
Continuing with CC2 (See color note above) beg tr in first st,
ch1, tr in same st, sk1, * (3trcl, ch2, 3trcl) in next st,
sk2, (tr, ch2, tr) in next st, sk2, rep from * 4 times, (3trcl, ch2, 3trcl) in next st, (tr, ch1, tr) in final st.
Row 16
Row 16 Beg tr in first st, ch1, 3trcl in first sp, * (tr, ch2, tr) in next sp, (3trcl, ch2, 3trcl) in next sp, rep from * 4 times, (tr, ch2, tr) in next sp, 3trcl in final sp, ch1, tr in final st, turn. [12 3trcl, 14 tr, 13 sp]
Step-by-step Photos
Beg tr in first st, ch1, 3trcl in first sp,
* (tr, ch2, tr) in next sp, (3trcl, ch2, 3trcl) in next sp, rep from * 4 times, (tr, ch2, tr) in next sp, 3trcl in final sp, ch1, tr in final st.
Row 17
Row 17 Beg tr in first st, ch1, tr in same st, * (3trcl, ch3, 3trcl) in next sp, (tr, ch2, tr) in next sp, rep from * 4 times, (3trcl, ch3, 3trcl) in next sp, tr in final sp, ch1, tr in final st, turn. [12 3trcl, 14 tr, 13 sp]
Note: Eeep, this is the only photo I took of this row. Luckily, it is very similar to the previous row!
Row 18
Row 18 Beg tr in first st, ch1, 3trcl in first sp, * (tr, ch2, tr) in next sp, (3trcl, ch3, 3trcl) in next sp, rep from * 4 times, (tr, ch2, tr) in next sp, 3trcl in final sp, ch1, tr in final st changing to MC by drawing it through on the final step of the st, cross working yarn of CC2 (See Color Note below) over working yarn of MC to carry it up, cut CC2 yarn, turn. [12 3trcl, 14 tr, 13 sp]
Gloria Blanket CAL Color Note
Catona 10g Colour PackVersion – Cross working yarn of CC2 over MC, and cut CC2 yarn.
Cahlista 15g Colour PackVersion – Cross working yarn of CC2 over MC, and cut CC2 yarn.
Stone Washed / River Washed 10g Colour Pack Version – Cross working yarn of CC2 over MC, and cut CC2 yarn.
Metropolis 10g Colour Pack Version – Cross working yarn of CC1 over MC, and cut CC1 yarn.
Whirl + Whirlette Version – Cross working yarn of CC1 over MC, and cut CC1 yarn.
All other versions – Cross working yarn of CC1 over MC, and cut CC1 yarn.
Step-by-step Photos
Beg tr in first st, ch1, 3trcl in first sp, * (tr, ch2, tr) in next sp, (3trcl, ch3, 3trcl) in next sp, rep from * 4 times, (tr, ch2, tr) in next sp, 3trcl in final sp, ch1, tr in final st changing to MC by drawing it through on the final step of the st,
cross working yarn of CC2 over working yarn of MC to carry it up, cut CC2 yarn (See Color Note above)
Row 19
Row 19 Continuing in MC, beg tr in first st, (3tr in next ch-sp, tr between next 3trcl and tr, 3tr in next ch-sp, tr between next tr and 3trcl) 6 times, 3tr in next ch-sp, tr in final st, turn. [53 tr]
Step-by-step Photos
Continuing in MC, beg tr in first st,
(3tr in next ch-sp, tr between next 3trcl and tr, 3tr in next ch-sp, tr between next tr and 3trcl) 6 times, 3tr in next ch-sp, tr in final st.
Row 20
Row 20 Dc in first 4 sts, (BPtr in next st, dc in 3 sts) 11 times, dc in final 4 sts changing back to CC1 (see Color Note below) in final dc by drawing CC1 through on the final step of the st, cross working yarn of MC over working yarn of CC1 to carry it up, turn. [12 BPtr, 41 dc]
Gloria Blanket CAL Color Note
Catona 10g Colour PackVersion – Change back to CC1.
Cahlista 15g Colour PackVersion – Change back to CC1.
Stone Washed / River Washed 10g Colour Pack Version – Change back to CC1.
Metropolis 10g Colour Pack Version – Change to CC2.
Whirl + Whirlette Version – Change to CC2.
All other versions – Change to CC2.
Step-by-step Photos
Note: I magically switched motifs, so you’ll notice the different colors! I was also booted out of my photo office by one of my kiddoes virtual schooling. So there’s a change of scenery for a few more rows, too. Sorry about that!
Dc in first 4 sts,
(BPtr in next st, dc in 3 sts) 11 times, dc in final 4 sts changing to CC1 in final dc (see Color Note above) by drawing CC1 through on the final step of the st,
(A peek from the reverse side…)
cross working yarn of MC over working yarn of CC1 *see color note above) to carry it up.
Row 21
Row 21 Continuing with CC1 (See Color Note below), dc in first 4 sts, (ch1, sk1, dc in next 3 sts) 12 times, dc in final st, turn. [41 dc, 12 sp]
Gloria Blanket CAL Color Note
Catona 10g Colour PackVersion – Continue with CC1.
Cahlista 15g Colour PackVersion – Continue with CC1.
Stone Washed / River Washed 10g Colour Pack Version – Continue with CC1.
Metropolis 10g Colour Pack Version – Continue with CC2.
Whirl + Whirlette Version – Continue with CC2.
All other versions – Continue with CC2.
Step-by-step Photos
Continuing with CC1 (See Color Note above), dc in first 4 sts, (ch1, sk1, dc in next 3 sts) 12 times, dc in final st.
Row 22
Row 22 Dc in first 2 sts, * (dtr, dc, dtr) in next st, dc in next dc, ch1, dc in next dc, rep from * 12 times, dc in final st changing to MC by drawing it through on the final step of the st, cross working yarn of CC1 over working yarn of MC to carry it up, cut CC1 yarn (See Color Note below), turn. [26 dtr, 41 dc, 12 sp]
Gloria Blanket CAL Color Note
Catona 10g Colour PackVersion – Cross working yarn of CC1 over MC, and cut CC1 yarn.
Cahlista 15g Colour PackVersion – Cross working yarn of CC1 over MC, and cut CC1 yarn.
Stone Washed / River Washed 10g Colour Pack Version – Cross working yarn of CC1 over MC, and cut CC1 yarn.
Metropolis 10g Colour Pack Version – Cross working yarn of CC2 over MC, and cut CC2 yarn.
Whirl + Whirlette Version – Cross working yarn of CC2 over MC, and cut CC2 yarn.
All other versions – Cross working yarn of CC2 over MC, and cut CC2 yarn.
Note: Dtr sts form tiny bobbles on RS of work.
Step-by-step Photos
Dc in first 2 sts,
* (dtr, dc, dtr) in next st, dc in next dc, ch1, dc in next dc, rep from * 12 times, dc in final st changing to MC by drawing it through on the final step of the st,
cross working yarn of CC1 over working yarn of MC to carry it up, cut CC1 yarn (See Color Note above).
Row 23
Row 23 Continuing in MC, dc in first 2 dc, (2dc in next dc, dc in next dc, FPdtr around next tr, dc in next dc) 12 times, 2dc in next dc, dc in final 2 dc, turn. [12 FPdtr, 54 dc]
Step-by-step Photos
Continuing in MC, dc in first 2 dc, (2dc in next dc, dc in next dc, FPdtr around next tr, dc in next dc) 12 times, 2dc in next dc, dc in final 2 dc.
Row 24
Row 24 Ss in first 10 sts, dc in next 2 sts, htr in next 2 sts, tr in next 2 sts, (ch1, sk1, tr) 17 times, ch1, tr in next 2 sts, htr in next 2 sts, dc in next 2 sts, turn. (10 sts are left unworked.) [21 tr, 4 htr, 4 dc, 18 sp]
Step-by-step Photos
Ss in first 10 sts,
dc in next 2 sts, htr in next 2 sts, tr in next 2 sts,
(ch1, sk1, tr) 17 times, ch1, tr in next 2 sts, htr in next 2 sts, dc in next 2 sts.
Row 25
Row 25 Ss in first 6 sts, dc in 35 sps/sts, turn. [35 dc]
Step-by-step Photos
Ss in first 6 sts,
dc in 35 sps/sts.
Row 26
Row 26 Ss in first st, change to CC2 in next st by making ss as follows: insert hook in next st and finish ss with CC2, continuing in CC2 and working over MC (dc in next st, dtr in next st) 15 times, dc in next st, cut CC2 yarn, turn. [15 dtr, 16 dc]
Note: On this row, CC2 is used, no matter what yarn version you are making. Dtr sts make tiny bobbles on RS of work.
Step-by-step Photos
Ss in first st,
change to CC2 in next st by making ss as follows: insert hook in next st and finish ss with CC2,
continuing in CC2 and working over MC(dc in next st, dtr in next st) 15 times, dc in next st, cut CC2 yarn.
(A peek from the RS so you can see the bobbles.)
Row 27
Row 27 Ss in first st, change to MC in next st by making ss as follows: insert hook in next st and finish ss with MC, cut CC2 yarn, continuing with MC, beg dtr in next dc, (2dtrcl in next dc, ch1) 11 times, 2dtrcl in next dc, dtr in next dc, turn. [12 2dtrcl, 2 dtr, 11 sp]
Step-by-step Photos
Ss in first st,
change to MC in next st by making ss as follows: insert hook in next st and finish ss with MC, cut CC2 yarn,
continuing with MC, beg dtr in next dc,
(2dtrcl in next dc, ch1) 11 times, 2dtrcl in next dc, dtr in next dc.
Row 28
Row 28 Dc in first ch-sp, (ch2, dc in next ch-sp) 10 times, turn. [11 dc, 10 sp]
Step-by-step Photos
Dc in first ch-sp,
(ch2, dc in next ch-sp) 10 times.
Row 29
Row 29 Beg tr in first ch-sp, tr in next ch-sp, (ch1, tr in next ch-sp) 6 times, ch1, decrease next 2 ch-sps together as follows: (yoh, insert yarn in next ch-sp, yoh, pull up lp, yoh, draw yarn through 2 lps on hook) 2 times, yoh and draw yarn through all 3 lps on hook, turn. [1 decrease, 8 tr, 7 sp]
Step-by-step Photos
Beg tr in first ch-sp,
tr in next ch-sp,
(ch1, tr in next ch-sp) 6 times, ch1, decrease next 2 ch-sps together as follows: (yoh, insert yarn in next ch-sp, yoh, pull up lp, yoh, draw yarn through 2 lps on hook) 2 times, yoh and draw yarn through all 3 lps on hook.
Row 30
Row 30 Dc in first ch-sp, dc in next 10 sts/sps, turn. [11 dc]
Step-by-step Photos
Dc in first ch-sp, dc in next 10 sts/sps.
Row 31
Row 31 Ss in first st, change to CC2 (see color note below) in next st by making ss as follows: insert hook in next st and finish ss with CC2, continuing in CC2, beg tr in next st, tr in next st, ch1, sk2, (3dtrcl, ch2, 3dtrcl) in next st, ch1, sk2, decrease next 2 sts together as follows: (yoh, insert yarn in next st,yoh, pull up lp, yoh, draw yarn through 2 lps on hook) 2 times, yoh and draw yarn through all 3 lps on hook, cut CC2 yarn, turn. [1 decrease, 2 3dtrcl, 2 tr, 3 sp]
Gloria Blanket CAL Color Note
Catona 10g Colour PackVersion – Change to CC2.
Cahlista 15g Colour PackVersion – Change to CC2.
Stone Washed / River Washed 10g Colour Pack Version – Change to CC2.
Metropolis 10g Colour Pack Version – Change to CC1.
Whirl + Whirlette Version – Change to CC1.
All other versions – Change to CC1.
Step-by-step Photos
Ss in first st,
change to CC2 (see color note below) in next st by making ss as follows: insert hook in next st and finish ss with CC2,
continuing in CC2, beg tr in next st, tr in next st,
ch1, sk2, (3dtrcl, ch2, 3dtrcl) in next st, ch1, sk2, decrease next 2 sts together as follows: (yoh, insert yarn in next st, yoh, pull up lp, yoh, draw yarn through 2 lps on hook) 2 times, yoh and draw yarn through all 3 lps on hook, cut CC2 yarn.
Row 32
Row 32 With RS still facing, insert hook in first ch-sp (not beg tr) and pull up lp of MC, ch1 to secure lp, beg tr in same sp, (2trcl, ch2, 2trcl) in next sp, tr in next sp, turn. [2 2trcl, 2 tr, 1 sp]
Step-by-step Photos
With RS still facing, insert hook in first ch-sp (not beg tr) and pull up lp of MC,
ch1 to secure lp,
beg tr in same sp,
(2trcl, ch2, 2trcl) in next sp, tr in next sp.
Row 33
Row 33 3dc in ch-sp, turn. [3 dc]
Step-by-step Photos
3dc in ch-sp.
Square Border
Rnd 1 With RS facing, (loosely ss in corner dc st, mark this ss as the corner, loosely make 34 ss evenly across side) 4 times, ss in first ss. Make your ss into the sts – not around them. So do not make the ss into the spaces, rather, make them by inserting your hook into the sts. Working this round will ensure a neat edge when you make your sc border.[140 ss]
Note: It is important to work these ss loosely. If you cannot work them loosely, then go up a hook size for this round, or you may regret it on the next round because the ss will be too tight to work into.
Rnd 2 Working into both lps of each ss, (make 3dc in marked corner ss, dc in all ss across) 4 times, ss in first dc, cut yarn and weave all remaining ends. Work over the “floats” that were made when yarns were carried up – this way they are hidden. [148 dc]
Finishing
Block square into square shape to expand lace and make for easier joining and a neater blanket.
The end! Give yourself a fist bump!
Hope you enjoy this square, and I can’t wait to see your WIP pics with all the awesome colors the community has picked. See you in the FB group and on IG!
Hello, lovely crafter! Welcome to the pattern for my Quarter-Mandala Square, part of the Gloria Blanket. I have written this pattern specifically with Scheepjes Catona in mind just to avoid confusion with so many yarn options.
For the Gloria Blanket CAL, please look for your yarn choice on the Week 9 post. You will find specific yarn colors for each square, gauge, motif measurements, hook size, and lots more info on that post. In that post, scroll to your yarn choice and follow the steps to complete this week’s CAL work. You will refer back to this pattern to create the square.
The pattern is in US Terms (This post) and UK Terms, and I provide step by step photos as well as a video which will release on Saturday, Sept 26th on my YouTube channel.
Gloria Blanket PDF PatternRavelry / Etsy/ My Shop As usual, the CAL will be released free every week here on my website, but I will offer the full blanket pattern in PDF form as soon as I write it up (I’ll have a date soon!)
Instagram Sharing – I’m on Insta as @CypressTextiles. Hashtag your WIP and FO pics with #GloriaBlanket and #CypressTextiles so I can share and save them in my story highlights!
CypressTextiles Tree Huggers Facebook Group – This is my main FB group (join!). Share your progress pics in this group if you like, and I will share CAL highlights there as well.
Social Media Hashtags: #GloriaBlanket and #CypressTextiles
Quarter-Mandala Square
This square was inspired by a photo of floor tiles that I saw in 2016 on the incredible Instagram account, @ihavethisthingwithfloors. After I saw that photo, I got to work designing the two motifs that are featured in this Gloria Blanket. The Quarter-Mandala Square looks intricate, but the individual stitches are pretty simple. It’s just the way the stitches come together, and working the square corner to corner that gives it that complex look. Your first few motifs will require concentration, but after that, you should be able to sail through them in front of the telly.
You can use any amount of colors, one or many, to make this square. Here in this pattern, I use a background color plus two contrast colors, which I think you will really enjoy. Any color combination till be glorious – hence the name, Gloria! Hope you love the pattern! – Rachele C.
Details and Materials
Note: These details and materials are written for Catona yarn in general. Refer to the Week 9 CAL Post and find your yarn choice if you are using different yarn. Some notes for other versions will be given within the pattern, but please check the week 9 post first.
Square measures 8in in Scheepjes Catona with a size 3mm hook, unblocked (I recommend blocking your squares before you join them.)
To make each square, you need 8g each of 2 contrast colors (CC1 and CC2), plus 20g of main color (MC) (Ordering info below)
3mm hook
4 Stitch markers – Or use a small length of yarn, bobby pins, etc.
Order Yarn
For a variety of color, order the Scheepjes Catona 10g Colour Pack at the following shops. These are affiliate links, so shopping through them will help support CypressTextiles at no additional cost to you.
2dccl (yoh, insert hook in st indicated, yoh, pull up lp, yoh, draw yarn through 2 lps on hook) 2 times, yoh, draw yarn through all 3 lps on hook
2trcl * yoh 2 times, insert hook in st indicated, (yoh, pull up lp, yoh, draw yarn through 2 lps on hook) 2 times, rep from * 1 time, yoh, draw yarn through all 3 lps on hook
3dccl (yoh, insert hook in st indicated, yoh, pull up lp, yoh, draw yarn through 2 lps on hook) 3 times, yoh, draw yarn through all 4 lps on hook
3trcl * yoh 2 times, insert hook in st indicated, (yoh, pull up lp, yoh, draw yarn through 2 lps on hook) 2 times, rep from * 2 times, yoh, draw yarn through all 4 lps on hook
4dc-popcorn 4dc in st/sp indicated release lp from hook, insert hook front to back through first dc, grab lp, pull lp to front to close popcorn
beg 4dc-popcorn (beg dc, 3dc) in st/sp indicated release lp from hook, insert hook front to back through beg dc, grab lp, pull lp to front to close popcorn
beg dc (sc, ch1) – counts as 1 dc
beg tr (sc, ch2) – counts as 1 tr
BPdc Back Post double crochet
ch chain
dc double crochet
FPdtr Front Post double treble crochet
FPtr Front Post treble crochet
hdc half double crochet
lp loop
MR (make ring) ch3, ss in third ch from hook
rem remaining
rep repeat
RS right side
sc single crochet
ss slip stitch
sk skip
sp space
st stitch
tr treble crochet
WS wrong side
yoh yarn over hook
Instructions
Tips and Notes:
To avoid having a lot of work when you are finished with the square, weave your ends after each time you cut the yarn. Please read the stitch guide for any abbreviations.
Written instruction is followed by step-by-step photos with the respective snippet of instruction added above the photo for clarity.
To get a neater result, I do not “chain up” for the first sc of the round/row; rather, I just jump straight into the first sc.
Color Notes for the different CAL versions are added in where necessary. If you aren’t making this square for the Gloria Blanket CAL, just ignore these Color Notes.
Row 1
Row 1(RS) Using MC, MR, beg dc, 4dc, turn. [5 dc]
Step-by-step Photos
MR, beg dc,
4dc.
Row 2
Row 2 Beg dc in first st, ch1, dc in same st, (ch1, sk1, dc) 2 times, ch1, dc in same st changing to CC1 by drawing it through on the final step of the st, cross working yarn of MC over working yarn of CC1 to carry it up, turn. [5 dc, 4 sp]
Step-by-step Photos
Beg dc in first st,
ch1, dc in same st, (ch1, sk1, dc) 2 times, ch1, dc in same st changing to CC1 by drawing it through on the final step of the st,
cross working yarn of MC over working yarn of CC1 to carry it up.
Row 3
Row 3 Continuing with CC1, beg dc in first st, ch1, dc in same st, ch1, 3trcl in first skipped dc from Row 1, ch1, (dc, ch1, dc) in next dc, ch1, 3trcl in second skipped dc from Row 1, ch1, (dc, ch1, dc) in final dc, turn. [2 3trcl, 6 dc, 7 sp]
Step-by-step Photos
Continuing with CC1, beg dc in first st,
ch1, dc in same st, ch1, 3trcl in first skipped dc from Row 1, ch1,
(dc, ch1, dc) in next dc, ch1,
3trcl in second skipped dc from Row 1, ch1, (dc, ch1, dc) in final dc.
Row 4
Row 4 Sc in first st, (tr, sc) in next 6 ch-sps, tr in next ch-sp, sc in final st changing to MC by drawing it through on the final step of the st, cross working yarn of CC1 over working yarn of MC to carry it up, turn. [7 tr, 8 sc]
Notes: Tr sts will make tiny bobbles on the RS of the work. Also, when drawing yarn through final st to change color, always be sure not to pull too tight on it. Leave enough slack that the yarn naturally lays against the side of the motif. See photos for reference.
Step-by-step Photos
Sc in first st,
(tr, sc) in next 6 ch-sps,
tr in next ch-sp,
sc in final st changing to MC by drawing it through on the final step of the st.
Note in the photo below, the MC yarn is carried up the side at a natural tension. Not too loose, not too tight.
cross working yarn of CC1 over working yarn of MC to carry it up.
Row 5
Row 5 Continuing with MC, beg dc in first st, dc in same st, (ch1, 2dc in next sc) 7 times, turn. [16 dc, 7 sp]
Step-by-step Photos
Continuing with MC, beg dc in first st,
dc in same st, (ch1, 2dc in next sc) 7 times.
Row 6
Row 6 Beg dc in first st, (dc, ch1, dc) in next 7 ch-sps, dc in final st changing to CC1 by drawing it through on the final step of the st, cross working yarn of MC over working yarn of CC1 to carry it up, turn. [16 dc, 7 sp]
Step-by-step Photos
Beg dc in first st,
(dc, ch1, dc) in next 7 ch-sps, dc in final st changing to CC1 by drawing it through on the final step of the st,
cross working yarn of MC over working yarn of CC1 to carry it up.
Row 7
Row 7 Continuing with CC1, beg dc in first st, 3dc in next 7 ch-sps, dc in final st, turn. [23 dc]
Step-by-step Photos
Continuing with CC1, beg dc in first st,
3dc in next 7 ch-sps, dc in final st.
Row 8
Row 8 Beg dc in first st, 3dc between first and second st working into the space between them – not working into any st or ch-sp, 3dc between next 2 3-dc groups 6 times, 3dc between last 3-dc group and final st, dc in final st changing to MC by drawing it through on the final step of the st, cross working yarn of CC1 over working yarn of MC to carry it up, turn. [26 dc]
Step-by-step Photos
Beg dc in first st,
3dc between first and second st, 3dc between next 2 3-dc groups 6 times, 3dc between last 3-dc group and final st, dc in final st changing to MC by drawing it through on the final step of the st,
cross working yarn of CC1 over working yarn of MC to carry it up.
Row 9
Row 9 Continuing with MC, beg dc in first st, sk1, (dc, ch1, dc) in next st, sk2, dc in next st, ch1, FPdtr around fifth dc from Row 6, ch1, dc in same st as previous dc, sk2, (dc, ch1, dc) in next st, sk2, dc in next st, ch1, FPdtr around sixth dc from Row 6, ch1, dc in same st as previous dc, sk2, dc in next st, ch1, FPdtr around eleventh dc from Row 6, ch1, dc in same st as previous dc, sk2, (dc, ch1, dc) in next st, sk2, dc in next st, ch1, FPdtr around twelfth dc from Row 6, ch1, dc in same st as previous dc, sk2, (dc, ch1, dc) in next st, dc in final st, turn. [4 FPdtr, 18 dc, 12 sp]
Step-by-step Photos
Continuing with MC, beg dc in first st,
(dc, ch1, dc) in next st, sk2, dc in next st, ch1,
FPdtr around fifth dc from Row 6,
ch1, dc in same st as previous dc, sk2, (dc, ch1, dc) in next st, sk2, dc in next st, ch1,
FPdtr around sixth dc from Row 6, ch1, dc in same st as previous dc, sk2, dc in next st, ch1, FPdtr around eleventh dc from Row 6, ch1, dc in same st as previous dc, sk2, (dc, ch1, dc) in next st, sk2, dc in next st, ch1, FPdtr around twelfth dc from Row 6, ch1, dc in same st as previous dc, sk2, (dc, ch1, dc) in next st, dc in final st.
Row 10
Row 10 Sc in 34 sts/sps across, changing to CC1 in final sc by drawing CC1 through on the final step of the st, cross working yarn of MC over working yarn of CC1 to carry it up, turn. [34 sc]
Step-by-step Photos
Sc in 34 sts/sps across, changing to CC1 in final sc by drawing CC1 through on the final step of the st,
cross working yarn of MC over working yarn of CC1 to carry it up.
Row 11
Row 11 Continuing with CC1, beg 4dc-popcorn in first st, (ch2, sk2, 4dc-popcorn) 11 times, turn. [12 4dc-popcorn, 11 sp]
Step-by-step Photos
Continuing with CC1, beg 4dc-popcorn in first st,
(ch2, sk2, 4dc-popcorn) 11 times.
Row 12
Row 12 Beg dc in first 4dc-popcorn, 3dc in 11 ch-sps, dc in final st changing to MC by drawing it through on the final step of the st, cross working yarn of CC1 over working yarn of MC to carry it up, cut CC1 yarn unless instructed not to in the Color Note below, turn. [35 dc]
Gloria Blanket CAL Color Note:
Catona 10g Colour PackVersion – Cut your CC1 yarn now and weave the end in. Save the remainder of CC1 for Rows 21 and 22
Cahlista 15g Colour PackVersion – Cut your CC1 yarn now and weave the end in. Save the remainder of CC1 for Rows 21 and 22
Stone Washed / River Washed 10g Colour Pack Version – Cut your CC1 yarn now and weave the end in. Save the remainder of CC1 for Rows 21 and 22
Metropolis 10g Colour Pack Version – Do NOT cut your CC1 yarn yet.
Whirl + Whirlette Version – Do NOT cut your CC1 yarn yet.
All other versions – Do NOT cut your CC1 yarn yet.
Step-by-step Photos
Beg dc in first 4dc-popcorn,
3dc in 11 ch-sps, dc in final st changing to MC by drawing it through on the final step of the st,
cross working yarn of CC1 over working yarn of MC to carry it up, cut CC1 yarn unless instructed not to in the color note above.
Row 13
Row 13 Continuing in MC, beg dc in first st, dc between first and second st working into the space between them – not working into any st or ch-sp, 3dc between next 2 3-dc groups 10 times, dc between last 3-dc group and final st, dc in final st, turn. [34 dc]
Step-by-step Photos
Continuing in MC, beg dc in first st,
dc between first and second st working into the space between them – not working into any st or ch-sp, 3dc between next 2 3-dc groups 10 times, dc between last 3-dc group and final st, dc in final st.
Row 14
Row 14 Beg dc in first st, 3dc between second dc and third dc as before, 3dc between next 2 3-dc groups 9 times, 3dc between last 3-dc group and final 2 dc, dc in final dc changing to CC2 (see Color Note below) by drawing it through on the final step of the st, cross working yarn of MC over working yarn of CC2 to carry it up, turn. [35 dc]
Gloria Blanket CAL Color Note
Catona 10g Colour PackVersion – Change to CC2.
Cahlista 15g Colour PackVersion – Change to CC2.
Stone Washed / River Washed 10g Colour Pack Version – Change to CC2.
Metropolis 10g Colour Pack Version – Change back to CC1; do not use CC2 yet.
Whirl + Whirlette Version – Change back to CC1; do not use CC2 yet.
All other versions – Change back to CC1; do not use CC2 yet.
Step-by-step Photos
Beg dc in first st,
3dc between second dc and third dc as before, 3dc between next 2 3-dc groups 9 times, 3dc between last 3-dc group and final 2 dc, dc in final dc changing to CC2 (see color note above) by drawing it through on the final step of the st, cross working yarn of MC over working yarn of CC2 to carry it up.
Row 15
Row 15 Continuing with CC2 (See Color Note below) beg dc in first st, ch1, dc in same st, sk1, * (3dccl, ch2, 3dccl) in next st, sk2, (dc, ch2, dc) in next st, sk2, rep from * 4 times, (3dccl, ch2, 3dccl) in next st, (dc, ch1, dc) in final st, turn. [12 3dccl, 14 dc, 13 sp]
Gloria Blanket CAL Color Note
Catona 10g Colour PackVersion – Continue with CC2.
Cahlista 15g Colour PackVersion – Continue with CC2.
Stone Washed / River Washed 10g Colour Pack Version – Continue with CC2.
Metropolis 10g Colour Pack Version – Continue with CC1.
Whirl + Whirlette Version – Continue with CC1.
All other versions – Continue with CC1.
Step-by-step Photos
Continuing with CC2 (See color note above) beg dc in first st,
ch1, dc in same st, sk1, * (3dccl, ch2, 3dccl) in next st,
sk2, (dc, ch2, dc) in next st, sk2, rep from * 4 times, (3dccl, ch2, 3dccl) in next st, (dc, ch1, dc) in final st.
Row 16
Row 16 Beg dc in first st, ch1, 3dccl in first sp, * (dc, ch2, dc) in next sp, (3dccl, ch2, 3dccl) in next sp, rep from * 4 times, (dc, ch2, dc) in next sp, 3dccl in final sp, ch1, dc in final st, turn. [12 3dccl, 14 dc, 13 sp]
Step-by-step Photos
Beg dc in first st, ch1, 3dccl in first sp,
* (dc, ch2, dc) in next sp, (3dccl, ch2, 3dccl) in next sp, rep from * 4 times, (dc, ch2, dc) in next sp, 3dccl in final sp, ch1, dc in final st.
Row 17
Row 17 Beg dc in first st, ch1, dc in same st, * (3dccl, ch3, 3dccl) in next sp, (dc, ch2, dc) in next sp, rep from * 4 times, (3dccl, ch3, 3dccl) in next sp, dc in final sp, ch1, dc in final st, turn. [12 3dccl, 14 dc, 13 sp]
Note: Eeep, this is the only photo I took of this row. Luckily, it is very similar to the previous row!
Row 18
Row 18 Beg dc in first st, ch1, 3dccl in first sp, * (dc, ch2, dc) in next sp, (3dccl, ch3, 3dccl) in next sp, rep from * 4 times, (dc, ch2, dc) in next sp, 3dccl in final sp, ch1, dc in final st changing to MC by drawing it through on the final step of the st, cross working yarn of CC2 (See Color Note below) over working yarn of MC to carry it up, cut CC2 yarn, turn. [12 3dccl, 14 dc, 13 sp]
Gloria Blanket CAL Color Note
Catona 10g Colour PackVersion – Cross working yarn of CC2 over MC, and cut CC2 yarn.
Cahlista 15g Colour PackVersion – Cross working yarn of CC2 over MC, and cut CC2 yarn.
Stone Washed / River Washed 10g Colour Pack Version – Cross working yarn of CC2 over MC, and cut CC2 yarn.
Metropolis 10g Colour Pack Version – Cross working yarn of CC1 over MC, and cut CC1 yarn.
Whirl + Whirlette Version – Cross working yarn of CC1 over MC, and cut CC1 yarn.
All other versions – Cross working yarn of CC1 over MC, and cut CC1 yarn.
Step-by-step Photos
Beg dc in first st, ch1, 3dccl in first sp, * (dc, ch2, dc) in next sp, (3dccl, ch3, 3dccl) in next sp, rep from * 4 times, (dc, ch2, dc) in next sp, 3dccl in final sp, ch1, dc in final st changing to MC by drawing it through on the final step of the st,
cross working yarn of CC2 over working yarn of MC to carry it up, cut CC2 yarn (See Color Note above)
Row 19
Row 19 Continuing in MC, beg dc in first st, (3dc in next ch-sp, dc between next 3dccl and dc, 3dc in next ch-sp, dc between next dc and 3dccl) 6 times, 3dc in next ch-sp, dc in final st, turn. [53dc]
Step-by-step Photos
Continuing in MC, beg dc in first st,
(3dc in next ch-sp, dc between next 3dccl and dc, 3dc in next ch-sp, dc between next dc and 3dccl) 6 times, 3dc in next ch-sp, dc in final st.
Row 20
Row 20 Sc in first 4 sts, (BPdc in next st, sc in 3 sts) 11 times, sc in final 4 sts changing back to CC1 (see Color Note below) in final sc by drawing CC1 through on the final step of the st, cross working yarn of MC over working yarn of CC1 to carry it up, turn. [12 BPdc, 41 sc]
Gloria Blanket CAL Color Note
Catona 10g Colour PackVersion – Change back to CC1.
Cahlista 15g Colour PackVersion – Change back to CC1.
Stone Washed / River Washed 10g Colour Pack Version – Change back to CC1.
Metropolis 10g Colour Pack Version – Change to CC2.
Whirl + Whirlette Version – Change to CC2.
All other versions – Change to CC2.
Step-by-step Photos
Note: I magically switched motifs, so you’ll notice the different colors! I was also booted out of my photo office by one of my kiddoes virtual schooling. So there’s a change of scenery for a few more rows, too. Sorry about that!
Sc in first 4 sts,
(BPdc in next st, sc in 3 sts) 11 times, sc in final 4 sts changing to CC1 in final sc (see Color Note above) by drawing CC1 through on the final step of the st,
(A peek from the reverse side…)
cross working yarn of MC over working yarn of CC1 *see color note above) to carry it up.
Row 21
Row 21 Continuing with CC1 (See Color Note below), sc in first 4 sts, (ch1, sk1, sc in next 3 sts) 12 times, sc in final st, turn. [41 sc, 12 sp]
Gloria Blanket CAL Color Note
Catona 10g Colour PackVersion – Continue with CC1.
Cahlista 15g Colour PackVersion – Continue with CC1.
Stone Washed / River Washed 10g Colour Pack Version – Continue with CC1.
Metropolis 10g Colour Pack Version – Continue with CC2.
Whirl + Whirlette Version – Continue with CC2.
All other versions – Continue with CC2.
Step-by-step Photos
Continuing with CC1 (See Color Note above), sc in first 4 sts, (ch1, sk1, sc in next 3 sts) 12 times, sc in final st.
Row 22
Row 22 Sc in first 2 sts, * (tr, sc, tr) in next st, sc in next sc, ch1, sc in next sc, rep from * 12 times, sc in final st changing to MC by drawing it through on the final step of the st, cross working yarn of CC1 over working yarn of MC to carry it up, cut CC1 yarn (See Color Note below), turn. [26 tr, 41 sc, 12 sp]
Gloria Blanket CAL Color Note
Catona 10g Colour PackVersion – Cross working yarn of CC1 over MC, and cut CC1 yarn.
Cahlista 15g Colour PackVersion – Cross working yarn of CC1 over MC, and cut CC1 yarn.
Stone Washed / River Washed 10g Colour Pack Version – Cross working yarn of CC1 over MC, and cut CC1 yarn.
Metropolis 10g Colour Pack Version – Cross working yarn of CC2 over MC, and cut CC2 yarn.
Whirl + Whirlette Version – Cross working yarn of CC2 over MC, and cut CC2 yarn.
All other versions – Cross working yarn of CC2 over MC, and cut CC2 yarn.
Note: Tr sts form tiny bobbles on RS of work.
Step-by-step Photos
Sc in first 2 sts,
* (tr, sc, tr) in next st, sc in next sc, ch1, sc in next sc, rep from * 12 times, sc in final st changing to MC by drawing it through on the final step of the st,
cross working yarn of CC1 over working yarn of MC to carry it up, cut CC1 yarn (See Color Note above).
Row 23
Row 23 Continuing in MC, sc in first 2 sc, (2sc in next sc, sc in next sc, FPtr around next dc, sc in next sc) 12 times, 2sc in next sc, sc in final 2 sc, turn. [12 FPtr, 54 sc]
Step-by-step Photos
Continuing in MC, sc in first 2 sc, (2sc in next sc, sc in next sc, FPtr around next dc, sc in next sc) 12 times, 2sc in next sc, sc in final 2 sc.
Row 24
Row 24 Ss in first 10 sts, sc in next 2 sts, hdc in next 2 sts, dc in next 2 sts, (ch1, sk1, dc) 17 times, ch1, dc in next 2 sts, hdc in next 2 sts, sc in next 2 sts, turn. (10 sts are left unworked.) [21 dc, 4 hdc, 4 sc, 18 sp]
Step-by-step Photos
Ss in first 10 sts,
sc in next 2 sts, hdc in next 2 sts, dc in next 2 sts,
(ch1, sk1, dc) 17 times, ch1, dc in next 2 sts, hdc in next 2 sts, sc in next 2 sts.
Row 25
Row 25 Ss in first 6 sts, sc in 35 sps/sts, turn. [35 sc]
Step-by-step Photos
Ss in first 6 sts,
sc in 35 sps/sts.
Row 26
Row 26 Ss in first st, change to CC2 in next st by making ss as follows: insert hook in next st and finish ss with CC2, continuing in CC2 and working over MC (sc in next st, tr in next st) 15 times, sc in next st, cut CC2 yarn, turn. [15 tr, 16 sc]
Note: On this row, CC2 is used, no matter what yarn version you are making. Tr sts make tiny bobbles on RS of work.
Step-by-step Photos
Ss in first st,
change to CC2 in next st by making ss as follows: insert hook in next st and finish ss with CC2,
continuing in CC2 and working over MC(sc in next st, tr in next st) 15 times, sc in next st, cut CC2 yarn.
(A peek from the RS so you can see the bobbles.)
Row 27
Row 27 Ss in first st, change to MC in next st by making ss as follows: insert hook in next st and finish ss with MC, cut CC2 yarn, continuing with MC, beg tr in next sc, (2trcl in next sc, ch1) 11 times, 2trcl in next sc, tr in next sc, turn. [12 2trcl, 2 tr, 11 sp]
Step-by-step Photos
Ss in first st,
change to MC in next st by making ss as follows: insert hook in next st and finish ss with MC, cut CC2 yarn,
continuing with MC, beg tr in next sc,
(2trcl in next sc, ch1) 11 times, 2trcl in next sc, tr in next sc.
Row 28
Row 28 Sc in first ch-sp, (ch2, sc in next ch-sp) 10 times, turn. [11 sc, 10 sp]
Step-by-step Photos
Sc in first ch-sp,
(ch2, sc in next ch-sp) 10 times.
Row 29
Row 29 Beg dc in first ch-sp, dc in next ch-sp, (ch1, dc in next ch-sp) 6 times, ch1, decrease next 2 ch-sps together as follows: (yoh, insert yarn in next ch-sp, yoh, pull up lp, yoh, draw yarn through 2 lps on hook) 2 times, yoh and draw yarn through all 3 lps on hook, turn. [1 decrease, 8 dc, 7 sp]
Step-by-step Photos
Beg dc in first ch-sp,
dc in next ch-sp,
(ch1, dc in next ch-sp) 6 times, ch1, decrease next 2 ch-sps together as follows: (yoh, insert yarn in next ch-sp, yoh, pull up lp, yoh, draw yarn through 2 lps on hook) 2 times, yoh and draw yarn through all 3 lps on hook.
Row 30
Row 30 Sc in first ch-sp, sc in next 10 sts/sps, turn. [11 sc]
Step-by-step Photos
Sc in first ch-sp, sc in next 10 sts/sps.
Row 31
Row 31 Ss in first st, change to CC2 (see color note below) in next st by making ss as follows: insert hook in next st and finish ss with CC2, continuing in CC2, beg dc in next st, dc in next st, ch1, sk2, (3trcl, ch2, 3trcl) in next st, ch1, sk2, decrease next 2 sts together as follows: (yoh, insert yarn in next st, yoh, pull up lp, yoh, draw yarn through 2 lps on hook) 2 times, yoh and draw yarn through all 3 lps on hook, cut CC2 yarn, turn. [1 decrease, 2 3trcl, 2 dc, 3 sp]
Gloria Blanket CAL Color Note
Catona 10g Colour PackVersion – Change to CC2.
Cahlista 15g Colour PackVersion – Change to CC2.
Stone Washed / River Washed 10g Colour Pack Version – Change to CC2.
Metropolis 10g Colour Pack Version – Change to CC1.
Whirl + Whirlette Version – Change to CC1.
All other versions – Change to CC1.
Step-by-step Photos
Ss in first st,
change to CC2 (see color note below) in next st by making ss as follows: insert hook in next st and finish ss with CC2,
continuing in CC2, beg dc in next st, dc in next st,
ch1, sk2, (3trcl, ch2, 3trcl) in next st, ch1, sk2, decrease next 2 sts together as follows: (yoh, insert yarn in next cyoh, pull up lp, yoh, draw yarn through 2 lps on hook) 2 times, yoh and draw yarn through all 3 lps on hook, cut CC2 yarn.
Row 32
Row 32 With RS still facing, insert hook in first ch-sp (not beg dc) and pull up lp of MC, ch1 to secure lp, beg dc in same sp, (2dccl, ch2, 2dccl) in next sp, dc in next sp, turn. [2 2dccl, 2 dc, 1 sp]
Step-by-step Photos
With RS still facing, insert hook in first ch-sp (not beg dc) and pull up lp of MC,
ch1 to secure lp,
beg dc in same sp,
(2dccl, ch2, 2dccl) in next sp, dc in next sp.
Row 33
Row 33 3sc in ch-sp, turn. [3 sc]
Step-by-step Photos
3sc in ch-sp.
Square Border
Rnd 1 With RS facing, (loosely ss in corner sc st, mark this ss as the corner, loosely make 34 ss evenly across side) 4 times, ss in first ss. Make your ss into the sts – not around them. So do not make the ss into the spaces, rather, make them by inserting your hook into the sts. Working this round will ensure a neat edge when you make your sc border.[140 ss]
Note: It is important to work these ss loosely. If you cannot work them loosely, then go up a hook size for this round, or you will regret it on the next round because the ss will be too tight to work into.
Rnd 2 Working into both lps of each ss, (make 3sc in marked corner ss, sc in all ss across) 4 times, ss in first sc, cut yarn and weave all remaining ends. Work over the “floats” that were made when yarns were carried up – this way they are hidden. [148 sc]
Finishing
Block square into square shape to expand lace and make for easier joining and a neater blanket.
The end! Give yourself a fist bump!
Hope you enjoy this square, and I can’t wait to see your WIP pics with all the awesome colors the community has picked. See you in the FB group and on IG!
Hello, and welcome to the first week of my Gloria Blanket Crochet-Along! This week we will make some of the Quarter-Mandala Squares. I am so pumped to get started and I’m very thankful that you’re joining me for this CAL. Have fun and share pics!
Gloria Blanket PDF PatternRavelry / Etsy/ My Shop – As usual, the CAL will be released free every week here on my website, but I will offer the full blanket pattern in PDF form as soon as I write it up (I’ll have a date soon!)
Instagram Sharing – I’m on Insta as @CypressTextiles. Hashtag your WIP and FO pics with #GloriaBlanket and #CypressTextiles so I can share and save them in my story highlights!
CypressTextiles Tree Huggers Facebook Group – This is my main FB group (join!). Share your progress pics in this group if you like, and I will share CAL highlights there as well.
YouTube Channel (Subscribe!) – Here I will be posting Gloria Blanket CAL pattern videos releasing the day after the Friday CAL release. Yay!
Social Media Hashtags: #GloriaBlanket and #CypressTextiles
How This CAL Works
Find your chosen yarn down below. I list separate instruction for each of the yarns that I discussed in the main info post. If you aren’t working any of the listed yarns, you can check out the Stash Yarn Version section, or go completely rogue! I often say that’s my favorite part of hosting a CAL, the variety of blankets that everyone presents in the Facebook group or on Instagram.
There are 3 suggested yarns for which I am making a sample blanket during the CAL. These yarns have a full CAL schedule for the 12 weeks. You can see that schedule on the Main Info Post. (Scroll all the way down on that post.) There are some yarns for which I am not making a sample blanket, but I do give advice on them below to help you.
Under each Gloria Blanket version section below, you will find the following information:
How to organize your yarn into groups by color, if applicable
A photo of the squares that we will make in week 1
How many squares to make this week, in which color (MC, CC1, CC2), plus link to pattern for Quarter-Mandala Motif (US and UK Terms)
Where to share pics
If you need yarn quantity info and yarn ordering info, please refer to the Main Info Post.
Once you make your squares, you can take pics and share them in my Facebook Group, or on Instagram with hashtags #GloriaBlanket and #CypressTextiles
Now begin the yarn sections with instructions for Week 1 – read everything carefully – and have fun!!
Metropolis 10g Colour Pack Version
This version uses one Scheepjes Metropolis 10g Colour Pack and 14 x 50g balls of Metropolis, with a size 3mm hook. For more yarn info and where to order, head to the Main Info Page.
Follow the steps below to complete your work for Week 1.
Step 1: Organize your yarn for this week
Color Group 1 – Pull colors 041, 042, 043, 058, 059, 060, and 045 from the Colour Pack and store them together. We will not be using color 045 this week as it will be used for a Snowflake Square on Week 2, but it does belong with Color Group 1.
Color Group 2 – Pull colors 044, 065, 066, 057, 064, 075, and 074 from the Colour Pack and store them together. We will not be using color 074 this week as it will be used for a Snowflake Square on Week 2, but it does belong with Color Group 2.
I am storing my separate color groups in reusable zip-lock bags. There are 9 total color groups just in case that helps you sort out your storage system.
Step 2: Make 6 Quarter-Mandala Squares
The Quarter-Mandala Square Pattern will note when to change colors between MC (Main Color), CC1 (Contrast Color 1), and CC2 (Contrast Color 2). Follow the Color Notes in the pattern.
For this version, CC1 colors are from Color Group 1, and CC2 colors are from Color Group 2 (see below). Save all remnants in an organized fashion with their ball bands, as we will use the colors again in the following weeks. FYI, the CC1 and CC2 colors will vary week to week, but the MC will always be the same.
For Week 1, use the following yarn colors for your 6 squares.
MC for all = Metropolis Color No. 025
Square 1: CC1 = 041, CC2 = 044
Square 2: CC1 = 042, CC2 = 065
Square 3: CC1 = 043, CC2 = 066
Square 4: CC1 = 058, CC2 = 057
Square 5: CC1 = 059, CC2 = 064
Square 6: CC1 = 060, CC2 = 075
Here is a sample Quarter-Mandala Square labeled with the CC1 and CC2 color placement. This sample is a Whirl + Whirlette square, but the CC1/CC2 placement is the same for the Metropolis Version.
Here is the Quarter-Mandala Square Pattern: US Terms // UK Terms
Gauge
Check your gauge! The first 8 Rows of the pattern measure 3in on either straight side with Metropolis and a 3mm hook.
If your motif is taller, but still makes a 90 degree angle at the corner, then going down a hook size will help.
If your motif is taller and narrow, or if you know yourself to make very tall dc sts, please check out this Golden Loop video. If you are a “lifter” your square will be elongated into a diamond. Changing hook size won’t help much. Working on controlling your Golden Loop will be your solution to having a nice square shape.
Note: The square needs a light blocking to make straight, neat edges and open the lace; however, if the square is too much of a diamond due to very tall dc sts, focus on the Golden Loop may be required.
Step 3: Share pics!
Instagram Sharing – I’m on Insta as @CypressTextiles. Hashtag your WIP and FO pics with #GloriaBlanket and #CypressTextiles so I can share and save them in my story highlights!
CypressTextiles Tree Huggers Facebook Group – This is my main FB group (join!). Share your progress pics in this group if you like, and I will share CAL highlights there as well.
Whirl+Whirlette Version
This version uses two Scheepjes Whirl and 6 x 100g balls of Whirlette OR 12 x 50g of Scheepjes Cotton 8, with a size 3mm hook. For more yarn info and where to order, head to the Main Info Page.
Follow the steps below to complete your work for Week 1.
Step 1: Organize your yarn for this week
This week, we will be working from the inside of one Whirl, and the outside of the other Whirl. Label one Whirl “A” and the other Whirl “B”.
Step 2: Make 6 Quarter-Mandala Squares
The Quarter-Mandala Square Pattern will note when to change colors between MC (Main Color), CC1 (Contrast Color 1), and CC2 (Contrast Color 2) – see below. Follow the Color Notes in the pattern. The label “Whirl A” and “Whirl B” will not change throughout the CAL, but the CC1 and CC2 will vary week to week. The MC will be the same throughout the CAL.
For Week 1, use the following yarn colors for your 6 squares.
MC for all = Scheepjes Whirlette in Ice, OR Scheepjes Cotton 8 in preferred background color
Squares 1-6: CC1 = Whirl A, pulled from inside, CC2 = Whirl B, pulled from outside
Here is a diagram of how the placement of CC1 and CC2 look for this square.
Check your gauge! The first 8 Rows of the pattern measure 2.5in on either straight side with Whirl/Whirlette and a 3mm hook.
If your motif is taller, but still makes a 90 degree angle at the corner, then going down a hook size will help.
If your motif is taller and narrow, or if you know yourself to make very tall dc sts, please check out this Golden Loop video. If you are a “lifter” your square will be elongated into a diamond. Changing hook size won’t help much. Working on controlling your Golden Loop will be your solution to having a nice square shape.
Note: The square needs a light blocking to make straight, neat edges and open the lace; however, if the square is too much of a diamond due to very tall dc sts, focus on the Golden Loop may be required.
Step 3: Share pics!
Instagram Sharing – I’m on Insta as @CypressTextiles. Hashtag your WIP and FO pics with #GloriaBlanket and #CypressTextiles so I can share and save them in my story highlights!
CypressTextiles Tree Huggers Facebook Group – This is my main FB group (join!). Share your progress pics in this group if you like, and I will share CAL highlights there as well.
Catona 10g Colour Pack Version
This version uses one Scheepjes Catona 10g Colour Pack and 20 x 50g balls of Catona, with a size 3mm hook. For more yarn info and where to order, head to the Main Info Page.
Follow the steps below to complete your work for Week 1.
Step 1: Organize your yarn for this week
Color Group 1 – Pull colors 258, 396, 409, 256, 252, 115, 114, 413, 390, 192, 516, and 517, from the Colour Pack and store them together. We will not be using colors 516 and 517 this week as they will be used for a Snowflake Square on Week 2, but they do belong with Color Group 1.
I am storing my separate color groups in reusable zip-lock bags. There are 9 total color groups just in case that helps you sort out your storage system.
Step 2: Make 5 Quarter-Mandala Squares
The Quarter-Mandala Square Pattern will note when to change colors between MC (Main Color), CC1 (Contrast Color 1), and CC2 (Contrast Color 2) – see below. Follow the Color Notes in the pattern. The CC1 and CC2 will vary week to week. The MC will be the same throughout the CAL.
For this version, CC1 and CC2 colors are all from Color Group 1. Save all remnants in an organized fashion with their ball bands, as we may use the colors again in the following weeks.
For Week 1, use the following yarn colors for your 5 squares.
MC for all = Catona Color No. 404
Square 1: CC1 = 114, CC2 = 413
Square 2: CC1 = 390, CC2 = 192
Square 3: CC1 = 252, CC2 = 115
Square 4: CC1 = 409, CC2 = 256
Square 5: CC1 = 258, CC2 = 396
Here is a sample Quarter-Mandala Square labeled with the CC1 and CC2 color placement for this version.
Check your gauge! The first 8 Rows of the pattern measure 2.75in on either straight side with Catona and a 3mm hook.
If your motif is taller, but still makes a 90 degree angle at the corner, then going down a hook size will help.
If your motif is taller and narrow, or if you know yourself to make very tall dc sts, please check out this Golden Loop video. If you are a “lifter” your square will be elongated into a diamond. Changing hook size won’t help much. Working on controlling your Golden Loop will be your solution to having a nice square shape.
Note: The square needs a light blocking to make straight, neat edges and open the lace; however, if the square is too much of a diamond due to very tall dc sts, focus on the Golden Loop may be required.
Step 3: Share pics!
Instagram Sharing – I’m on Insta as @CypressTextiles. Hashtag your WIP and FO pics with #GloriaBlanket and #CypressTextiles so I can share and save them in my story highlights!
CypressTextiles Tree Huggers Facebook Group – This is my main FB group (join!). Share your progress pics in this group if you like, and I will share CAL highlights there as well.
**Suggested Yarns Without a Sample Blanket**
Here is some advice on these yarn versions for this week. Feel free to follow along with one of the versions above!
Stone Washed / River Washed 10g Colour Pack Version
For this yarn, if you are making 30 squares, you can make 3 of the Quarter-Mandala Squares this week. Pick 2 similar contrast colors for CC1 and CC2 or even use 2 completely different colors! It will look amazing.
You can follow along with the Catona 10g colour pack version above if you like. Just make fewer squares. MC will remain the same week to week, but the CC1 and CC2 will be unique to each square.
Here is an example of how your square will look if you follow the Catona 10g pack version:
Catona 50g Skeins Version
For this yarn, if you are making 56 squares, you should make 5 Quarter-Mandala Squares this week. CC1 and CC2 follow the Whirl + Whirlette Version.
For this yarn, I gave several layout options on the Main Info Page. You can follow the color combos CC1 and CC2 for the Catona 10g Colour Pack Version as the colors are the same for these 2 packs, but the quantity of squares will depend on how many will be in your blanket.
Here is the Quarter-Mandala Square Pattern: US Terms // UK Terms
Stash Yarn Version!
If you are going rogue (YAY!) you can make anywhere between 5-7 Quarter-Mandala Squares this week, depending how many squares your blanket will be. I can’t wait to see the fun color combos!
Here is the Quarter-Mandala Square Pattern: US Terms // UK Terms
Have fun making your squares this week! Be sure to share progress pics as we love them in the FB group and IG. I share them in my IG story highlights as well if you post them and add the hashtags.
THANK YOU for joining me in the Gloria Blanket CAL!
As some of the recommended yarns are difficult to find, I have updated the yarn info below. Please take a look at your chosen yarn and see if I have added any recommended substitutes. I have also added a few more yarn choices and posted the yarn amounts for you! Check it out below.
Introduction
Hello, lovely! Today I am shouting out the announcement for my Gloria Blanket CAL! One of my favorite things to do in my designer life is to host a Crochet-A-Long. I just love the community involvement, and I especially love seeing the different variations being made all over Instagram and my Facebook Group.
Gloria has been several years in the making and I am so pleased to finally release the pattern as a CAL. Originally, I wasn’t going to as my typical CALs have many different motifs to entertain you week after week, whereas Gloria only has two motifs, but lots of folks agreed it would still be a great CAL, so I decided to just go for it!
This CAL will probably be smaller than a VVCAL but I am still thrilled to host it, and I look forward to seeing all of your progress and finished pics.
Social Media Hashtags: #GloriaBlanket and #CypressTextiles
Gloria Blanket CAL Quick Links
Gloria Blanket PDF PatternRavelry / Etsy/ My Shop – As usual, the CAL will be released free every week here on my website, but I will offer the full blanket pattern in PDF form as soon as I write it up (I’ll have a date soon!)
Instagram Sharing – I’m on Insta as @CypressTextiles. Hashtag your WIP and FO pics with #GloriaBlanket and #CypressTextiles so I can share and save them in my story highlights!
CypressTextiles Tree Huggers Facebook Group – This is my main FB group (join!). Share your progress pics in this group if you like, and I will share CAL highlights there as well.
The Gloria Blanket CAL will begin Friday, September 25th, and run through Friday, December 11th. It is a 12-week CAL with plenty of time to make the 63 squares and join / border.
Look for CAL posts here on this website (CypressTextiles.net) each Friday during the CAL.
The patterns are in US Terms and UK Terms, written, and video instruction form, as well as step by step photos. No charts this time, unfortunately! Video will be helpful for chart readers.
Every Friday during the CAL, I will release a new pattern part, and we will make the squares and join them up, and then add a sweet border at the end!
Gloria Blanket Information
For this blanket, there are two motifs. One is a quarter mandala, and the other is a snowflake. You’ll be making them all up separately and then joining at the end.
Whether you choose to make the Metropolis version, or the Whirl version, you will definitely have fun! The tiny 10g balls of yarn in the Metropolis pack are an absolute delight, and watching the Whirl slowly change color is always a sight to behold. I am LOVING the process of both blanket samples.
Measurements: Blanket will measure about 50x57in for the Whirl/Whirlette Version and 55x70in for the Metropolis Version
Gauge: Squares measure 6.75in for Whirl and 7.5in for Metropolis
Notions: US Size 3mm hook for both the Whirl and Metropolis versions
Want to see the inspiration?? It’s this floor photo from Instagram account, @IHaveThisThingWithFloors. Isn’t it incredible? I love how unexpectedly the quarter mandala tiles are rotated, and of course I adore the random snowflake placement. The way the simple snowflake pairs with the complex mandala – I just love it!
The motifs you see in the photos above were my first trials of the design. I still have the prototypes, but I really had to simplify the pattern a bit so that it would be easier to work up. The final design flows much more smoothly.
Whirl+Whirlette Version Information
Note: There is a yarn sub listed below for this version as the Ice Whirlette is tough to find.
This version of the Gloria Blanket is really lovely. The blanket has 56 squares of beautiful color changing Whirl, which is faded from one corner to the other using the color placement of the squares.
Bold snowflakes pleasantly interrupt the unexpected broken mandala effect of the quarter-mandala motifs. The snowflakes are made along the Whirl color changes, so they will fit in at all areas of the blanket. I’ll probably say it at least 3 times in this post, but watching the Whirl slowly change color as you work is nothing short of breathtaking. When I look down and my motif is that deep teal, I can hardly believe I started out working with the deep purple… It’s truly awesome!
Note: All shopping links below are affiliate links. This means any purchase made through those links will gain me a small commission at no additional cost to you!
For this colorway, I used my favorite Whirl, Blackberry Mint Chip, plus a gorgeous Whirlette, 860 Ice. You can definitely pick any Whirl and Whirlette combination, but I suggest a very contrasting color combo so that none of the pattern and texture is lost. The Ice Whirlette will pair nicely with almost any Whirl, and I have a photo below where I show I was obviously undecided! I love all 3 of those Whirls in the photo! Maybe I will make a couple more sample blankets as we progress in the CAL.
Whirl+Whirlette Colorway Yarn Details
I will be making a sample of this version during the CAL. Scroll all the way down to the bottom of this post for the schedule.
For this colorway, you will need:
3mm hook
2 of the same color Scheepjes Whirl – or mix it up and choose 2 that coordinate! I show Blackberry Mint Chip in the photos here, and I am almost to the olive green of the colorway
6 Scheepjes Whirlette in 860 Ice or a contrasting color to your chosen Whirl
Yarn order info below
Order Yarn for Whirl+Whirlette Colorway
Find the 2 x 220g balls of Scheepjes Whirl Blackberry Mint Chip (or color of your choice) at one of these shops.
If you cannot find Ice Whirlette, Scheepjes Cotton 8 in color 502 White will work great as a substitute. You will need 12 x 50g balls of Cotton 8. You will still need the 2 Whirls.
Find your 12 x 50g balls of Cotton 8 at the affiliate links below:
Note: There is yarn substitution info in the yarn ordering section below. The Metropolis 10g Colour Pack is difficult to find.
I will be making a sample of this version during the CAL. Scroll all the way down to the bottom of this post for the schedule.
I am in love with the Scheepjes Colour Packs, and the Metropolis 10g Colour Pack is so lush. You’ll be amazed by just how much yardage is packed in each little ball! Setting up the colors is going to be a blast, and I can’t wait for that part of the CAL.
This version of the blanket has 63 squares, and the remaining 17 colors are used up in the border. The color fade is epic; I can’t wait for you to see it!
Metropolis Colorway Yarn Details
For this colorway, you will need:
3mm hook
1 x Scheepjes Metropolis 10g Colour Pack
14 x 50g balls of Scheepjes Metropolis in color 025 “Nice”
Order Yarn for Metropolis Colorway
Find the Metropolis 10g Colour Pack at one of these shops.
If you cannot find the Metropolis 10g Colour Pack, you can make the whole blanket with 50g balls instead. You will need:
13 x 50g balls, each in a different color. Choose 12 colors that fade nicely across when you lay them in a line, or just choose 12 colors that you love!
17 x 50g balls, of all the same color for the background
For example, in the color pack shown below, each row of colors fades nicely across. Look at that second row from the top. What an amazing blue to orchid fade.. add in the 2 blues before, and that deep violet at the beginning of the next row, and you’re set. Maybe you like teals and greens.. On the fourth row from the top, the second 5 balls are lovely teals that fade beautifully. The eighth and ninth rows have awesome green fades. You can easily find 13 colors that look great when laid in a row.
Another option is to just pick 13 colors that you love! Gloria doesn’t have to be a color fade. It will look awesome with a fun mix of colors!
Catona 50g Yarn Version
I will not be making a Catona sample during the CAL, so if you want to follow along, use the yarn stash version. I recommend making 35 squares for a 5×7 layout.
To use the 50g balls of Catona, you will need:
3mm hook
12 x 50g balls, each in a different color. Choose 12 colors that fade nicely across when you lay them in a line, or just choose 12 colors that you love!
18 x 50g balls, all in the same color for the background
Important note: If you use the yarn amounts above, you can make 35 squares in a 5 x 7 layout, and that blanket will measure about 45x62in. The squares in Catona are larger than the squares in Whirl or Metropolis, so you can make fewer without getting too small of a blanket.
I will be making a sample with this pack during the CAL if you want to join me. If you want to use this pack, you can make a blanket with 56 squares, in a 7×8 layout and it will measure about 63x71in. Scroll all the way down to the bottom of this post for the schedule.
You will need:
3mm hook
1 x Catona 10g Colour Pack
20 x 50g balls, all in the same color, of Catona
Find the Scheepjes Catona 10g Colour Pack through one of the following affiliate links, and the 50g balls at the links above.
Stone Washed + River Washed 10g Colour Pack Version
I won’t be making a sample in this pack for the CAL, but you can definitely use it! There isn’t enough yardage in each SW/RW 10g ball to make the squares. You can use more than one color in each square if you want to use the pack. It takes 2 x 10g balls of Stone Washed / River Washed to make 1 square, so that means you can make about 30 squares for a 5×6 layout. And you can use the remnants in the border to make the blanket even larger. Yay!
You will need:
3mm hook
1 Stone Washed + River Washed 10g Colour Pack
12 x 50g Stone Washed balls, all in the same color – preferably a light color, but go wild!, for the background
Find the Colour Pack here at the following affiliate links:
I won’t be making a sample with this pack for the duration of the CAL, but the yarn amounts are listed below, along with some suggestions to use this large square. It measures about 12in, so relatively few will make a blanket, but the pack will make 56 squares (7×8 square layout). That makes a blanket of about 7 feet by 8 feet – huge! I have some suggestions below for different amounts of squares and layouts.
You can perfectly use 2 x 15g balls to make 1 square, plus each square takes 32g of Cahlista 50g ball in a solid background color. The squares are large – with a 4.25mm G Hook they are about 12in Square. So you’ll need fewer to make a blanket.
Suggestions for how many squares to make with this kit (Just brainstorming!)
I recommend you make a blanket with 48 squares in a 6×8 layout, and that will be about 6x8ft – plus an inch or 2 for border. That’s a big blanket!
You can do 5×7 square layout with 35 squares.. that only uses 70 colors out of the 109 though.
You could always do 2 blankets from the pack at 24 squares a piece.. in a 4×6 squares layout. That would make the blankets just over 4x6ft probably 52x76in…
You’ll still need to get the background color 50g Cahlista balls. Remember it’s 32g of Cahlista for 1 square. Add in maybe 10 balls for join and border? Depending on how large your blanket is of course.
You will need:
4.25mm hook
1 Scheepjes Cahlista 15g Colour Pack
Cahlista 50g balls, all in the same color – preferably a light color, but go wild!, for the background – amounts discussed above
Find the Cahlista Colour Pack here at the following affiliate links:
Yay! I think that is all the information you need to know right now. I will see you again on September 25th for the first week! Get your yarn and hooks ready!
Hello, lovely crafter! Today I have a special treat for you. I want to show you the latest Scheepjes YARN Bookazine: The Colour Issue, a celebration of 10 issues of YARN and the perfect salute to color. If you’ve followed my work for any length of time, you know that I am color obsessed, so when Scheepjes told me that the next issue of YARN would be The Colour Issue of course I jumped for joy! I mean just look at the cover.
The bookazine is on its way to me, and I am absolutely giddy to receive it and flip through the pages. You may have a copy – or maybe a collection – of YARN Bookazine, so you know that it’s more than just the awesome patterns within… It’s the photography, the mood, the theme, and much more. When you flip through it, it truly is like flipping through a magazine, and you’ll find yourself reaching for it again and again, just to look through the beautiful pages. And as for this issue, wait till you see my contribution!
If you make the Technicolour Dream Blanket, be sure to add the following hashtags to post it on social media so I can see your progress and finished pics! You can also join my Crochet Facebook Group and post pics there!
#TechnicolourDreamBlanket and #CypressTextiles
Technicolour Dream Blanket
My contribution to the celebratory 10th issue of YARN Bookazine is the Technicolour Dream Blanket (Ravelry link) made with ScheepjesSoftfun. It was so much fun to design this blanket and choose the colors for it. What a real dedication to COLOR this project is! Mixing the colors and creating the layout was a delight, and I know you will enjoy the construction. It is so simple, but comes together to make something beautiful.
Aren’t the bookazine photos lovely? I am always amazed when the photography comes back and it feels like my blanket is a total rock star. They do such a great job! I love how the colors pop with the cobalt blue.
Scheepjes Softfun
To find this yarn and make the Technicolor Dream Blanket (scroll a little bit for the list of colors), shop through the following affiliate links to support CypressTextiles, or head to a Scheepjes Retailer near you!
Did you know they added over 30 new colors to the Softfun range? Check out the new colors:
Softfun Color List – Technicolour Dream Blanket
Here is the list of colors that you will need for the blanket. It only calls for 1 ball each of the colors listed, and then the border uses 7 balls. All that info is below. I also made a little picture of all the colors I used, that way when you order, you can be sure what you are looking for. These yarn balls are in the order that you’ll find them in the list below, and that one lone grey at the bottom right is the border color.
I took a few progress photos along the way, and thought I would show them to you to get you pumped about the project! Enjoy!
Working with this yarn is a dream… Softfun is squooshy, springy, and soft, while being very durable. The cotton and acrylic blend is the absolute best thing ever.
I took a quick photo here to try and decide what border color to use, but then I decided it was so lovely, I would share it with you.
And one more of the edge – I love the introduction of those pinks and mauves. It brings the color palette back around full circle to the burgundy and reddish colors at the beginning.
Here is a shot of the finished blanket in all its Technicolour Dream glory. I cannot express how enjoyable this blanket was to work up. The color placement was a blast – always one of my favorite aspects of blanket design – and then the faux pompom edging is just the icing on the cake. If you haven’t ever tried faux pompom edging, you should definitely give this pattern a try. You will love it!
There are a couple more patterns in the Bookazine that I really want to show you! I know we are mainly a crochet community, but for those of us who knit – I do know how and need to get back into it! – these Red Panda Socks by Carmen Jorissen are an absolute delight. I want a pair for myself and for my four kiddoes. Plus, the’re made in one of my favorite new yarns, the durable and soft Scheepjes Metropolis. Can’t go wrong!
This project caught my eye because of the varying techniques and “crafting speed level” in them. I love projects that use a couple different techniques, in this case the colorwork, and the plain striping, and then vary the working speed, slow and thoughtful on the panda, and then just speed along on the stripes. That is just the best! I can’t wait to try these out.
Another project from this issue that I just love is this gorgeous Frozen Rose Shawl by Nerissa Muijs. What a lovely shawl, and a perfect stitch repeat makes for a quick and fulfilling project. Besides that, Whirl Yarn never disappoints and is always fun to work with.
The perfectly dainty edging and that classic stitch come together for a shawl that showcases the color of the Whirl Ombre perfectly. When working with a gorgeous Whirl, sometimes it’s best to just let the color do the talking and leave out an overly distracting array of different textures. This shawl demonstrates that perfectly.
Thank you for taking some time out of your day to check out my Technicolour Dream Blanket in the latest Scheepjes YARN Bookazine. I hope you enjoyed it, and if you make it, be sure to tag me (@cypresstextiles) on social media or post it in my Facebook group.
As always, happy crafting!
Rachele C.
* This post contains affiliate links, and Shopping through them costs nothing additional and supports my content.
Check out my previous Scheepjes YARN Bookazine Projects!
Hello, you! Today I have the fourth installment of my free Linen Stitch Blanket Series, the Beach Hut Blanket. This pattern was originally published in 2015, but since then it has been updated a couple of times and was also featured in a magazine! I decided it needed to live as a free pattern on my blog, in my Linen Stitch Blanket Series, but of course the pattern will always be available in PDF version for easy printing.
Quick Links: Linen Stitch Blanket Series
Have a look at the other blankets in this series! They are all free patterns, releasing on the last day of each month from May through September.
Find the PDF version here for easy print or just to help support CypressTextiles: Etsy, Ravelry, CypressTextiles Pattern Shop. 2 versions are available in the download – the heavy-image version, and the condensed version.
Social Media Sharing
Please use these hashtags when posting about your Beach Hut Blanket on Social Media:
#BeachHutBlanket and #CypressTextiles
About the Beach Hut Blanket
The Beach Hut Crochet Blanket is a definite keeper. It was inspired by the Colorful Chevrons Quilt by Christa Watson. I highly recommend looking into her work! It’s the modern quilts that inspire me to convert them to my crochet medium. The clever no-sew construction will definitely make you happy! The piece is made by creating base triangles and layering colored chevron with simple zig-zag until your blanket is long enough. Finish off by squaring the top and you have a gorgeous, modern blanket. Any border can be substituted for the one in the pattern, but I believe the bright colors on a white background call for simplicity.
Skill Level Easy
Finished Measurements 40x40in
US Hook size 4.5mm, and tapestry needle for weaving ends
US Hook size 3.75mm, for final round of border only
Gauge With J hook, 18 sts and 18 rows = 4 inches in pattern. Take time to check gauge.
Scheepjes Colour Crafter Yarn
You will need Scheepjes, Colour Crafter 100g balls in the following colors and amounts to make the teal and sea green colored blanket pictured above and below.
Color No. x Qty
Yarn A: No. 1722 x 4
Yarn B: No. 1725 x 1
Yarn C: No. 1034 x 1
Yarn D: No. 2017 x 1
Yarn E: No. 2012 x 1
Yarn F: No. 1708 x 1
Shop Colour Crafter Yarn
Shopping through the following affiliate links helps support CypressTextiles at no additional cost to you!
Do not make a turning chain when beginning the row with a single crochet. This creates neater edges without rippling or puckering.
Consistently turn work counter-clockwise for neater edges.
Special Stitches
Pull Loop Through join (PLT join): release lp from hook, insert hook front to back in st/sp indicated, grab lp, pull lp to front of work, continue as instructed in pattern. Loop joins pieces as you go.
Key Stitch Descriptions (US Terms)
Note: This pattern is only in US Terms, but there is only 1 stitch used: single crochet, so if you are used to reading UK Terms, please know that you are using UK dc for this entire project. (US) sc = (UK) dc
In the border, UK TR is also used, so remember, US DC = UK TR
Ch-n = Chain “n” number of Sts
St(s) = Stitch(es)
Sp = Space
Beg = Beginning
YO = Yarn Over
Slst = Slip stitch
SC = Single Crochet
DC = Double Crochet
Beg DC = SC, Ch-1
TR = Treble Crochet
Inc = “Increase” (SC, Ch-1, SC) in Sp or St indicated
PLT = “Pull Loop Through” See more info within pattern
Make Ring: Chain 3 and join with Slst to first Ch
Join new yarn = Attach new color yarn with a Slst in indicated spot
Instructions
Note: The step by step photos reflect a different stitch count. Please read the stitch count in the pattern, and make sure your work matches. Use the step by step photos to see the general methods used to construct the blanket. The colors shown in the step by step photos are used to make a previous version of this blanket, not the teal one.
Base Triangles
Make 4 Identical
Row 1 (RS) With A, ch 3, join (see Pattern Notes) in 3rd ch from hook to make ring, [sc, ch 1] 3 times in ring, sc in ring, turn. [4 sc, 3 sp]
Note: Mark RS to help in pattern construction. I consistently turn Counter-Clockwise to keep edges nice and tidy.
Row 2 (Sc, ch 1, sc) in first ch-1 sp, * ch 1, (sc, ch 1, sc) in next sp, rep from * once, turn.
Row 3-15 (Sc, ch 1, sc) in first ch-1 sp, (ch 1, sc in next ch-1 sp) across to center ch-1 sp, ch 1, (sc, ch 1, sc) in center ch-1 sp, (ch 1, sc in next ch-1 sp) across to last ch-1 sp, ch 1, (sc, ch 1, sc) in last ch-1 sp, turn. [32 sc, 31 sp]
After Row 15, cut yarn and finish off. Weave bottom center tail. Base Triangle complete.
No-Sew Chevron Layer
First Color Block
Row 1 (RS) With RS facing, join C in first ch-1 sp, sc in same sp, (ch 1, sc in next ch-1 sp) across to center ch-1 sp, ch 1, (sc, ch 1, sc) in center ch-1 sp, turn. [17 sc, 16 sp]
Note: I do not “chain up” after turning rows because I find it leaves my edges messy and loose. For a tighter edge that lies flat, I simply begin my next row by going straight into an SC.
Row 2 (Sc, ch 1, sc) in first ch-1 sp, (ch 1, sc in next ch-1 sp) across to last sp, turn. (17 sc, 16 ch-1 sps)
Row 3 Sc in first ch-1 sp, (ch 1, sc in next ch-1 sp) across to last ch-1 sp, ch 1, (sc, ch 1, sc) in last ch-1 sp, turn. [17 sc, 16 sp]
Rows 4-16 [Rep Rows 2 and 3] 6 times, ending with WS facing. [17 sc, 16 sp] Fasten off after last row.
Second Color Block
Row 1 (WS) With WS facing, join E in first ch-1 sp, sc in same sp, (ch 1, sc in next ch-1 sp) across to ch-1 sp just before center ch-1 sp, turn. [15 sc, 14 sp]
Row 2 PLT join (Special Stitches) in first ch-1 sp of Row 2 of previous color block, ch 1, sc around PLT lp (before first sc), (ch 1, sc in next ch-1 sp) across to last sp, turn. [15 sc, 15 sp]
Row 3 Sc in first ch-1 sp, (ch 1, sc in next ch-1 sp) across to last ch-1 sp, turn. [15 sc, 14 sp]
Rows 4–16 [Rep Rows 2 and 3] 6 times, making PLT join at beginning of every RS row into the ch-1 sp 2 rows up on the previous color block, ending with RS facing. [15 sc, 15 sp] Fasten off after last row.
Third Color Block
Row 1 (RS) Holding second base triangle with RS facing, join F in first ch-1 sp, PLT join in first ch-1 sp of row 1 of previous color block, sc in same sp as sl st, (ch 1, sc in next ch-1 sp) across to center ch-1 sp, ch 1, (sc, ch 1, sc) in center ch-1 sp, turn. [17 sc, 16 sp]
Row 2 (Sc, ch 1, sc) in first ch-1 sp, (ch 1, sc in next ch-1 sp) across to last ch-1 sp, turn. [17 sc, 16 sp]
Row 3 PLT join in first ch-1 sp of row 2 of previous color block, sc in first ch-1 sp, (ch 1, sc in next ch-1 sp) across to last ch-1 sp, ch 1, (sc, ch 1, sc) in last ch-1 sp, turn. [17 sc, 16 sp]
Rows 4–16 [Rep Rows 2 and 3] 6 times, making PLT join at beginning of every RS row into the ch-1 sp 2 rows up on previous color block, ending with WS facing. Fasten off after last row. Make square knot with ends from this row and Row 16 of second color block. Weave in ends through sts of their own color. [17 sc, 16 sp]
Fourth color block
Rows 1–16: With B on left side of second base triangle, work same as second color block, joining to third color block.
Fifth–Eighth color blocks
Work same as second and third color blocks, on third and fourth base triangles, using the colors D, F, B, and E, respectively, joining to previous color block.
Note: Once you complete the final Color Block, you will have all 4 Base Triangles used up. You will always start a Color Block by joining new yarn at the bottom right hand corner of a Base Triangle.
Zig-Zag Layer
Row 1 (WS) With WS facing, join A in first ch-1 sp of eighth color block, *[sc in ch-1 sp, ch 1] 15 times, (sc, ch 1, sc) in center ch-1 sp, [ch 1, sc in next ch-1 sp]15 times, rep from * 3 times, turn. (Note: Count to ensure there are 15 sc on each zig-zag “slant”, plus a [sc, ch 1, sc] in each center or “peak” ch-1 sp). [128 sc, 124 sp]
Rows 2–15 *[Sc in ch-1 sp, ch 1] 15 times, (sc, ch 1, sc) in center ch-1 sp, [ch 1, sc in ch-1 sp] 15 times, rep from * 3 times, turn. [128 sc, 124 sp] Fasten off.
Second No-Sew Layer
Work same as first no-sew layer, working in the following color sequence: 1 color block each in B, F, D, E, B, D, C and F.
Second Zig-Zag Layer
Rep first zig-zag layer.
Third No-Sew Layer
Work same as first no-sew layer, working in the following color sequence: 1 color block each in E, D, B, C, F, B, E and C.
Third Zig-Zag Layer
Rep first zig-zag layer.
Fourth No-Sew Layer
Work same as first no-sew layer, working in the following color sequence: 1 color block each in C, B, E, F, D, E, B and F.
Straightening No-sew Chevron Layer
First triangle gap
Row 1 (RS) With RS facing, join A in first ch-1 sp, (sc in ch-1 sp, ch 1) 15 times, sc in center ch-1 sp, turn. [16 sc, 15 sp]
Rows 2–15 (Sc in ch-1 sp, ch 1) across to last sp, sc in last ch-1 sp, turn. [12 sc, 11 sp at end of last row]
Row 16 Sc in next ch-1 sp. [1 sc] Fasten off.
Second, third, and fourth triangle gaps
Row 1 (RS) With RS facing, join A in same ch-1 sp holding last sc of row 1 on previous triangle gap, *[sc in ch-1 sp, ch 1] 15 times, sc in next ch-1 sp, rep from * once, turn. [32 sc, 30 sp]
Rows 2–15 *(Sc in next ch-1 sp, ch 1) across to last sp of “valley”, sc in next ch-1 sp, rep from * once, turn. [4 sc, 2 sp at end of last row]
Row 16 Sc in each of next 2 ch-1 sps. [2 sc] Fasten off.
Fifth triangle gap
Rows 1-16 With WS facing, join A in first ch-1 sp on last side of eighth color block, work as for first triangle gap. Do not fasten off at end of last row.
Border
Rnd 1 *3 sc in corner st, sc evenly across to next corner, working 1 sc in each row, rep from * around, making sure that opposing sides have the same number of stitches, join in first sc.
Rnd 2 (Sc, ch 1, 4 dc) in corner st, *dc in each st across to next corner st**, 5 dc in next corner st, rep from * around, ending last rep at **, join in top of beg ch-1.
Rnd 3 Change to F hook. With smaller hook, sc in each st around, join in first sc. Fasten off.
Finishing
Weave in ends. Block if desired.
Resizing or Making a Rectangle
Change the amount of rows in the Base Triangle or the amount of rows in the Color Blocks or the Chevron Layers and you can change the look of the whole blanket!
This piece is so easy to resize. Add more Base Triangles for a wider blanket. I’ve made these Beach Hut Blankets as custom orders when I did custom work. Check them out!
To widen
Easy version: Add more Base Triangles to widen the base of the blanket in 8-inch increments. Work the blanket in the same way.
Intermediate version: You can work the Base Triangles with fewer or more rows to change the width, and the construction process will be the same. In the photo below, I have made smaller Base Triangles, and as a result, the No-Sew Chevrons are narrower as well. Of course, the Zig-Zag Layer is also modified, but again, the process is the same. Experiment with different widths for a new look!
To lengthen
Simply add more layers to lengthen. I find that adding 1 more layer each of Zig-Zag and No-Sew Chevron makes a lovely rectangle. If you have widened your piece, you can surely add as many layers as you like!
Note: You can definitely alter the amount of rows that you work on either Layer to get different effects. Play with the pattern to make it your own!
FIN!
Copyright Information
No pattern or other material may be reproduced — mechanically, electronically, or by any other means, including photocopying — without written permission of Rachele Carmona. This applies to all content on CypressTextiles.net, BabyLoveBrand.net, and all other sites used by Rachele Carmona. Paid patterns are for personal use only. You may sell your finished crocheted items.
Pin this Pattern!
Thank you for stopping in for this freebie!
I’ve enjoyed sharing my LInen Stitch Blanket Series, and there’s just one more pattern. Stay Tuned!
Until then, happy crafting,
Rachele C.
Quick Links: Linen Stitch Blanket Series
Have a look at the other blankets in this series! They are all free patterns, releasing on the last day of each month from May through September.
Hello, lovely! Today I wanted to pop in and tell you all about Scheepjes YARN Bookazine, Issue 9: NOW Age. Twice a year, Scheepjes comes out with a new issue of YARN, and it just blows me away each time. I have had a design in every issue since the third one, and it seems like I make my humble offering, and send it off to The Netherlands, where the creative geniuses at Scheepjes make absolute magic with it.
I love how each issue has a theme, and a general color vibe and mood to it. This issue’s theme is NOW Age, and here is the gorgeous cover.
This issue features stunning designs – something for everyone, ranging from elegant to playful – mixed in with delightful articles all centered on the new age theme.
Changing Tides Bag
One of the makes that I just love is this pretty and practical Changing Tides Bag by Jellina Verhoeff. How fun is this bag? Made in the super-durable yarn Mighty, they look like a great intro to feather and fan type work and open lace.
The combination of the waves and the lace really gets me, and Mighty is the perfect yarn for it because the strong yarn won’t buckle under the pressure of filling the bag with all your beach stuff. I am making a bag tutorial with Mighty and after using the bag for the past months, I can tell you it holds up beautifully.
Another project from this issue that I just loved is this design by Tatsiana Kupryianchyk. The Free Flow Shawl has a very basic design constructions, so as a blanket maker I do not find it too intimidating. Bonus: it’s made with Secret Garden yarn which I am in love with!
The stitch is beautiful and just the right amount of mindless, if you get what I mean. I can stitch this while watching my favorite show, and not get bored to death in the process. What a simple, yet elegant stitch.
My contribution to this issue is the Floral Eclipse Throw (Ravelry link) made with Scheepjes Cahlista. I had a blast creating this piece, as it is worked up in join as-you-go lacy motifs, which come together to make the blanket body, plus bonus tassels added for a not-so-subtle detail.
Are you as in love with the photo below as I am? The Bug, the Zebra, plus my blanket – I’m telling you, the Scheepjes photography is always incredible!
I also took a lot of photos of this one at my house before sending it off, mostly because of how in love I became with this color palette. The golden circles and border pull it all together.
This is definitely one of those projects that you take with you to a festival or on a long road trip for that big pop of color and perfect lacy weight. The yarn is Aran Weight, but it’s just lacy enough that you wont be hot under the weight. Amazingly, it will also keep you warm! That’s the funny thing about crochet blankets – the air passes through on a breezy night, but the blanket is still cozy warm.
Here is a close-up of the edge – forever in love with that gold color.
And another shot of the long side of the blanket – the edging on the long sides is a bit different for visual interest, and because I added tassels to the short sides.
You can see how I matched up the large petal scallops to the half-hexagon motifs on the long sides, and that was one of the most fun parts of the blanket to design.
Those tassels are so yummy! I wasn’t ever a tassel fan until suddenly I put them on a design, and now I want to make tassels every chance I get. They add such a pop to the blanket. I agree they don’t go on every design, but for this one it really works and they’re perfect with the smaller scallops on this short edge.
One more shot of this beauty before I get back to work on a top secret project!
* This post contains affiliate links, and Shopping through them costs nothing additional and supports my content. Affiliate links are better than guacamole! They don’t cost extra!
Check out my previous Scheepjes YARN Bookazine Projects!
Hello, lovely! I have a surprise pattern drop for you today! This is my much anticipated Garden Walk Crochet Blanket Pattern. It features a traditional and solid granny as well as a fun and preppy half-striped square.
This pattern was offered as a free promo by Interweave Press during the promotion of my book, The Art of Crochet Blankets. Now my book has switched hands to Penguin Random House, and the free promo is no longer offered, so I begged and pleaded to have the copyright returned to me so that I could share it with you all! Finally, my wish came true, and I just couldn’t wait to share it. I have received many messages requesting this pattern, and I am so happy to be able to share it now.
This is the free crochet pattern for Garden Walk Blanket in US and UK Terms.
PDF Version
Find this pattern in a condensed ad-free PDF for a small fee in my Etsy Shop and on Ravelry.Coloring pages for layouts are also included. Pattern PDFs for US and UK Terms are both included in the purchase.
Social Media Sharing
Please use these hashtags when posting about Garden Walk Blanket:
#GardenWalkBlanket and #CypressTextiles
This sample was made by the lovely and talented Carol of The Hoosier Crocheter / I’m so thankful!
Garden Walk Blanket Crochet Pattern
Visual interest abounds with this beautiful piece. The preppy navy and white stripes make a fun accent and add a new technique to the open and solid granny squares. From construction to display, this piece is sure to become a fast favorite.
Blanket Details
Blanket measures about 35x45in square
Yarn is Scheepjes Colour Crafter and Merino Soft Brush
Hook size: 5mm hook
Yarn Information
I used two balls each of the Scheepjes Merino Soft Brush range (14 x 50g balls total) and one ball each of two colors of Scheepjes Colour Crafter. The links below are affiliate links, and shopping through them helps to support CypressTextiles at no additional cost to you!
MR make ring: slip knot, ch3, ss in third ch from hook
Rep repeat
Rnd round
RS right side
sc single crochet
sk skip
sp space (chain space)
ss slip stitch
st stitch
WS wrong side
yoh yarn over hook
Slip Stitch Join – With right sides together (on wrong side of piece), join blocks together with sl st through back loops only.
Schematic
Instructions
Note: After all motifs are worked, they are joined on the back side with a sl st through back loops only. Then a simple border is added to complete the blanket.
Motif A (Make 18)
Striped section
Row 1 (RS) Using Color A, slip knot, ch 14, sc in second ch from hook, and in 12 rem chs, turn. [13 sc]
Row 2 Beg dc in first st, dc in rem 12 sts, but on the last step of the final dc, draw Color B through to change color, turn.
Row 3 Continuing in Color B, sc in all 13 sts across, turn.
Row 4 Beg dc in first st, dc in rem 12 sts, but change to Color A on final dc, turn.
Note: Carry colors up the side, as these floats will be covered later.
Rows 5-18 Rep Rows 3 and 4, changing color at the end of every even row. Do not change color at the end of Row 18, cut yarn and finish off.
Solid section
Note: Orient Striped section sideways, so that RS is facing and carried yarn floats are along the top edge. For Solid section yarn color, refer to Schematic.
Row1 Join yarn with ss in side of first st, sc 23 sts evenly across, working over carried yarn floats, turn.
Row 2 Beg dc in first st, dc in all rem sts, turn.
Row 3 Sc in all sts across, turn.
Rows 4-9 Rep Rows 2 and 3.
Row 10 Sc in all sts across, turn.
Border Rnd 3 sc in first st, sc in 21 sts, 3 sc in next st, sc in 21 sts evenly across next side, 3 sc in first st on next side, sc 21 sts evenly across, 3 sc in next st, sc 21 sts evenly across side to beginning, ss in first st of Rnd, cut yarn and finish off. [96 sc]
Motif B (Make 4)
Note: For yarn color choice, refer to Schematic.
Rnd 1 (RS) MR, beg dc, (ch 1, 3 dc) 3 times, ch 1, 2 dc, ss in beg dc.
Rnd 2 In first ch sp, beg dc, ch 1, turn work, 3 dc in same ch sp, (3 dc, ch 1, 3 dc) in next ch sp – corner made, make corner in 2 more ch sps, 2 dc in first ch sp to complete corner, ss in beg dc.
Rnd 3 In first ch sp, beg dc, ch 1, turn work, * 3 dc in same ch sp, 3 dc between 3-dc groups across to next corner ch sp, make corner in corner ch sp, rep from * 3 times, omitting corner on final rep, 2 dc in first ch sp complete corner, ss in beg dc.
Rnds 4 and 5 Rep Rnd 3.
Rnd 6 With RS facing, (beg dc, ch 1, 2 dc) in first ch sp, * dc in all 15 sts across, (2 dc, ch 1, 2 dc) in next ch sp, rep from * 3 times, omitting corner on final rep, dc in first ch sp to complete corner, ss in beg dc, do not turn.
Rnd 7 * 3 sc in ch sp, sc in all sts across to next ch sp, rep from * 3 times, ss in first st.
Rnd 8 * 3 sc in corner st, sc in all sts across to next corner st, rep from * 3 times, ss in first st, cut yarn and finish off. [96 sc]
Motif C (Make 8)
Note: For yarn color choice, refer to Schematic.
Rnd 1 (RS) MR, beg dc, (ch 1, 3 dc) 3 times, ch 1, 2 dc, ss in beg dc.
Rnd 2 In first ch sp: (beg dc, ch 1, 2 dc), * dc in all sts across to next ch sp, (2 dc, ch 1, 2 dc) in next ch sp, rep from * 3 times, omitting corner on final rep, dc in first ch sp to complete corner, ss in beg dc.
Rnds 3-6 Rep Rnd 2.
Rnd 7 * 3 sc in ch sp, sc in all sts across to next ch sp, rep from * 3 times, ss in first st. [96 sc]
Join the motifs
Lay out blocks as shown in the schematic, paying attention to orientation of Motif A.
Using Color B, and working first in vertical columns then horizontal rows, join blocks by working slip st on the back side through back loops only as follows:
Pick up two adjacent blocks and, holding right sides together, sl st through outside loops across. Without breaking yarn, pick up next pair of blocks and continue in this manner down the piece until the end of the final block is reached. Cut yarn and weave ends. Join each subsequent row of squares, until all vertical columns are joined.
Rotate the piece to join horizontal rows in the same manner. When all squares are joined, it is time to work the simple border.
Tip: When working horizontal joins and crossing over the vertical joins, work one chain to “cross over” the vertical join. If this chain is omitted, the blanket may pull or pucker at the corners where four blocks meet.
Border
Rnd 1 Join Color A with a sl st in any corner, * 3 sc in corner st, sc in all stitches across to next corner st, rep from * 3 times, ss in first st.
Rnd 2 (Beg dc, ch 2, 2 dc) in corner st, * dc in all sts across to next corner st, (2 dc, ch 2, 2 dc) in corner st, rep from * 3 times omitting final corner, dc in first corner to complete it, ss in first st.
Rnd 3 * 3 sc in corner sp, sc in all stitches across to next corner sp, rep from * 3 times, ss in first st, cut yarn and finish off.
Finished! Yay!! Re-sizing the blanket is easy! Just add more squares and continue the garden walk striped pattern down the diagonal.
Re-sizing Example Schematic
Blank Original Schematic
Stitch Guide (UK Terms)
Scroll up for US Terms.
beg tr (dc, ch1) – counts as 1 tr
chN chain N number of times
dc double crochet
MR make ring: slip knot, ch3, ss in third ch from hook
Rep repeat
Rnd round
RS right side
sk skip
sp space (chain space)
ss slip stitch
st stitch
tr treble crochet
WS wrong side
yoh yarn over hook
Slip Stitch Join – With right sides together (on wrong side of piece), join blocks together with sl st through back loops only.
Schematic
Instructions
Note: After all motifs are worked, they are joined on the back side with a sl st through back loops only. Then a simple border is added to complete the blanket.
Motif A (Make 18)
Striped section
Row 1 (RS) Using Color A, slip knot, ch 14, dc in second ch from hook, and in 12 rem chs, turn. [13 dc]
Row 2 Beg tr in first st, tr in rem 12 sts, but on the last step of the final tr, draw Color B through to change color, turn.
Row 3 Continuing in Color B, dc in all 13 sts across, turn.
Row 4 Beg tr in first st, tr in rem 12 sts, but change to Color A on final tr, turn.
Note: Carry colors up the side, as these floats will be covered later.
Rows 5-18 Rep Rows 3 and 4, changing color at the end of every even row. Do not change color at the end of Row 18, cut yarn and finish off.
Solid section
Note: Orient Striped section sideways, so that RS is facing and carried yarn floats are along the top edge. For Solid section yarn color, refer to Schematic.
Row1 Join yarn with ss in side of first st, dc 23 sts evenly across, working over carried yarn floats, turn.
Row 2 Beg tr in first st, tr in all rem sts, turn.
Row 3 Dc in all sts across, turn.
Rows 4-9 Rep Rows 2 and 3.
Row 10 Dc in all sts across, turn.
Border Rnd 3 dc in first st, dc in 21 sts, 3 dc in next st, dc in 21 sts evenly across next side, 3 dc in first st on next side, dc 21 sts evenly across, 3 dc in next st, dc 21 sts evenly across side to beginning, ss in first st of Rnd, cut yarn and finish off. [96 dc ]
Motif B (Make 4)
Note: For yarn color choice, refer to Schematic.
Rnd 1 (RS) MR, beg tr, (ch 1, 3 tr) 3 times, ch 1, 2 tr, ss in beg tr.
Rnd 2 In first ch sp, beg tr, ch 1, turn work, 3 tr in same ch sp, (3 tr, ch 1, 3 tr) in next ch sp – corner made, make corner in 2 more ch sps, 2 tr in first ch sp to complete corner, ss in beg tr.
Rnd 3 In first ch sp, beg tr, ch 1, turn work, * 3 tr in same ch sp, 3 tr between 3-tr groups across to next corner ch sp, make corner in corner ch sp, rep from * 3 times, omitting corner on final rep, 2 tr in first ch sp complete corner, ss in beg tr.
Rnds 4 and 5 Rep Rnd 3.
Rnd 6 With RS facing, (beg tr, ch 1, 2 tr) in first ch sp, * tr in all 15 sts across, (2 tr, ch 1, 2 tr) in next ch sp, rep from * 3 times, omitting corner on final rep, tr in first ch sp to complete corner, ss in beg tr, do not turn.
Rnd 7 * 3 dc in ch sp, dc in all sts across to next ch sp, rep from * 3 times, ss in first st.
Rnd 8 * 3 dc in corner st, dc in all sts across to next corner st, rep from * 3 times, ss in first st, cut yarn and finish off. [96 dc]
Motif C (Make 8)
Note: For yarn color choice, refer to Schematic.
Rnd 1 (RS) MR, beg tr, (ch 1, 3 tr) 3 times, ch 1, 2 tr, ss in beg tr.
Rnd 2 In first ch sp: (beg tr, ch 1, 2 tr), * tr in all sts across to next ch sp, (2 tr, ch 1, 2 tr) in next ch sp, rep from * 3 times, omitting corner on final rep, tr in first ch sp to complete corner, ss in beg tr.
Rnds 3-6 Rep Rnd 2.
Rnd 7 * 3 dc in ch sp, dc in all sts across to next ch sp, rep from * 3 times, ss in first st. [96 dc]
Join the motifs
Lay out blocks as shown in the schematic, paying attention to orientation of Motif A.
Using Color B, and working first in vertical columns then horizontal rows, join blocks by working slip st on the back side through back loops only as follows:
Pick up two adjacent blocks and, holding right sides together, sl st through outside loops across. Without breaking yarn, pick up next pair of blocks and continue in this manner down the piece until the end of the final block is reached. Cut yarn and weave ends. Join each subsequent row of squares, until all vertical columns are joined.
Rotate the piece to join horizontal rows in the same manner. When all squares are joined, it is time to work the simple border.
Tip: When working horizontal joins and crossing over the vertical joins, work one chain to “cross over” the vertical join. If this chain is omitted, the blanket may pull or pucker at the corners where four blocks meet.
Border
Rnd 1 Join Color A with a sl st in any corner, * 3 dc in corner st, dc in all stitches across to next corner st, rep from * 3 times, ss in first st.
Rnd 2 (Beg tr, ch 2, 2 tr) in corner st, * tr in all sts across to next corner st, (2 tr, ch 2, 2 tr) in corner st, rep from * 3 times omitting final corner, tr in first corner to complete it, ss in first st.
Rnd 3 * 3 dc in corner sp, dc in all stitches across to next corner sp, rep from * 3 times, ss in first st, cut yarn and finish off.
Finished! Yay!! Re-sizing the blanket is easy! Just add more squares and continue the garden walk striped pattern down the diagonal.
Thank you for stopping in, and as always, Happy Crafting!
Rachele C.
PS: Keep up with the latest on my Linen Stitch Blanket Series! All Free Patterns.
Hi, sweet crafter! As the 4-part Zendoodle Blanket series has just come to a close, I have had messages regarding the rectangle POC inclusive rainbow version that I have been working up in Scheepjes Softfun and showing on my Instagram.
So I decided to create a free pattern version for this rectangle Zendoodle as well! It is just as wide as the original Zendoodle, but extended upward to make a big rectangle.
Here are links to the 4 parts of this free rectangle version:
Note: If you have previously purchased my Zendoodle Blanket on Etsy or Ravelry, I will send the updated PDF as soon as I am finished with it. Thank you! Good news: The update will include both PDFs for the Zendoodle Blanket and the Rectangle Version!
Use this hashtag to keep all of the Zendoodle Blankets progress photos together, whether you make the Original or the Rectangle.
#ZendoodleBlanket and #cypresstextiles
Find this pattern in a condensed ad-free PDF for a small fee on Etsy, and Ravelry.
Softfun Aquarel No. 804 – or simply omit and use Softfun No. 2426 in its place x 1
Stitch Guide (US Terms)
Note: This pattern is only in US Terms, but there is only 1 stitch used: single crochet, so if you are used to reading UK Terms, please know that you are using UK dc for this entire project. (US) sc = (UK) dc
chN chain N number of times
MR make ring: slip knot, ch3, ss in third ch from hook
PLT Join “Pull Loop Through” join (See more info within pattern)
Rep repeat
Rnd round
RS right side
sc single crochet
sk skip
sp space (chain space)
ss slip stitch
st stitch
WS wrong side
yoh yarn over hook
Instructions
Zendoodle is worked in strips from bottom edge to top edge. I give two options to construct this blanket. You can either work the first strip complete and then join all subsequent strips on as you go, or you can make all of the strips complete (separately) and then sew them together using my instructions. I provide full instruction for the join-as-you-go strips method, and then I give notes for the sewn strips method.
Note: If you are working the blanket join-as-you-go, then this strip is joined onto Strip 1 at the left hand edge as per the instructions. Notes will be given if you’d like to work all of the strips separately and then sew them together.
Step 1: House
Note: The House shape is made by working up a Base Triangle as for Strip 1, but instead of cutting the yarn after the Base Triangle, continue vertically as to make the House shape as instructed.
Row 1WS Using Softfun No. 2535, MR, (sc, ch1) 3 times, sc, turn. [4 sc, 3 sp] (Mark this row as the WS – this pattern is reversible and tough to tell which side is which.)
Row 2 (Sc, ch1, sc) in first sp, * ch1, (sc, ch1, sc) in next sp, rep from * 1 time, turn. [6 sc, 5 sp]
Rows 3-10 (Sc, ch1, sc) in first sp, (ch1, sc in next sp) across to center sp, ch1, (sc, ch1, sc) in center sp, (ch1, sc in next sp) across to final sp, ch1, (sc, ch1, sc) in final sp, turn. DO NOT cut yarn after Row 10. [22 sc, 21 sp]
If you are working Join-as-you-go strips, join to Strip 1 at this point as follows:
Turn both Strip 1 and Base Triangle to the WS, and align them as in the photo below.
Release the loop from the hook, insert the hook front to back through the left corner of the base triangle on strip 1, and grab the loop. Now your work should look like the photo below.
Pull Loop Through to the front like in the second photo below. PLT Join maneuver complete!
This is how you will join Strip 2 to Strip 1 as you go. Before every WS Row, when the row touches the completed strip, you will work the PLT maneuver in the space of the corresponding row that you are about to work. I have plenty of photos, don’t worry.
If you are working the strips separately and sewing them afterward, simply omit this PLT Join maneuver and work the strips as instructed.
Rows 11-31 Sc in first sp, (ch1, sc in next sp) 9 times, ch1, (sc, ch1, sc) in next sp, (ch1, sc in next sp) 9 times, ch1, sc in final sp, turn [22 sc, 21 sp]
Here are some photos of the PLT Join process for the House shape.
This photo shows that before you begin Row 13, you release the loop to prepare to PLT Join.
This next photo shows the PLT Join in progress. You can see that the loop is being pulled through the corresponding row that is about to be worked.
Here is Row 3 being worked, and you can see that the first sc of Row 3 is simply continued after the PLT Join maneuver is worked. It is a common mistake to make a chain after you pull the loop through. Instead, you just work the first sc of the next row.
Here is the House shape when it’s done! The work is turned to the RS in this photo. You can see that the House shape is joined on the left hand side, before every WS Row, when the row touches the completed
Step 2: Bow Tie
First triangle of Bow Tie
Joining Note: There is no joining on this part, because the first triangle does not touch strip 1 at all.
Row 1 With RS facing, join Softfun Denim No. 505 with ss in first sp, sc in same sp, (ch1, sc in next sp) 10 times, turn. [11 sc, 10 sp]
Row 2 (Ch1, sc in next sp) 10 times, turn. [10 sc, 10 sp]
Row 3 (Sc in next sp, ch1) 9 times, sc in final sp, turn. [10 sc, 9 sp]
Rows 4-21 Rep Rows 2 and 3. Cut yarn after row 21. [1 sc]
Second triangle of Bow Tie
Joining Note: If you are Joining as-you-go, then before you work all odd-numbered rows, be sure and work the PLT Join maneuver as shown in the photos below.
Rows 1-21 With WS facing and Softfun No. 2605, work as for first triangle of Bow Tie. Weave all ends.
Here is a photo of the work right before Row 1, with PLT Join in progress. This is an important photo because it shows that the PLT is worked before EVERY WS row – even is that means the first row. After you join your yarn with a slip st, you make the PLT Join maneuver.
Here is the second triangle in progress, and you can see the PLT Join worked before each odd-numbered row. Remember, this photo shows the WS of the work, because the PLT is always worked with WS facing.
Step 3: Diamond
Joining Note: There is no joining on this part, because the Diamond does not touch strip 1 at all.
Row 1 With RS facing, join Softfun Denim No. 506 in final sc of first triangle of Bow Tie from Step 2, sc in same st, (ch1, sc) 9 times evenly across using photo as a guide, ch1, sc in center sp of House shape from Step 1, (ch1, sc) 9 times evenly across, ch1, sc in final sc of second triangle on Bow Tie from Step 2, turn. [21 sc, 20 ch]
Rows 2-21 (Ch1, sc in next sp) up to final sp before center st, ch1, sc2tog as follows: (Insert hook in next sp, yoh, pull up loop) 2 times, yoh, draw yarn through all 3 lps – sc2tog made, (ch1, sc in next sp) to end, placing final sc in last sp. On Row 21, work sc in ch-sp, cut yarn, and finish off. [1 sc]
Step 4: Bow Tie
First triangle of Bow Tie
Joining Note: There is no joining on this part, because the first triangle does not touch strip 1 at all.
Row 1 With RS facing, join Softfun No. 2650 with ss in final sc of first triangle on Bow Tie from Step 2, sc in same sp, (ch1, sc) 10 times evenly across placing final sc in final sc of Diamond from Step 3, turn. [11 sc, 10 sp]
Row 2 (Ch1, sc in next sp) 10 times, turn. [10 sc, 10 sp]
Row 3 (Sc in next sp, ch1) 9 times, sc in final sp, turn. [10 sc, 9 sp]
Rows 4-21 Rep Rows 2 and 3. Cut yarn after row 21. [1 sc]
Second triangle of Bow Tie
Joining Note: If you are Joining as-you-go, then before you work all odd-numbered rows, be sure and work the PLT Join maneuver.
Rows 1-21 With WS facing, join Softfun Aruarel No. 804 with ss in final sc of second triangle on Bow Tie from Step 2, and work as for first triangle. Weave all ends.
Step 5: Arrow A, Tail pointing left
Joining Note: Be sure to work PLT Join before each WS row, unless you are making all your strips up and then sewing them together..
Row 1 With WS facing, join Softfun No. 2617 in final sc of second triangle on Bow Tie from Step 4, (sc, ch1, sc) in same st, (ch1, sc) 9 times evenly across to just before center, ch1, sc in final sc of Diamond from Step 3, (ch1, sc) 9 times evenly across to just before end, ch1, (sc, ch1, sc) in final st of first triangle on Bow Tie from Step 4, turn. [21 sc, 20 ch]
Row 2 (Sc, ch1, sc) in first sp, (ch1, sc in next sp) 9 times, ch1, sc2tog over the next 2 sps, (ch1, sc in next sp) 9 times, ch1, (sc, ch1, sc) in final sp, turn. [21 sc, 21 ch, 1 sc2tog]
Rows 4-20 Rep Row 2.
Row 21 (Sc, ch1, sc) in first sp, (ch1, sc in next sp) 9 times, ch1, sc2tog over next 2 sps, (ch1, sc in next sp) across to end, turn. [21 sc, 21 sp, 1 sc2tog]
Row 22 (Ch1, sc in next sp) across to ch-sp just before sc2tog, ch1, sc2tog over next 2 sps, (ch1, sc in next sp) 9 times, (sc, ch1, sc) in final sp, turn. [20 sc, 21 sp, 1 sc2tog]
Rows 23-40 Rep Rows 21 and 22, using chart as a guide. [11 sc, 12 sp, 1 sc2tog]
Row 41 (Sc, ch1, sc) in first sp, (ch1, sc in next sp) 9 times, ch1, sc2tog, cut yarn and weave ends. [11 sc, 11 sp, 1 sc2tog]
Step 6: Large Triangle, Tail pointing right
Joining Note: There is no PLT joining on this shape, because it does not touch the completed strip.
Row 1 With RS facing, join Softfun Denim No. 505 with ss in final sc of Row 21 on Arrow A from Step 5, sc in same st, (ch1, sc) 20 times evenly across placing final sc in first sp on Row 41 of Arrow A, turn. [21 sc, 20 sp]
Row 2 (Ch1, sc in next sp) across to end, turn. [20 sc, 20 sp]
Row 3 (Sc in next sp, ch1) across to final sp, sc in final sp, turn. [20 sc, 19 sp]
Rows 4-41 Rep Rows 2 and 3, cutting yarn after Row 41. [1 sc]
Step 7: Trapezoid B, Tail pointing left
This Trapezoid B in the photo is worked after a Trapezoid A, but the concept is the same.
Joining Note: Be sure to work PLT Join before every WS row, unless you are making all your strips up and then sewing them together. .
Row 1 With WS facing, join Softfun No. 2617 with ss in first sp of Row 41 of Arrow A from Step 5, sc in same sp, (ch1, sc) 20 times evenly across placing final sc in last st of Large Triangle from Step 6, turn. [21 sc, 20 sp]
Rows 2-20 Work exactly as for Large Triangle from Step 6 stopping after Row 20, cut yarn and weave all ends. [11 sc, 11 sp]
Step 8: Bow Tie
First triangle of Bow Tie
Joining Note: There is no joining on this shape as it does not touch the completed strip.
Row 1 With RS facing, join Softfun No. 2426 with ss in final sc of Large Triangle from Step 6, sc in same st, (ch1, sc) 10 times evenly across placing final sc in first sp of Row 20 on Trapezoid B from Step 7, turn. [11 sc, 10 sp]
Rows 2–21 Work as for First Triangle of Bow Tie as normal.
Second triangle of Bow Tie
Joining Note: Be sure to make the PLT Join maneuver before each WS row, unless you are making all your strips up and then sewing them together.
Row 1 With WS facing, join Softfun No. 2623 with ss in first sp of Row 20 of Trapezoid B from Step 7, sc in same sp, (ch1, sc in next sp) 10 times, turn. [11 sc, 10 sp]
Rows 2-21 Work as for Second Triangle of Bow Tie as normal.
Step 9: Diamond
Joining Note: There is no joining on this part, because the Diamond does not touch the completed strip.
Row 1 With RS facing, join Softfun Denim No. 510 in final sc of first triangle of Bow Tie from Step 8, sc in same st, (ch1, sc) 9 times evenly across using photo as a guide, ch1, sc in center st of Trapezoid B from Step 7, (ch1, sc) 9 times evenly across, ch1, sc in final sc of second triangle on Bow Tie from Step 8, turn. [21 sc, 20 ch]
Rows 2-21 (Ch1, sc in next sp) up to final sp before center st, ch1, sc2tog as follows: (Insert hook in next sp, yoh, pull up loop) 2 times, yoh, draw yarn through all 3 lps – sc2tog made, (ch1, sc in next sp) to end, placing final sc in last sp. On Row 21, work sc in ch-sp, cut yarn, and finish off. [1 sc]
Step 10: Bow Tie
First triangle of Bow Tie
Joining Note: There is no joining on this shape as it does not touch the completed strip.
Row 1 With RS facing, join Softfun Denim No. 505 with ss in final sc of First Triangle on Bow Tie from Step 8, sc in same st, (ch1, sc) 10 times evenly across placing final sc in final st of Diamond from Step 9, turn. [11 sc, 10 sp]
Rows 2–21 Work as for First Triangle of Bow Tie as normal.
Second triangle of Bow Tie
Joining Note: Be sure to make the PLT Join maneuver before each WS row, unless you are making all your strips up and then sewing them together.
Row 1 With WS facing, join Softfun No. 2492 with ss in final sc of Second Triangle on Bow Tie from Step 8, sc in same st, (ch1, sc) 10 times evenly across placing final sc in final st of Diamond from Step 9, turn. [11 sc, 10 sp]
Rows 2-21 Work as for Second Triangle of Bow Tie as normal.
Step 11: Trapezoid A, Tail pointing left
Joining Note: If you are joining strips as-you-go, be sure to work the PLT Join maneuver before each WS row.
Row 1 With WS facing, join Softfun Denim No. 506 with ss in final st of second triangle on Bow Tie from Step 7, (sc, ch1, sc) in same st, (ch1, sc) 9 times evenly across, ch1, sc in center sp of Trapezoid from Step 6, (ch1, sc) 10 times evenly across placing final sc in final st of first triangle of Bow Tie, turn. [22 sc, 21 sp]
Row 2 (Ch1, sc in next sp) 9 times, sc2tog as follows: (Insert hook in next sp, yoh, pull up loop) 2 times, yoh, draw yarn through all 3 lps – sc2tog made, (ch1, sc in next sp) 9 times, ch1, (sc, ch1, sc) in final sp, turn. [20 sc, 20 sp, 1 sc2tog]
Row 3 (Sc, ch1, sc) in first sp, (ch1, sc in next sp) 9 times, ch1, sc2tog, (ch1, sc in next sp) across to end, placing final sc in final sp, turn. [20 sc, 20 sp, 1 sc2tog]
Row 4 (Ch1, sc in next sp) across to within 1 sp of sc2tog, sc2tog across next 2 sps, (ch1, sc in next sp) 9 times, ch1, (sc, ch1, sc) in final sp, turn. [19 sc, 20 sp, 1 sc2tog]
Rows 5-20 Rep Rows 3 and 4, using chart as a guide when needed. [11 sc, 12 sp, 1 sc2tog]
Row 21 (Sc, ch1, sc) in first sp, (ch1, sc in next sp) 10 times, ch1, join with ss to sc2tog of Row 20, cut yarn and weave ends. [11 sc, 11 sp, 1 sc2tog]
Step 12: Large Triangle, Tail pointing right
Joining Note: There is no PLT joining on this shape, because it does not touch the completed strip.
Row 1 With RS facing, join Softfun No. 2492 with ss in final sc of Row 21 on Arrow A from Step 5, sc in same st, (ch1, sc) 20 times evenly across placing final sc in first sp on Row 41 of Arrow A, turn. [21 sc, 20 sp]
Row 2 (Ch1, sc in next sp) across to end, turn. [20 sc, 20 sp]
Row 3 (Sc in next sp, ch1) across to final sp, sc in final sp, turn. [20 sc, 19 sp]
Rows 4-41 Rep Rows 2 and 3, cutting yarn after Row 41. [1 sc]
Step 13: Parallelogram, Tail pointing right
Joining Note: If you are Joining as-you-go, then before you work all WS rows, be sure and work the PLT Join maneuver as shown in the photos below.
Row 1 With WS facing, join Softfun Denim No. 510 in the first sp of Row 21 of Trapezoid A from Step 7, sc in same sp, (ch1, sc in next sp) 19 times evenly across, ch1, (sc, ch1, sc) in final sc of Large Triangle, turn. [22 sc, 21 sp]
Row 2 (Sc, ch1, sc) in first sp, (ch1, sc in next sp) 20 times, turn. [22 sc, 21 sp]
Row 3 (Sc in next sp, ch1) across to final sp, (sc, ch1, sc) in final sp, turn. [22 sc, 21 sp]
Row 4-21 Rep Rows 2 and 3 for pattern, cut yarn and weave ends. [22 sc, 21 sp]
Step 14: Fill Triangle A, Tail pointing left
Joining Note: PLT Join before each WS row.
Row 1 With WS facing, join Softfun No. 2623 in the first sp, sc in same sp, (ch1, sc) 20 times evenly across, turn. [21 sc, 20 sp]
Row 2-21 Sc in first sp, (ch1, sc in next sp) across, turn. Work until 1 sc remains, cut yarn and weave ends.
Strip 2 is complete! Do a happy dance!
Strip 3
Note: If you are working the blanket join-as-you-go, then this strip is joined onto Strip 2 at the left hand edge as per the instructions. Notes will be given if you’d like to work all of the strips separately and then sew them together.
Step 1: Base Triangle
Joining note: there is no joining on this shape because it doesn’t touch the completed strip.
Row 1WS Using Softfun Denim No. 516, MR, (sc, ch1) 3 times, sc, turn. [4 sc, 3 sp] (Mark this row as the WS – this pattern is reversible and tough to tell which side is which.)
Row 2 (Sc, ch1, sc) in first sp, * ch1, (sc, ch1, sc) in next sp, rep from * 1 time, turn. [6 sc, 5 sp]
Rows 3-10 (Sc, ch1, sc) in first sp, (ch1, sc in next sp) across to center sp, ch1, (sc, ch1, sc) in center sp, (ch1, sc in next sp) across to final sp, ch1, (sc, ch1, sc) in final sp, turn. Cut yarn after Row 10. [22 sc, 21 sp]
Step 2: Bow Tie
First triangle of Bow Tie
Joining Note: There is no joining on this part, because the first triangle does not touch strip 2 at all.
Row 1 With RS facing, join Softfun No. 2426 with ss in first sp, sc in same sp, (ch1, sc in next sp) 10 times, turn. [11 sc, 10 sp]
Row 2 (Ch1, sc in next sp) 10 times, turn. [10 sc, 10 sp]
Row 3 (Sc in next sp, ch1) 9 times, sc in final sp, turn. [10 sc, 9 sp]
Rows 4-21 Rep Rows 2 and 3. Cut yarn after row 21. [1 sc]
Second triangle of Bow Tie
Joining Note: If you are Joining as-you-go, then before you work all WS rows, be sure and work the PLT Join maneuver.
Rows 1-21 With WS facing and Softfun Aquarel No. 804, work as for first triangle of Bow Tie. Weave all ends.
Step 3: Trapezoid A, Tail pointing left
Joining Note: If you are joining strips as-you-go, be sure to work the PLT Join maneuver before each WS row.
Row 1 With WS facing, join Softfun Denim No. 516 with ss in final st of second triangle on Bow Tie from Step 2, (sc, ch1, sc) in same st, (ch1, sc) 9 times evenly across, ch1, sc in center sp of Row 10 of Base Triangle from Step 1, (ch1, sc) 10 times evenly across placing final sc in final st of first triangle of Bow Tie from Step 2, turn. [22 sc, 21 sp]
Row 2 (Ch1, sc in next sp) 9 times, sc2tog as follows: (Insert hook in next sp, yoh, pull up loop) 2 times, yoh, draw yarn through all 3 lps – sc2tog made, (ch1, sc in next sp) 9 times, ch1, (sc, ch1, sc) in final sp, turn. [20 sc, 20 sp, 1 sc2tog]
Row 3 (Sc, ch1, sc) in first sp, (ch1, sc in next sp) 9 times, ch1, sc2tog, (ch1, sc in next sp) across to end, placing final sc in final sp, turn. [20 sc, 20 sp, 1 sc2tog]
Row 4 (Ch1, sc in next sp) across to within 1 sp of sc2tog, sc2tog across next 2 sps, (ch1, sc in next sp) 9 times, ch1, (sc, ch1, sc) in final sp, turn. [19 sc, 20 sp, 1 sc2tog]
Rows 5-20 Rep Rows 3 and 4, using chart as a guide when needed. [11 sc, 12 sp, 1 sc2tog]
Row 21 (Sc, ch1, sc) in first sp, (ch1, sc in next sp) 10 times, ch1, join with ss to sc2tog of Row 20, cut yarn and weave ends. [11 sc, 11 sp, 1 sc2tog]
Step 4: Large Triangle, Tail pointing right
Joining Note: There is no joining on this part, because the Large Triangle does not touch the completed strip.
Row 1 With RS facing, join Softfun Denim No. 506 with ss in final sc of first triangle of Bow Tie from Step 2, sc in same st, (ch1, sc) 20 times evenly across placing final sc in first sp on Row 21 of Trapezoid A from Step 3, turn. [21 sc, 20 sp]
Row 2 (Ch1, sc in next sp) across to end, turn. [20 sc, 20 sp]
Row 3 (Sc in next sp, ch1) across to final sp, sc in final sp, turn. [20 sc, 19 sp]
Rows 4-41 Rep Rows 2 and 3, cutting yarn after Row 41. [1 sc]
Step 5: Trapezoid B
Joining Note: Be sure to work PLT Join before every WS row, unless you are making all your strips up and then sewing them together.
Row 1 With WS facing, join Softfun No. 2651 with ss in first sp of Row 21 of Trapezoid A from Step 3, sc in same sp, (ch1, sc) 20 times evenly across placing final sc in last st of Large Triangle from Step 4, turn. [21 sc, 20 sp]
Rows 2-20 Work exactly as for Large Triangle stopping after Row 20, cut yarn and weave all ends. [11 sc, 11 sp]
Step 6: Bow Tie
First triangle of Bow Tie
Joining Note: There is no joining on this part, because the first triangle does not touch strip 2 at all.
Row 1 With RS facing, join Softfun No. 2634 with ss in final st of Large Triangle from Step 4, sc in same st, (ch1, sc) 10 times evenly across placing final sc in first sp of Row 20 on Trapezoid B from Step 5, turn. [11 sc, 10 sp]
Row 2 (Ch1, sc in next sp) 10 times, turn. [10 sc, 10 sp]
Row 3 (Sc in next sp, ch1) 9 times, sc in final sp, turn. [10 sc, 9 sp]
Rows 4-21 Rep Rows 2 and 3. Cut yarn after row 21. [1 sc]
Second triangle of Bow Tie
Joining Note: If you are Joining as-you-go, then before you work all WS rows, be sure and work the PLT Join maneuver.
Rows 1-21 With WS facing and Softfun No. 2634, work as for first triangle of Bow Tie. Weave all ends.
Step 7: Arrow A, Tail pointing left
Joining Note: Be sure to work PLT Join before each WS row, unless you are making all your strips up and then sewing them together..
Row 1 With WS facing, join Softun No. 2651 in final sc of second triangle on Bow Tie from Step 6, (sc, ch1, sc) in same st, (ch1, sc) 9 times evenly across to just before center, ch1, sc in first sp of row 20 on Trapezoid B from Step 5, (ch1, sc) 9 times evenly across to just before end, ch1, (sc, ch1, sc) in final st of first triangle on Bow Tie from Step 6, turn. [21 sc, 20 ch]
Row 2 (Sc, ch1, sc) in first sp, (ch1, sc in next sp) 9 times, ch1, sc2tog over the next 2 sps, (ch1, sc in next sp) 9 times, ch1, (sc, ch1, sc) in final sp, turn. [21 sc, 21 ch, 1 sc2tog]
Rows 4-20 Rep Row 2.
Row 21 (Sc, ch1, sc) in first sp, (ch1, sc in next sp) 9 times, ch1, sc2tog over next 2 sps, (ch1, sc in next sp) across to end, turn. [21 sc, 21 sp, 1 sc2tog]
Row 22 (Ch1, sc in next sp) across to ch-sp just before sc2tog, ch1, sc2tog over next 2 sps, (ch1, sc in next sp) 9 times, (sc, ch1, sc) in final sp, turn. [20 sc, 21 sp, 1 sc2tog]
Rows 23-40 Rep Rows 21 and 22, using chart as a guide. [11 sc, 12 sp, 1 sc2tog]
Row 41 (Sc, ch1, sc) in first sp, (ch1, sc in next sp) 9 times, ch1, sc2tog, cut yarn and weave ends. [11 sc, 11 sp, 1 sc2tog]
Step 8: Trapezoid B, Tail pointing right
Joining Note: There is no joining on this shape because it doesn’t touch the completed strip.
Row 1 With RS facing, join Softfun No. 2650 with ss in final st of Row 21 of Arrow A from Step 7, sc in same st, (ch1, sc) 20 times evenly across placing final sc in first sp of Row 41 of Arrow A from Step 7, turn. [21 sc, 20 sp]
Rows 2-20 Work exactly as for Large Triangle stopping after Row 20, cut yarn and weave all ends. [11 sc, 11 sp]
Step 9: Bow Tie
Note: this bow tie is worked after a diamond shape, but the idea is the same.
First triangle of Bow Tie
Joining Note: There is no joining on this shape as it does not touch the completed strip.
Row 1 With RS facing, join Softfun Denim No. 505 with ss in final sc of Trapezoid B from Step 9, sc in same st, (ch1, sc) 10 times evenly across placing final sc in first sp of Row 20 on Trapezoid B from Step 9, turn. [11 sc, 10 sp]
Rows 2–21 Work as for First Triangle of Bow Tie as normal.
Second triangle of Bow Tie
Joining Note: Be sure to make the PLT Join maneuver before each WS row, unless you are making all your strips up and then sewing them together.
Rows 1-21 With WS facing and Softfun Denim No. 510, work as for first triangle of Bow Tie. Weave all ends.
Step 10: Diamond
Joining Note: There is no joining on this part, because the Diamond does not touch the completed strip.
Row 1 With RS facing, join Softfun No. 2650 in final sc of first triangle of Bow Tie from Step 9, sc in same st, (ch1, sc) 9 times evenly across using photo as a guide, ch1, sc in center st of Trapezoid B from Step 8, (ch1, sc) 9 times evenly across, ch1, sc in final sc of second triangle on Bow Tie from Step 9, turn. [21 sc, 20 ch]
Rows 2-21 (Ch1, sc in next sp) up to final sp before center st, ch1, sc2tog as follows: (Insert hook in next sp, yoh, pull up loop) 2 times, yoh, draw yarn through all 3 lps – sc2tog made, (ch1, sc in next sp) to end, placing final sc in last sp. On Row 21, work sc in ch-sp, cut yarn, and finish off. [1 sc]
Step 11: Bow Tie
First triangle of Bow Tie
Joining Note: There is no joining on this shape as it does not touch the completed strip.
Row 1 With RS facing, join Softfun Aquarel No. 804 with ss in final sc of First Triangle on Bow Tie from Step 9, sc in same st, (ch1, sc) 10 times evenly across placing final sc in final st of Diamond from Step 10, turn. [11 sc, 10 sp]
Rows 2–21 Work as for First Triangle of Bow Tie as normal.
Second triangle of Bow Tie
Joining Note: Be sure to make the PLT Join maneuver before each WS row, unless you are making all your strips up and then sewing them together.
Row 1 With WS facing, join Softfun No. 2623 with ss in final sc of Second Triangle on Bow Tie from Step 9, sc in same st, (ch1, sc) 10 times evenly across placing final sc in final st of Diamond from Step 10, turn. [11 sc, 10 sp]
Rows 2-21 Work as for Second Triangle of Bow Tie as normal.
Step 12: Trapezoid A, Tail pointing right
Joining Note: No joining on this shape.
Row 1 With RS facing, join Softfun denim 510 with ss in first sp, (sc, ch1, sc) in same sp, (ch1, sc) 9 times evenly using above photo as a guide, ch1, sc in center sp of Row 10 of Base Triangle, (ch1, sc) 9 times evenly using above photo as a guide, ch1, sc in final sp, turn. [22 sc, 21 sp]
Row 2 (Ch1, sc in next sp) 9 times, sc2tog as follows: (Insert hook in next sp, yoh, pull up loop) 2 times, yoh, draw yarn through all 3 lps – sc2tog made, (ch1, sc in next sp) 9 times, ch1, (sc, ch1, sc) in final sp, turn. [20 sc, 20 sp, 1 sc2tog]
Row 3 (Sc, ch1, sc) in first sp, (ch1, sc in next sp) 9 times, ch1, sc2tog, (ch1, sc in next sp) across to end, placing final sc in final sp, turn. [20 sc, 20 sp, 1 sc2tog]
Row 4 (Ch1, sc in next sp) across to within 1 sp of sc2tog, sc2tog across next 2 sps, (ch1, sc in next sp) 9 times, ch1, (sc, ch1, sc) in final sp, turn. [19 sc, 20 sp, 1 sc2tog]
Rows 5-20 Rep Rows 3 and 4, using chart as a guide when needed. [11 sc, 12 sp, 1 sc2tog]
Row 21 (Sc, ch1, sc) in first sp, (ch1, sc in next sp) 10 times, ch1, join with ss to sc2tog of Row 20, cut yarn and weave ends. [11 sc, 11 sp, 1 sc2tog]
Step 13: Arrow B, Tail pointing left
Note: The construction of this shape in the photo is slightly different, but the resulting shape is the same. Use the written and chart instructions.
Note: The Arrow B above was created with slightly different construction. General shape is correct. Follow chart and written instruction. Arrow B is made by working a Parallelogram and then a Trapezoid B.
Joining Note: Work PLT Join before each WS row unless sewing.
Row 1 With WS facing, join Softfun No. 2623 in the first st of Trapezoid, sc in same st, (ch1, sc in next sp) 19 times evenly across, ch1, (sc, ch1, sc) in final sp of trapezoid, turn. [22 sc, 21 sp]
Row 2 (Sc, ch1, sc) in first sp, (ch1, sc in next sp) 20 times, turn. [22 sc, 21 sp]
Row 3 (Sc in next sp, ch1) across to final sp, (sc, ch1, sc) in final sp, turn. [22 sc, 21 sp]
Row 4-21 Rep Rows 2 and 3 for pattern. [22 sc, 21 sp]
Row 22 Sc in first sp, (ch1, sc) 20 times evenly across placing final sc in last sp, turn. [21 sc, 20 sp]
Rows 23-41 Work exactly as for Large Triangle stopping after Row 20, cut yarn and weave all ends. [11 sc, 11 sp]
Step 14: Bow Tie
First triangle of Bow Tie
Joining Note: There is no joining on this part, because the first triangle does not touch strip 1 at all.
Rows 1-21 With RS facing, join Softfun No. 2492 with ss in first sp, work as for previous Bow Tie.
Second triangle of Bow Tie
Joining Note: Work PLT Join before each WS row unless sewing.
Rows 1-21 With WS facing and Softfun Aquarel No. 804, work as for first triangle of Bow Tie. Weave all ends.
Step 15: Fill Triangle B
Joining Note: There is no joining on this shape because it doesn’t touch the completed strip.
Row 1 With RS facing, join Softfun Denim No. 510 with ss in final st of first triangle of Bow Tie from step 11, sc in same st, (ch1, sc) 9 times evenly across, ch1, sc in final st of Diamond from step 10, (ch1, sc) 10 times evenly across placing final sc in final st of second triangle on Bow Tie from step 11, turn [21 sc, 20 sp]
Row 2-9 (Sc in next sp, ch1) across to just sp just before center st, sc2tog over next 2 sps, (ch1, sc in next sp) to end, turn. [4 sc, 4 sp, 1 sc2tog]
Row 10 Sc in sp, ch1, sc2tog over next 2 sps, ch1, sc in final sp, turn. [2 sc, 2 sp, 1 sc2tog]
Row 11 Sc2tog over 2 sps, cut yarn and weave ends.
Strip 3 is finished!! Woohoo! Give yourself a fist bump!
I can’t wait to share more with you, but for now, Part 2 is finished!
Hello, crafter! Welcome to the third free pattern of my five-blanket Linen Stitch series. LissMiss is a pattern I have picked up and set down many times since 2013. Check out the WIP post for tons of background info, including the knitted inspiration, and lots of photos.
Here are the first two blankets in my Linen Stitch Blanket Series
Find this pattern in a condensed ad-free PDF for a small fee in my Etsy Shop and on Ravelry. Coloring pages for layouts are also included.
Social Media Sharing
Use this hashtag to keep all of the LissMiss Blankets progress photos together.
#LissMissBlanket
LissMiss Blanket Crochet Pattern
Blanket Details
The LissMiss Blanket name comes from “Linen Stitch Mitered Square (LSMS).” The way that the bright crisp white Cahlista interacts with the artsy and mottled River Washed XL is really a sight to behold. The River Washed XL has a slight halo, and the smooth white cotton really contrasts that in a lovely way. The resulting blanket is opulent and so visually appealing. It will be perfect in any room!
Blanket measures about 52x52in square
Yarn is Scheepjes River Washed XL and Cahlista
Hook size: 5mm hook and size 4mm for the final 2 rounds of the blanket border
Yarn Information
I used 1 x 50g ball each of the 22 colors of Scheepjes River Washed, and 14 balls of Scheepjes Cahlista.
Shop Scheepjes River Washed XL
I used 1 ball of each color – 22 colors at the time of this project. All of these links are affiliate links. You can shop through them to help support CypressTextiles at no additional cost to you, or find a Scheepjes Retailer nearby.
Here are some ideas for yarn subs. The amounts will be up to you to discover, but I think they will all look great!
Thicker yarn and larger hook will result in a larger blanket.
Stone Washed XL will also work for this blanket and it would be lovely!
Sub in another color of Cahlista for a different look.
To use only Scheepjes Cahlista for the whole blanket, I recommend going down to a size G 4.2mm hook for this project. Then for the final 2 border rounds, go down to an F 3.75mm.
To use Scheepjes Stone Washed / River Washed original weight and Scheepjes Catona, I think it might work! Obviously, more squares will need to be made to achieve the same size blanket since these yarns are thinner. I would try a 3.5mm hook.
Stitch Guide (US Terms)
Note: This pattern is only in US Terms, but there is only 1 stitch used in the blanket body: single crochet, so if you are used to reading UK Terms, please know that you are using UK dc for this entire project. (US) sc = (UK) dc
In the blanket border, I use (US) dc = (UK) tr
beg dc (sc, ch1) – counts as 1 dc
chN chain N number of times
dc double crochet
MR make ring: slip knot, ch3, ss in third ch from hook
PLT Join “Pull Loop Through” join (See more info within pattern)
Rep repeat
Rnd round
RS right side
sc single crochet
sk skip
sp space (chain space)
ss slip stitch
st stitch
WS wrong side
yoh yarn over hook
Instructions
LissMiss is worked by making 1 mitered square, and then working 3 more off of it to make a 4-patch of mitered squares. At this point you have an option of making the mitered square groups individually and then sewing them together with an invisible seam like Mattress Stitch for example, or you can do as I do and work the entire blanket as a no-sew project. I will include those instructions.
Use 5mm hook for blanket body and first 2 rounds of blanket border. Use 4mm hook for final 2 rounds of blanket border.
Choosing a Construction Method
Should you join-as-you-go, or should you sew the separate strips together?
Join-as-you-go: Make square complete, and then join all subsequent squares as you go following instructions.
Love a no-sew project? This method is for you!
Want to learn my popular PLT Join method? Choose this method!
Invisible Seam: Work all square groups complete (separately) as instructed, and then sew them together when you’re done.
Want to take your project on the go? Choose this method!
Don’t mind a bit of sewing? This method is for you!
Schematics
LissMiss Layout
LissMiss Larger Layout (Just a suggestion for how to resize)
Square No. 1
Here is the back of the square. This pattern is completely reversible, but you can tell the front side by the ridge of the first chain edge. Look at the square from the back side to see how the beginning chain edge is different here. You may mark the front side if desired.
Row 1 Using River Washed XL, ch73, sc in third ch from hook, (ch1, sk 1 ch, sc) 16 times, ch1, sk 1 ch, decrease as follows: insert hook in next ch, yoh, pull up lp, sk 1 ch, insert hook in next ch, yoh, pull up lp, yoh, draw yarn through all 3 lps on hook, (ch1, sk 1 ch, sc) 17 times, turn. [34 sc, 34 sp, 1 decrease]
Row 2 (Ch1, sc in next ch-sp) until ch-sp before decrease is reached, sc2tog as follows: insert hook in ch-sp before decrease, yoh, pull up lp, insert hook in next ch-sp after decrease, yoh, pull up lp, yoh, draw yarn through all 3 lps on hook, (ch1, sc in next ch-sp) across to end, turn.
Rows 3-6 Repeat Row 2. On Row 6, stop at the final step of the last sc, so you can change color, and cut yarn. (Note: I swapped for a new square, so it’s suddenly turquoise!) Draw Cahlista through to finish the last sc of this row.
Rows 7-12 Repeat Row 2. At the end of Row 12, change back to a new color of River Washed XL as before, and cut Cahlista.
Rows 13-34 Repeat Row 2, changing to Cahlista at the end of Row 18 and back to a new color of River Washed XL at the end of Row 24. Note: The square will be finished using this color of River Washed XL.
Row 35 Sc2tog over 2 ch-sps, cut yarn and weave all ends.
Square No. 2
Row 1 Join River Washed XL with ss in corner sp, ch37, sc in third ch from hook, (ch1, sk 1 ch, sc) 16 times, ch1, sk 1 ch, decrease as follows: insert hook in next ch, yoh, pull up lp, insert hook in first ch-sp on completed Square, yoh, pull up lp, yoh, draw yarn through all 3 lps on hook, (ch1, sk 1 ch, sc) 17 times, turn. [34 sc, 34 sp, 1 decrease]
Rows 2-35 Work as for Row 2 on first square.
Here are Square No. 1 and 2, RS facing. Square No. 1 is on bottom.
Square No. 3
Rows 1-35 Work as for Square No. 2.
Close-up!
Square No. 4
Row 1 Join River Washed XL with ss in first ch-sp on Square No. 1, ch2, sc in same sp, (ch1, sk 1 ch, sc) 16 times, ch1, sk 1 ch, decrease as follows: insert hook in next ch-sp, yoh, pull up lp, insert hook in first ch-sp on Square No. 3, yoh, pull up lp, yoh, draw yarn through all 3 lps on hook, (ch1, sk 1 ch, sc) 17 times, turn.
Rows 2-35 Work as for Square No. 1.
Sewing Pieces with Invisible Seam
At this point, if you want to sew your pieces with an invisible seam at the end, you have all the instructions that you need to complete your blanket body.
Follow the schematic below. Make 4 total 4-patches like you just made. These go in the center of the blanket body. Make 8 groups of only 2 squares (Square No. 1 and 2 in the instructions), and arrange them around the edges as shown. Make 4 of just Square No. 1 and sew them in at the corners. If you like, you can sew the pieces in rows and columns. However you prefer!
No-Sew Instructions
If you want to make your blanket without any sewing, I took lots more photos to show how that’s done. To make the squares, you have all the instructions you need, but you will need to join to adjacent completed squares with my PLT (Pull Loop Through) Join.
I drew up this schematic to show what order the squares will be made in if you are joining as you go. The amazing thing is, the blanket is NO-SEW! The hard part is, it grows as you go, so it’s tough to carry around toward the end.
LissMiss Layout with Squares Numbered in Order of Construction
Square No. 5
Row 1 Ch73, PLT Join as follows: release the lp from the hook, insert the hook front to back through the final sc of Row 1 of Square No. 4, grab lp, Pull Loop Through – PLT Join complete, ch1, sc in fourth ch from hook and work across as for previous squares. Count and make sure you have 34 sc total.
Rows 2-6 Work as for previous squares, making PLT Join to Square No. 4 before every WS Row. At the end of Row 6, stop after final step of last sc as before. Cut River Washed XL and draw Cahlista through to complete final sc. Note: PLT Join is always worked into the final sc stitch of the adjacent row.
Row 7 PLT Join in the adjacent Cahlista row, and continue in pattern.
Square No. 6
Work as for Square No. 2, joining yarn in corner sp of Square No. 5 and then working as for previous squares, and joining with PLT Join to Square No. 3 before each RS Row. Remember to work your PLT in the sc st at the end of the adjacent row.
Square No. 7
Work as for Square No. 3. No PLT Join for this square.
Square No. 8
Work as for Square No. 4. No PLT Join for this square.
Squares No. 9-12
Work as for Squares No. 5-8. Now your blanket looks like the one below! Hopefully you’ve weaved in your ends though haha. I used Surgeon’s Knots – YouTube – and they do not come undone. You can weave them in or knot them – your choice.
Square No. 13
Note: This is the trickiest type of square because you need to PLT Join before every row. I made a little diagram to show what to for Row 1.
Row 1 Join River Washed XL with ss in the first ch-sp of Row 1 on Square No. 10, where the green dot is in the diagram below, ch73, PLT Join in the outside sc on Row 1 of Square No. 3, where the red dot is in the diagram below. Ch1, sc in fourth ch from hook and work across as for previous squares.
Rows 2-35 PLT Join in outside sc of adjacent row on completed square, and work across in pattern. Note: You will PLT Join before every row to join this square to both Square No. 3 and 10.
Square No. 14
Work as for Square No. 6.
Square No. 15
Work as for Square No. 7.
Square No. 16
Work as for Square 8, making PLT Join before each RS row to join across Square No. 11 as follows: Join River Washed XL with ss in first ch-sp on Square No. 13, ch2, PLT Join, sc in same ch-sp, and work across in pattern. Continue square, making PLT Join before every RS row.
I’m dropping the Numbered Schematic here again so you don’t have to scroll as far.
Square No. 17 and 18
Work as for Square No. 5 and 6
Square No. 19
Work as for Square No. 13
Square No. 20
Work as for Square No. 18.
Square No. 21-24, Square No. 25-28, and Square No. 29-32
Work as for Square No. 17-20.
Square No. 33-36
Work as for Square 13.
And you are done with the blanket body! Here are some more pics.
Border
At this point you can add any border. I worked up a small 4-round border.
Rnd 1 Join Cahlista with ss in upper right corner sp, * (sc, ch1, sc) in corner sp, (ch1, sc in next ch-sp) across to next corner, ch1, rep from * 3 times, ss in first sc.
Rnd 2 * (Sc, ch1, sc) in corner sp, ch1, sc in next ch-sp) across to next corner, ch1, rep from * 3 times, ss in first sc.
Switch to smaller hook (4mm).
Rnd 3 Beg dc in corner sp (see Stitch Guide), (ch3, 2dc in same sp, 2dc in all ch-sps across to next corner, 2dc in corner sp) 4 times omitting final dc, ss in beg dc.
Rnd 4 (3sc in corner sp, sc in all sts across to next corner) 4 times, ss in first sc, cut yarn and finish off.
Hope you enjoyed this one! I had a goofy grin on my face the whole time I was working on it!
Hello, beautiful crafter! Remember when I released the Equinox Square as part of the Friends Around the World CAL? Well I have another square in the CAL, and it releases today! Meet the Runway Square.
The Runway Square is perfect for when you need a lacy motif that is not too delicate. There is a lot of integrity in the square, and yet it retains that open look. To create something engaging and still simple, I have kept the more complex portions at the center of the square, and the outer rounds can be worked while watching your favorite show.
Here is Runway with her sister Equinox – I enjoyed designing these FATW5 squares so much!
Check them out in full color!
Details and Materials
Notions & Sizing
US Size 5mm hook, Tapestry needle for weaving ends
Measurements Motif measures 12in
Yarn is Scheepjes Cahlista – you will need 2 balls
Order Scheepjes Cahlista
Order from these affiliate links to support CypressTextiles at no additional cost to you, or head to the Scheepjes website to find a retailer near you!
2dccl (yoh, insert hook in st/sp indicated, yoh, pull up lp, yoh, draw yarn through 2 lps on hook) 2 times, yoh, draw yarn through all 3 lps
dc3tog (yoh, insert hook in next st/sp, yoh, pull up lp, yoh, draw yarn through 2 lps on hook) 3 times, yoh, draw yarn through all 4 lps
ch chain
cl cluster
beg beginning
beg dc (sc, ch 1) – counts as 1 dc
dc double crochet
lp(s) loop(s)
MR make ring: ch3, ss in third ch from hook
rep repeat
RS/WS right side/wrong side of work
sc single crochet
sk skip
sp space
ss slip stitch
st(s) stitch(es)
yoh yarn over hook
Video
Here is the video for this square! Video by Tania Leis
Instructions
I will add in step by step pics as I create them.
Rnd 1 MR, beg dc, (2dc, ch5, dc) 4 times omitting final dc, ss in beg dc. [12 dc, 4 sp]
Rnd 2 Sc in next st, * ch3, (3dc, ch3, 3dc) in ch-sp, ch3, sk1, sc, rep from * 3 times omitting final sc, ss in first sc. [24 dc, 4 sc, 12 sp]
Rnd 3 Ss in first 2 chs, sc in same ch-sp, (sc in 3 sts, 5sc in next ch-sp, sc in 3 sts, sc in next ch-sp, ch5, sc in next ch-sp) 4 times omitting final sc, ss in first sc. [52 sc, 4 sp]
Rnd 4 Sc in next st, * ch3, sk2, 3dc in next st, (sk1, 3dc in next st) 2 times, ch3, sk2, sc, ch5, sk 2 sc, sc in next st, rep from * 3 times omitting final sc, ss in first sc. [36 dc, 8 sc, 12 sp]
Rnd 5 Ss in first 2 chs, sc in same ch-sp, * (ch3, dc3tog over next 3 sts) 3 times, ch3, sc in next ch-sp, ch3, sc around both ch-5 sps from Rounds 3 and 4 – treating them as 1, ch3, sc in next ch-sp, rep from * 3 times omitting final sc, ss in first sc. [12 dc3tog, 12 sc, 24 sp]
Rnd 6 3sc in first ch-sp * (2hdc, 3dc) in next sp, ch3, (3dc, 2hdc) in next sp, 3sc in next sp, 3dc in next sp, fpdc around sc from previous Rnd, 3dc in next sp, 3sc in next sp, rep from * 3 times omitting final 3sc, ss in first sc. [4 fpdc, 48 dc, 16 hdc, 24 sc, 4 sp]
Rnd 7 Ss in next st, beg dc, * (ch1, sk1, dc) 2 times, ch1, sk1, (2dc, ch3, 2dc) in corner ch-sp, (ch1, sk1, dc) 9 times, rep from * 3 times omitting final dc, ss in beg dc. [60 dc, 52 sp]
Rnd 8 Ss in first ch, (beg dc, dc) in next st – counts as 1 2dccl, * (ch1, 2dccl in next dc) 2 times, ch1, (2dccl in corner ch-sp, ch1) 4 times, ch1, sk1, 2dccl, (ch1, 2dccl in next dc) 10 times, rep from * 3 times omitting final 2dccl, ss in first full dc. [68 2dccl, 68 sp]
Rnds 9 and 10 (Sc in next ch-sp, ch3) around entire square. [68 sc, 68 sp]
Rnd 11 * (Sc in next ch-sp, ch3) 4 times, sc in same ch-sp, (ch3, sc in next ch-sp) 13 times, ch3, rep from * 3 times, ss in first sc. [72 sc, 72 sp]
Rnd 12 (2sc in next 3 ch-sps, 5sc in corner ch-sp, 2sc in next 14 ch-sps) 4 times, ss in first sc, cut yarn and finish off. [156 sc]
Optional Round 13 to obtain size can be worked in sc, hdc or dc:
OPTIONAL Rnd 13 *sc in next 8sc, 5sc in corner sc, sc in next 30sc* rep from * 4 times, ss in first sc, cut yarn and finish off. [172 sc]
Stitch Guide (UK Terms)
Scroll up for US Terms.
2trcl (yoh, insert hook in st/sp indicated, yoh, pull up lp, yoh, draw yarn through 2 lps on hook) 2 times, yoh, draw yarn through all 3 lps
tr3tog (yoh, insert hook in next st/sp, yoh, pull up lp, yoh, draw yarn through 2 lps on hook) 3 times, yoh, draw yarn through all 4 lps
ch chain
cl cluster
beg beginning
beg tr (dc, ch 1) – counts as 1 tr
tr treble crochet
lp(s) loop(s)
MR make ring: ch3, ss in third ch from hook
rep repeat
RS/WS right side/wrong side of work
dc double crochet
sp space
ss slip stitch
st(s) stitch(es)
yoh yarn over hook
Instructions
I will add in step by step pics as I create them.
Rnd 1 MR, beg tr, (2tr, ch5, tr) 4 times omitting final tr, ss in beg tr. [12 tr, 4 sp]
Rnd 2 Dc in next st, * ch3, (3tr, ch3, 3tr) in ch-sp, ch3, miss 1 st, dc, rep from * 3 times omitting final dc, ss in first dc. [24 tr, 4 dc, 12 sp]
Rnd 3 Ss in first 2 chs, dc in same ch-sp, (dc in 3 sts, 5dc in next ch-sp, dc in 3 sts, dc in next ch-sp, ch5, dc in next ch-sp) 4 times omitting final dc, ss in first dc. [52 dc, 4 sp]
Rnd 4 Dc in next st, * ch3, miss 2 sts, 3tr in next st, (miss 1 st, 3tr in next st) 2 times, ch3, miss 2 sts, dc, ch5, miss 2 dc, dc in next st, rep from * 3 times omitting final dc, ss in first dc. [36 tr, 8 dc, 12 sp]
Rnd 5 Ss in first 2 chs, dc in same ch-sp, * (ch3, tr3tog over next 3 sts) 3 times, ch3, dc in next ch-sp, ch3, dc around both ch-5 sps from Rounds 3 and 4 – treating them as 1, ch3, dc in next ch-sp, rep from * 3 times omitting final dc, ss in first dc. [12 tr3tog, 12 dc, 24 sp]
Rnd 6 3dc in first ch-sp * (2htr, 3tr) in next sp, ch3, (3tr, 2htr) in next sp, 3dc in next sp, 3tr in next sp, fptr around dc from previous Rnd, 3tr in next sp, 3dc in next sp, rep from * 3 times omitting final 3dc, ss in first dc. [4 fptr, 48 tr, 16 htr, 24 dc, 4 sp]
Rnd 7 Ss in next st, beg tr, * (ch1, miss 1 st, tr) 2 times, ch1, miss 1 st, (2tr, ch3, 2tr) in corner ch-sp, (ch1, miss 1 st, tr) 9 times, rep from * 3 times omitting final tr, ss in beg tr. [60 tr, 52 sp]
Rnd 8 Ss in first ch, (beg tr, tr) in next st – counts as 1 2trcl, * (ch1, 2trcl in next tr) 2 times, ch1, (2trcl in corner ch-sp, ch1) 4 times, ch1, miss 1 st, 2trcl, (ch1, 2trcl in next tr) 10 times, rep from * 3 times omitting final 2trcl, ss in first full tr. [68 2trcl, 68 sp]
Rnds 9 and 10 (Dc in next ch-sp, ch3) around entire square. [68 dc, 68 sp]
Rnd 11 * (Dc in next ch-sp, ch3) 4 times, dc in same ch-sp, (ch3, dc in next ch-sp) 13 times, ch3, rep from * 3 times, ss in first dc. [72 dc, 72 sp]
Rnd 12 (2dc in next 3 ch-sps, 5dc in corner ch-sp, 2dc in next 14 ch-sps) 4 times, ss in first dc, cut yarn and finish off. [156 dc]
Optional Round 13 to obtain size can be worked in dc, htr or tr:
OPTIONAL Rnd 13 *dc in next 8dc, 5dc in corner dc, dc in next 30dc* rep from * 4 times, ss in first dc, cut yarn and finish off. [172 dc]
Hey, lovely! Today I want to reveal a WIP that I have had in the works since late 2013. Mind you, my design career started in 2012, so this puppy has been waiting since the beginning of my designer days. I was just a baby! But I had a seed of an idea… And that seed grew into the LissMiss Blanket, the third blanket in my Linen Stitch Blanket Series.
First let’s talk about how I planted that LissMiss seed.
My Knitting Days
Before I learned to crochet, I was a knitter! You may not have known that, but I taught myself to knit in college – from books, as YouTube was in its infancy – and one of the first things I made was something that I really connected with. I loved the bright, randomized colors and the geometric, striped look. This pattern was the No-Sew Mitered Square Afghan (an alternate construction method for the Psychedelic Square Afghan).
I worked it up using the no-sew tips from the Mason-Dixon Knitting site, but I never ended up mattress stitching everything together to finish. The colors and the design reminded me of my former self and I knew I had to create something to bring the pieces back to life.
In 2014, I dug those squares out of the UFO (unfinished object) bin, and crocheted them together. I even filled in granny squares on some of them that were incomplete, as I was a full-blown crocheter already at that time. I may have knitted my way through college, but after I graduated, I picked up a hook and never looked back.
Side note: If you want to watch me try to remember how to knit after over a decade of purely crochet every day, watch this YouTube video… It only took me 6 minutes to remember what to do.
So, here is how the squares looked all crocheted together. You can head to this blog post if you want to read about what it was like collaborating with my former self – and in a totally different craft at that! I made three of these blankets from the squares, and it was a delightful experience.
Crochet Mitered Square
In 2013, before I even thought to crochet my knitted mitered squares together, I was inspired to create my own linen stitch mitered square. I even named it after the concept – Linen Stitch Mitered Square (LSMS) turned to LissMiss, and the first little seed of the LissMiss Blanket was planted.
Here is the first prototype I made in 2013. I even posted about it on Instagram in November 2013! Seven years and it’s still in the works. After I made this prototype, the idea went into hibernation.
First Revival Attempt
In 2016, I tried to revive this project by working up some squares using Scheepjes Colour Crafter that I had on hand. I ended up with this sample, and I quite liked it!
I even took the time to write up some notes and work out the kinks on making the LissMiss Blanket completely no sew! You can use an invisible join like a mattress stitch type join, but I think the best and most seamless way to make the blanket is by having the design be 100% no sew.
Alright, the year is 2020 and I finally found the time to create my Linen Stitch Blanket Series, the third of which is my LissMiss Blanket. Finally! I had 1 ball of each color of Scheepjes River Washed XL in my stash, so I decided to use that, but it wouldn’t have been able to stretch very far for a blanket as the range has 22 colors at this time.
Side note: Remember when they added 8 new colors?? Check that blog post out! Super neat! These are the 8 new colors Scheepjes added to the River Washed range, but of course, I used River Washed XL in my LissMiss Blanket.
Also in my stash, I had a bunch of Scheepjes Cahlista, and the gears in my head started turning… Would they work together to help create a larger blanket thank I could make if I just used the River Washed XL alone? I couldn’t help but work up a sample with a size 5mm hook, and YEP they work beautifully together!
Shop Scheepjes River Washed XL
I used 1 ball of each color – 22 colors at the time of this project. All of these links are affiliate links. You can shop through them to help support CypressTextiles at no additional cost to you, or find a Scheepjes Retailer nearby.
The marriage of River Washed XL and Cahlista was lovely, and I have enjoyed working on this blanket so much.
Work In Progress Photos
I took an abundance of photos of this blanket in progress, but here are a few selected ones. In the photo below, you can kind of see how the 4-square module comes together – totally no-sew!
The way that the bright crisp white Cahlista interacts with the artsy and mottled River Washed XL is really a sight to behold. The River Washed XL has a slight halo, and the smooth white cotton really contrasts that in a lovely way.
One of the things I love about River Washed is that no two colors are created equal. Some colors are two-tone, and some are solid. You can see details in this close-up of River Washed.
Isn’t this a beauty?? I’m in love!
And here is a photo of the blanket as it grows. I am just putting the colors completely randomly, and I’m digging it! When the blanket is finished, the white squares will make a nine-patch, so I will be going around this center piece with another round of mitered squares to finish up.
I love the close-up showing the texture of the miter.
The drape and texture of this blanket are amazing already. With the thicker weight yarns, it is already large enough to drape across my legs as I work on it. Even in the Houston heat, that is something I really enjoy – my favorite stage of a blanket in progress: the wearable stage!
Adding on to make that nine-patch of white squares. Can you see it taking shape?
Well, I hope you enjoyed a little sneak peek into the behind the scenes of the LissMiss Blanket that will be released as a free pattern – the third in my Linen Stitch Blanket Series – on Friday, 8/21.
Thank you for reading, and as always, Happy Crafting to you!