
Hello, lovely crafter! Today I want to share everything I know about multicolor motif blankets. Every time I post a motif blanket with lots of colors, I get the same exclamations, responses, and questions, and so I decided to compile all of my knowledge into an ultimate guide. There is a wide variety of thought that goes into creating a motif blanket, like the design, color choice, layout, management of ends, joining method, etc., so I have a lot to share today.
I’ll do my best to keep everything organized, and in an effort to do so, here is a little rundown of what you’ll find in this post:
- Reasons to make a multicolor motif blanket
- Types of motif blanket patterns and choosing a design
- Planning a color palette
- Organizing an intentional layout (detailed)
- Mega construction discussion, like weaving ends and joining motifs
- Free simple hexie pattern and example project walkthrough
Why Should I Make a Multicolor Motif Blanket?
If you are a lover of solid color back-and-forth blankets, or even stripey back-and-forth blankets, or perhaps even solid color blankets with large one-color motifs, you may be wondering, why you would even create a multicolor motif blanket.

–
The reasons are simple. I like making multicolor motif blankets because:
- They are portable, and I get more done if I can bring a project along with me anywhere
- Each motif is like a little FO that comes with a satisfying sense of accomplishment
- I can use nearly every bit of my remnants (zero-waste high five!), and even bust through some stash yarn
- Multicolor motif blankets are very pleasing to the eye, with a bit of guidance on color and layout
- After you’re done with every project you make, you can work little motifs to use up those remnants so they don’t end up in the trash or your stash
So for you back-and-forth blanket lovers who can’t fathom taking on a motif project, there are strong reasons to do so! You just need to learn some tips and tricks to make it easier on you.

–
7 Steps to a Scrappy No-Waste Blanket
I have broken this entire scrappy blanket process down into steps so that you can follow along for a pile of motifs that you already have, or so you can plan a scrappy blanket from the start. Then in a separate post, I have a free demo blanket pattern that I use to actually show you how I would go through these seven steps.
- Step 1: Choose a Design
- Step 2: Plan a Color Palette
- Step 3: Organize an Intentional Color Layout
- Step 4: Plan the Physical Layout (Length x Width)
- Step 5: Create Motifs + Weave Ends
- Step 6: Joining Method + Prep for Border
- Step 7: Border Construction
First, let’s talk about the variety of designs out there and how to choose one.
Step 1: Choose a Design
There are an infinite number of multicolor motif blanket designs out there, but I am going to talk a lot today about splitting them up into two categories: Stripey Motifs, and Solid Motifs. Each of these two blanket types has a different reason why you would choose it.
Stripey Motif Blankets – Easy Mode
These have multiple colors in one motif. There can be color changes in the same row/round, or just different colors from one row/round to the next. Let me show you some easy mode stripey motif blankets and why you may choose one of them.
Painted Hexagon Blanket
Blog: Free Pattern, PDF: Etsy // Ravelry

–
Striped Granny Square Blanket (from my 2016 VVCAL)
Blog: Free Pattern, PDF: Etsy // CypressTextiles Shop

–
You can also create a squares piece with a mix of solid and striped motifs just like the Painted Hexagons pattern in order to bust through more of your stash.

–
Either of these two designs are great pattern choice if you:
- Want to zen out and make the same simple motifs over and over again
- Have a lot of different length remnants – you can use shorter ones toward the center of the motif, and then longer ones as your motif grows
- Have some remnants that are very long/multiple ounces of some colors – see how I include some one-color motifs? It breaks up the pattern visually and allows you to use more of your stash
Stripey Motif Blankets – Adventurous Beginner
These patterns require a little more concentration, but are not incredibly difficult.
Gumdrop Garden Blanket
Blog: Free Pattern , PDF: Etsy – Ravelry – CypressTextiles Shop

–
Heirloom Collection Blanket
Blog: Free Pattern , PDF: Etsy – Ravelry – CypressTextiles Shop

–
Either of these two designs are great pattern choice if you:
- Prefer a variety of motifs that you can be present and focus on
- Want a more complex visual aesthetic for your remnants to shine
- Have some very outlandish colors to use up that you want to hide in a more textured design
The Heirloom Collection Blanket example above has the same colors for all of the motifs, so it isn’t a remnant eating stash buster, but you can convert any motif blanket into a multicolor design to use your scraps.
–
Color Riot Blanket
Blog: Free Pattern , PDF: Etsy – Ravelry – CypressTextiles Shop

–
This a great pattern choice if you:
- Want to have a good time creating and display an incredible art blanket.
- Are looking for a beautiful and unique pattern to display your remnants in a wonderful light.
Solid Motif Blankets – Easy Mode
Solid motif blankets can still be considered a multicolor blanket when the motifs are small. The idea is that a hundred small motifs have way more ends to weave than thirty larger motifs in the same size blanket.
Pixelated Blanket
Pattern coming soon! A simple two-round granny square which is joined as-you-go on the second round.

–
Geometric Lace Blanket
Blog: Free Pattern , PDF: Etsy – Ravelry

–
Either of these two designs are great pattern choice if you:
- Have a lot of colors with the same amount, for example, if you have around 4 grams of a wide variety of colors
- Want to create a visually stunning color layout with colors that fade around the blanket
- Have a few pops of contrast color that you want to use up
Solid Motif Blankets – Adventurous Beginner
Happy Little Tree Blanket
Blog: Free Pattern , PDF: Etsy – Ravelry – CypressTextiles Shop

–
VVCAL Blanket
Blog: Free Pattern , PDF: Etsy – Ravelry – CypressTextiles Shop

–
Either of these two designs are great pattern choice if you:
- Prefer a variety of motifs that you can be present and focus on
- Have at least 10g of each color
Free Demo Pattern
If you look out for the separate post coming in the next couple of days, I’ll have a free demo pattern called “Mini Hexies Blanket” and I will go through this entire step by step process from start to finish! This is the perfect way to use up all those remnants.

–
Some motifs allow you to use different lengths of remnants – if you have a bunch of same size identical motifs, you’ll use about the same amount of yarn for each motif, but stripey blankets like Painted Hexagons or Color Riot for example, call for different lengths and you can use more of your stash. You may want to have one of each going at once!
Step 2: Plan a Color Palette
The most important factor in your color palette choice is going to be that you work with the remnants that you have on-hand. Remember, a huge bonus of creating a multicolor motif blanket is that you can use up your remnants and stash.
Mixing Yarns Across Lines / Composition
A quick note on mixing yarns: I often get asked if it is okay to mix yarns across brands or lines. Check if the yarns are all easy care and a similar weight, and you can be sure they are okay to mix. The yarn weight does not have to be exact, just similar enough.
I have no problem using fingering weight yarn, sock weight, and sport weight, and even a lighter DK weight yarn all in the same blanket. My best tip for this is to use a hook that is in between. So if you would use a 3.5mm for the thickest yarn, and a 2.5mm for the thinnest yarn, you would use a 3mm hook for all of the motifs to even out the motif sizing.
Some yarns are very fuzzy or some are thick and thin, with very thin lengths, and those may be harder to mix in. Once you get a feel for it, you will be able to trust your instinct when it comes to choosing what yarns you can put together in the same piece.
I find that mixing yarns adds to the cozy charm of the overall blanket. It also allows you to use more of your remnants quicker, as you don’t have to wait as long to save them up, and you don’t have to cast aside yarns that you could be using.
After you evaluate your remnant situation, the color choice will depend on the type of pattern you choose. I’ll reference again the Stripey Motifs and Solid Motifs.
Stripey Motif Color Choice
If you have many colors in one motif, you have a lot of freedom in your color palette. You can hide lots of wild and crazy colors in the blanket, and you will never be able to pick them out. All of the colors come together to make a bright and cheery piece.
Look at the colors I used in these squares. This is a very wild mix of colors, warm and cool, bold and pastel, bright and neutral.

–
But once all of the crazy colors are mixed together, and especially with the solid neutral join, the blanket just looks like a bold mix.

–
Important note: For the most part, if I make a stripey motif blanket, it is because I have an extremely random mix of colors and a wide range of remnant lengths.
Solid Motifs Color Choice
These are typically made of motifs that are all the same size, so you can make one motif, weight it, and then you know which remnants you can use for your blanket. The smaller your motifs are, the more remnants you can use up, since you don’t have to set aside the ones that are too short.

–
A good thing about working a solid motif blanket is that you can really use any colors together, and it will end up looking amazing.

–
You can see that the colors below aren’t something you may necessarily put together…

–
But here is how they look in the blanket, and the strategic layout makes them play well together.

–
Let’s talk more about strategies for creating a color layout!
Step 3: Organize an Intentional Color Layout
If you want to take a deeper dive into this topic, you can check out my Creative Art Blanket Course, as I break down layouts to a science. You will be a layout pro after you take the course!
When I see layout talked about “in the wild”, there seem to be two camps: those who pull motifs randomly from a bag, and those who fuss over the layout for hours, and then carefully pick up the motifs, keeping them in exact order. There must be a happy middle ground for folks who want a thoughtful layout, but don’t want to absolutely stress over it.
I’m here to tell you that crochet is meant to de-stress you, not re-stress you. You should be able to quickly lay down a mindful layout, be happy with it, and then mess it all up, only to lay the motifs out again, and find you are totally happy with the new layout as well.
You may think I am crazy, but I hear that all the time: “How do you keep your layout straight after you create it so that it doesn’t get messed up?” Well, the truth is, I am never so committed to a layout that messing it up angers me. To happily create is to feel like an artist. To feel like an artist is to embrace imperfection.

–
So let’s dive into layout – take notes!
Stripey Motifs Color Layout
You have already seen that for the most part, I make a completely random color layout when the motifs are stripey, but I also wanted to show you a couple of fun ideas.
Cottage Quilt Blanket
PDF: Etsy – Ravelry – CypressTextiles Shop
This blanket is based on a hexagon sunburst type motif. I had a lot of bright color remnants for this one!

–
In order to tie the random colors together and create a cute aesthetic, I pulled aside all of my different pink remnants, and used them for the final joining rounds of the motifs.
I arranged the motifs strictly by their shade of pink border, and made a color-fade. This really ended up being a precious make to showcase my scraps in style!

–
Sunburst Blanket
Blog: Free Pattern
For this piece, I organized my scraps into ombre piles of similar colors. You can see there are different colors mixed in here and there and all of the motifs of the same color are not actually identical. This was a great way to intentionally use up leftovers.

–
For this example, I used a neutral grey to join, for a more relaxed look.

–
Now that you have some ideas for Stripey Motifs, let’s move on to Solid Motifs.
Solid Motifs Color Layout
When I create a blanket with solid color motifs, I like to arrange them in a more artful, eye-pleasing way. I generally separate my remnants into piles of like colors, and then depending on how many colors I have, I will create one of two layout styles: A “Galaxy” layout, or a “Split Rainbow” layout.
First let’s look at a few galaxy layouts.
Galaxy Style Layout
For these, layouts, I place sections of color around the blanket and I blend the edges of the colors so that they reach across to one another. Below, you can see in my Geometric Lace Blanket that I have five sections of color, and I have blended them together on the section borders.

–
In the example below, I have created red and blues, yellows, aquas, and then the top right corner has a sort of random mix – but it works! This is perfect if you have a bunch of random color motifs. You can see some colors are only represented by 1-2 motifs, and it looks amazing. Of course, your motifs may be much smaller if your remnants are small, but the same ideas will apply.

–
In this next Geometric Lace Blanket example, I used splotches of color with some accents sprinkled among them. You can see how I have blended the edges between the green and the orange on the left side. If you think green and orange cannot be blended, just look!

–
My Happy Little Tree Blanket shown below also has a galaxy layout, but it has more colors in a sort of “circular rainbow” with yellow at the center.

–
You should choose the galaxy layout if you have:
- A lot of motifs but only 4-5 color families
- Some random pops of color, let’s say 1-2 motifs of a color that is nowhere else in your blanket (you can use those pops of color as contrast in one of your color areas)
- Colors which do not normally flow together that you will be blending at the edges
I talk more about this is my course! If you would like to know more, you can check it out.
The main idea behind the galaxy color layout is that there are large swaths of a certain color arranged around the blanket, giving the eye a chance to roam around the piece. It takes a bit of practice to develop the instinct, but if you keep making remnant blankets, you will get a feel for the color placement. Sometimes the color range of your scraps gives you no choice but to figure out a way to creatively lay them out. Hopefully you have gathered a few ideas from this post!
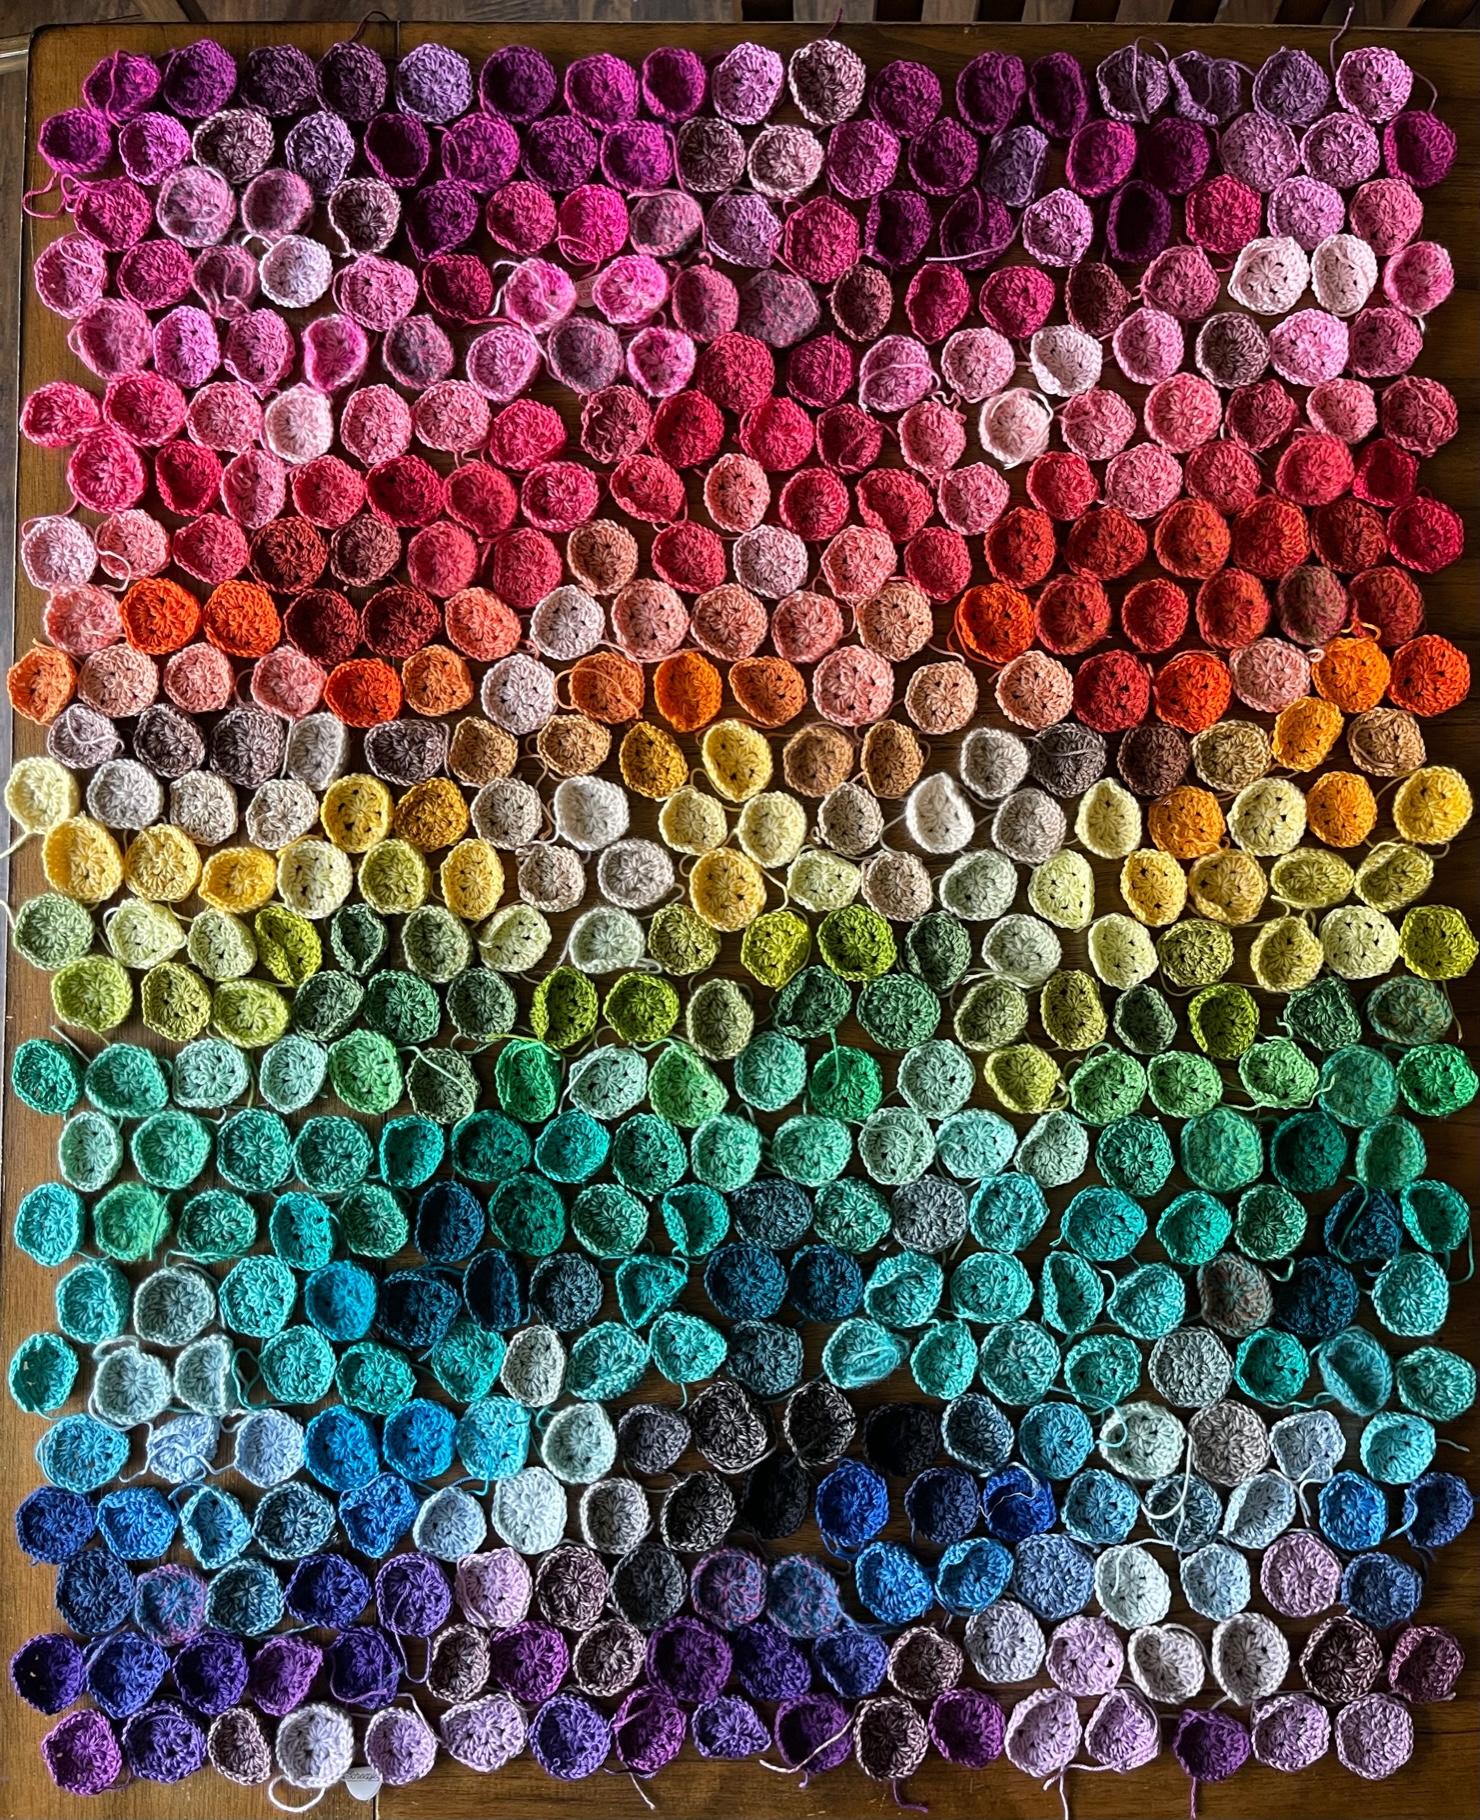
Split Rainbow Style Layout
Let’s talk color! When I create rainbows, I like to include as many colors as possible, in order to make a beautiful color-fade. I typically use the following color groups: Red-Violet, Red, Orange, Yellow, Yellow-Green, Blue-Green, Aqua, Blue, and Blue-Purple. If I have enough colors, I may add another group in between, like pink, red-orange and yellow-orange, etc.
If you make these little hexie motifs after you’re done with every project, you will amass piles like this, and if anything needs filling in because the color is scant, you can pull from your stash to fill in.
Important note: If you are making hexagons, be sure to leave some colors for the half hexagon motifs. You want the half hexies to flow with the rest of the color palette in the blanket.

–
When I say “split rainbow” layout, I mean that I will cut this circle anywhere, and make the top and bottom edge of the blanket. In the example below, I split the rainbow between the yellow and the yellow-green, so that the yellow is at the top edge, all the way down to yellow-green at the bottom edge.

–
Here is an example of what that looks like. I made my 2022 VVCAL Blanket with a split rainbow just like this.

–
For my 2020 VVCAL demo, I split the rainbow between the yellow-green and the blue-green / aqua. I really love how this came out! These split rainbows are a great way to get a gorgeous color but have your rainbow be extra sneaky, because it doesn’t scream “rainbow.” I am a huge fan of rainbows, but sometimes you just want to play around with the colors a bit more and bend the rules.

–
In the Gumball Blanket below, you can see that the rainbow is made from side to side. I collected these remnants and made piles of each color.
For those that didn’t have quite enough different colors, I used two motifs in a row of the same color, and you can’t even tell! This layout style is very forgiving because of the overall eye-catching design. For this blanket, I made the rainbow from red-violet, all the way over to blue-purple.

–
If you don’t want a “rainbow “ per se, or your remnants won’t make a rainbow, you have other options. You can leave out a few colors in the rainbow, mix up the layout, or create a unique galaxy layout.
You should use a Split Rainbow Layout if you:
- Have a lot of motifs for all of the colors of the rainbow
- Feel like this layout appeals to you
- Love the satisfaction of creating a layout where one color logically flows into the next
Again, visit my Creative Art Blanket Course for a LOT more info on this topic. It’s too much to dive into here in this post, but I hope I shared enough here to get you started!
Step 4: Plan the Physical Layout (Length x Width)
I like to have a general idea of how large my blanket will be so that I sort of know how many motifs I will need. I will say though, sometimes I just make mini hexagons after every project, using up all the remnants, and then when I have enough to make a blanket, I figure out my layout. Then I can see if I need to make more motifs to finalize the blanket.
The physical layout is dependent on the shape and style of your motifs. Your motifs may be pre-determined by your blanket pattern, or more flexible.
Pre-Determined Layout
If you are following a specific pattern, some blankets have the physical layout planned for you, such as the Color Riot Blanket. For that design, I used the colors randomly in the main motifs, then framed them with the chevron motifs, and the layout is already set in that way.

–
Square Motifs
If your motifs are squares, all you need to do is plan how many squares wide and how many squares long to make your blanket. Most blankets have a .7 ratio of length to width. This means if you take the width, and divide it by the length, you get around .7 for a most comfortable blanket shape.
Think of where your blanket will be displayed: The bed? Couch? Dragged around the house? This can inform your blanket side and width/length. Of course, you can always make a square blanket as well!

–
Hexagon Motifs
If your motifs are hexagons, you have a couple of unique options since your motifs will be staggered. Let me show you what I mean with schematics.
In the example below, the hexagons are set on point, and the half hexagons are down the sides of the blanket, making the zig-zag edge at top and bottom. This is my preference for hexie layouts!

–
In this example, the half hexagons are along the top and bottom edge of the blanket, and then zig-zag edges are at the sides. I used to make all of my hexie blankets this way, but I decided to switch because I started to prefer the hexies set on point.

–
For either layout, you can see that the hexagon rows begin and end with a half hexagon. This makes for a more defined corner, and you won’t have to fill in tiny odd corner gaps as seen in the sample schematic below.
I would NOT recommend setting your layout like the one below, for these reasons. Always start and finish with a half hexagon.

–
How Many Motifs???
If you would like to know exactly how many motif to make, you need a few simple measurements.
Square Motifs
For squares, simply measure them, and figure out about how large you want your blanket. If you have a narrow join, you can really estimate this part. If your join is wider, just add in those inches.
If my squares are 6in across, and I have a narrow join like single crochet, then I can use 8 motifs across and 10 motifs down for a blanket that measures a bit over 50 x 62in before the border. This means I will make 80 motifs.
If I am trying to get a split rainbow, I should make about 8 motifs in 10 color groups, or 10 motifs in 8 color groups, give or take. If I am using the galaxy method, I will need 4-5 color groups so that would be roughly 20 motifs for 4 color groups or 16 motifs for 5 color groups.
Hexagon Motifs
For hexagons, the measurements are slightly trickier, and I do go into detail in my Creative Art Blanket Course, but the idea is to measure from flat side to flat side, and from point to point, These measurements will allow you to estimate how many motifs to make across and down your blanket and how many of each color group you will need.
Below is an example of how I would measure a hexagon.

–
Take another look at the hexagon layouts shown above, and you can see how to use the measurements to find out how many you will need for your desired blanket size. The demo blanket in my next post uses hexagons, so I will go into more detail during that example.
Now that you have a physical layout created, you can start to work on your motifs, and get going on your blanket!
Step 5: Create Motifs + Weave Ends
This section is for everyone who screams “All those ends!” when they see a multicolor blanket. If this is you, please consider keeping an open mind regarding maintenance of yarn ends, and the different ways that you can do so. Projects with ends can be intimidating, but as long as you know what to do with them, and you do them as you go, you won’t be left with a project in the UFO (unfinished object) pile when you’re all done because the number of ends seems overwhelming.
Following your pattern, create your motifs, but DO NOT save your yarn ends until the entire blanket is finished. You will regret that. Set your future self up for success by taking care of yarn ends as you go. But how? Let me show you!
One note before I dive in: If you do not like weaving your yarn ends with a darning needle, you may want to choose a motif design that is not very lacy. I find that it can be more intricate of a process to work over yarn ends when the motifs are lacy, and so I prefer to weave ends with a needle in that case. If you choose a design with more solid stitches and few gaps/holes, you can work over your ends in the manner that I will show you.
Weaving Ends for Stripey Motifs
For stripey motifs, you will have several yarn ends to weave in per motif. Here’s how you want to take care of those ends as you go. Every color stripe of your motif will involve two yarn ends, the end created by starting a new color, which I will call “end 1”, and the end created by cutting the yarn, which I will call “end 2.”
Many times, the center of your motif is very small, maybe one round. If this is the case, you can bring end 1 up and trap it when you join the round and cut the yarn. Then you will have end 1 and end 2 together, and you can either tie a little surgeon’s knot (shown below) or you can simply weave both ends together at the same time.
The surgeon’s knot will hold forever if it is seated correctly. If it is pulled tight incorrectly, it may come undone. Always test it to make sure.

–
If you don’t want to make a knot, you can work over end 1 until it is completely used up, and you can weave in end 2 as follows.
Bring end 2 to the back of the work by pulling it through the same stitch as the join, or through the stitch to the left of the join, as I prefer to do.

–
Now insert your hook through the back loop only of the stitch to the right of the joining stitch, and pull end 2 through. (In the photo below, I am weaving in end 1 and end 2 together.)

–
Keep inserting the hook through back loop only of each stitch to the right, and pulling end 2 through, until the yarn end is completely used up.

–
Alternatively, if you have chosen a solid stitching motif, and not a lacy one, you can simply work over end 2 on the next round. Some people along the way have mentioned that they fear simply working over the yarn tail will mean it can come loose in the future. I suppose it could be a problem if you crochet very very loosely, but for me, I have never had that happen!
When you join yarn for the next round, you can work over end 1, and then when you cut the yarn, you would use the method I described above to bury end 2, or simply work over it on the next round like I explained.
Of course this would mean you would be working over end 2 of one color and end 1 of the next color at the same time! If this irks you because you find it makes things too bulky, then I recommend burying end 2 as above, and then working over end 1 of the next color. This way, they are dealt with differently and it won’t be as bulky.
Once the motif is all finished, and there is just one final end 2 to deal with, I will typically work over it during the join. And it’s as easy as that! I try to choose continuous joins for my scrappy blankets, as I will discuss below, so when I’m all done I have only a few ends to weave in from the joining, depending on how many balls of yarn I have used.
I want to quickly show you an example of how to work over end 1 if you do have a bit of chain loop lace in your pattern. First, work over the yarn on the chain loop row. See how the yarn is floating along the backside? You can see it in the spaces.

–
Then, on the next round, trap the floating yarn, and work over it. This works best if your next round is solid stitches, because like I said before, for very lacy work, it is best to use a darning needle to weave them in.

–
And you can see from the back, now yarn end 1 is completely invisible.

–
If you manage your ends this way, you will have nothing to worry about, and you can open the doors to many new and fun designs, and use more of your remnants too.
Weaving Ends for Solid Color Motifs
If you are making solid color motifs, you will only have two yarn ends to think about on each motif. This is the easier of the two weaving scenarios.
My best recommendation is to work over yarn end 1 as you make the first couple of rounds of your square. If you trap the yarn as you work, you can easily get rid of that yarn end without any additional weaving.
Yarn end 2, I usually leave to be worked over during the joining process, because I always pick a continuous join when I have a bunch of solid motifs. This means that instead of cutting the yarn after every motif joined, you join along a path that is continuous from one end of the blanket to the other, one row at a time, without stopping.
Here, I have been joining these little motifs and all of the yarn tails are nice and secure.
IMAGE
–
If you work over the yarn ends while you join, then you won’t have to worry about them later on!
Step 6: Joining Method + Prep for Border
I want to share some suggestions regarding what joining method to choose based on what type of design you have selected. If you already have your eyes set on a certain joining method, you can definitely choose that join!
To me, the joining method that you choose is very important because it is what will propel your pile of motifs into becoming a finished blanket. If you have a bunch of square or hexagon motifs, my recommendation to finish your blanket is always to use a continuous join as-you-go.
What is a continuous join?
If you can imagine drawing an imaginary line around your blanket starting in one corner, and all the way through and around, back to the start, without picking up your pen, you have a continuous join. The trick to it is the pathway that you take. You are creating the look of a regular join, but you have “faked” the corners in order to keep the join continuous. Let me show you!
Square Motifs
For square motifs, this is the path that you follow for a continuous join. You can see that the start and the stop are at the same place.

–
Most any joining method can be converted to a continuous join. Here are a couple of examples.
Flat Braid Continuous Join for Squares
Here is a snapshot of the continuous FBJ for squares in progress. This works great for large or small squares. You can find this free joining pattern here. This motif is called “Circle of Friends” and it is designed by Priscilla Hewitt.

–
Granny Stitch Continuous Join for Squares
Look how in this example, you can see the corners look like a normal join where you cut after every motif. This joining pattern is free here!

–
Single Crochet PLT Continuous Join for Squares
My favorite join for remnant motifs is my continuous single crochet PLT Join because it’s the one that hides yarn ends the best, and it is pretty quick, while using less yarn. Find this free joining pattern here.

–
Once you choose your favorite method, you can get going! Let’s look at some joins for hexies.
Hexagon Motifs
For hexagons, the method is the same, but the path is slightly different because of the staggered layout.

–
Here are some examples for hexagons:
Single Crochet PLT Continuous Join for Hexagons
As I said before, this is my favorite join for scrappy blankets because it hides ends very well. This is the method I will be using for my free demo blanket, but you can find the free joining pattern here.

–
Flat Braid Continuous Join for Hexagons
I have video tutorials for this join (Part 1 and part 2)! If all of your ends are woven in, you can use this join. It works up very quickly. This is my Autumn Blues Blanket.

–
Granny Stitch Continuous Join for Hexagons
This join is precious and I do have video tutorials for it (Part 1 and Part 2). I have used multiple colors for the join on this blanket as a style choice, but you of course can use one color, and it will not look broken up like it does in the picture. This is my Cozy Flowers Blanket.

–
Why is a continuous join advantageous?
Why is the continuous join a great skill to have?
- You only have to weave the ends from starting and ending (2 ends) and then the ends that occur if you run out of your yarn ball
- It is easy to work over the yarn ends from all of your motifs
- You don’t have to start and stop after every motif, so you will be less likely to get distracted, and you can finish your blanket faster
- It’s just plain fun! For those folks who hate joining up, you will probably fall in love with this method
Prepping for the Border
If you have square motifs, you don’t need to do much prep for the border. I would say all you need to do is work a round of single crochet around your blanket to square away any wild edges, and to make it easy to add on any border that you choose.
If you have hexagons, you have a little work to do to make your blanket into a square or rectangle.
Half Hexagons
Your hexie pattern should come with instructions on how to make a half hexagon motif to fill in the gaps at the sides. Once you work those up, you can join them in using the same style join that you used for your continuous join, if you chose that method.

–
Fill Triangle Gaps
You pattern should also show how to fill in the zig-zag triangle gaps at the opposite edges of your hexagon blanket. I like to use my border color to fill these gaps, so that it flows nicely into the border. You can also use the colors in your blanket for a detailed look.

–
Once you have filled the half hexagons and the triangle gaps, you can start on the border. I like to add one round of single crochet to even everything out and start with a good foundation.
Step 7: Border Construction
At this point, you can add any border. You can use yarn from your stash to join and work the border, and you’ve still used up a lot of remnants in the motifs.
Another option is to create a zero-waste border. This is a fun addition to your colorful blanket! If you still have long remnants, you can tie them together with surgeon’s knots and make a big yarn ball of remnants for your border. You may think this is crazy, but it comes out looking very fun!

–
This is the Happy Little Trees Blanket, and you can see I tried to see remnants that were close to the color families in the galaxy layout, to extend the color out to the border.

–
I also used this no waste method for my Let it Go Blanket border. It came out so cute!

–
Another example of the zero waste border is using your main joining color for the border, but just adding in a round of bobbles using your remaining long remnants. You can also just replace one round in your border with the remnants, as I have done below for this border in progress.

–
However you choose to make your border, do it in a way that you enjoy. The border is the final touch on your blanket, and it is what is standing between a UFO and an FO.
Finish more projects!!
- Pick an artful color selection and layout, so you are eager to work your blanket
- Use simple motifs that you can take anywhere and crank out quickly
- Manage your yarn ends as you go with my easy methods
- Pick a continuous join so that your stopping point is after every row instead of after every square
- Choose a simple border that you love, so that you will finish it faster
When I posted teaser photos of this demo blanket, many of you were excited to see something like this laid out step by step, because you find that this idea seems like a challenge. Hopefully as we work through the demo you can see how to make your own, using the scraps that you have!
7-Step Scrappy Demo: Mini Hexagons Blanket
After all was said and done, I thought it was to much to put the demo blanket below. I want to give as much detail as I can into the process, and I feel like if I added it below, this post will be unwieldy with too much scrolling up and down.
SO – Click here for the Free Demo Blanket Pattern, in a separate blog post! I’ll be publishing the post in 1-2 days, but hopefully in that time, you can let these tips and tricks digest, and even sort your remnants out in the meantime! Sort them by similar weight, and by color group, and we will have fun making our blanket shortly.
Don’t be afraid of multicolor or remnant blankets! The ends are easy to manage once you get the hang of it, and you will feel so good turning your scraps into something beautiful.
Happy crafting!
Rachele C.
The Art of Crochet Blankets (my book on Amazon)
Support My Work
You’re supporting by just being here! You can read my blog (Start Here!), like and comment on socials, and message me for a chat. All of this supports my work free of charge!
- Affiliate links – Shopping through my links supports me at no additional cost to you as I get a small commission through my affiliates. Jimmy Beans Wool // WoolWarehouse // Amazon.com
- Buy my pattern book – I wrote a super neat crochet blanket pattern book, published under Penguin Random House. You can buy it here!
- Browse my self-published patterns – I have over a hundred patterns on Etsy and Ravelry
- Creative Art Blanket Course – Check it out on Podia
Where to Find Me
- Instagram: @cypresstextiles
- Facebook Page: CypressTextiles
- YouTube Channel: Rachele Carmona
- Pinterest: CypressTextiles
- Tumblr: CypressTextiles
- Etsy: CypressTextiles
- Ravelry: Rachele Carmona
- Podia: Creative Art Blanket Course