
Hello again! Today I have a new-to-this-blog crochet join which will be another alternate joining method for the 2020 VVCAL. It’s the crochet Continuous Granny Stitch Join as-you-go (CJAYG) for squares, and I am using it specifically for my “Fresh Earth” colorway (Scheepjes Catona yarn).
For the regular Granny Stitch JAYG tutorial (not continous), head to this blog post!
You can now find the Granny Stitch JAYG and CJAYG in a convenient PDF format for easy printing and totally ad-free.

My 2020 VVCAL Squares
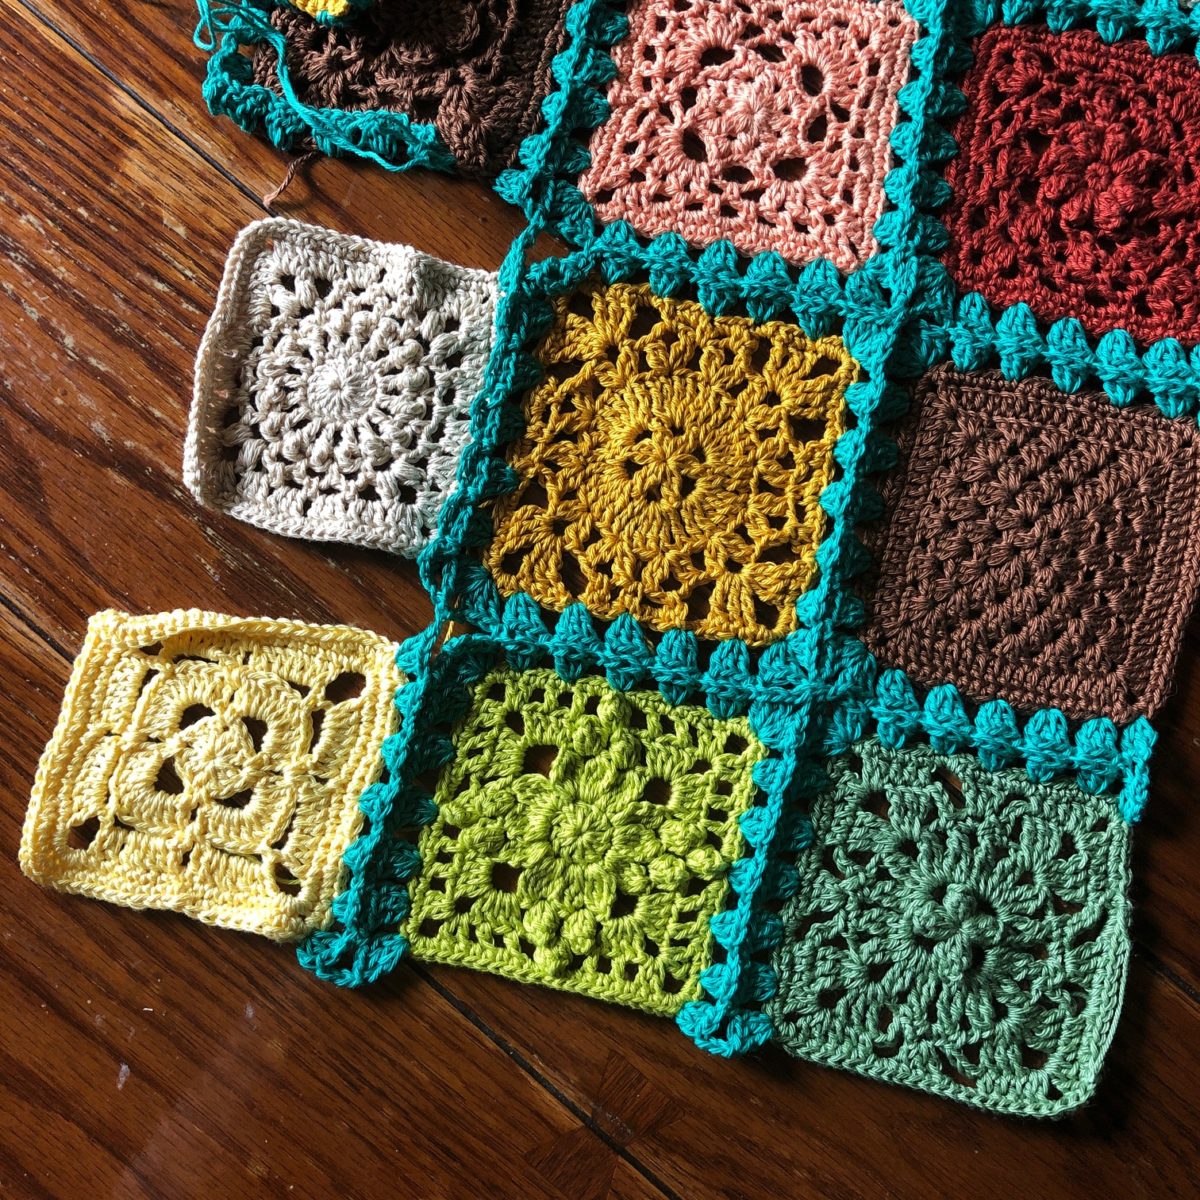
Before I start, here are some of my squares. The final stitch count is 88 sc, but you can use this join for any square stitch count, as long as you evenly spread out the 3dc groups. You’ll see what I mean later on!
Don’t you just love a pile of different squares? That’s one of my favorite things about the VVCAL projects. After 2016, 2018, and 2020, there are now over 100 square patterns to mix and match!

If you want to find out more about the Fresh Earth palette including yarn colors and amounts as well as color layout, or to learn about the 2020 VVCAL in general, head to the Fresh Earth blog post or the 2020 main CAL page.
JAYG and CJAYG – What’s the difference?
What is the difference between Join as-you-go and Continuous Join as-you-go?

JAYG just means Join as-you-go, which means that on the final round of your square edging, you join the square onto the blanket, and then complete your round, and cut the yarn. So, after you join each square on, you cut the yarn and start to join on the next square.
For the regular Granny Stitch Join as-you-go for Squares (pictured above), I am edging the squares with a round of Granny Stitch, and joining every side that is adjacent to a completed square.

CJAYG means Continuous Join as-you-go, and it is a little more complicated than the regular JAYG, but once it “clicks” you will love it!
The best way I can describe this Granny Stitch CJAYG pattern is that you are making a granny stitch crochet path around the squares like if you were drawing around them without picking up your pencil. The path makes it seem like all 4 sides of the square were edged at once when the blanket is done, but it’s just a Jedi mind trick..
Here is a graphic (from Crochet Cabana) of the path that you take when you do a CJAYG for squares. I know it looks scary! But when you get the hang of it, it really does click in place.


Related Links for Continuous JAYG (or CJAYG)
For more reading and tutorials, as well as CJAYG tutorials for different shape motifs, check out these links below.
YouTube Tutorials (Link goes to Part 1)
- CJAYG with sc for triangles //// Blog post link
- CJAYG Flat Braid Join for hexagons //// Blog post link
- CJAYG with sc for hexagons //// Blog post link
- CJAYG granny st for hexagons //// Blog post link
Blog Posts (Written/Photo instruction only)
- CJAYG for squares using sc and my PLT Join
- CJAYG Flat Braid Join for squares
- CJAYG tutorial for Sunburst Flower Blanket
- CJAYG Making a small cushion cover

Continuous Granny Stitch Join As-you-go
Now that we went over some background info for CJAYG, let’s get started on this pattern!
Materials
- Scheepjes Catona yarn – available from these affiliate links – purchasing through them gains me a small commission at no additional cost to you. WoolWarehouse, Deramores, Black Sheep Wool – or find a Scheepjes Retailer near you!
- Size 3mm hook
Stitch Guide
Note: This tutorial is written in US Terms, but there are only 2 sts involved: (US) sc and dc. These are (UK) dc and tr, respectively. So if you are used to UK Terms, just remember, US sc = UK dc, and US dc = UK tr.
- beg beginning
- beg dc (sc, ch1) – counts as 1 dc
- ch chain
- dc double crochet
- lp(s) loop(s)
- rem remaining
- rep rep
- rnd round
- sc single crochet
- sk skip
- sp space
- ss slip stitch
- st(s) stitch(es)
- yoh yarn over hook
Instructions
Let’s get started!
First Square
With joining yarn, ss in the corner st, beg dc, * ch3, 3dc in same st, ch1, sk2, (3dc in next st, ch1, sk3) 5 times until the corner is reached, 3dc in corner st, rep from * 2 times, ch3.

Second Square
Bring second square under first square, ready to join along the top side.

3dc in the corner st of the second square,

Hold both motifs with wrong sides together, and insert the hook through the next ch-1 sp on the previous motif,

Ss in the ch-1 sp,

Sk2, (3dc in next st, ss in next ch-1 sp on previous motif, sk3) 5 times until next corner is reached, (3dc, ch3, 3dc) in corner st,

Here’s a closer look:

ch1, sk2, (3dc in next st, ch1, sk3) 5 times until next corner is reached, (3dc, ch3, 3dc) in corner st, ch1, sk2, (3dc in next st, ch1, sk3) 5 times until next corner is reached, 3dc in corner st, ch3,

Here’s a close-up:

Remaining Squares in this Column
Join all of the rest of the squares in the column in this same manner, except on the final square at the bottom of the column, only work 2 sides, instead of 3, ch3.

Here is a closer look of the final square in the column.

Next Column
Note: Now you will join on just the right side of each square, so that the squares hang freely like bunting or garland.
Get your squares ready to join on,

Join 1 side of the square, as before, when you get to the corner, 3dc in the corner st, and ch1,

Here is a close-up:

Holding motifs with wrong sides together, ss in the corner ch-sp that is diagonally located from the square in progress, (refer to photo below)

Ch1, pick up next motif, 3dc in corner st, ss in ch-1 sp, sk2, 3dc in next st, and so on, joining the side as before,

A closer look:

Here is what you will be looking at when you join 1 side of all squares, working your way up the column.


When the top of the column is reached, 3sc in corner st, ch1,

Ss in ch-3 corner sp, ch1,

Continue around 3 sides of the square like normal without joining, until you approach the corner as shown below,

3dc in bottom right corner st, release lp from hook, insert hook front to back through adjacent ch-3 corner sp,

Also, insert hook from front to back through diagonally located ch-3 corner sp,

Another look:

Grab loop,

Pull Loop Through the corner sps,

Ch1 – this chain encases the corner sps, then ch1 again to complete the ch-3 corner sp,

3dc in corner st on next square below in the column (in photo below it is the orange square), and continue to join the top side of the square as shown below.

Work 2 more sides of the square plain without joining, and repeat the join for the corner as before.

Here is a step back to see how the join looks in progress:

When the bottom square of the column is reached, again work only 2 sides of the square, and ch3, as shown below.

Looking good!
Continue joining columns in this manner, until all columns are joined. When you work the final column of squares, be sure to join all corners immediately, as there will not be another column of squares to link those corners up.

Finishing the Join
The yellow square below is the bottom right square in the blanket, and the last square in the final column of squares. Instead of working only 2 sides of this square, finish the corner as shown below.

Work across the top of the square as normal, make 3dc in the corner, ch1, ss in the ch-3 sp that is between the 2 squares, ch1, and continue working across the next square.

Once you have worked across all of the squares, turn the next corner, and continue down the next side in the same manner.

And that’s it! Once you have worked across those 2 “raw edges” of the blanket, you are all done! 2dc in the very first corner st to complete that first corner, ss in the beg dc, and cut your yarn, and weave ends.

I hope you like this fun and engaging twist on a simple and traditional join! I find continuous joins to be much faster going, because you aren’t just joining 1 square at a time, you’re effectively joining 1 whole column of squares at a time! It’s much neater and faster, and best of all, only 2 ends to weave in.
Thanks for stopping in for this Continuous Granny Stitch JAYG!
Happy crafting as always!
Rachele C.
4 Comments