
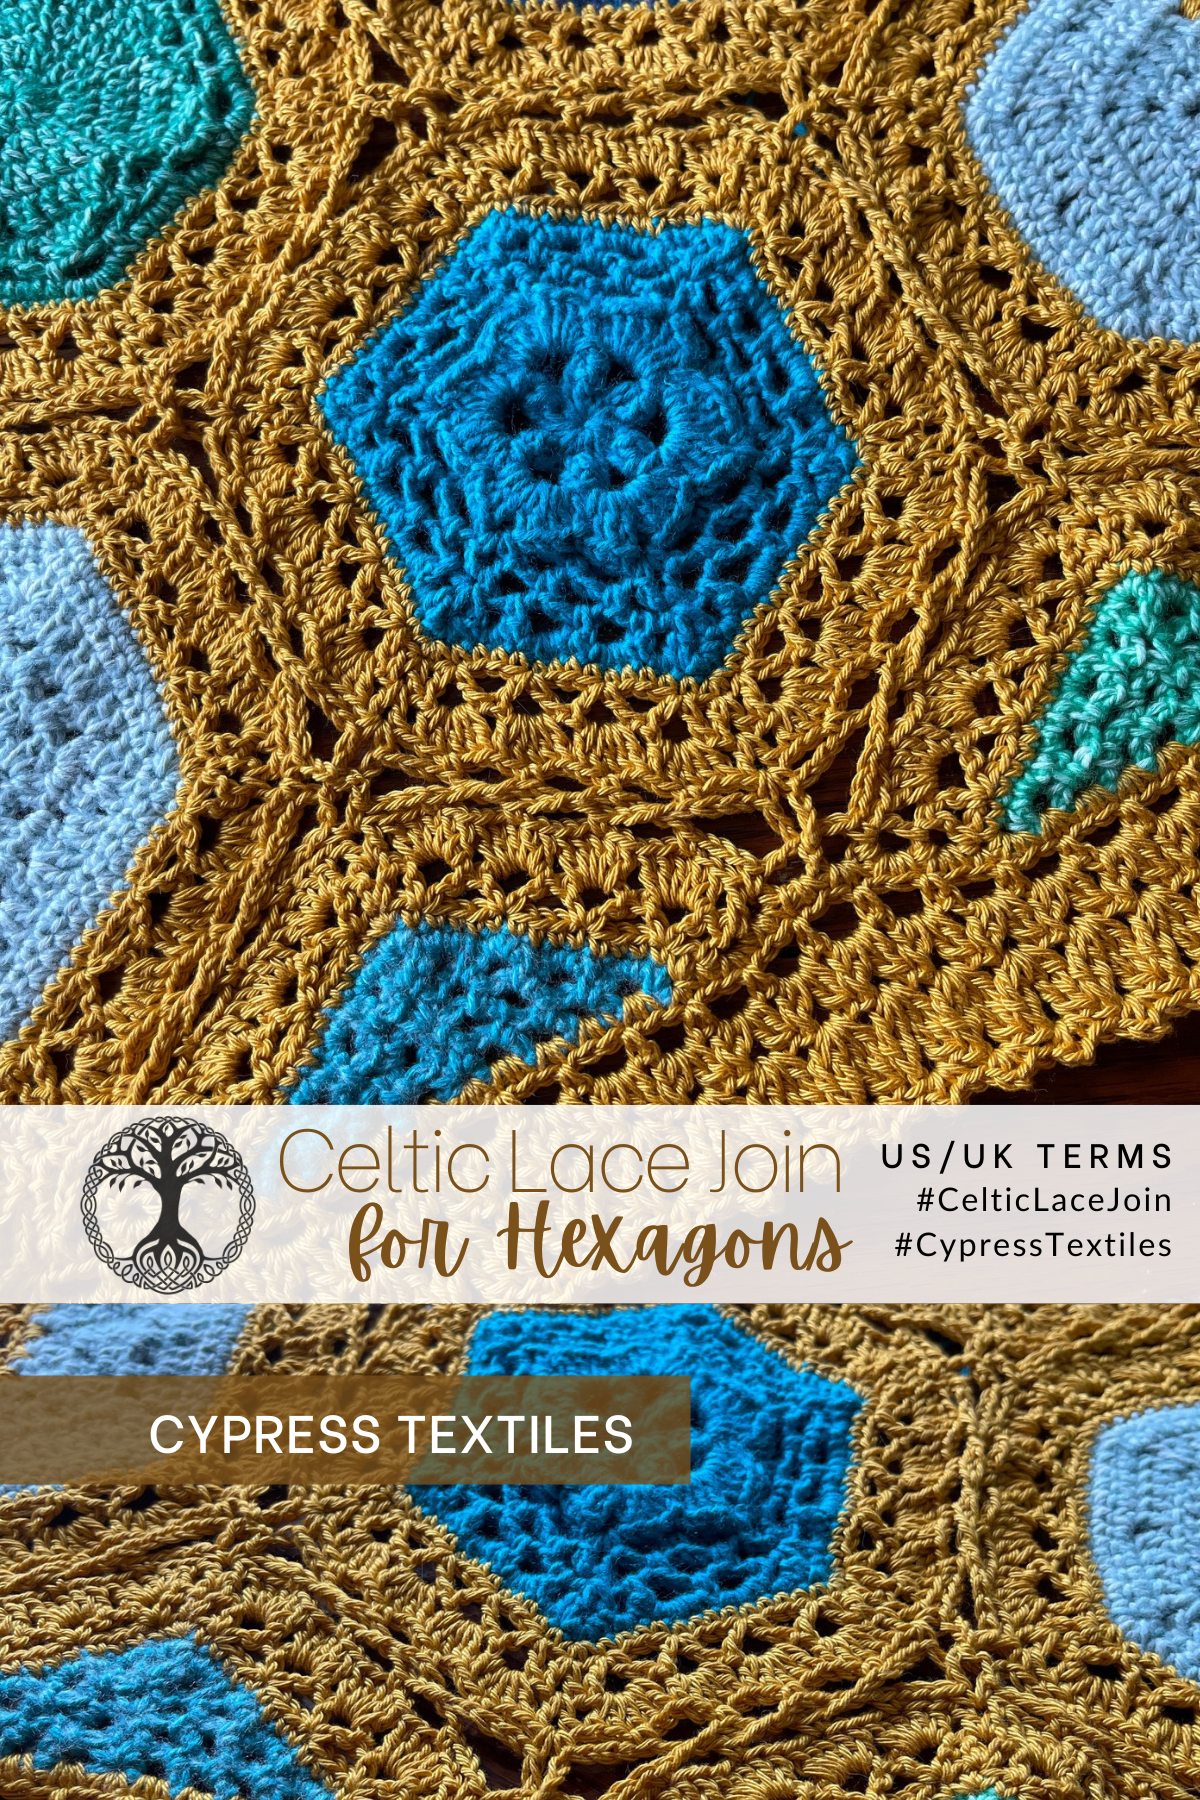
Hello, lovely crafter! Today I wanted to share my Celtic Lace Join for Hexagons with you! This was the official joining method for the 2022 VVCAL, and I thought I would also make it available as a separate post for easy bookmarking. I hope you enjoy this one!
PDF Version
You can find this joining method pattern along with the entire 2022 VVCAL in a convenient PDF on Etsy // Ravelry // CypressTextiles Online Shop.
The 2022 VVCAL PDF includes:
- 42-Page PDF of the entire 2022 VVCAL
- 36 full mix-and-match hexagons plus 2 half hexagons
- 2 joining options (Including this join) plus border
- All motifs have charted and written instructions
- 2.5 pages of tips and tricks
- Full layouts, motif progress tracker checklist, and yarn information for Scheepjes Catona Colour Pack, SW/RW Colour Pack (1 or 2 packs), and Metropolis Pack
- Guidance and blank layout for Colour Crafter and Chunky Monkey stash yarn
More Joins for Hexagon Motifs
Before we dive in, you may also enjoy these joining methods for Hexagons. I always get requests for more hexagon joins. You can bookmark that link and reference it for other projects!

–
Celtic Lace Join for Hexagons
This is the hexagon version of my Celtic Lace Join pattern that I wrote in 2013. I have made many versions of the Celtic Lace Join since then – like the Junior and Mini versions – and finally after many requests, I have the hexagon version!

–
Written Instructions
Stitch Guide (US Terms)
Scroll down for UK Terms.
- 2dccl 2dc cluster: (yoh, insert hook in st/sp, yoh, pull up lp, yoh, draw yarn through 2 lps) 2 times, yoh, draw yarn through 3 lps
- beg beginning
- beg dc (sc, ch1) – counts as 1 dc
- chN chain N number of times
- dc double crochet
- lp loop
- MR make ring: slip knot, ch3, ss in third ch from hook
- rep repeat
- rnd round
- sc single crochet
- sp space (chain space)
- ss slip stitch
- st stitch
- yoh yarn over hook
For this method, we will join the full hexagons 1 by 1 in rows, moving from top to bottom of the blanket. Half hexagons will be joined onto the blanket body after all full hexagons are joined together.

–
First Full Hexagon Motif
Rnd 1 Join background yarn with ss in corner st, [3sc in corner st, 1sc in all sts across to next corner] 4 times, ss in first sc. [96 sc]
Rnd 2 Beg dc in corner st, * ch1, 1dc in same st, sk1, [(1dc, ch3, 1dc) in next st, sk3] 3 times, (1dc, ch3, 1dc) in next st, 1dc in corner st, rep from * 5 times omt final dc, ss in beg dc. [60 dc, 30 sp]
Rnd 3 Beg dc in corner sp, [ch1, 1dc in same sp, 5dc in next 4 ch-sps, 1dc in next ch-sp] 6 times omt final dc, ss in beg dc. [132 dc, 6 sp]
Rnd 4 * (1sc, ch5, 1sc) in corner sp, ch3, sk3, 1sc, [ch3, sk4, 1sc] 3 times, ch3, rep from * 5 times, ss in first sc, cut yarn and weave ends. [36 sc, 36 sp]
Second Full Hexagon Motif
Rnds 1-3 Work as for First Motif.
Rnd 4 (1sc, ch5, 1sc) in corner sp, ch3, sk3, 1sc, [ch3, sk4, 1sc] 3 times, ch3, 1sc in corner sp, ch2, PLT in ch-5 corner sp of adjacent completed motif, ch3, 1sc in same corner sp on motif in progress, ch3, sk3, [1sc, ch1, PLT in corresponding ch-3 sp on adjacent motif, ch2, sk4] 3 times, 1sc, ch3, 1sc in corner sp, ch2, PLT in ch-5 corner sp on adjacent completed motif, ch3, 1sc in same corner sp, work rem 4 sides plain without joining, ss in first sc, cut yarn and weave ends.
Work remaining full hexagons of the top row as for second motif.
First Motif of next row
Rnds 1-4 Work as for Second Motif.
Second Motif of row
Rnds 1-3 Work as before.
Rnd 4 (1sc, ch5, 1sc) in corner sp, ch3, sk3, 1sc, [ch3, sk4, 1sc] 3 times, ch3, 1sc in corner sp, ch2, PLT in ch-5 corner sp of adjacent completed motif, ch3, 1sc in same corner sp on motif in progress, ch3, sk3, [1sc, ch1, PLT in corresponding ch-3 sp on adjacent motif, ch2, sk4] 3 times, 1sc, ch3, 1sc in corner sp, ch2, join to 2 previously joined ch-sps as follows: remove lp from hook, insert hook front to back through left-hand corner sp and back to front through right-hand corner sp, PLT so that the PLT lp goes through both corner sps, ch3, 1sc in same corner sp, join next side as before, join next corner as for previous corner, join next side as before, join next corner with PLT in adjacent corner sp, work rem 2 sides plain without joining, ss in first sc, cut yarn and weave ends.
With these techniques, you can join all remaining hexagons to make blanket body. Next, we will join the half hexies onto the blanket body. Joining method will be abbreviated in the instruction, because the same techniques as above are used.
Join the Half Hexie Motifs onto the Blanket Body

–
The first 3 rows on every half hexagon are the same, and the 4th row is the joining row, just as for the full hexagons.
Row 1 (RS) Join yarn with ss in first st, 2sc in same st, [1sc in all sts across to next corner, 3sc in corner st] 3 times omt final sc, turn. [49 sc]
Row 2 Beg dc in first st, * ch1, 1dc in same st, sk1, [(1dc, ch3, 1dc) in next st, sk3] 3 times, (1dc, ch3, 1dc) in next st, 1dc in corner st, rep from * 2 times, ch1, 1dc in same st, turn. [32 dc, 31 sp]
Row 3 Beg dc in first sp, [ch1, 1dc in same sp, 5dc in next 4 ch-sps, 1dc in next ch-sp] 3 times, ch1, 1dc in same sp, cut yarn and weave ends. [132 dc, 6 sp]
There are 3 different situations you will encounter when joining your half hexies. Either you are joining the first 2 sides only, the second 2 sides only, or you are joining all 3 sides, depending on where the motif is located in the blanket schematic. The “raw” edge is not joined. This edge will be part of the outside border of your blanket.
Joining the first 2 sides only: With RS still facing, join yarn with ss in first sp, 1sc in same sp, ch2, PLT in corresponding ch-5 sp on adjacent motif, join side as before, join corner as before, join second side, join next corner, work final side plain without joining, finishing with (1sc, ch5, 1sc) in final sp, cut yarn and weave ends. [20 sc, 19 sp]
Joining the second 2 sides only: Join yarn with ss in first sp, (1sc, ch5, 1sc) in same sp, work across first side as before, join next corner, join next side, join next corner, join next side, join final corner, cut yarn and weave ends.
Joining all 3 sides: Join yarn with ss in first st, [join corner, join side] 3 times, join final corner, cut yarn and weave ends.
Now it is time to fill in the triangle gaps at the top and bottom of your blanket.
Fill the Triangle Gaps
The top and bottom edge of your blanket is a zig-zag making triangle gaps that should be filled to make a squared-off edge. For Rows 1-5, use the remnants from a color that is in the “family” of the position of the triangle gap in the schematic.

–

–
Triangle Gap A

–
Row 1 (RS) Using remnant as instructed, MR, beg dc, [ch3, 1sc] 3 times omt final sc, 1dc, turn. [2 dc, 2 sc, 3 sp]
Row 2 1sc in first st, [ch3, 1sc in next ch-sp] 3 times, ch3, 1sc in final st, turn. [5 sc, 4 sp]
Row 3 Beg dc in first st, [ch3, 1sc in next ch-sp] 2 times, ch3, (1sc, ch3, 1sc) in next sc, [ch3, 1sc in next ch-sp] 2 times, ch3, 1dc in final st, turn. [2 dc, 6 sc, 7 sp]
Row 4 Beg dc in first st, [ch3, 1sc in next ch-sp] 4 times, ch3, 1sc in same st, [ch3, 1sc in next ch-sp] 3 times, ch3, 1dc in final st, turn. [2 dc, 8 sc, 9 sp]
Row 5 2sc in first st, [2sc in next ch-sp, 1sc in next sc] 3 times, 2sc in next ch-sp, 3sc in next ch-sp, [2sc in next ch-sp, 1sc in next sc] 3 times, 2sc in next ch-sp, 2sc in final st, cut yarn and weave ends. [29 sc]
Row 6 With RS still facing, join background yarn with ss in first st, 2sc in same st, 13sc, 3sc in next st, 13sc, 2sc in final st, turn. [33 sc]
Row 7 Beg dc in first st, * ch1, 1dc in same st, sk1, [(1dc, ch3, 1dc) in next st, sk3] 3 times, (1dc, ch3, 1dc) in next st, 1dc in corner st, rep from * 1 time, ch1, 1dc in same st, turn. [22 dc, 11 sp]
Row 8 Beg dc in first sp, [ch1, 1dc in same sp, 5dc in next 4 ch-sps, 1dc in next ch-sp] 2 times, ch1, 1dc in same sp, cut yarn and weave ends. [46 dc, 3 sp]
Row 9 With RS still facing, join yarn with ss in first sp, [join corner, join side] 2 times, join corner, cut yarn and weave ends. [14 sc, 13 sp]
Triangle Gap B

–
Row 1 (RS) Using remnant as instructed, MR, beg dc, ch1, 1sc, ch3, 1dc, turn. [2 dc, 1 sc, 2 sp]
Row 2 1sc in first st, ch3, 1sc in next ch-sp, ch3, 1sc in final st, turn. [3 sc, 2 sp]
Row 3 Beg dc in first st, ch1, 1sc in same st, [ch3, 1sc in next ch-sp] 2 times, ch3, 1dc in final st, turn. [2 dc, 3 sc, 4 sp]
Row 4 Beg dc in first st, [ch3, 1sc in next ch-sp] 4 times, ch1, 1dc in same st, turn. [2dc, 4 sc, 5 sp]
Row 5 2sc in first 2 sps, [1sc in next sc, 2sc in next ch-sp] 3 times, 2sc in final st, cut yarn and weave ends. [15 sc]
Row 6 With RS still facing, join background yarn with ss in first st, 2sc in same st, 13sc, 2sc in final st, turn. [17 sc]
Row 7 Beg dc in first st, * ch1, 1dc in same st, sk1, [(1dc, ch3, 1dc) in next st, sk3] 3 times, (1dc, ch3, 1dc) in next st, (1dc, ch1, 1dc) in final st, turn. [12 dc, 6 sp]
Row 8 Beg dc in first sp, ch1, 1dc in same sp, 5dc in next 4 ch-sps, (1dc, ch1, 1dc) in next ch-sp, cut yarn and weave ends. [24 dc, 2 sp]
Row 9 With RS still facing, join yarn with ss in first sp, join corner, join side, join corner, cut yarn and weave ends. [8 sc, 7 sp]
Triangle Gap C

–
Row 1 (RS) Using remnant as instructed, MR, beg dc, ch3, 1sc, ch1, 1dc, turn. [2 dc, 1 sc, 2 sp]
Row 2 1sc in first st, ch3, 1sc in next ch-sp, ch3, 1sc in final st, turn. [3 sc, 2 sp]
Row 3 Beg dc in first st, [ch3, 1sc in next ch-sp] 2 times, ch3, (1sc, ch1, 1dc) in final st, turn. [2 dc, 3 sc, 4 sp]
Row 4 Beg dc in first st, ch1, 1sc in same st, [ch3, 1sc in next ch-sp] 3 times, ch3, 1dc in final st, turn. [2dc, 4 sc, 5 sp]
Row 5 2sc in first st, [2sc in next ch-sp, 1sc in next sc] 3 times, 2sc in next 2 ch-sps, cut yarn and weave ends. [15 sc]
Rows 6-9 Work as for Triangle Gap B.
Fill all triangle gaps until all sides of the blanket are squared off.
Single Crochet Border Foundation Round
Make an sc border around the blanket as follows, before continuing to the border section.
On the SC Border Round, you will place sc sts evenly across each edge. Here is a guide to how I placed the sc sts.
- 2 sides with Triangle Gaps: Place 2sc in each ch-sp, including around dc sts, treating them as ch-sps
- 2 sides with Half Hexagons: Place 2sc in all ch-sps across triangle gaps at corners and half hexies, place 3sc in the ch-sps of the full hexagon sides
SC Border Round: Join background yarn with ss in corner sc, [3sc in corner st, 1sc in all sts evenly across to next corner] 4 times, ss in first sc. Double check that opposing sides have an equal amount of sts and adjust as necessary.
Now you can add any border you like!

–
Stitch Guide (UK Terms)
- 2trcl 2tr cluster: (yoh, insert hook in st/sp, yoh, pull up lp, yoh, draw yarn through 2 lps) 2 times, yoh, draw yarn through 3 lps
- beg beginning
- beg tr (1dc, ch1) – counts as 1 tr
- chN chain N number of times
- dc double crochet
- lp loop
- MR make ring: slip knot, ch3, ss in third ch from hook
- rep repeat
- rnd round
- sp space (chain space)
- ss slip stitch
- st stitch
- tr treble crochet
- yoh yarn over hook
For this method, we will join the full hexagons 1 by 1 in rows, moving from top to bottom of the blanket. Half hexagons will be joined onto the blanket body after all full hexagons are joined together.

–
First Full Hexagon Motif
Rnd 1 Join background yarn with ss in corner st, [3dc in corner st, 1dc in all sts across to next corner] 4 times, ss in first dc. [96 dc]
Rnd 2 Beg tr in corner st, * ch1, 1tr in same st, sk1, [(1tr, ch3, 1tr) in next st, sk3] 3 times, (1tr, ch3, 1tr) in next st, 1tr in corner st, rep from * 5 times omt final tr, ss in beg tr. [60 tr, 30 sp]
Rnd 3 Beg tr in corner sp, [ch1, 1tr in same sp, 5tr in next 4 ch-sps, 1tr in next ch-sp] 6 times omt final tr, ss in beg tr. [132 tr, 6 sp]
Rnd 4 * (1dc, ch5, 1dc) in corner sp, ch3, sk3, 1dc, [ch3, sk4, 1dc] 3 times, ch3, rep from * 5 times, ss in first dc, cut yarn and weave ends. [36 dc, 36 sp]
Second Full Hexagon Motif
Rnds 1-3 Work as for First Motif.
Rnd 4 (1dc, ch5, 1dc) in corner sp, ch3, sk3, 1dc, [ch3, sk4, 1dc] 3 times, ch3, 1dc in corner sp, ch2, PLT in ch-5 corner sp of adjacent completed motif, ch3, 1dc in same corner sp on motif in progress, ch3, sk3, [1dc, ch1, PLT in corresponding ch-3 sp on adjacent motif, ch2, sk4] 3 times, 1dc, ch3, 1dc in corner sp, ch2, PLT in ch-5 corner sp on adjacent completed motif, ch3, 1dc in same corner sp, work rem 4 sides plain without joining, ss in first dc, cut yarn and weave ends.
Work remaining full hexagons of the top row as for second motif.
First Motif of next row
Rnds 1-4 Work as for Second Motif.
Second Motif of row
Rnds 1-3 Work as before.
Rnd 4 (1dc, ch5, 1dc) in corner sp, ch3, sk3, 1dc, [ch3, sk4, 1dc] 3 times, ch3, 1dc in corner sp, ch2, PLT in ch-5 corner sp of adjacent completed motif, ch3, 1dc in same corner sp on motif in progress, ch3, sk3, [1dc, ch1, PLT in corresponding ch-3 sp on adjacent motif, ch2, sk4] 3 times, 1dc, ch3, 1dc in corner sp, ch2, join to 2 previously joined ch-sps as follows: remove lp from hook, insert hook front to back through left-hand corner sp and back to front through right-hand corner sp, PLT so that the PLT lp goes through both corner sps, ch3, 1dc in same corner sp, join next side as before, join next corner as for previous corner, join next side as before, join next corner with PLT in adjacent corner sp, work rem 2 sides plain without joining, ss in first dc, cut yarn and weave ends.
With these techniques, you can join all remaining hexagons to make blanket body. Next, we will join the half hexies onto the blanket body. Joining method will be abbreviated in the instruction, because the same techniques as above are used.
Join the Half Hexie Motifs onto the Blanket Body

–
The first 3 rows on every half hexagon are the same, and the 4th row is the joining row, just as for the full hexagons.
Row 1 (RS) Join yarn with ss in first st, 2dc in same st, [1dc in all sts across to next corner, 3dc in corner st] 3 times omt final dc, turn. [49 dc]
Row 2 Beg tr in first st, * ch1, 1tr in same st, sk1, [(1tr, ch3, 1tr) in next st, sk3] 3 times, (1tr, ch3, 1tr) in next st, 1tr in corner st, rep from * 2 times, ch1, 1tr in same st, turn. [32 tr, 31 sp]
Row 3 Beg tr in first sp, [ch1, 1tr in same sp, 5tr in next 4 ch-sps, 1tr in next ch-sp] 3 times, ch1, 1tr in same sp, cut yarn and weave ends. [132 tr, 6 sp]
There are 3 different situations you will encounter when joining your half hexies. Either you are joining the first 2 sides only, the second 2 sides only, or you are joining all 3 sides, depending on where the motif is located in the blanket schematic. The “raw” edge is not joined. This edge will be part of the outside border of your blanket.
Joining the first 2 sides only: With RS still facing, join yarn with ss in first sp, 1dc in same sp, ch2, PLT in corresponding ch-5 sp on adjacent motif, join side as before, join corner as before, join second side, join next corner, work final side plain without joining, finishing with (1dc, ch5, 1dc) in final sp, cut yarn and weave ends. [20 dc, 19 sp]
Joining the second 2 sides only: Join yarn with ss in first sp, (1dc, ch5, 1dc) in same sp, work across first side as before, join next corner, join next side, join next corner, join next side, join final corner, cut yarn and weave ends.
Joining all 3 sides: Join yarn with ss in first st, [join corner, join side] 3 times, join final corner, cut yarn and weave ends.
Now it is time to fill in the triangle gaps at the top and bottom of your blanket.
Fill the Triangle Gaps

–
For Rows 1-5, use the remnants from a color that is in the “family” of the position of the triangle gap in the schematic.
Triangle Gap A

–
Row 1 (RS) Using remnant as instructed, MR, beg tr, [ch3, 1dc] 3 times omt final dc, 1tr, turn. [2 tr, 2 dc, 3 sp]
Row 2 1dc in first st, [ch3, 1dc in next ch-sp] 3 times, ch3, 1dc in final st, turn. [5 dc, 4 sp]
Row 3 Beg tr in first st, [ch3, 1dc in next ch-sp] 2 times, ch3, (1dc, ch3, 1dc) in next dc, [ch3, 1dc in next ch-sp] 2 times, ch3, 1r in final st, turn. [2 tr, 6 dc, 7 sp]
Row 4 Beg tr in first st, [ch3, 1dc in next ch-sp] 4 times, ch3, 1dc in same st, [ch3, 1dc in next ch-sp] 3 times, ch3, 1dc in final st, turn. [2 tr, 8 dc, 9 sp]
Row 5 2dc in first st, [2dc in next ch-sp, 1dc in next dc] 3 times, 2dc in next ch-sp, 3dc in next ch-sp, [2dc in next ch-sp, 1dc in next dc] 3 times, 2dc in next ch-sp, 2dc in final st, cut yarn and weave ends. [29 dc]
Row 6 With RS still facing, join background yarn with ss in first st, 2dc in same st, 13dc, 3dc in next st, 13dc, 2dc in final st, turn. [33 dc]
Row 7 Beg tr in first st, * ch1, 1tr in same st, sk1, [(1tr, ch3, 1tr) in next st, sk3] 3 times, (1tr, ch3, 1tr) in next st, 1tr in corner st, rep from * 1 time, ch1, 1tr in same st, turn. [22 tr, 11 sp]
Row 8 Beg tr in first sp, [ch1, 1tr in same sp, 5tr in next 4 ch-sps, 1tr in next ch-sp] 2 times, ch1, 1tr in same sp, cut yarn and weave ends. [46 tr, 3 sp]
Row 9 With RS still facing, join yarn with ss in first sp, [join corner, join side] 2 times, join corner, cut yarn and weave ends. [14 dc, 13 sp]
Triangle Gap B

–
Row 1 (RS) Using remnant as instructed, MR, beg tr, ch1, 1dc, ch3, 1tr, turn. [2 tr, 1 dc, 2 sp]
Row 2 1dc in first st, ch3, 1dc in next ch-sp, ch3, 1dc in final st, turn. [3 dc, 2 sp]
Row 3 Beg tr in first st, ch1, 1dc in same st, [ch3, 1dc in next ch-sp] 2 times, ch3, 1tr in final st, turn. [2 tr, 3 dc, 4 sp]
Row 4 Beg tr in first st, [ch3, 1dc in next ch-sp] 4 times, ch1, 1tr in same st, turn. [2 tr, 4 dc, 5 sp]
Row 5 2dc in first 2 sps, [1dc in next dc, 2dc in next ch-sp] 3 times, 2dc in final st, cut yarn and weave ends. [15 dc]
Row 6 With RS still facing, join background yarn with ss in first st, 2dc in same st, 13dc, 2dc in final st, turn. [17 dc]
Row 7 Beg tr in first st, * ch1, 1tr in same st, sk1, [(1tr, ch3, 1tr) in next st, sk3] 3 times, (1tr, ch3, 1tr) in next st, (1tr, ch1, 1tr) in final st, turn. [12 tr, 6 sp]
Row 8 Beg tr in first sp, ch1, 1tr in same sp, 5tr in next 4 ch-sps, (1tr, ch1, 1tr) in next ch-sp, cut yarn and weave ends. [24 tr, 2 sp]
Row 9 With RS still facing, join yarn with ss in first sp, join corner, join side, join corner, cut yarn and weave ends. [8 dc, 7 sp]
Triangle Gap C

–
Row 1 (RS) Using remnant as instructed, MR, beg tr, ch3, 1dc, ch1, 1tr, turn. [2 tr, 1 dc, 2 sp]
Row 2 1dc in first st, ch3, 1dc in next ch-sp, ch3, 1dc in final st, turn. [3 dc, 2 sp]
Row 3 Beg tr in first st, [ch3, 1dc in next ch-sp] 2 times, ch3, (1dc, ch1, 1tr) in final st, turn. [2 tr, 3 dc, 4 sp]
Row 4 Beg tr in first st, ch1, 1dc in same st, [ch3, 1dc in next ch-sp] 3 times, ch3, 1tr in final st, turn. [2 tr, 4 dc, 5 sp]
Row 5 2dc in first st, [2dc in next ch-sp, 1dc in next dc] 3 times, 2dc in next 2 ch-sps, cut yarn and weave ends. [15 dc]
Rows 6-9 Work as for Triangle Gap B.
Fill all triangle gaps until all sides of the blanket are squared off.
Double Crochet Border Foundation Round
Make a dc border around the blanket as follows, before continuing to the border section.
On the DC Border Round, you will place dc sts evenly across each edge. Here is a guide to how I placed the dc sts.
- 2 sides with Triangle Gaps: Place 2dc in each ch-sp, including around dc sts, treating them as ch-sps
- 2 sides with Half Hexagons: Place 2dc in all ch-sps across triangle gaps at corners and half hexies, place 3dc in the ch-sps of the full hexagon sides
SC Border Round: Join background yarn with ss in corner dc, [3dc in corner st, 1dc in all sts evenly across to next corner] 4 times, ss in first dc. Double check that opposing sides have an equal amount of sts and adjust as necessary.
Now you can add any border you like!

–
Celtic Lace Join for Hexagons – Video Instruction (3 Parts)
Part 1
Part 2
Part 3
I hope the videos are helpful!

–
Thank you so much for stopping in to see this join! You can definitely use it for any size hexagon, just add more stitches and more chain loops on each side.
Happy crafting,
Rachele C. – The Art of Crochet Blankets
–
Support My Work
You’re supporting by just being here! You can read my blog (Start Here!), like and comment on socials, and message me for a chat. All of this supports my work free of charge!
- Affiliate links – Shopping through my links supports me at no additional cost to you as I get a small commission through my affiliates. Jimmy Beans Wool // WoolWarehouse // Amazon.com
- Buy my pattern book – I wrote a super neat crochet blanket pattern book, published under Penguin Random House. You can buy it here!
- Browse my self-published patterns – I have over a hundred patterns on Etsy and Ravelry
- Creative Art Blanket Course – Check it out on Podia
Where to Find Me
- Instagram: @cypresstextiles
- Facebook Page: CypressTextiles
- YouTube Channel: Rachele Carmona
- Pinterest: CypressTextiles
- Tumblr: CypressTextiles
- Etsy: CypressTextiles
- Ravelry: Rachele Carmona
- Podia: Creative Art Blanket Course