CypressTextiles Tree Huggers Facebook Group – This is my main FB group (join!). Share your VVCAL progress pics in this group if you like, and I will share CAL highlights here, but the weekly action will be in the other group linked above.
Florence is considered the birthplace of the Renaissance, and has been called “the Athens of the Middle Ages”
The Historic Center of Florence attracts 13 million tourists each year
Italian Gelato was invented in Florence! It was the Florentine architect who in 1565 made the first frozen dessert considered as Italian Gelato.
Florence Nightingale, famous nurse and founder of modern nursing, was born on May 12, 1820 in Florence, Italy, and was named after the city of her birth.
Fashion brand Gucci was founded in Florence by Guccio Gucci in 1921.
Beautiful sunset cityscape view of the Santa maria nouvelle Duomo and the town of Florence, in the Italian Tuscany.
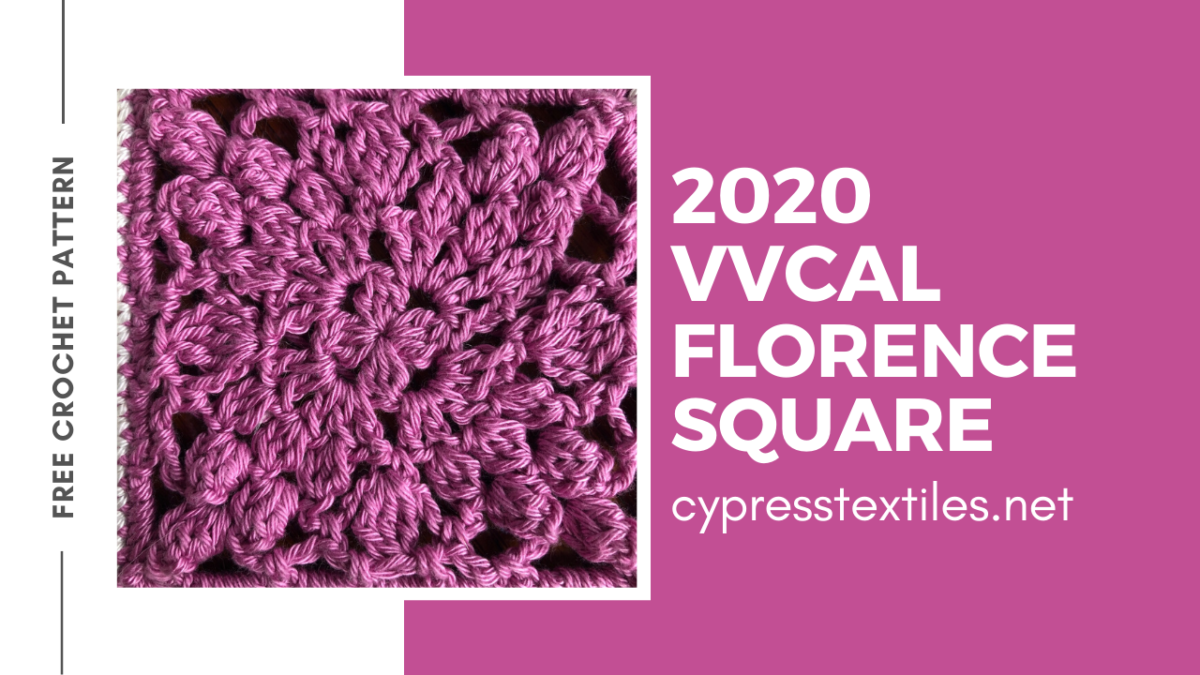
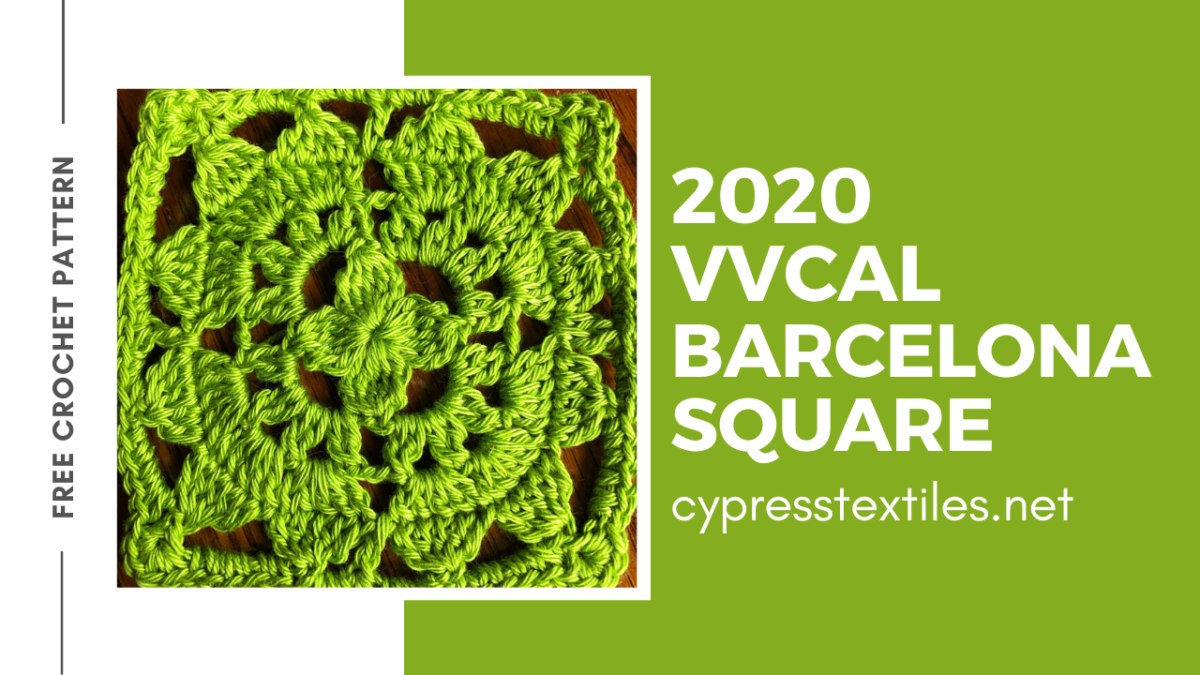
Florence Square Pattern
“Catona 10g Colour Pack” Version: Make 2 – Use colors 399 and 398
Catona “Shy Violet” Version: Make 2 – Use colors 249 and 264
Catona “Fresh Earth” Version: Make 2 – Use colors 388 and 524
Colour Crafter Version: Make 1 – I used color 1035 Note: I’m just using my stash.
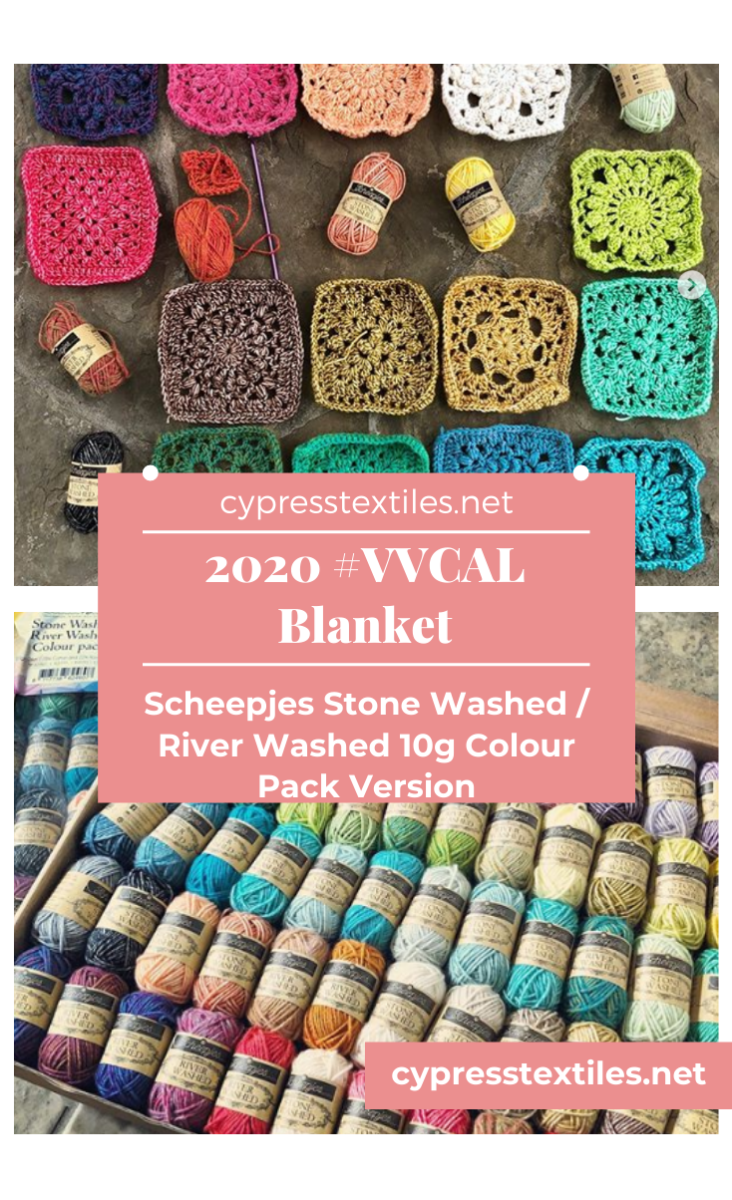
Stone Washed / River Washed 10g Colour Pack Version: Make 2 – Use colors 836 and 821
Measurements and Materials
Measurements: Blanket will measure about 64x72in for all colorways/yarns
Gauge: Squares measure 4.25in for Catona, 6in for Colour Crafter, 4.5in for Stone Washed/River Washed
Notions: US Size 3mm hook for Catona, 4.25mm hook for Colour Crafter, 3mm for Stone Washed’/River Washed
3dccl (yoh, insert hook in st/sp, yoh, pull up lp, yoh, draw yarn through 2 lps) 3 times, yoh, draw yarn through 4 lps
3trcl * yoh 2 times, insert hook in st, yoh pull through, (yoh, pull through 2 lps on hook) 2 times, rep from * 2 times, yoh and pull through all 4 lps
4dc-popcorn 4dc in st/sp indicated, remove lp from hook, insert hook front to back through first dc, pull lp to the front of the work to close popcorn
beg beginning
beg 3dccl beg dc, (yoh, insert hook in st/sp, yoh, pull up lp, yoh, draw yarn through 2 lps) 2 times, yoh, draw yarn through 3 lps – Counts as 1 3dccl
beg 4dc-popcorn (beg dc, 3dc) in st/sp indicated, remove lp from hook, insert hook front to back through beg dc, pull lp to the front of the work to close popcorn
beg dc (sc, ch1) – counts as 1 dc
beg tr (sc, ch2) – counts as 1 tr
chN chain N number of times
dc double crochet
hdc half double crochet
lp loop
MR make ring: slip knot, ch3, ss in third ch from hook
rep repeat
rnd round
sc single crochet
sp space (chain space)
ss slip stitch
st stitch
tr treble crochet
yoh yarn over hook
Written Instructions & Step-by-step Photos (US Terms)
Rnd 1 MR, beg 3dccl, (ch4, 3dccl) 3 times, ch4, ss in beg 3dccl. [4 3dccl, 4 sp]
Rnd 2 Beg dc in sp, * (ch1, dc in same sp) 4 times, ch1, dc in next sp, rep from * 3 times omitting final dc, ss in beg dc. [20 dc, 20 sp]
Rnd 3 Ss in first ch, beg 3dccl in dc, * (ch2, 3dccl in next dc) 2 times, ch4, sk 1 sp, sc in next sp, ch4, sk 1 sp, 3dccl in next dc, rep from * 3 times omitting final 3dccl, ss in beg 3dccl. [12 3dccl, 4 sc, 16 sp]
Rnd 4 Beg 4dc-pcorn in first sp, * ch2, 4dc-pcorn in next sp, ch5, sc in next sp, ch2, 3trcl in next sc, ch2, sc in next sp, ch5, 4dc-pcorn in next sp, rep from * 3 times omitting final 4dc-pcorn, ss in beg 4dc-pcorn. [8 4dc-pcorn, 4 3trcl, 8 sc, 20 sp]
Rnd 5 Beg 4dc-pcorn in first sp, * ch3, ss in third ch from the hook – picot made, ch4, (sc in next sp, ch3) 3 times, sc in next sp, ch4, 4dc-pcorn in next sp, rep from * 3 times omitting final 4dc-pcorn, ss in beg 4dc-pcorn. [4 picot, 4 4dc-pcorn, 16 sc, 20 sp]
Rnd 6 (3sc in picot, 4sc in next sp, sc in sc, 2sc in next sp, sc in sc, 3sc in next sp, sc in sc, 2sc in next sp, sc in sc, 4sc in next sp) 4 times, ss in first sc, cut yarn and weave ends. [88 sc]
Stitch Guide (UK Terms)
Note: Scroll up for US Terms.
3trcl (yoh, insert hook in st/sp, yoh, pull up lp, yoh, draw yarn through 2 lps) 3 times, yoh, draw yarn through 4 lps
3dtrcl * yoh 2 times, insert hook in st, yoh pull through, (yoh, pull through 2 lps on hook) 2 times, rep from * 2 times, yoh and pull through all 4 lps
4tr-popcorn 4tr in st/sp indicated, remove lp from hook, insert hook front to back through first tr, pull lp to the front of the work to close popcorn
beg beginning
beg 3trclbeg tr, (yoh, insert hook in st/sp, yoh, pull up lp, yoh, draw yarn through 2 lps) 2 times, yoh, draw yarn through 3 lps – Counts as 1 3trcl
beg 4tr-popcorn (beg tr, 3tr) in st/sp indicated, remove lp from hook, insert hook front to back through beg tr, pull lp to the front of the work to close popcorn
beg tr(dc, ch1) – counts as 1 tr
beg dtr (dc, ch2) – counts as 1 dtr
chNchain N number of times
dcdouble crochet
dtr double treble crochet
htr half treble crochet
lploop
MRmake ring: slip knot, ch3, ss in third ch from hook
rep repeat
rndround
spspace (chain space)
ss slip stitch
ststitch
trtreble crochet
yohyarn over hook
Written Instructions & Step-by-step Photos (UK Terms)
Rnd 1 MR, beg 3trcl, (ch4, 3trcl) 3 times, ch4, ss in beg 3trcl. [4 3trcl, 4 sp]
Rnd 2 Beg tr in sp, * (ch1, tr in same sp) 4 times, ch1, tr in next sp, rep from * 3 times omitting final tr, ss in beg tr. [20 tr, 20 sp]
Rnd 3 Ss in first ch, beg 3trcl in tr, * (ch2, 3trcl in next tr) 2 times, ch4, sk 1 sp, dc in next sp, ch4, sk 1 sp, 3trcl in next tr, rep from * 3 times omitting final 3trcl, ss in beg 3trcl. [12 3trcl, 4 dc, 16 sp]
Rnd 4 Beg 4tr-pcorn in first sp, * ch2, 4tr-pcorn in next sp, ch5, dc in next sp, ch2, 3dtrcl in next dc, ch2, dc in next sp, ch5, 4tr-pcorn in next sp, rep from * 3 times omitting final 4tr-pcorn, ss in beg 4tr-pcorn. [8 4tr-pcorn, 4 3dtrcl, 8 dc, 20 sp]
Rnd 5 Beg 4tr-pcorn in first sp, * ch3, ss in third ch from the hook – picot made, ch4, (dc in next sp, ch3) 3 times, dc in next sp, ch4, 4tr-pcorn in next sp, rep from * 3 times omitting final 4tr-pcorn, ss in beg 4tr-pcorn. [4 picot, 4 4tr-pcorn, 16 dc, 20 sp]
Rnd 6 (3dc in picot, 4dc in next sp, dc in dc, 2dc in next sp, dc in dc , 3dc in next sp, dc in dc, 2dc in next sp, dc in dc, 4dc in next sp) 4 times, ss in first dc, cut yarn and weave ends. [88 dc]
CypressTextiles Tree Huggers Facebook Group – This is my main FB group (join!). Share your VVCAL progress pics in this group if you like, and I will share CAL highlights here, but the weekly action will be in the other group linked above.
CypressTextiles Tree Huggers Facebook Group – This is my main FB group (join!). Share your VVCAL progress pics in this group if you like, and I will share CAL highlights here, but the weekly action will be in the other group linked above.
Istanbul is the only transcontinental city in the world located on two continents, Europe and Asia.
In its thousands of years of history, it has been the capital of three great empires – Roman, Byzantine and Ottoman. However the modern day capital of Turkey is Ankara.
Istanbul has had several different names in the past, including Byzantium, Constantinople, Stamboul and Tsarigrad.
Istanbul is surrounded by sea, with the Bosphorus cutting right through it. The European bank of the Bosphorus is dotted by palaces and parks while the Asian bank houses lovely residential neighbourhoods.
The delicately preserved history allows visitors to step back in time and relive Istanbul as the centre and mirror of 2 world empires and 2 world religions over 16 centuries.
Exterior view of the famous Sultan Ahmet or Blue Mosque in Istanbul, Turkey.
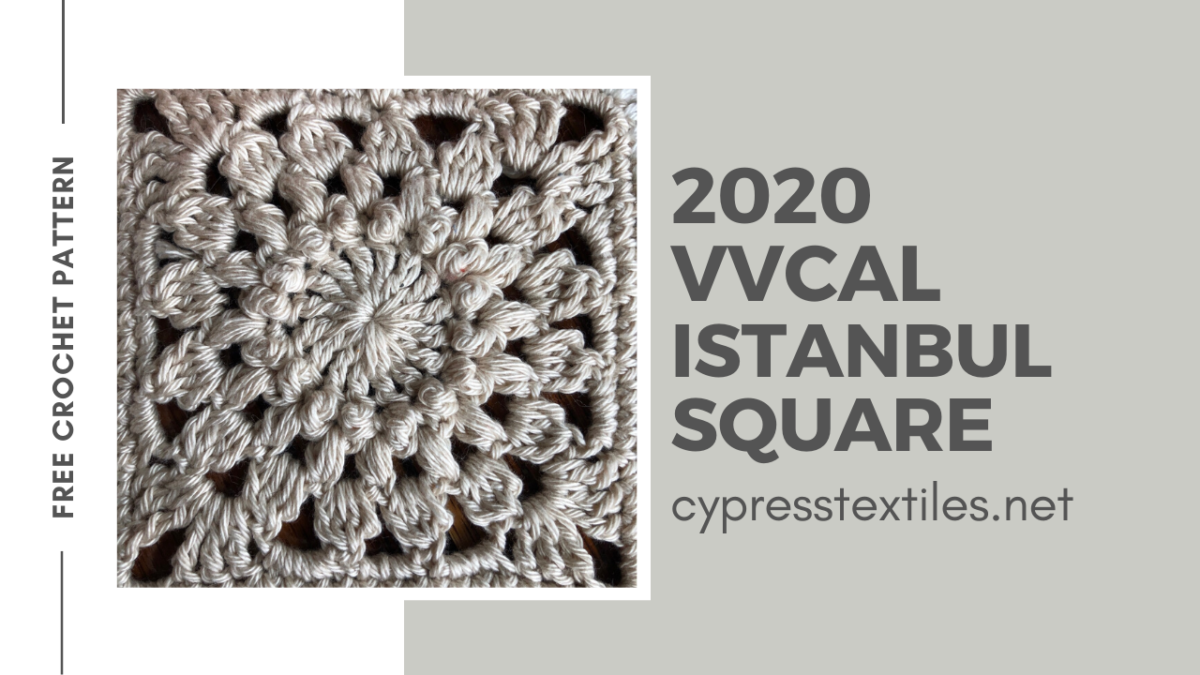
Istanbul Square Pattern
“Catona 10g Colour Pack” Version: Make 2 – Use colors 509 and 201
Catona “Shy Violet” Version: Make 2 – Use colors 519 and 264
Catona “Fresh Earth” Version: Make 2 – Use colors 157 and 522
Colour Crafter Version: Make 1 – I used color 1035 Note: I’m just using my stash.
Stone Washed / River Washed 10g Colour Pack Version: Make 2 – Use colors 962 and 952
Measurements and Materials
Measurements: Blanket will measure about 64x72in for all colorways/yarns
Gauge: Squares measure 4.25in for Catona, 6in for Colour Crafter, 4.5in for Stone Washed/River Washed
Notions: US Size 3mm hook for Catona, 4.25mm hook for Colour Crafter, 3mm for Stone Washed’/River Washed
CypressTextiles Tree Huggers Facebook Group – This is my main FB group (join!). Share your VVCAL progress pics in this group if you like, and I will share CAL highlights here, but the weekly action will be in the other group linked above.
Hello, fellow 2020 VVCALer! I decided to create a separate post for each version of the blanket that I am posting each week, that way you can follow along with your particular project and have more details. All 5 pages aren’t quite finished at the time I published this post, but as I finish them, I will link them below.
The purpose of this page is to supplement your normal VVCAL routine. So you will still look at the posts weekly to get your square color numbers and patterns, but when we get further along into joining and finishing up the squares, there are differences that are specific to each colorway. For this reason, I thought it would be beneficial to just have a place to look at only your blanket’s general information and photos. PS, affiliate links are marked with an asterisk. Purchasing through them will gain me a small commission at no extra cost to you.
These are the tips and tricks that pertain to the SW / RW 10g Colour Pack Version only. For all tips and tricks, head to the FAQ post.
When will we start joining our squares?
I will release joining instructions for the blanket by June 15; however, if you are using a 10g Colour Pack and you want to follow my payout exactly, then you need to wait until after all the squares are made to start joining.
Can I join my squares with a different color from the Colour Pack?
Yes! Here’s how: When your preferred joining color comes up in the CAL, you need to sub in Color No. 821 instead. Then you will simply use up your chosen color ball when you start joining.
I’m using a 10g skein color pack.Can I go up a hook size for larger squares?
Yes! But beware some squares (especially the ones with lots of petals or popcorns) which use more yarn will make you run out if you use a larger hook. You can substitute in one of the other squares or even one from the 2016 or 2018 VVCAL.
There are too many Plain Granny squares! 40 is too much!
You can always substitute in one of the other squares or even one from the 2016 or 2018 VVCAL. When I post the color layout, I will completely ignore the design of the squares, and will be placing them based solely on color. So for the final layout, it won’t matter if you sub in other VVCAL squares.
How can I keep all of these squares organized for the color layout?
Here are some ideas that your fellow makers are suggesting:
Take a photo of the square and edit in text over it with the color number.
Roll up the square and put it into the yarn ball band. (Love this one.)
Wrap your excess yarn around the ball band so you can compare it later.
Instagram user @hookedongoodyarns
Weekly Timeline, Stone Washed / River Washed 10g Colour Pack version:
This timeline includes 108 Squares. (Alternatively you can make your blanket 10×12 squares by adding in 12 optional striped granny squares using your leftovers – for a 120 squares blanket.)
CypressTextiles Tree Huggers Facebook Group – This is my main FB group (join!). Share your VVCAL progress pics in this group if you like, and I will share CAL highlights here, but the weekly action will be in the other group linked above.
Budapest became a city on November 17, 1873 when the three neighboring cities of Pest, Buda and Óbuda united. The unification was an extremely important historic event that lead to a rapid development of the city.
No building in the city can be taller than 96 meters. The number 96 represents the year when the Magyars settled in the area (896).
Budapest has the largest synagogue in Europe
Beneath the city of Budapest lies a hidden subterranean world, a maze of over 200 caverns. The caverns are the result of the large number of geothermal springs in the area.
Budapest is home to the onlymetro system in the world that is a UNESCO Site. The Budapest Millennium Underground line opened in 1896, making it the second oldest metro line in Europe, after the London Underground.
The Hungarian Parliament Building on the Banks of the Danube at dawn.
Budapest Square Pattern
“Catona 10g Colour Pack” Version: Make 2 – Use colors 256 and 157
Catona Color No. 256
Catona Color No. 157
Catona “Shy Violet” Version: Make 2 – Use colors 398 and 519
Catona Color No. 398
Catona “Fresh Earth” Version: Make 2 – Use colors 157 and 524
Catona Color No. 157
Colour Crafter Version: Make 1 – I used color 1034 Note: I’m just using my stash.
Stone Washed / River Washed 10g Colour Pack Version: Make 2 – Use colors 835 and 960
Measurements and Materials
Measurements: Blanket will measure about 64x72in for all colorways/yarns
Gauge: Squares measure 4.25in for Catona, 6in for Colour Crafter, 4.5in for Stone Washed/River Washed
Notions: US Size 3mm hook for Catona, 4.25mm hook for Colour Crafter, 3mm for Stone Washed’/River Washed
4tr-popcorn 4tr in st/sp indicated, remove lp from hook, insert hook front to back through first tr, pull lp to the front of the work to close popcorn
beg beginning
beg 4tr-popcorn (beg tr, 3tr) in st/sp indicated, remove lp from hook, insert hook front to back through beg tr, pull lp to the front of the work to close popcorn
beg dc (sc, ch1) – counts as 1 dc
beg tr (sc, ch2) – counts as 1 tr
chN chain N number of times
dc double crochet
hdc half double crochet
lp loop
MR make ring: slip knot, ch3, ss in third ch from hook
rep repeat
rnd round
sc single crochet
sp space (chain space)
ss slip stitch
st stitch
tr treble crochet
yoh yarn over hook
Written Instructions & Step-by-step Photos (US Terms)
Rnd 1 MR, beg tr, (ch1, tr) 11 times, ch1, ss in beg tr. [12 tr, 12 sp]
Rnd 2 Beg 4tr-popcorn, (ch3, 4tr-popcorn in next sp) 11 times, ch3, ss in beg 4tr-popcorn. [12 4tr-popcorn, 12 sp]
Rnd 3 (2sc, ch1, 2sc, ch1) in all 12 sps around, ss in first sc. [48 sc, 24 sp]
Rnd 4 Ss in next sc, (sc in next sp, ch3) 24 times, ss in first sc. [24 sc, 24 sp]
Rnd 5 * 3sc in next 3 sps, 3hdc in next sp, (2dc, 2ch, 2dc) in corner sp, 3hdc in next sp, rep from * 3 times, ss in first sc. [16 dc, 24 hdc, 36 sc, 4 sp]
note: photos show (3dc, ch2, 3dc) in the corners – the written instruction is correct with (2dc, ch2, 2dc)
Rnd 6 (Sc in all sts across to corner, 3sc in corner sp) 4 times, sc in all sts across to beginning, ss in first sc, cut yarn and weave ends. [88 sc]
Stitch Guide (UK Terms)
Note: Scroll up for US Terms.
4dtr-popcorn 4dtr in st/sp indicated, remove lp from hook, insert hook front to back through first dtr, pull lp to the front of the work to close popcorn
begbeginning
beg 4dtr-popcorn (beg dtr, 3dtr) in st/sp indicated, remove lp from hook, insert hook front to back through beg dtr, pull lp to the front of the work to close popcorn
beg tr (dc, ch1) – counts as 1 tr
beg dtr (dc, ch2) – counts as 1 dtr
chN chain N number of times
dc double crochet
dtr double treble crochet
htr half treble crochet
lp loop
MR make ring: slip knot, ch3, ss in third ch from hook
rep repeat
rnd round
sp space (chain space)
ss slip stitch
st stitch
tr treble crochet
yoh yarn over hook
Written Instructions & Step-by-step Photos (UK Terms)
Rnd 1 MR, beg dtr, (ch1, dtr) 11 times, ch1, ss in beg dtr. [12 dtr, 12 sp]
Rnd 2 Beg 4dtr-popcorn, (ch3, 4dtr-popcorn in next sp) 11 times, ch3, ss in beg 4dtr-popcorn. [12 4dtr-popcorn, 12 sp]
Rnd 3 (2dc, ch1, 2dc, ch1) in all 12 sps around, ss in first dc. [48 dc, 24 sp]
Rnd 4 Ss in next dc, (dc in next sp, ch3) 24 times, ss in first dc. [24 dc, 24 sp]
Rnd 5 * 3dc in next 3 sps, 3htr in next sp, (2tr, 2ch, 2tr) in corner sp, 3htr in next sp, rep from * 3 times, ss in first dc. [16 tr, 24 htr, 36 dc, 4 sp]
note: photos show (3tr, ch2, 3tr) in the corners – the written instruction is correct with (2tr, ch2, 2tr)
Rnd 6 (Dc in all sts across to corner, 3dc in corner sp) 4 times, dc in all sts across to beginning, ss in first dc, cut yarn and weave ends. [88 dc]
CypressTextiles Tree Huggers Facebook Group – This is my main FB group (join!). Share your VVCAL progress pics in this group if you like, and I will share CAL highlights here, but the weekly action will be in the other group linked above.
CypressTextiles Tree Huggers Facebook Group – This is my main FB group (join!). Share your VVCAL progress pics in this group if you like, and I will share CAL highlights here, but the weekly action will be in the other group linked above.
Cape Town is home to the incredible Table Mountain, which supposedly rose from the sea level millions of years ago!
The city is one of the cleanest and safest capitals in the world. In fact, it was the first non-European city to receive the coveted Blue Flag award.
Table Mountain Park, based in Cape Town, is said to be a hotbed for plant life. In fact, there are more plant species growing in this 22,000-hectare zone than there are in the whole of the UK!
The Cape Floral Kingdom, too, is home to thousands of plants you won’t see elsewhere in the world. Nearly 7,000 flora species, in fact, grow here exclusively.
The population of the Western Cape is surprisingly young. Almost half of the population falls below the age of 25!
Table Mountain covered by its typical cloud table cloth and the twelve Apostles. Below on the left you can see Cape Town and the beautiful Camps Bay on the right. Taken right after sunset.
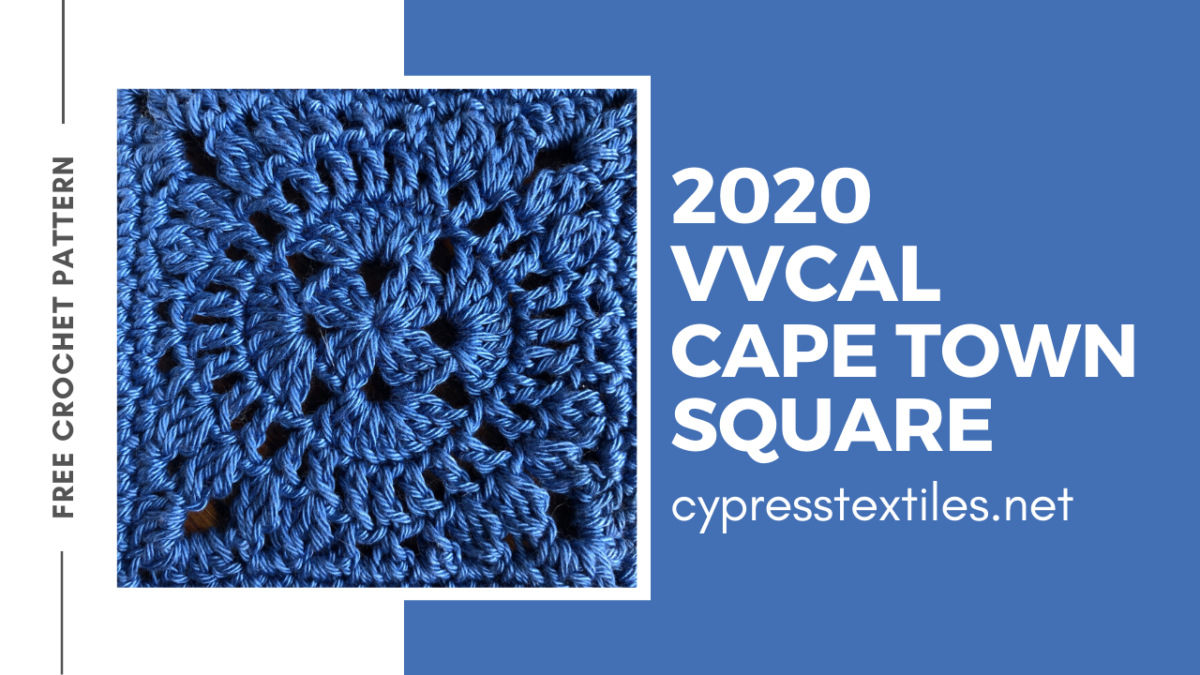
Cape Town Square Pattern
“Catona 10g Colour Pack” Version: Make 2 – Use colors 247 and 251
Catona Color No. 247
Catona Color No. 251
Catona “Shy Violet” Version: Make 2 – Use colors 249 and 520
Catona “Fresh Earth” Version: Make 2 – Use colors 249 and 404
Catona Color No. 404
Colour Crafter Version: Make 1 – I used color 1277 Note: I’m just using my stash.
Stone Washed / River Washed 10g Colour Pack Version: Make 2 – Use colors 823 and 805
Stone Washed Color No. 823
Stone Washed Color No. 805
Measurements and Materials
Measurements: Blanket will measure about 64x72in for all colorways/yarns
Gauge: Squares measure 4.25in for Catona, 6in for Colour Crafter, 4.5in for Stone Washed/River Washed
Notions: US Size 3mm hook for Catona, 4.25mm hook for Colour Crafter, 3mm for Stone Washed’/River Washed
3dccl 3dc cluster: (yoh, insert hook in st/sp, yoh, pull up lp, yoh, draw yarn through 2 lps) 3 times, yoh, draw yarn through 4 lps
beg beginning
beg dc (sc, ch1) – counts as 1 dc
chN chain N number of times
dc double crochet
lp loop
MR make ring: slip knot, ch3, ss in third ch from hook
rep repeat
rnd round
sc single crochet
sp space (chain space)
ss slip stitch
st stitch
yoh yarn over hook
Written Instructions & Step-by-step Photos (US Terms)
Rnd 1 MR, beg dc, (ch3, 3dc) 3 times, ch3, 2dc, ss in beg dc. [12 dc, 4 sp]
Rnd 2 Beg dc, (6dc in same sp, ch1, dc in next sp) 4 times omitting final dc, ss in beg dc. [28 dc, 4 sp]
Rnd 3 Beg dc in next st, (ch1, dc in next dc) 27 times, ch1, ss in beg dc. [28 dc, 28 sp]
Rnd 4 Ss in first ch, * (sc in next dc, ch2) 3 times, 3dccl in next dc, ch2, 3dccl in next dc, ch5, (3dccl in next dc, ch2) 2 times, rep from * 3 times, ss in first sc. [16 3dccl, 12 sc, 28 sp]
Rnd 5 * 2sc in next sp, sc in next sc, 2sc in next 3 sps, (3dc, ch2, 3dc), 2sc in next 2 sps, rep from * 3 times, ss in first sc. [24 dc, 52 sc]
Rnd 6 (Sc in all sts across to corner, 3sc in corner sp) 4 times, sc in all sts across to beginning, ss in first sc, cut yarn and weave ends. [88 sc]
Stitch Guide (UK Terms)
Note: Scroll up for US Terms.
3trcl 3tr cluster: (yoh, insert hook in st/sp, yoh, pull up lp, yoh, draw yarn through 2 lps) 3 times, yoh, draw yarn through 4 lps
beg beginning
beg tr (dc, ch1) – counts as 1 tr
chN chain N number of times
dc double crochet
lp loop
MR make ring: slip knot, ch3, ss in third ch from hook
rep repeat
rnd round
sp space (chain space)
ss slip stitch
st stitch
tr treble crochet
yoh yarn over hook
Written Instructions & Step-by-step Photos (UK Terms)
Rnd 1 MR, beg tr, (ch3, 3tr) 3 times, ch3, 2tr, ss in beg tr. [12 tr, 4 sp]
Rnd 2 Beg tr, (6tr in same sp, ch1, tr in next sp) 4 times omitting final tr, ss in beg tr. [28 tr, 4 sp]
Rnd 3 Beg tr in next st, (ch1, tr in next tr ) 27 times, ch1, ss in beg tr . [28 tr, 28 sp]
Rnd 4 Ss in first ch, * (dc in next tr, ch2) 3 times, 3trcl in next tr, ch2, 3trcl in next tr, ch5, (3trcl in next tr, ch2) 2 times, rep from * 3 times, ss in first dc. [16 3trcl, 12 dc, 28 sp]
Rnd 5 * 2dc in next sp, dc in next dc, 2dc in next 3 sps, (3tr, ch2, 3tr), 2dc in next 2 sps, rep from * 3 times, ss in first dc. [24 tr, 52 dc]
Rnd 6 (Dc in all sts across to corner, 3dc in corner sp) 4 times, dc in all sts across to beginning, ss in first dc, cut yarn and weave ends. [88 dc]
CypressTextiles Tree Huggers Facebook Group – This is my main FB group (join!). Share your VVCAL progress pics in this group if you like, and I will share CAL highlights here, but the weekly action will be in the other group linked above.
Hello, precious crafter! Today is a great day because I am releasing my French Braid Blanket free crochet pattern. I really hope you enjoy it, and do have a peek at the WIP post of this project to see a lot more details if you’re interested. PS, do you know how many times I’ve typed “French Bread” instead of braid? Countless… lol
Use this hashtag, whether you make the Mondo Square version or the Mini Square version, just to keep all of the French Braid Blankets together.
#FrenchBraidBlanket
Find this pattern in a condensed ad-free PDF for a small fee on Etsy, and Ravelry. Both MONDO and MINI Square versions PDFs are included! Coloring pages for layout are also included.
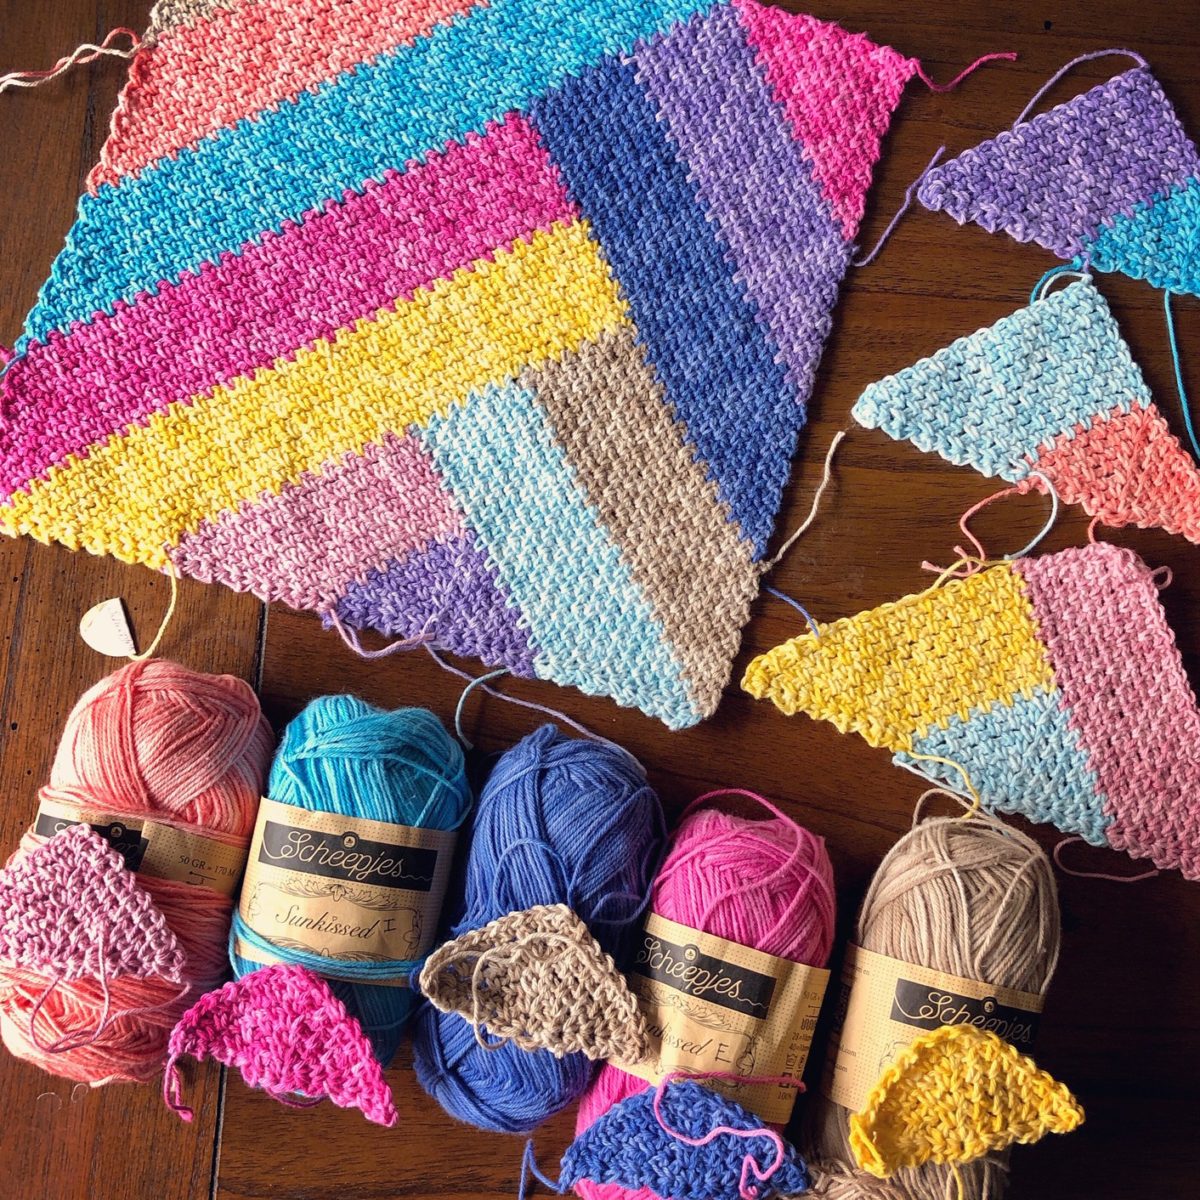
There are 2 versions of this blanket, the Mondo Square version and the Mini Square version. You can pick which one you want to make for your blanket! Both instructions are included below. Also, I have made each square, Mondo and Mini, in 3 different weight yarns to showcase how you can resize the blanket just by changing yarn weight.
Below, you can see Mondo Squares at top left and Mini Squares at bottom right. The 3 yarns pictured are (left to right) Scheepjes: Sunkissed, Stone Washed XL, and Colour Crafter + Velvet. You can really see how the size of the squares differ beautifully!
Note: this post contains affiliate links marked with an asterisk. Purchasing through these links gains me a small commission at no additional cost to you.
To Mondo or to Mini?
Should you make the Mondo version or the Mini version?
Make the Mondo version if:
You have larger quantities of each color
You want fewer ends to weave (the squares are larger so you need to make fewer of them for the same size blanket)
You want to make fewer motifs to reach your desired blanket size
Make the Mini version if:
You are working with small amounts of yarn, for a zero-waste project (remnants busting)
You want each motif to be quicker for instant gratification
You like the look of many motifs or want more color variety
French Braid Blanket, Mondo Square Version
Scroll down for Mini Square version.
Find this pattern in a condensed ad-free PDF for a small fee on Etsy, and Ravelry. Both MONDO and MINI Square versions PDFs are included! Coloring pages for layout are also included.
Materials
Size 3.5mm hook
Scheepjes Sunkissed Yarn
Important note about hook size: Whichever hook you would normally use for a certain yarn, you should go up a hook size for this project. Linen stitch tends to “pull in” so your project may be too stiff if you use your normal hook size. If you are trying a yarn for the first time, look at the ball band and then go up a hook size from the recommended. For example, if your ball band recommends size 3mm hook, go up to 3.5m.
Yarn: Scheepjes Sunkissed + Cotton 8
I actually made a full blanket in the Sunkissed yarn, so here are the exact yarn amounts I used for my small 34 x 44in French Braid Blanket, made in the Mondo version (12 squares in a 3×4 formation):
Yarn A: 02 Sand Dunes x 2 balls
Yarn B: 15 Nook Day Sun x 2 balls
Yarn C: 11 Peach Ice x 2 balls
Yarn D: 09 Strawberry Ice x 1 ball
Yarn E: 20 Beach Hut Pink x 1 ball
Yarn F: 03 Breeze x 1 ball
Yarn G: 04 Poolside x 1 ball
Yarn H: 05 Seaside x 1 ball
Yarn I: 10 Lavender Ice x 1 ball
You can order Scheepjes Sunkissed from WoolWarehouse *
I joined and made the small border with 2 balls of Cotton 8 in color 502. You can order Scheepjes Cotton 8 from WoolWarehouse *
Resize French Braid Blanket with Alternative Yarns
These are the sizes of my Mondo Square with different yarn weights:
Note: This pattern is in US Terms, but there is only 1 stitch used: single crochet, so if you are used to reading UK Terms, please know that you are using dc for this entire project. (US) sc = (UK) dc
chN chain N number of times
MR make ring: slip knot, ch3, ss in third ch from hook
Rep repeat
Rnd round
sc single crochet
sp space (chain space)
ss slip stitch
st stitch
yoh yarn over hook
Instructions
First a base triangle is made, and then each section is worked off the previous ones to create the design, in a log cabin type fashion. Squares are joined with my PLT Join, and a small border is added to finish the piece. The join and border are small to really let the opulent squares take center stage.
Mondo Square
Note: For neater edges follow these tips. Please watch the “Video: Section 1 (Base Triangle)”below, as I explain these tips and demonstrate them.
I do not “chain up” for the first sc of the row, so you will work the first sc of the row directly into a chain space without chaining 1.
Be sure to turn your work the same way each time. If you are looking down on your work from the top edge, you will turn the work counter-clockwise. In other words, you will turn the right edge of the piece toward you to flip the work over.
Work “over” the working yarn for your first sc stitch, instead of carrying it up the edge.
Section 1 (Base Triangle)
On all section graphics, green spot shows where section begins, and arrow indicates the direction the work grows. I tried my best on these graphics, but the lines are a little off… Look at the photos to see how it’s supposed to line up.
Mark Row 1 as the RS of the square to make things easier later. This stitch pattern is reversible and it is hard to tell front from back.
Row 2 (Sc, ch1, sc) in first sp, ch1, (sc, ch1, sc) in next sp, ch1, (sc, ch1, sc) in final sp, turn. [6 sc, 5 sp]
Rows 3-7 (Sc, ch1, sc) in first sp, (ch1, sc in next sp) across to center sp, ch1, (sc, ch1, sc) in center sp, (ch1, sc in next sp) across to final sp, ch1, (sc, ch1, sc) in final sp, turn. Cut yarn after Row 7. [16 sc 15 sp]
Video: Section 1 (Base Triangle)
Section 2
Row 1 With WS facing, join Yarn B with ss in the first sp, (sc, ch1, sc) in first sp, (ch1, sc in next sp) 7 times, turn. [9 sc, 8 sp]
Row 2 Ch1, sc in first sp, (ch1, sc in next sp) across to final sp, ch1, (sc, ch1, sc) in final sp, turn. [9 sc, 9 sp]
Row 3 (Sc, ch1, sc) in first sp, (ch1, sc in next sp) across to end, turn. [10 sc, 9 sp]
Rows 4-11 Rep Rows 2 and 3, cut yarn after Row 11. [14 sc, 13 sp]
Video: Section 2
Section 3
This section is similar to section 2.
Row 1 With RS facing, join Yarn D with ss in the first sp, (sc, ch1, sc) in first sp, (ch1, sc in next sp) 6 times, ch1, sc into final sc of Row 1 of Section 2 – note: watch “Video: Sections 3 and 4” (below) for demo, (ch1, sc in final sc of next odd numbered row of Section 2) 5 times, turn. [14 sc, 13 sp]
Rows 2-11 Work repeating Rows 2 and 3 as for Section 2, cut yarn after Row 11. [19 sc, 18 sp]
Video: Sections 3 and 4
Section 4
Row 1 With WS facing, join Yarn A with ss in the final sc of Section 3 – note: watch “Video: Sections 3 and 4” (above) for demo, ch1, sc in first sp, (ch1, sc in next sp) across to end, turn. [18 sc, 18 sp]
Row 2 Sc in first sp, (ch1, sc in next sp) across to end, turn. [18 sc, 17 sp]
Row 3 Ch1, sc in first sp, (ch1, sc in next sp) across to end, turn. [17 sc, 17 sp]
Rows 4-11 Rep Rows 2 and 3, cut yarn after Row 11. [13 sc, 13 sp]
NOTE: Remaining videos are coming, but the first 3 videos should be very helpful to see how the square is constructed.
Section 5
This section is similar to sections 2 and 3.
Row 1 With WS facing, join Yarn H with ss in the first sp, (sc, ch1, sc) in first sp, (ch1, sc in next sp) 12 times, ch1, sc into final sc of Row 1 of Section 3, (ch1, sc in final sc of next odd numbered row of Section 3) 5 times, ch1, sc into first sp of Row 1 of Section 4, (ch1, sc in first sp of next odd numbered row of Section 4) 5 times, turn. [26 sc, 25 sp]
Rows 2-11 Work repeating Rows 2 and 3 as for Section 2, cut yarn after Row 11. [31 sc, 30 sp]
Section 6
This section is similar to section 4.
Row 1 With RS facing, join Yarn C with ss in the final sc of Section 5, ch1, sc in first sp, (ch1, sc in next sp) across to end, turn. [30 sc, 30 sp]
Rows 2-11Work repeating Rows 2 and 3 as for Section 4, cut yarn after Row 11. [25 sc, 25 sp]
Section 7
Row 1 With RS facing, join Yarn G with ss in the first sp, sc in first sp, (ch1, sc in next sp) 11 times, ch1, sc into final sc of Row 1 of Section 5, (ch1, sc in final sc of next odd numbered row of Section 5) 5 times, ch1, sc into first sp of Row 1 of Section 6, (ch1, sc in first sp of next odd numbered row of Section 6) 5 times, turn. [24 sc, 23 sp]
Row 2 Ch1, sc in first sp, (ch1, sc in next sp) across to end, turn. [23 sc, 23 sp]
Row 3 Sc in first sp, (ch1, sc in next sp) across to end, turn. [23 sc, 22 sp]
Rows 4-11 Repeat Rows 2 and 3, cut yarn after Row 11. [19 sc, 18 sp]
Section 8
This section is the exact same as section 4.
Rows 1-11 With WS facing and Yarn B, work exactly as for Section 4.
Section 9
Row 1 With RS facing, join Yarn E with ss in the first sp, sc in first sp, (ch1, sc in next sp) 12 times, turn. [13 sc, 12 sp]
Rows 2-13 Sc in first sp, (ch1, sc in next sp) across to end, turn. Cut yarn after Row 13. [1 sc]
Sections 10-12
Row 1 With WS facing, join Yarn F with ss in first sp, sc in first sp, (ch1, sc in next sp) 23 times, ch1, sc into final sc of Row 1 of Section 7, (ch1, sc in final sc of next odd numbered row of Section 7) 5 times, ch1, sc into first sp of Row 1 of Section 8, (ch1, sc in first sp of next odd numbered row of Section 8) 5 times, turn. [36 sc, 35 sp]
Rows 2-11 Sc in first sp, (ch1, sc in next sp) across to end, turn. Cut yarn after Row 11. [26 sc, 25 sp]
Rows 12-22 With RS facing, join Yarn I with ss in first sp, work as for Row 2. Cut yarn after Row 22. [15 sc, 14 sp]
Rows 23-36 With WS facing, join Yarn E with ss in first sp, work as for Row 2. Cut yarn after Row 36. [1 sc]
Weave ends! You will regret it later if you don’t! Alternatively, use a surgeon’s knot as shown below. This will not come undone, and you can cut the ends short. I add in an extra pass on the top also.
Work 11 more squares following the color key in the layout below.
Join Squares
This is a simple 2-round join-as-you-go. Each square will have 2 rounds added to it, and will be joined with adjacent completed motifs on the second round.
Work first square complete as follows:
Rnd 1 With RS facing, join contrast color yarn with ss in final sc of section 9, (make 47 ss across, working into sc sts, ss in corner) 4 times, ss in first ss.
Rnd 2 Working under entire ss (working in both lps of ss), (make 47 sc across. make 3 sc in corner ss) 4 times, ss in first sc, cut yarn and weave ends.
Work remaining squares as follows:
Rnd 1 Work as for first square.
Rnd 2 Work as for first square BUT, stop when you are about to join a side to an adjacent completed square, and follow this instruction to work my PLT Join. (Please refer to this link for a very detailed explanation of my PLT Join.)
Release the loop from the hook,
insert the hook front to back through both loops of the corresponding stitch on the adjacent completed square,
grab the loop and Pull the Loop Through to the front of the work (PLT maneuver made). That stitch is now joined.
Work the next sc on the motif in progress, and PLT in the next corresponding stitch on the adjacent completed square, across until the side is completely joined. You are just repeating (sc, PLT) across, from corner st to corner st.
If there are no more sides to join, finish the square normally as for the first square, and cut yarn, weave ends.
Don’t you like the squares held this side up? I can’t decide which way I like them better!
Border
Make simple 2-round sc border as follows:
Rnd 1 Join contrast yarn with ss in top right corner of blanket, (3sc in corner st, sc in each st across) 4 times, being sure to make the same amount of sc on opposing sides of blanket, ss in first sc.
Rnd 2 (3sc in corner st, sc in all sts across) 4 times, ss in first sc, cut yarn and finish off.
Leave as is, or add any border you like! I prefer to let the squares do the talking for this piece.
French Braid Blanket, Mini Square Version
Find this pattern in a condensed ad-free PDF for a small fee on Etsy, and Ravelry. Both MONDO and MINI Square versions PDFs are included! Coloring pages for layout are also included.
Materials
Size 6mm hook
Scheepjes Stone Washed XL
Important note about hook size: Whichever hook you would normally use for a certain yarn, you should go up a hook size for this project. Linen stitch tends to “pull in” so your project may be too stiff if you use your normal hook size. If you are trying a yarn for the first time, look at the ball band and then go up a hook size from the recommended. For example, if your ball band recommends size 3mm hook, go up to 3.5m.
Yarn: Stone Washed XL
Here are yarn amounts for a throw made in the Mini version:
Resize French Braid Blanket with Alternative Yarns
Mini Square Measurements:
Sunkissed Mini Square: 5in – 3.5mm hook
Colour Crafter Mini Square: 6.25in – 4.5mm hook
Stone Washed XL Mini Square: 8in – 6mm hook
Stitch Guide
Note: This pattern is in US Terms, but there is only 1 stitch used: single crochet, so if you are used to reading UK Terms, please know that you are using dc for this entire project. (US) sc = (UK) dc
chN chain N number of times
MR make ring: slip knot, ch3, ss in third ch from hook
Rep repeat
Rnd round
sc single crochet
sp space (chain space)
ss slip stitch
st stitch
yoh yarn over hook
Instructions
First a base triangle is made, and then each section is worked off the previous ones to create the design, in a log cabin type fashion. Squares are joined with my PLT Join, and a small border is added to finish the piece. The join and border are small to really let the opulent squares take center stage.
Mini Square
Note: For neater edges follow these tips. Please watch the “Video: Section 1 (Base Triangle)”shown in the Mondo Square pattern above, as I explain these tips and demonstrate them. The Mini Square videos will be posted tomorrow, but that video will give you an idea. You would just stop working after Row 3 following the pattern below.
I do not “chain up” for the first sc of the row, so you will work the first sc of the row directly into a chain space without chaining 1.
Be sure to turn your work the same way each time. If you are looking down on your work from the top edge, you will turn the work counter-clockwise. In other words, you will turn the right edge of the piece toward you to flip the work over.
Work “over” the working yarn for your first sc stitch, instead of carrying it up the edge.
Section 1 (Base Triangle)
On all section graphics, green spot shows where section begins, and arrow indicates the direction the work grows. I tried my best on these graphics, but the lines are a little off… Look at the photos to see how it’s supposed to line up.
Mark Row 1 as the RS of the square to make things easier later. This stitch pattern is reversible and it is hard to tell front from back.
Row 2 (Sc, ch1, sc) in first sp, ch1, (sc, ch1, sc) in next sp, ch1, (sc, ch1, sc) in final sp, turn. [6 sc, 5 sp]
Row 3 (Sc, ch1, sc) in first sp, ch1, sc in next sp, ch1, (sc, ch1, sc) in center sp, ch1, sc in next sp, ch1, (sc, ch1, sc) in final sp, cut yarn. [8 sc, 7 sp]
Video: Section 1 (Base Triangle) – This video is for the Mondo Square, but it will give you an idea of what to do if you are confused by the written instructions. You will stop working after row 3 and cut yarn. The videos for the mini square will be up tomorrow or Tuesday.
Section 2
Row 1 With WS facing, join Yarn J with ss in the first sp, (sc, ch1, sc) in first sp, (ch1, sc in next sp) 3 times, turn. [5 sc, 4 sp]
Row 2 Ch1, sc in first sp, (ch1, sc in next sp) across to final sp, ch1, (sc, ch1, sc) in final sp, turn. [5 sc, 5 sp]
Row 3 (Sc, ch1, sc) in first sp, (ch1, sc in next sp) across to end, turn. [6 sc, 5 sp]
Rows 4 and 5 Rep Rows 2 and 3, cut yarn after Row 5. [7 sc, 6 sp]
Video: Section 2 – This video is for the Mondo Square, but it will give you an idea of what to do if you are confused by the written instructions. You will stop working after row 5 and cut yarn. The videos for the mini square will be up tomorrow or Tuesday.
Section 3
This section is similar to section 2.
Row 1 With RS facing, join Yarn E with ss in the first sp, (sc, ch1, sc) in first sp, (ch1, sc in next sp) 3 times, ch1, sc into final sc of Row 1 of Section 2 – note: watch “Video: Sections 3 and 4” (below) for demo, (ch1, sc in final sc of next odd numbered row of Section 2) 2 times, turn. [8 sc, 7 sp]
Rows 2-5 Work repeating Rows 2 and 3 as for Section 2, cut yarn after Row 5. [10 sc, 9 sp]
Video: Sections 3 and 4 – This video is for the Mondo Square, but it will give you an idea of what to do if you are confused by the written instructions. You will stop working after row 5 and cut yarn. The videos for the mini square will be up tomorrow or Tuesday.
Section 4
Row 1 With WS facing, join Yarn A with ss in the final sc of Section 3 – note: watch “Video: Sections 3 and 4” (above) for demo, ch1, sc in first sp, (ch1, sc in next sp) across to end, turn. [9 sc, 9 sp]
Row 2 Sc in first sp, (ch1, sc in next sp) across to end, turn. [9 sc, 8 sp]
Row 3 Ch1, sc in first sp, (ch1, sc in next sp) across to end, turn. [8 sc, 8 sp]
Rows 4 and 5 Rep Rows 2 and 3, cut yarn after Row 5. [7 sc, 7 sp]
Section 5
This section is similar to sections 2 and 3.
Row 1 With WS facing, join Yarn H with ss in the first sp, (sc, ch1, sc) in first sp, (ch1, sc in next sp) 5 times, ch1, sc into final sc of Row 1 of Section 3, (ch1, sc in final sc of next odd numbered row of Section 3) 2 times, ch1, sc into first sp of Row 1 of Section 4, (ch1, sc in first sp of next odd numbered row of Section 4) 2 times, turn. [13 sc, 12 sp]
Rows 2-5 Work repeating Rows 2 and 3 as for Section 2, cut yarn after Row 5. [15 sc, 14 sp]
Section 6
This section is similar to section 4.
Row 1 With RS facing, join Yarn B with ss in the final sc of Section 5, ch1, sc in first sp, (ch1, sc in next sp) across to end, turn. [14 sc, 14 sp]
Rows 2-5Work repeating Rows 2 and 3 as for Section 4, cut yarn after Row 5. [12 sc, 12 sp]
Section 7
Row 1 With RS facing, join Yarn J with ss in the first sp, sc in first sp, (ch1, sc in next sp) 5 times, ch1, sc into final sc of Row 1 of Section 5, (ch1, sc in final sc of next odd numbered row of Section 5) 2 times, ch1, sc into first sp of Row 1 of Section 6, (ch1, sc in first sp of next odd numbered row of Section 6) 2 times, turn. [12 sc, 11 sp]
Row 2 Ch1, sc in first sp, (ch1, sc in next sp) across to end, turn. [11 sc, 11 sp]
Row 3 Sc in first sp, (ch1, sc in next sp) across to end, turn. [11 sc, 10 sp]
Rows 4 and 5 Repeat Rows 2 and 3, cut yarn after Row 5. [10 sc, 9 sp]
Section 8
This section is the exact same as section 4.
Rows 1-11 With WS facing and Yarn C, work exactly as for Section 4.
Section 9
Row 1 With RS facing, join Yarn I with ss in the first sp, sc in first sp, (ch1, sc in next sp) 6 times, turn. [7 sc, 6 sp]
Rows 2-7 Sc in first sp, (ch1, sc in next sp) across to end, turn. Cut yarn after Row 7. [1 sc]
Sections 10-12
Row 1 With WS facing, join Yarn E with ss in first sp, sc in first sp, (ch1, sc in next sp) 10 times, ch1, sc into final sc of Row 1 of Section 7, (ch1, sc in final sc of next odd numbered row of Section 7) 2 times, ch1, sc into first sp of Row 1 of Section 8, (ch1, sc in first sp of next odd numbered row of Section 8) 2 times, turn. [17 sc, 16 sp]
Rows 2-5 Sc in first sp, (ch1, sc in next sp) across to end, turn. Cut yarn after Row 5. [13 sc, 12 sp]
Rows 6-10 With RS facing, join Yarn I with ss in first sp, work as for Row 2. Cut yarn after Row 10. [8 sc, 7 sp]
Rows 11-17 With WS facing, join Yarn B with ss in first sp, work as for Row 2. Cut yarn after Row 17. [1 sc]
Weave ends! You will regret it later if you don’t! Alternatively, use a surgeon’s knot as shown below. This will not come undone, and you can cut the ends short. I add in an extra pass on the top also.
Join Squares
This is a simple 2-round join-as-you-go. Each square will have 2 rounds added to it, and will be joined with adjacent completed motifs on the second round.
Squares pictured in Join and border demo are from the Mondo Square Version, but the methods are exactly the same. I will update with more Mini Square Version Photos as soon as my border is completed.
Work first square complete as follows:
Rnd 1 With RS facing, join contrast color yarn with ss in final sc of section 9, (make 23 ss across, working into sc sts, ss in corner) 4 times, ss in first ss.
Rnd 2 Working under entire ss (working in both lps of ss), (make 23 sc across. make 3 sc in corner ss) 4 times, ss in first sc, cut yarn and weave ends.
Work remaining squares as follows:
Rnd 1 Work as for first square.
Rnd 2 Work as for first square BUT, stop when you are about to join a side to an adjacent completed square, and follow this instruction to work my PLT Join. (Please refer to this link for a very detailed explanation of my PLT Join.)
Release the loop from the hook,
insert the hook front to back through both loops of the corresponding stitch on the adjacent completed square,
grab the loop and Pull the Loop Through to the front of the work (PLT maneuver made). That stitch is now joined.
Work the next sc on the motif in progress, and PLT in the next corresponding stitch on the adjacent completed square, across until the side is completely joined. You are just repeating (sc, PLT) across, from corner st to corner st.
If there are no more sides to join, finish the square normally as for the first square, and cut yarn, weave ends.
Border
Make simple 2-round sc border as follows:
Rnd 1 Join contrast yarn with ss in top right corner of blanket, (3sc in corner st, sc in each st across) 4 times, being sure to make the same amount of sc on opposing sides of blanket, ss in first sc.
Rnd 2 (3sc in corner st, sc in all sts across) 4 times, ss in first sc, cut yarn and finish off.
Leave as is, or add any border you like! I prefer to let the squares do the talking for this piece.
Copyright Information
No pattern or other material may be reproduced — mechanically, electronically, or by any other means, including photocopying — without written permission of Rachele Carmona. This applies to all content on CypressTextiles.net, BabyLoveBrand.net, and all other sites used by Rachele Carmona. Paid patterns are for personal use only. You may sell your finished crocheted items, but do not use my photos to sell your items. Take your own photos please.
Find this pattern in a condensed ad-free PDF for a small fee on Etsy, and Ravelry. Both MONDO and MINI Square versions PDFs are included! Coloring pages for layout are also included.
Thank you for following along! I hope you enjoy this pattern! Can’t wait to show you how the Mini Square Version turned out!
Hello, fellow 2020 VVCALer! I decided to create a separate post for each version of the blanket that I am posting each week, that way you can follow along with your particular project and have more details. All 5 pages aren’t quite finished at the time I published this post, but as I finish them, I will link them below.
The purpose of this page is to supplement your normal VVCAL routine. So you will still look at the posts weekly to get your square color numbers and patterns, but when we get further along into joining and finishing up the squares, there are differences that are specific to each colorway. For this reason, I thought it would be beneficial to just have a place to look at only your blanket’s general information and photos. PS, affiliate links are marked with an asterisk. Purchasing through them will gain me a small commission at no extra cost to you.
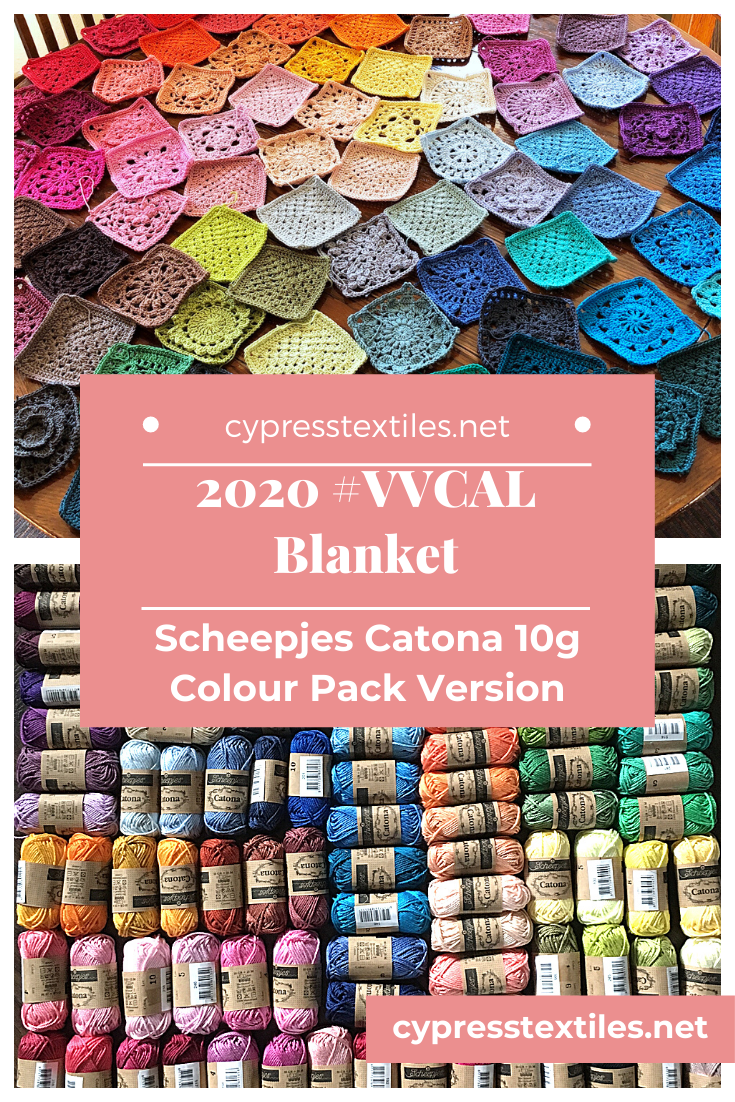
For this colorway, I used the 10g Colour Pack of Catona. This pack has 1 teensy 10g ball of every Catona color, and it is amazing. Look at the magnificent array it produces! Special thanks to Emily O’Kelley for using this pack for a previous VVCAL blanket on Instagram, and totally showing me that it’s possible to get a VVCAL-size square from one of those teeny skeins. THANK YOU EMILY!
“Catona Colour Pack” Colorway Yarn Details
For this colorway, you will need:
3mm hook
1 x Catona 10g Colour Pack
14 x 50g Balls of Catona Color No. 105
Order Yarn
Find the Catona 10g Colour Pack at one of these shops.
These are the tips and tricks that pertain to the Catona Colour Pack Version only. For all tips and tricks, head to the FAQ post.
When will we start joining our squares?
I will release joining instructions for the blanket by June 15; however, if you are using a 10g Colour Pack and you want to follow my payout exactly, then you need to wait until after all the squares are made to start joining.
Can I join my “Multicolor” squares with a different color from the Catona 10g Colour Pack?
Yes! Here’s how: When your preferred joining color comes up in the CAL, you need to sub in Color No. 105 instead. Then you will simply use up your chosen color ball when you start joining.
I’m using a 10g skein color pack.Can I go up a hook size for larger squares?
Yes! But beware some squares (especially the ones with lots of petals or popcorns) which use more yarn will make you run out if you use a larger hook. You can substitute in one of the other squares or even one from the 2016 or 2018 VVCAL.
There are too many Plain Granny squares! 40 is too much!
You can always substitute in one of the other squares or even one from the 2016 or 2018 VVCAL. When I post the color layout, I will completely ignore the design of the squares, and will be placing them based solely on color. So for the final layout, it won’t matter if you sub in other VVCAL squares.
How can I keep all of these squares organized for the color layout?
Here are some ideas that your fellow makers are suggesting:
Take a photo of the square and edit in text over it with the color number.
Roll up the square and put it into the yarn ball band. (Love this one.)
Wrap your excess yarn around the ball band so you can compare it later.
Instagram user @hookedongoodyarns
Weekly Timeline, Catona 10g Colour Pack Version:
Click the square name and scroll to see which colors to use for this pack.
July 31, Week 17: Chicago x 2 / Prague x 2 / Plain Granny x 2
August 7, Week 18: Join Remaining Squares / Catch up
August 14, Week 19: Border, Part 1
August 21, Week 20: Border, Part 2 – Finished!
Progress Photos
Here are the photos I have taken along the way, including a peek at the joining method I use for this colorway. There will be 3 joining method options, each demonstrated with a different colorway.
I hope this page is helpful! I will be updating it along the way with layout and joining information, and of course more photos.
CypressTextiles Tree Huggers Facebook Group – This is my main FB group (join!). Share your VVCAL progress pics in this group if you like, and I will share CAL highlights here, but the weekly action will be in the other group linked above.
Hemingway lived here. Bibliophiles have probably read or at least heard of “The Old Man and the Sea” by Ernest Hemingway. This book was actually based on his experiences in Cuba.
Old Havana – the downtown area of Havana – was founded by the Spanish in 1519, and is now the capital city, largest city, and the leading commercial center in Cuba.
Old Havana looks similar to places like Cadiz and Tenerife, both of which are located in Spain.
Cuba’s capital is known for its many statues, some of which might be unexpected. In the center of John Lennon Park is a bronze likeness of, yes, John Lennon. It was unveiled in 2000 after Fidel Castro declared the former Beatle to be a “true revolutionary.”
Havana is home to a street cobbled with wood. It runs right next to the Palacio de los Capitanes Generales. As the story goes, the wife of one of the capitanes was afraid that horses walking on stone cobbles outside her window would keep her awake, so she had the lane paved with wood.
Vintage cars parked on roadside. Taxis on street in city.
Havana Square Pattern
“Catona 10g Colour Pack” Version: Make 2 – Use colors 410 and 113
Catona Color 410
Catona Color 113
Catona “Shy Violet” Version: Make 2 – Use colors 414 and 398 – photos coming shortly
Catona “Fresh Earth” Version: Make 2 – Use colors 388 and 212
Catona Color 388
Catona Color 212
Colour Crafter Version: Make 1 – I used color 2015 Note: I’m just using my stash.
Stone Washed / River Washed 10g Colour Pack Version: Make 2 – Use colors 959 and 815
River Washed Color 959
Stone Washed Color 815
Measurements and Materials
Measurements: Blanket will measure about 64x72in for all colorways/yarns
Gauge: Squares measure 4.25in for Catona, 6in for Colour Crafter, 4.5in for Stone Washed/River Washed
Notions: US Size 3mm hook for Catona, 4.25mm hook for Colour Crafter, 3mm for Stone Washed’/River Washed
2trcl * yoh 2 times, insert hook in st, yoh pull through, (yoh, pull through 2 lps on hook) 2 times, rep from * 1 time, yoh and pull through all 3 lps
4dc-popcorn 4dc in st/sp, release lp from hook, insert hook front to back through first dc, grab lp, pull through to front of work to close popcorn
beg beginning
beg 2trcl (beg tr, tr) in st/sp – counts as 1 2trcl
beg 4dc-popcorn (beg dc, 3dc) in st/sp, release lp from hook, insert hook front to back through beg dc, grab lp, pull through to front of work to close popcorn
beg dc / beg hdc (sc, ch1) – counts as 1 dc or 1 hdc
beg tr (sc, ch2) – counts as 1 tr
chN chain N number of times
dc double crochet
hdc half double crochet
lp loop
MR make ring: slip knot, ch3, ss in third ch from hook
Rep repeat
Rnd round
sc single crochet
sp space (chain space)
ss slip stitch
st stitch
tr treble
yoh yarn over hook
Written Instructions & Step-by-step Photos (US Terms)
Rnd 1 MR, beg 4dc-popcorn, (ch5, 4dc-popcorn) 3 times, ch5, ss in 4dc-popcorn. [4 4dc-popcorn, 4 sp]
Rnd 2 Beg 2trcl in first sp, * (ch2, 2trcl in same sp) 3 times, ch2, 2trcl in next sp, rep from * 3 times omitting final 2trcl, ss in beg 2trcl. [16 2trcl, 16 sp]
Rnd 3 Ss in first ch, sc in same sp, * ch3, (3tr, ch2, 3tr) in next sp, ch3, sc in next sp, (sc, ch2, sc) in next sp, sc in next sp), rep from * 3 times omitting final sc, ss in first sc. [24 tr, 16 sc, 16 sp]
Rnd 4 Ss in first 3 chs, beg hdc in tr, * hdc in next 2 sts, (2dc, ch2, 2dc) in next sp, hdc in next 3 sts, ch2, 3dc in next ch2-sp, ch2, hdc in next tr, rep from * 3 times omitting final hdc, ss in beg hdc. [28 dc, 24 hdc, 12 sp]
Rnd 5 (Sc in 4 sts, 3sc in sp, sc in 5 sts, 3sc in sp, sc in 3 sts, 3sc in sp, sc in hdc) 4 times, ss in first sc, cut yarn and weave ends. [88 sc]
Stitch Guide (UK Terms)
Note: Scroll up for US Terms.
2dtrcl * yoh 2 times, insert hook in st, yoh pull through, (yoh, pull through 2 lps on hook) 2 times, rep from * 1 time, yoh and pull through all 3 lps
4tr-popcorn 4tr in st/sp, release lp from hook, insert hook front to back through first tr, grab lp, pull through to front of work to close popcorn
beg beginning
beg 2dtrcl (beg dtr, dtr) in st/sp – counts as 1 2dtrcl
beg 4tr-popcorn (beg tr, 3tr) in st/sp, release lp from hook, insert hook front to back through beg tr, grab lp, pull through to front of work to close popcorn
beg tr / beg htr (dc, ch1) – counts as 1 tr or 1 htr
beg dtr (dc, ch2) – counts as 1 dtr
chN chain N number of times
dc double crochet
dtr double treble crochet
htr half treble crochet
lp loop
MR make ring: slip knot, ch3, ss in third ch from hook
Rep repeat
Rnd round
sp space (chain space)
ss slip stitch
st stitch
tr treble
yoh yarn over hook
Written Instructions & Step-by-step Photos (UK Terms)
Rnd 1 MR, beg 4tr-popcorn, (ch5, 4tr-popcorn) 3 times, ch5, ss in 4tr-popcorn. [4 4tr-popcorn, 4 sp]
Rnd 2 Beg 2dtrcl in first sp, * (ch2, 2dtrcl in same sp) 3 times, ch2, 2dtrcl in next sp, rep from * 3 times omitting final 2dtrcl, ss in beg 2dtrcl. [16 2dtrcl, 16 sp]
Rnd 3 Ss in first ch, dc in same sp, * ch3, (3dtr, ch2, 3dtr) in next sp, ch3, dc in next sp, (dc, ch2, dc) in next sp, dc in next sp), rep from * 3 times omitting final dc, ss in first dc. [24 dtr, 16 dc, 16 sp]
Rnd 4 Ss in first 3 chs, beg htr in dtr, * htr in next 2 sts, (2tr, ch2, 2tr) in next sp, htr in next 3 sts, ch2, 3tr in next ch2-sp, ch2, htr in next dtr, rep from * 3 times omitting final htr, ss in beg htr. [28 tr, 24 htr, 12 sp]
Rnd 5 (Dc in 4 sts, 3dc in sp, dc in 5 sts, 3dc in sp, dc in 3 sts, 3dc in sp, dc in htr) 4 times, ss in first dc, cut yarn and weave ends. [88 dc]
CypressTextiles Tree Huggers Facebook Group – This is my main FB group (join!). Share your VVCAL progress pics in this group if you like, and I will share CAL highlights here, but the weekly action will be in the other group linked above.
CypressTextiles Tree Huggers Facebook Group – This is my main FB group (join!). Share your VVCAL progress pics in this group if you like, and I will share CAL highlights here, but the weekly action will be in the other group linked above.
It is home to the first known democracy. Democracy was established in Athens around 500 B.C. It was based on a direct democracy system, in which eligible citizens directly voted on laws.
It has experienced almost every form of government. Having been inhabited for over 4,000 years, Athens has been submitted to nearly every form of government known to this day: monarchy, democracy, socialism, capitalism, even communism.
Athens has the most theatrical stages in the world. It is home to 148 theater stages – more than the West End and Broadway combined.
The marathon event was created for the modern Olympic Games held in Athens.
Greece, Athens. The Parthenon, Theater Of Herodes Atticus, The Odeon of Herodes Atticus and The Erechtheum.
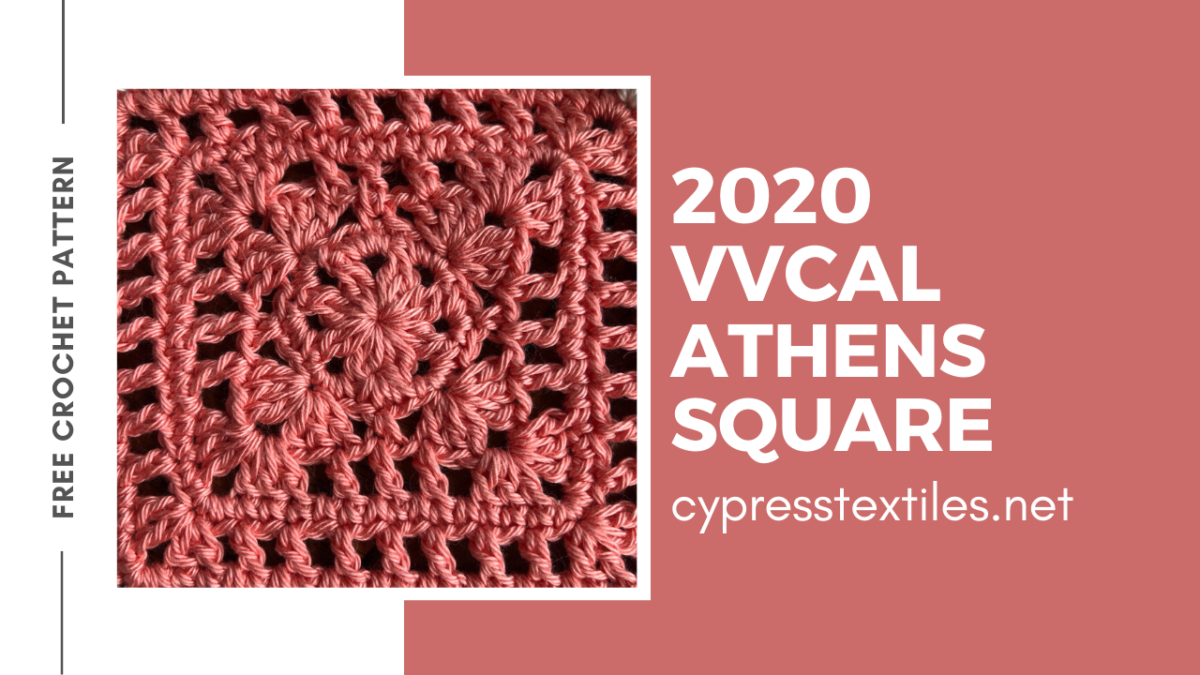
Athens Square Pattern
“Catona 10g Colour Pack” Version: Make 2 – Use colors 264 and 505
Catona Color 264
Catona Color 505
Catona “Shy Violet” Version: Make 2 – Use colors 414 and 249
Catona Color 414
Catona Color 249
Catona “Fresh Earth” Version: Make 2 – Use colors 404 and 245
Catona Color 404
Catona Color 245
Colour Crafter Version: Make 1 – I used color 1316 Note: I’m just using my stash.
Stone Washed / River Washed 10g Colour Pack Version: Make 2 – Use colors 961 and 957
River Washed Color 961
River Washed Color 957
Measurements and Materials
Measurements: Blanket will measure about 64x72in for all colorways/yarns
Gauge: Squares measure 4.25in for Catona, 6in for Colour Crafter, 4.5in for Stone Washed/River Washed
Notions: US Size 3mm hook for Catona, 4.25mm hook for Colour Crafter, 3mm for Stone Washed’/River Washed
2dccl 2dc cluster: (yoh, insert hook in st/sp, yoh, pull up lp, yoh, draw yarn through 2 lps) 2 times, yoh, draw yarn through 3 lps
beg beginning
beg 2dccl (beg dc, dc) in st/sp indicated – counts as 1 2dccl
beg dc (sc, ch1) – counts as 1 dc
chN chain N number of times
dc double crochet
lp loop
MR make ring: slip knot, ch3, ss in third ch from hook
Rep repeat
Rnd round
sc single crochet
sp space (chain space)
ss slip stitch
st stitch
yoh yarn over hook
Written Instructions & Step-by-step Photos (US Terms)
Rnd 1 MR, beg 2dccl, (ch2, 2dccl) 7 times, ch2, ss in beg 2dccl. [8 2dccl, 8 sp]
Rnd 2 3sc in 8 sps around, ss in first sc. [24 sc]
Rnd 3 (Sc in next st, ch1, sk2, 3dc in next st, ch2, 3dc in same st, ch1, sk2) 4 times, ss in first sc. [24 dc, 4 sc, 12 sp]
Rnd 4 Ss in first ch, beg dc in next dc, * ch1, (3dc, ch2, 3dc) in corner sp, ch1, sk2, dc, ch1, dc in sc, ch1, dc in next dc, rep from * 3 times omitting final dc, ss in beg dc. [36 dc, 20 sp]
Rnd 5 (Sc in next 4 sts/sps, 3sc in corner sp, sc in next 9 sts/sps) 4 times, ss in first sc. [64 sc]
Rnd 6 Beg dc in next st, * ch1, sk1, dc, ch1, sk1, (2dc, ch3, 2dc) in next st, (ch1, sk1, dc) 6 times, rep from * 3 times omitting final dc, ss in beg dc. [44 dc, 36 sp]
Rnd 7 (Sc in all sts/sps across to next ch3-sp, 3sc in ch3-sp) 4 times, sc in all sts/sps across to beginning, ss in first sc, cut yarn and weave ends. [88sc]
Stitch Guide (UK Terms)
Note: Scroll up for US Terms.
2trcl 2tr cluster: (yoh, insert hook in st/sp, yoh, pull up lp, yoh, draw yarn through 2 lps) 2 times, yoh, draw yarn through 3 lps
beg beginning
beg 2trcl (beg tr, tr) in st/sp indicated – counts as 1 2trcl
beg tr (dc, ch1) – counts as 1 tr
chN chain N number of times
dc double crochet
lp loop
MR make ring: slip knot, ch3, ss in third ch from hook
Rep repeat
Rnd round
sp space (chain space)
ss slip stitch
st stitch
tr treble crochet
yoh yarn over hook
Written Instructions & Step-by-step Photos (UK Terms)
Rnd 1 MR, beg 2trcl, (ch2, 2trcl) 7 times, ch2, ss in beg 2trcl. [8 2trcl, 8 sp]
Rnd 2 3dc in 8 sps around, ss in first dc. [24 dc]
Rnd 3 (Dc in next st, ch1, sk2, 3tr in next st, ch2, 3tr in same st, ch1, sk2) 4 times, ss in first dc. [24 tr, 4 dc, 12 sp]
Rnd 4 Ss in first ch, beg tr in next tr, * ch1, (3tr, ch2, 3tr) in corner sp, ch1, sk2, tr, ch1, tr in dc, ch1, tr in next tr, rep from * 3 times omitting final tr. [36 tr, 20 sp]
Rnd 5 (Dc in next 4 sts/sps, 3dc in corner sp, dc in next 9 sts/sps) 4 times, ss in first dc. [64 dc]
Rnd 6 Beg tr in next st, * ch1, sk1, tr, ch1, sk1, (2tr, ch3, 2tr) in next st, (ch1, sk1, tr) 6 times, rep from * 3 times omitting final tr, ss in beg tr. [44 tr, 36 sp]
Rnd 7 (Dc in all sts/sps across to next ch3-sp, 3dc in ch3-sp) 4 times, dc in all sts/sps across to beginning, ss in first dc, cut yarn and weave ends. [88dc]
CypressTextiles Tree Huggers Facebook Group – This is my main FB group (join!). Share your VVCAL progress pics in this group if you like, and I will share CAL highlights here, but the weekly action will be in the other group linked above.
Hello, lovely! I’m taking some time today to show you about a new crochet project I’ve been working on. The French Braid Blanket!
#FrenchBraidBlanket
Well, it’s not exactly *new*, because it’s been an idea in my mind since 2015, when I made a mock-up. Since then I’ve wanted to include it in a little linen stitch pattern collection, and I’ve finally had the time to release it!
Here’s a prototype of the Mini square version, but I ended up tweaking it a bit later on.
Crochet Pattern Collections
If you know my ShadeTree pattern collection, inspired by the art of Jessica Wilkinson, and my Relaxghans pattern collection, inspired by stash busting and crushing your inner crochet meanie, then you will love this linen stitch blanket stack.
I will be releasing a free linen stitch pattern at the end of every month from May through September. That’s 5 free linen stitch blanket patterns! Linen stitch is so versatile and so very zen… I just love it. I have already designed a couple of linen stitch crochet blankets: Zendoodle and Beach Hut – and my Good Vibes Blanket has a cool linen stitch center panel. You just might see Zendoodle and Beach Hut as free patterns in this collection – wink wink!
This is the fuzzy photo taken in 2015 of the little idea seed. I made this little cutie with my Scheepjes Yarns stash before I was even a Scheepjes Blogger! It’s Stone Washed* and Catona* mixed together. (*affiliates)
Can you believe I saved this idea from that long ago? Well, I’m glad I did, because it has been so much fun to play with this square!
French Braid Blanket, Mini Version
Immediately, I started imagining this same mini block, but in different yarn weights. Check this out! Fingering weight Sunkissed, DK weight Colour Crafter, and aran weight Stone Washed XL. I love how the square is perfectly sized up by changing yarn weights.
Mini Square Measurements:
Sunkissed Mini Square: 5in
Colour Crafter Mini Square: 6.25in
Stone Washed XL Mini Square: 8in
French Braid Blanket, Mondo Version
This started out as just a project to use up remnants of yarn in a cool way. Then I started imagining, what if folks have larger amounts of yarn to use and don’t need such a small square.
For folks who wanted a larger square, I created the Mondo version and made up some samples in the same 3 yarn weights:
Sunkissed Mondo Square: 10.5in
Colour Crafter Mondo Square: 13in
Stone Washed XL Mondo Square: 17.25in
See how the Mondo and Mini look side by side? You can tell it has the same amount of sections, but a different amount of rows on each section makes the squares differ in size. This yarn pictured here is fingering weight Scheepjes Sunkissed.
Sunkissed Yarn
I actually made a full blanket in the Sunkissed yarn, so here are the exact yarn amounts I used for my small 34 x 44in French Braid Blanket, made in the Mondo version (12 squares in a 3×4 formation):
02 Sand Dunes x 2 balls
15 Nook Day Sun x 2 balls
11 Peach Ice x 2 balls
09 Strawberry Ice x 1 ball
20 Beach Hut Pink x 1 ball
03 Breeze x 1 ball
04 Poolside x 1 ball
05 Seaside x 1 ball
10 Lavender Ice x 1 ball
You can order Scheepjes Sunkissed from WoolWarehouse (affiliate)
Here are the beginnings of my French Braid Blanket, Mondo Version, in Sunkissed:
These squares were perfectly aligned, and then my cat jumped up and decided that they would be better off if one was askew…
Colour Crafter and Velvet
Here’s the Mondo and Mini in Colour Crafter and Colour Crafter Velvet. I really love how this turned out! Mixing in the Velvet gives it a ton of character and depth.
I created these squares with some of my stash yarns, so I am not sure what yarn amounts would be required for a certain size blanket, but you can order Colour Crafter from WoolWarehouse, Deramores, and Black Sheep Wools, and you can order Colour Crafter Velvet from WoolWarehouse and Deramores. (affiliates)
PS: If you are curious how Colour Crafter Velvet looks when worked up, you can look at my Hexagon Burst Blanket free crochet pattern.
Stone Washed XL
And here are the Mondo and Mini Squares in Stone Washed XL. I’m not sure how much yarn would be needed for a blanket with the Mondo square, but I do have yarn amounts for a throw made in the Mini version:
When you group the Mini and Mondo squares into separate photos, you see how much of a difference there is in the squares.
And here is a peek at all of the 6 squares together. Isn’t it crazy how much versatility can come from a couple pattern tweaks and different yarn weights?
I’ve included a regular 6in hook in the photo for scale. Yes, that Stone Washed XL Mondo square is gargantuan! You can easily make a 54x54in throw with just 9 of those squares.
I have played with this square so much that I could probably spend a whole year just making French Braid Blankets. Here is a little peek at a fun layout I made, inspired by a quilt pattern. Yes the pattern will include coloring sheets!
As promised in the title, here is a sneak peek at the video pattern tutorial for the French Braid Blanket. This is Part 1 of the Mondo version. Enjoy!
I hope you love the French Braid Blanket as much as I do! It is so versatile and fun! And bonus, in the completely zen-tastic linen stitch. Keep an eye out for the free pattern on May 31.
CypressTextiles Tree Huggers Facebook Group – This is my main FB group (join!). Share your VVCAL progress pics in this group if you like, and I will share CAL highlights here, but the weekly action will be in the other group linked above.
There are no roads in Venice – just canals – bellissimo!
Venice receives more than 20 million tourists every year, and shows no signs of slowing anytime soon. However, this huge number is not appreciated by the locals who believe it’s far more than the city can cope with.
Life expectancy here is a very healthy 83.42 years (2019) – it must be that famous Mediterranean diet!
Analysis is showing that the city is actually sinking by about 1-2mm every year! This is explained by natural causes such as the Adriatic plates and man-made causes, such as the extraction of water continuously from the city over the last century.
Bikes, skateboards, and roller-skates are not allowed in Venice. If you are caught riding them, big fines are in place.
A gondolier paddles towards the sunset in Venice’s Grand Canal. Photo taken from the famous Rialto Bridge
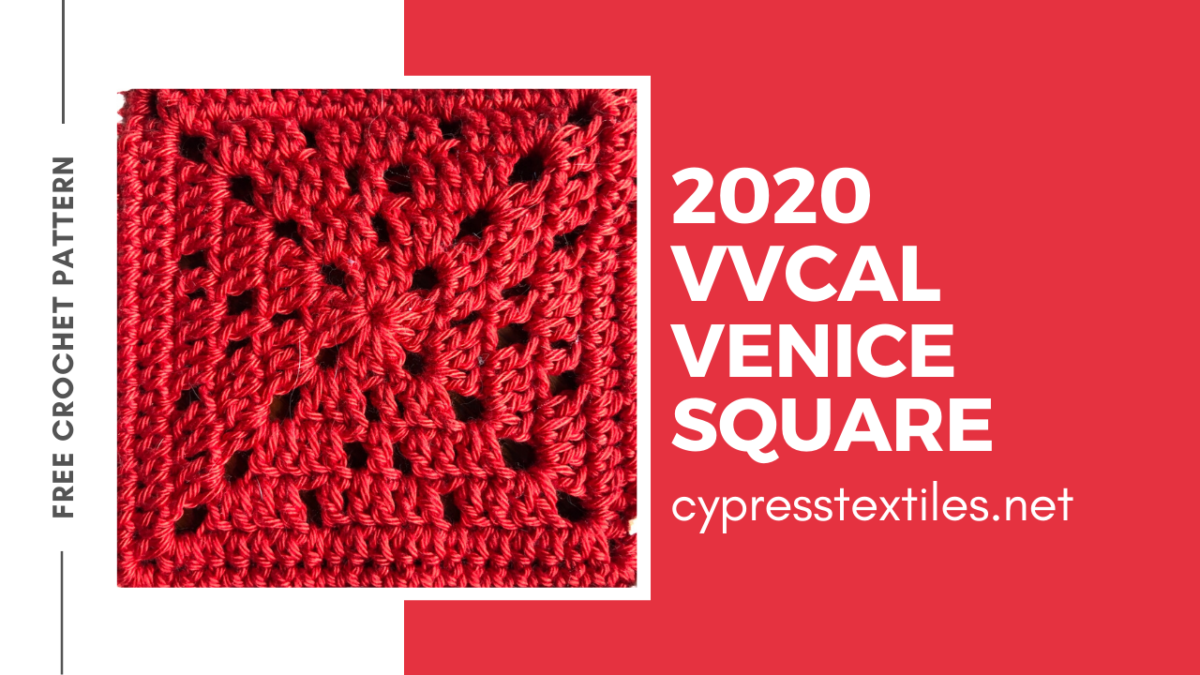
Venice Square Pattern
“Catona 10g Colour Pack” Version: Make 2 – Use colors 391 and 390
Catona Color No. 391
Catona Color No. 390
Catona “Shy Violet” Version: Make 2 – Use colors 240 and 414
Catona Color No. 240
Catona Color No. 414
Catona “Fresh Earth” Version: Make 2 – Use colors 245 and 522
Catona Color No. 245
Catona Color No. 522
Colour Crafter Version: Make 1 – I used color 1316 Note: I’m just using my stash.
Stone Washed / River Washed 10g Colour Pack Version: Make 2 – Use colors 811 and 808
Stone Washed Color No. 811
Stone Washed Color No. 808
Measurements and Materials
Measurements: Blanket will measure about 64x72in for all colorways/yarns
Gauge: Squares measure 4.25in for Catona, 6in for Colour Crafter, 4.5in for Stone Washed/River Washed
Notions: US Size 3mm hook for Catona, 4.25mm hook for Colour Crafter, 3mm for Stone Washed’/River Washed
beg dc / beg hdc (sc, ch1) – counts as 1 dc or 1 hdc
chN chain N number of times
dc double crochet
hdc half double crochet
lp loop
MR make ring: slip knot, ch3, ss in third ch from hook
Rep repeat
Rnd round
sc single crochet
sp space (chain space)
ss slip stitch
st stitch
yoh yarn over hook
Written Instructions & Step-by-step Photos (US Terms)
Rnd 1 MR, beg dc, (ch3, 3dc) 3 times, ch3, 2dc, ss in beg dc. [12 dc, 4 sp]
Rnd 2 Ss in first ch, beg dc in same sp, (ch3, 2dc in same sp, dc in next dc, ch1, sk1, dc, 2dc in next sp) 4 times omitting final dc, ss in beg dc. [24 dc, 8 sp]
Rnd 3 Ss in first ch, beg dc in same sp, (ch3, 2dc in same sp, dc in next 2 sts, ch1, dc in next sp, ch1, sk1, dc in next 2 sts, 2 dc in next sp) 4 times omitting final dc, ss in beg dc. [36 dc, 12 sp]
Rnd 4 Ss in first ch, beg dc in same sp, (ch3, 2dc in same sp, dc in next 2 sts, ch1, sk1, dc in next 5 sts/sps, ch1, sk1, dc in next 2 sts, 2 dc in next sp) 4 times omitting final dc, ss in beg dc. [52 dc, 12 sp]
Rnd 5 Ss in first ch, beg hdc in same sp, (ch3, 2hdc in same sp, hdc in 15 sts/sps, 2hdc in next sp) 4 times omitting final hdc, ss in beg hdc. [76 hdc, 4 sp]
Rnd 6 (3sc in sp, sc in all sts to next sp) 4 times, ss in first sc, cut yarn and weave ends. [88 sc]
Stitch Guide (UK Terms)
Note: Scroll up for US Terms.
beg beginning
beg tr/ beg htr (dc, ch1) – counts as 1 tr or 1 htr
chN chain N number of times
dc double crochet
htr half treble crochet
lp loop
MR make ring: slip knot, ch3, ss in third ch from hook
Rep repeat
Rnd round
sp space (chain space)
ss slip stitch
st stitch
tr treble crochet
yoh yarn over hook
Written Instructions & Step-by-step Photos (UK Terms)
Rnd 1 MR, beg tr, (ch3, 3tr) 3 times, ch3, 2tr, ss in beg tr. [12 tr, 4 sp]
Rnd 2 Ss in first ch, beg tr in same sp, (ch3, 2tr in same sp, tr in next tr, ch1, sk1, tr, 2tr in next sp) 4 times omitting final tr, ss in beg tr. [24 tr, 8 sp]
Rnd 3 Ss in first ch, beg tr in same sp, (ch3, 2tr in same sp, tr in next 2 sts, ch1, tr in next sp, ch1, sk1, tr in next 2 sts, 2 tr in next sp) 4 times omitting final tr, ss in beg tr. [36 tr, 12 sp]
Rnd 4 Ss in first ch, beg tr in same sp, (ch3, 2tr in same sp, tr in next 2 sts, ch1, sk1, tr in next 5 sts/sps, ch1, sk1, tr in next 2 sts, 2 tr in next sp) 4 times omitting final tr, ss in beg tr. [52 tr, 12 sp]
Rnd 5 Ss in first ch, beg htr in same sp, (ch3, 2htr in same sp, htr in 15 sts/sps, 2htr in next sp) 4 times omitting final htr, ss in beg htr. [76 htr, 4 sp]
Rnd 6 (3dc in sp, dc in all sts to next sp) 4 times, ss in first dc, cut yarn and weave ends. [88 dc]
CypressTextiles Tree Huggers Facebook Group – This is my main FB group (join!). Share your VVCAL progress pics in this group if you like, and I will share CAL highlights here, but the weekly action will be in the other group linked above.
CypressTextiles Tree Huggers Facebook Group – This is my main FB group (join!). Share your VVCAL progress pics in this group if you like, and I will share CAL highlights here, but the weekly action will be in the other group linked above.
2dccl 2dc cluster: (yoh, insert hook in st/sp, yoh, pull up lp, yoh, draw yarn through 2 lps) 2 times, yoh, draw yarn through all 3 lps
5trcl 5tr cluster:* yoh 2 times, insert hook in st, yoh pull through, (yoh, pull through 2 lps on hook) 2 times, rep from * 4 times, yoh and pull through all 6 lps
beg beginning
beg 2dccl (beg dc, dc) in st/sp indicated – counts as 1 2dccl
beg 5trcl beg tr,* yoh 2 times, insert hook in same st, yoh pull through, (yoh, pull through 2 lps on hook) 2 times, rep from * 3 times, yoh and pull through all 5 lps
beg dc (sc, ch1) – counts as 1 dc
beg dc5tog beginning dc 5 together: beg dc, (yoh, insert hook in next st, yoh, pull up lp, yoh, pull yarn through 2 lps) 4 times, yoh, pull yarn through 5 lps
beg tr (sc, ch2) – counts as 1 tr
chN chain N number of times
dc double crochet
dc5tog dc 5 together: (yoh, insert hook in next st, yoh, pull up lp, yoh, pull yarn through 2 lps) 5 times, yoh, pull yarn through 6 lps
lp loop
MR make ring: slip knot, ch3, ss in third ch from hook
Rep repeat
Rnd round
sc single crochet
sp space (chain space)
ss slip stitch
st stitch
yoh yarn over hook
Written Instructions & Step-by-step Photos (US Terms)
Rnd 1 MR, beg 5trcl, (ch6, 5trcl) 3 times, ch6, ss in beg 5trcl. [4 5trcl, 4 sp]
Rnd 2 Beg 2dccl in sp, * (ch2, 2dccl in same sp) 3 times, ch2, 2dccl in next sp, rep from * 3 times omitting final 2dccl, ss in beg 2dccl. [16 2dccl, 16 sp]
Rnd 3 Beg dc in sp, * (4dc in same sp, dc in next sp) 2 times, 4dc in same sp, ch1, sk 1 sp, dc in next sp, rep from * 3 times omitting final dc, do not join. [60 dc, 4 sp]
Rnd 4 Beg dc5tog across first 5 dc, * ch5, dc5tog, ch4, ss in previous dc5tog working around ch-4 sp – picot made, ch5, dc5tog, ch2, dc in sp, ch2, dc5tog, rep from * 3 times omitting final dc5tog, ss in beg dc5tog. [4 picot, 12 dc5tog, 4 dc, 16 sp]
Note: I didn’t get a photo of the round joined with a ss, but you can see it has been joined in the next pic.
Rnd 5 (5sc in next sp, 5sc in picot, 5sc in next sp, 3sc in next sp, sc in dc st, 3sc in next sp) 4 times, ss in first sc, cut yarn and weave ends. [88 sc]
Stitch Guide (UK Terms)
Note: Scroll up for US Terms.
2trcl 2tr cluster: (yoh, insert hook in st/sp, yoh, pull up lp, yoh, draw yarn through 2 lps) 2 times, yoh, draw yarn through all 3 lps
5dtrcl 5dtr cluster:* yoh 2 times, insert hook in st, yoh pull through, (yoh, pull through 2 lps on hook) 2 times, rep from * 4 times, yoh and pull through all 6 lps
begbeginning
beg 2trcl (beg tr, tr) in st/sp indicated – counts as 1 2trcl
beg 5dtrcl beg dtr,* yoh 2 times, insert hook in same st, yoh pull through, (yoh, pull through 2 lps on hook) 2 times, rep from * 3 times, yoh and pull through all 5 lps
beg tr (dc, ch1) – counts as 1 tr
beg tr5tog beginning tr 5 together: beg tr, (yoh, insert hook in next st, yoh, pull up lp, yoh, pull yarn through 2 lps) 4 times, yoh, pull yarn through 5 lps
beg dtr(dc, ch2) – counts as 1 dtr
chNchain N number of times
dcdouble crochet
dtr double treble crochet
tr5togtr 5 together: (yoh, insert hook in next st, yoh, pull up lp, yoh, pull yarn through 2 lps) 5 times, yoh, pull yarn through 6 lps
lploop
MRmake ring: slip knot, ch3, ss in third ch from hook
Reprepeat
Rndround
sp space (chain space)
ss slip stitch
ststitch
tr treble crochet
yohyarn over hook
Written Instructions & Step-by-step Photos (UK Terms)
Rnd 1 MR, beg 5dtrcl, (ch6, 5dtrcl) 3 times, ch6, ss in beg 5dtrcl. [4 5dtrcl, 4 sp]
Rnd 2 Beg 2trcl in sp, * (ch2, 2trcl in same sp) 3 times, ch2, 2trcl in next sp, rep from * 3 times omitting final 2trcl, ss in beg 2trcl. [16 2trcl, 16 sp]
Rnd 3 Beg tr in sp, * (4tr in same sp, tr in next sp) 2 times, 4tr in same sp, ch1, sk 1 sp, tr in next sp, rep from * 3 times omitting final tr, do not join. [60 tr, 4 sp]
Rnd 4 Beg tr5tog across first 5 tr, * ch5, tr5tog, ch4, ss in 5th ch from hook – picot made, ch5, tr5tog, ch2, tr in sp, ch2, tr5tog, rep from * 3 times omitting final tr5tog, ss in beg tr5tog. [4 picot, 12 tr5tog, 4 tr, 16 sp]
Note: I didn’t get a photo of the round joined with a ss, but you can see it has been joined in the next pic.
Rnd 5 (5dc in next sp, 5dc in picot, 5dc in next sp, 3dc in next sp, dc in tr st, 3dc in next sp) 4 times, ss in first dc, cut yarn and weave ends. [88 dc]
CypressTextiles Tree Huggers Facebook Group – This is my main FB group (join!). Share your VVCAL progress pics in this group if you like, and I will share CAL highlights here, but the weekly action will be in the other group linked above.
CypressTextiles Tree Huggers Facebook Group – This is my main FB group (join!). Share your VVCAL progress pics in this group if you like, and I will share CAL highlights here, but the weekly action will be in the other group linked above.
Around 40% of Belarus is covered by forest. Sometimes referred to as the ‘Lungs of Europe’, Belarus is home to one of the last and largest remaining parts of the huge primeval forest that once covered the European Plain – the Białowieża Forest.
Belarus has a national literacy rate of 99.6%, making it one of the most literate countries in the world. Go Belarus!
The European Bison is the national animal of Belarus; it’s the heaviest surviving wild land mammal in Europe!
During the 17th and 18th centuries straw weaving was a popular medium for Belarusian art. Have a Google, it’s pretty impressive!
Make sure you taste the birch sap on your next visit. The sap extracted from a birch tree every spring, is one of the favorite drinks of the Belarusians.
Sunny cloudscape over Minsk downtown and bay of Svisloch river from high observation deck
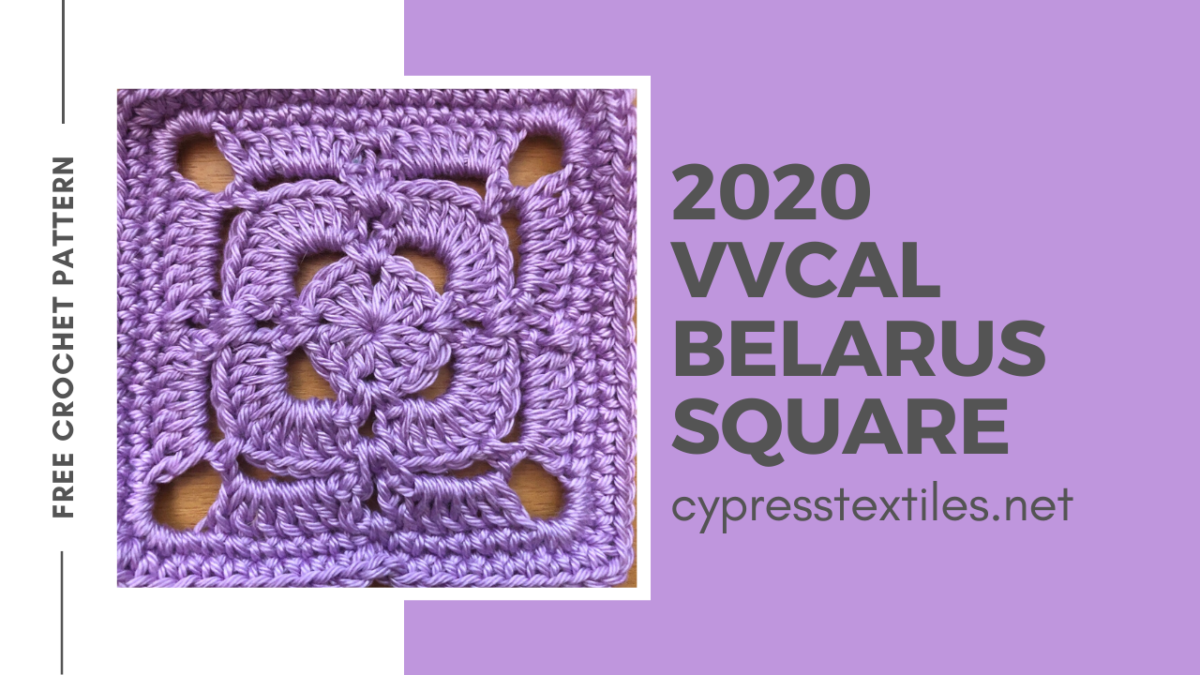
Belarus Square Pattern
“Catona 10g Colour Pack” Version: Make 2 – Use colors 504 and 508
Catona Color No. 504
Catona Color No. 508
Catona “Shy Violet” Version: Make 2 – Use colors 519 and 520
Catona Color No. 519
Catona Color No. 520
Catona “Fresh Earth” Version: Make 2 – Use colors 522 and 212
Catona Color No. 522
Catona Color No. 212
Colour Crafter Version: Make 1 – I used color 1034 Note: I’m just using my stash.
Stone Washed / River Washed 10g Colour Pack Version: Make 2 – Use colors 802 and 949
Stone Washed Color No. 802
River Washed Color No. 949
Measurements and Materials
Measurements: Blanket will measure about 64x72in for all colorways/yarns
Gauge: Squares measure 4.25in for Catona, 6in for Colour Crafter, 4.5in for Stone Washed/River Washed
Notions: US Size 3mm hook for Catona, 4.25mm hook for Colour Crafter, 3mm for Stone Washed’/River Washed
CypressTextiles Tree Huggers Facebook Group – This is my main FB group (join!). Share your VVCAL progress pics in this group if you like, and I will share CAL highlights here, but the weekly action will be in the other group linked above.
CypressTextiles Tree Huggers Facebook Group – This is my main FB group (join!). Share your VVCAL progress pics in this group if you like, and I will share CAL highlights here, but the weekly action will be in the other group linked above.
Amsterdam has officially only been the capital of The Netherlands since 1983. Before that everyone saw Amsterdam as the capital, but it wasn’t official.
De Torensluis bridge from 1648 is the oldest and widest bridge of Amsterdam.
There are more than 1 million bicycles in Amsterdam, but only around 821.000 people. Yearly around 100.000 bikes get stolen.
Amsterdam gets visited by around 14 million tourists each year. Around 4.5 million of those are Dutch tourists and more than 9.5 million are foreign visitors. And that in a city that has only around 821.000 inhabitants.
Most canal houses are very small at the entrance, the reason for this is that they only had to pay taxes for the size of the facade of the house. That’s why everyone built high and long houses. You can find the smallest facade in the world at Het Singel 7. It is only 1 meter wide and barely wider than the front door. As the house goes back it rapidly increases in width.
View of canal in Amsterdam, Holland.
Amstel river, canal, and bicycles.
Amsterdam Square Pattern
“Catona 10g Colour Pack” Version: Make 2 – Use colors 248 and 520
Catona Color No. 248
Catona Color No. 520
Catona “Shy Violet” Version: Make 2 – Use colors 519 and 264
Catona Color No. 519
Catona Color No. 264
Catona “Fresh Earth” Version: Make 2 – Use colors 249 and 388
Catona Color No. 388
Catona Color No. 249
Colour Crafter Version: Make 1 – I used color 1316 Note: I’m just using my stash.
Stone Washed / River Washed 10g Colour Pack Version: Make 2 – Use colors 948 and 825
River Washed Color No. 948
Stone Washed Color No. 825
Measurements and Materials
Measurements: Blanket will measure about 64x72in for all colorways/yarns
Gauge: Squares measure 4.25in for Catona, 6in for Colour Crafter, 4.5in for Stone Washed/River Washed
Notions: US Size 3mm hook for Catona, 4.25mm hook for Colour Crafter, 3mm for Stone Washed’/River Washed
2trcl * yoh 2 times, insert hook in st, yoh pull through, (yoh, pull through 2 lps on hook) 2 times, rep from * 1 time, yoh and pull through all 3 lps
beg beginning
beg 2trcl (beg tr, tr) in st/sp – counts as 1 2trcl
beg dc (sc, ch1) – counts as 1 dc
chN chain N number of times
hdc half double crochet
dc double crochet
lp loop
MR make ring: slip knot, ch3, ss in third ch from hook
puff st (yoh, insert hook in st, yoh, pull up lp) 3 times, yoh, draw yarn through all lps
Rep repeat
Rnd round
sc single crochet
sp space (chain space)
ss slip stitch
st stitch
tr treble crochet
yoh yarn over hook
Written Instructions & Step-by-step Photos (US Terms)
Rnd 1 MR, beg dc, 11dc, ss in beg dc. [12 dc]
Rnd 2 (Ch2, puff st in next dc) 12 times, ch2, ss in top of puff st. Note: First ch2 does not count as a st. [12 puff st, 12 sp]
Rnd 3 Beg 2trcl into ch after first puff st, (ch2, 2trcl in ch-sp, ch2, 2trcl into ch after next puff) 12 times omitting final 2trcl, ss in beg 2trcl. [24 2trcl, 24 sp]
Rnd 4 3sc in each sp around, ss in first sc. [72 sc]
Rnd 5 Beg dc in next st, * dc in next st, hdc in next 2 sts, sc in next 7 sts, hdc in next 2 sts, dc in next 2 sts, tr, (tr, ch2, tr) in next st, tr, dc, rep from * 3 times omitting final dc, ss in beg dc. [16 tr, 16 dc, 16 hdc, 28 sc, 4 sp]
Rnd 6 (Sc in all sts across to next corner sp, 3sc in corner sp) 4 times, sc in all sts across to beginning, ss in first sc, cut yarn and weave ends. [88 sc]
Stitch Guide (UK Terms)
Note: Scroll up for US Terms.
2dtrcl * yoh 2 times, insert hook in st, yoh pull through, (yoh, pull through 2 lps on hook) 2 times, rep from * 1 time, yoh and pull through all 3 lps
beg beginning
beg 2dtrcl (beg dtr, dtr) in st/sp – counts as 1 2dtrcl
begtr (dc, ch1) – counts as 1 tr
chNchain N number of times
htrhalf treble crochet
dcdouble crochet
dtr double treble crochet
lploop
MRmake ring: slip knot, ch3, ss in third ch from hook
puff st(yoh, insert hook in st, yoh, pull up lp) 3 times, yoh, draw yarn through all lps
Reprepeat
Rndround
spspace (chain space)
ssslip stitch
ststitch
trtreble crochet
yohyarn over hook
Written Instructions & Step-by-step Photos (UK Terms)
Rnd 1 MR, beg tr, 11tr, ss in beg tr. [12 tr]
Rnd 2 (Ch2, puff st in next tr) 12 times, ch2, ss in top of puff st. Note: First ch2 does not count as a st. [12 puff st, 12 sp]
Rnd 3 Beg 2dtrcl into ch after first puff st, (ch2, 2dtrcl in ch-sp, ch2, 2dtrcl into ch after next puff) 12 times omitting final 2dtrcl, ss in beg 2dtrcl. [24 2dtrcl, 24 sp]
Rnd 4 3dc in each sp around, ss in first dc. [72 dc]
Rnd 5 Beg tr in next st, * tr, htr in next 2 sts, dc in next 7 sts, htr in next 2 sts, tr in next 2 sts, dtr, (dtr, ch2, dtr) in next st, dtr, tr, rep from * 3 times omitting final tr, ss in beg tr. [16 dtr, 16 tr, 16 htr, 28 dc, 4 sp]
Rnd 6 (Dc in all sts across to next corner sp, 3dc in corner sp) 4 times, dc in all sts across to beginning, ss in first dc, cut yarn and weave ends. [88 dc]
CypressTextiles Tree Huggers Facebook Group – This is my main FB group (join!). Share your VVCAL progress pics in this group if you like, and I will share CAL highlights here, but the weekly action will be in the other group linked above.
CypressTextiles Tree Huggers Facebook Group – This is my main FB group (join!). Share your VVCAL progress pics in this group if you like, and I will share CAL highlights here, but the weekly action will be in the other group linked above.
It was in the Guinness Book of Records for producing the longest line of pizzas at 221 metres in the Italian quarter of Leichardt.
The Sydney Fish Market is the largest market of its kind in the Southern Hemisphere and the world’s 3rd largest fish market.
Operating since 1875, the Sydney Ferries carries over 14 million passengers each year in and around Sydney.
The cost of building the Sydney Opera House ended up at AUD102 million instead of the original estimate of AUD7 million.
Sydney cafe, Ambrosia On The Spot, set a record by making the world’s largest burger at 95.5 kilograms outweighing the previous record of 84 kilograms in the US.
Sydney Square Pattern
“Catona 10g Colour Pack” Version: Make 2 – Use colors 503 and 146
Catona Color No. 503
Catona Color No. 146
Catona “Shy Violet” Version: Make 2 – Use colors 249 and 398
Catona Color No. 249
Catona Color No. 398
Catona “Fresh Earth” Version: Make 2 – Use colors 157 and 404
Colour Crafter Version: Make 1 – I used color 1722 Note: I’m just using my stash.
Stone Washed / River Washed 10g Colour Pack Version: Make 2 – Use colors 948 and 942
Measurements and Materials
Measurements: Blanket will measure about 64x72in for all colorways/yarns
Gauge: Squares measure 4.25in for Catona, 6in for Colour Crafter, 4.5in for Stone Washed/River Washed
Notions: US Size 3mm hook for Catona, 4.25mm hook for Colour Crafter, 3mm for Stone Washed’/River Washed
beg dc4tog beginning dc 4 together: beg dc, (yoh, insert hook in next st, yoh, pull up lp, yoh, pull yarn through 2 lps) 3 times, yoh, pull yarn through 4 lps
chN chain N number of times
dc double crochet
dc4tog (yoh, insert hook in next st, yoh, pull up lp, yoh, pull yarn through 2 lps) 4 times, yoh, pull yarn through 5 lps
lp loop
MR make ring: slip knot, ch3, ss in third ch from hook
Rep repeat
Rnd round
sc single crochet
sp space (chain space)
ss slip stitch
st stitch
tr treble crochet
yoh yarn over hook
Written Instructions & Step-by-step Photos (US Terms)
Rnd 1 MR, beg tr, (ch1, tr) 11 times, ch1, ss in beg tr. [12 tr]
Rnd 2 Ss in first ch, beg dc in next tr, (3dc in same tr, dc in next tr) 12 times omitting final dc, do not join. [48 dc]
Rnd 3 Beg dc4tog across first 4 dc, (ch4, dc4tog) 11 times, ch4, ss in beg dc4tog. [12 dc4tog, 12 sp]
Rnd 4 Beg dc in first sp, (4dc in same sp, dc in dc4tog, 5dc in next sp, 4tr in next sp, ch3, 4tr in same sp, dc in next sp) 4 times omitting final dc, ss in beg dc. [32 tr, 44 dc, 4 sp]
Rnd 5 (Sc in all sts across to corner sp, 3sc in corner sp) 4 times, sc in all sts across to beginning, ss in first sc, cut yarn and weave ends. [88 sc]
Stitch Guide (UK Terms)
Note: Scroll up for US Terms.
begbeginning
beg tr (dc, ch1) – counts as 1 tr
beg dtr(dc, ch2) – counts as 1 dtr
beg tr4togbeginning tr 4 together: beg tr, (yoh, insert hook in next st, yoh, pull up lp, yoh, pull yarn through 2 lps) 3 times, yoh, pull yarn through 4 lps
chNchain N number of times
dc double crochet
dtr double treble crochet
tr4tog (yoh, insert hook in next st, yoh, pull up lp, yoh, pull yarn through 2 lps) 4 times, yoh, pull yarn through 5 lps
lploop
MRmake ring: slip knot, ch3, ss in third ch from hook
Reprepeat
Rndround
spspace (chain space)
ssslip stitch
ststitch
trtreble crochet
yoh yarn over hook
Written Instructions & Step-by-step Photos (UK Terms)
Rnd 1 MR, beg dtr, (ch1, dtr) 11 times, ch1, ss in beg dtr. [12 dtr]
Rnd 2 Ss in first ch, beg tr in next dtr, (3tr in same dtr, tr in next dtr) 12 times omitting final tr, do not join. [48 tr]
Rnd 3 Beg tr4tog across first 4 tr, (ch4, tr4tog) 11 times, ch4, ss in beg tr4tog. [12 tr4tog, 12 sp]
Rnd 4 Beg tr in first sp, (4tr in same sp, tr in tr4tog, 5tr in next sp, 4dtr in next sp, ch3, 4dtr in same sp, tr in next sp) 4 times omitting final tr, ss in beg tr. [32 dtr, 44 tr, 4 sp]
Rnd 5 (Dc in all sts across to corner sp, 3dc in corner sp) 4 times, dc in all sts across to beginning, ss in first dc, cut yarn and weave ends. [88 dc]
CypressTextiles Tree Huggers Facebook Group – This is my main FB group (join!). Share your VVCAL progress pics in this group if you like, and I will share CAL highlights here, but the weekly action will be in the other group linked above.