
Hello, gorgeous crafter! Today I am sharing the final installment of my French Braid Blanket. The MEGA version!
Find the Mini and Mondo free crochet pattern at this blog post. You can find all 3 PDF files, the Mini, Mondo, and Mega versions in one pattern at my Etsy Shop and Ravelry Page. All 3 PDF files are included in the French Braid Blanket pattern.
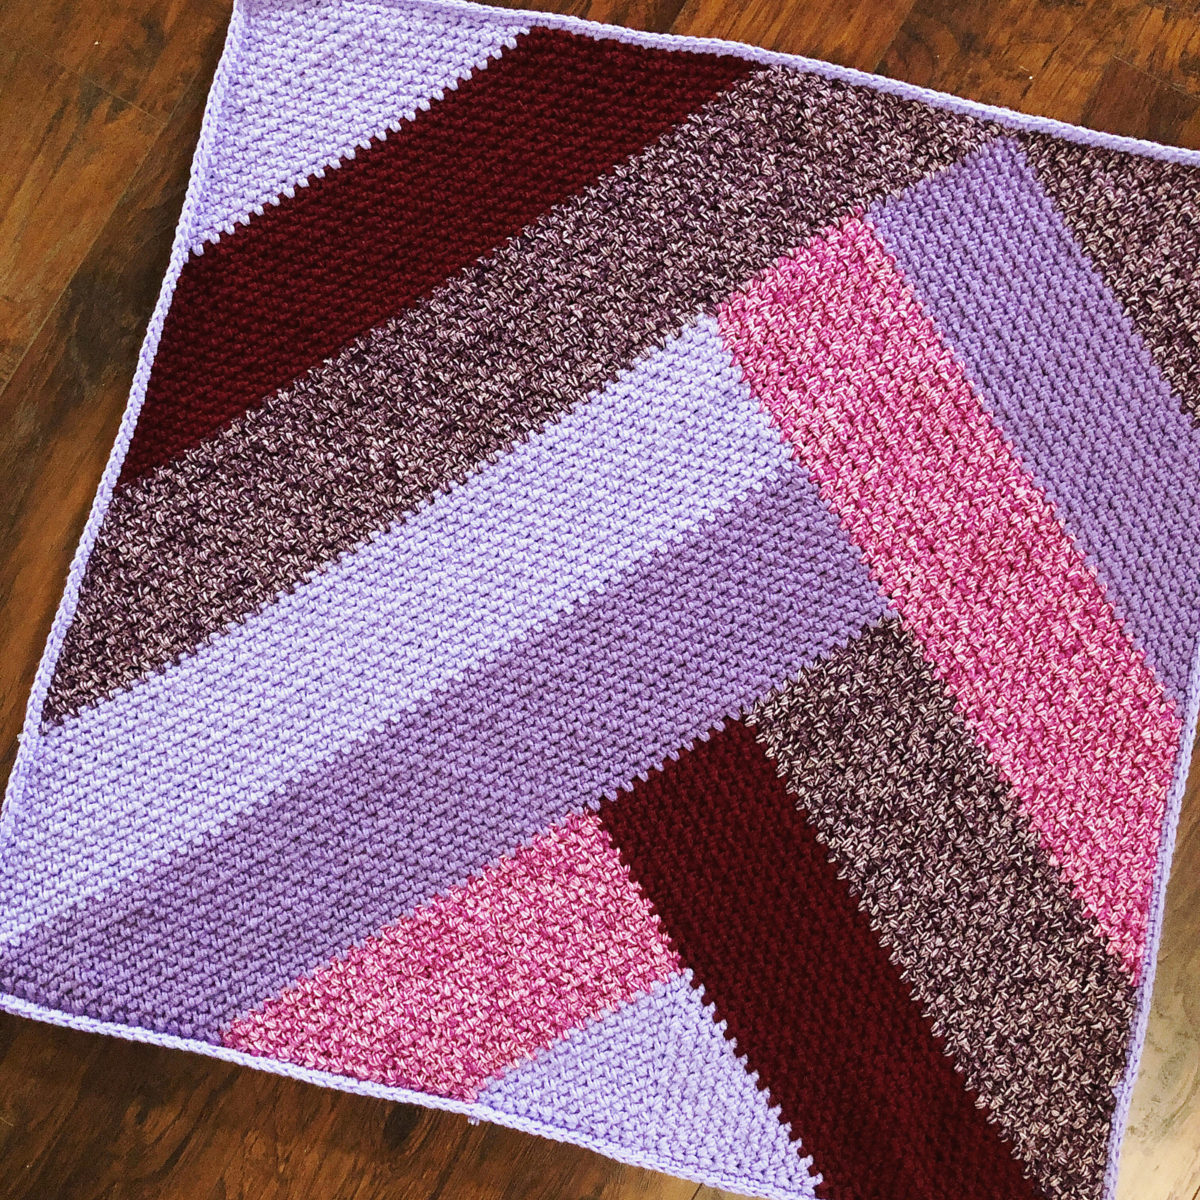
French Braid Blanket, Mega Square Version
This pattern will be great to make blankets and sell them because some customers are looking for handmade blankets that have less of a “traditional crochet” look, and more of a modern look. French Braid Blanket, Mega Version really delivers!
Use this hashtag, whether you make the Mega Square, Mondo Square version or the Mini Square version, just to keep all of the French Braid Blankets together.
#FrenchBraidBlanket
Pattern Includes Adjustments
- How to make the blanket any size
- How to use any yarn weight to get your desired blanket size
- How to make the Mega version a rectangle instead of a square
Mini Version
Make a bunch of squares, using small remnants of yarn – great for zero waste projects.

Mondo Version
Make fewer (bigger) squares using larger amounts of yarn – great for stash busting.

New! Mega Version
Make 1 giant square using multiple balls of the same color, DK/light weight yarn held triple or super bulky weight – great for stash busting!

Find this pattern in a condensed ad-free PDF for a small fee on Etsy, and Ravelry. MEGA, MONDO, and MINI Square versions PDFs are included! Coloring pages for layout are also included.
Note: this post contains affiliate links marked with an asterisk. Purchasing through these links gains me a small commission at no additional cost to you.
To Mega, Mondo, or Mini?
Make the Mega version if:
- You have at least 2 100g balls of each color
- You want fewer ends to weave (the blanket is literally one huge square)
- You don’t want to sew squares together
Make the Mondo version if:
- You have larger quantities of each color
- You want fewer ends to weave (the squares are larger so you need to make fewer of them for the same size blanket)
- You want to make fewer motifs to reach your desired blanket size
Make the Mini version if:
- You are working with small amounts of yarn, for a zero-waste project (remnants busting)
- You want each motif to be quicker for instant gratification
- You like the look of many motifs or want more color variety
French Braid Blanket, Mega Square Version
Head to this blog post for the French Braid Blanket, Mondo and Mini square versions free crochet patterns.
Find this pattern in a condensed ad-free PDF for a small fee on Etsy, and Ravelry. MEGA, MONDO, and MINI Square versions PDFs are included! Coloring pages for layout are also included.

Materials
- Size 10mm hook
- Scheepjes Colour Crafter and Velvet Yarn (held triple using a fun trick)
Yarn: Scheepjes Colour Crafter + Velvet
Here are the exact yarn amounts I used for my small 42x42in French Braid Blanket, made in the Mega version (1 large square):
- Colour Crafter
- Yarn A: 1082 Zwolle x 3 balls
- Yarn B: 1277 Amstelveen x 3 balls
- Yarn C: 1035 Kampen x 2 balls
- Velvet
- Yarn D: 856 Grant x 3 balls
- Yarn E: 848 Rogers x 2 balls
Order Scheepjes Colour Crafter from WoolWarehouse *
Order Scheepjes Velvet from WoolWarehouse *
Stitch Guide
Note: This pattern is in US Terms, but there is only 1 stitch used: single crochet, so if you are used to reading UK Terms, please know that you are using dc for this entire project. (US) sc = (UK) dc
- chN chain N number of times
- MR make ring: slip knot, ch3, ss in third ch from hook
- Rep repeat
- Rnd round
- sc single crochet
- sp space (chain space)
- ss slip stitch
- st stitch
- yoh yarn over hook

Instructions
Important note: This pattern is worked with Scheepjes Colour Crafter DK weight yarn held triple. I use 1 ball of yarn at a time to avoid tangling. Also, for some colors, only 2 balls are required, so holding 1 thread from each of 3 balls would not be logical. Use the following tip to hold the yarn triple while using just one ball.
“Chain Ply” or “Long Chain Method” – start with an elongated “S” to start the 3 strands held together, and then loop the yarn through and pull a long length of yarn through to continue the “S” chain, and continue holding 3 strands together.
Head to this blog post to see how the trick works.
Blanket construction notes: First a base triangle is made, and then each section is worked off the previous ones to create the design, in a log cabin type fashion.
French Braid Blanket, Mega Square Version
Note: For neater edges follow these tips. Please watch the “Video: Section 1 (Base Triangle)”below, as I explain these tips and demonstrate them.
- I do not “chain up” for the first sc of the row, so you will work the first sc of the row directly into a chain space without chaining 1.
- Be sure to turn your work the same way each time. If you are looking down on your work from the top edge, you will turn the work counter-clockwise. In other words, you will turn the right edge of the piece toward you to flip the work over.
- Work “over” the working yarn for your first sc stitch, instead of carrying it up the edge.
Section 1 (Base Triangle)

- Row 1 (RS) Using Yarn A, MR, (sc, ch1) 3 times, sc, turn. [4 sc, 3 sp]
- Mark Row 1 as the RS of the square to make things easier later. This stitch pattern is reversible and it is hard to tell front from back.
- Row 2 (Sc, ch1, sc) in first sp, ch1, (sc, ch1, sc) in next sp, ch1, (sc, ch1, sc) in final sp, turn. [6 sc, 5 sp]
- Rows 3-13 (Sc, ch1, sc) in first sp, (ch1, sc in next sp) across to center sp, ch1, (sc, ch1, sc) in center sp, (ch1, sc in next sp) across to final sp, ch1, (sc, ch1, sc) in final sp, turn. Cut yarn after Row 13. [28 sc, 27 sp]
Video: Section 1 (Base Triangle)
Note: These videos are of the Mondo version, but it will really help to watch it, to understand the method of the French Braid Blanket in general.
Section 2

- Row 1 With WS facing, join Yarn E with ss in the first sp, (sc, ch1, sc) in first sp, (ch1, sc in next sp) 13 times, turn. [15 sc, 14 sp]
- Row 2 Ch1, sc in first sp, (ch1, sc in next sp) across to final sp, ch1, (sc, ch1, sc) in final sp, turn. [15 sc, 15 sp]
- Row 3 (Sc, ch1, sc) in first sp, (ch1, sc in next sp) across to end, turn. [16 sc, 15 sp]
- Rows 4-19 Rep Rows 2 and 3, cut yarn after Row 19. [24 sc, 23 sp]
Video: Section 2
Section 3

- Row 1 With RS facing, join Yarn C with ss in the first sp, (sc, ch1, sc) in first sp, (ch1, sc in next sp) 12 times, ch1, sc into final sc of Row 1 of Section 2 – note: watch “Video: Sections 3 and 4” (below) for demo, (ch1, sc in final sc of next odd numbered row of Section 2) 9 times, turn. [24 sc, 23 sp]
- Rows 2-19 Work repeating Rows 2 and 3 as for Section 2, cut yarn after Row 19. [33 sc, 32 sp]
Video: Sections 3 and 4
Section 4

- Row 1 With WS facing, join Yarn D with ss in the final sc of Section 3 – note: watch “Video: Sections 3 and 4” (above) for demo, ch1, sc in first sp, (ch1, sc in next sp) across to end, turn. [32 sc, 32 sp]
- Row 2 Sc in first sp, (ch1, sc in next sp) across to end, turn. [32 sc, 31 sp]
- Row 3 Ch1, sc in first sp, (ch1, sc in next sp) across to end, turn. [31 sc, 31 sp]
- Rows 4-19 Rep Rows 2 and 3, cut yarn after Row 19. [23 sc, 23 sp]
NOTE: There are no videos of the next sections, but the first 3 videos should be very helpful to see how the square is constructed.
Section 5

- Row 1 With WS facing, join Yarn B with ss in the first sp, (sc, ch1, sc) in first sp, (ch1, sc in next sp) 22 times, ch1, sc into final sc of Row 1 of Section 3, (ch1, sc in final sc of next odd numbered row of Section 3) 9 times, ch1, sc into first sp of Row 1 of Section 4, (ch1, sc in first sp of next odd numbered row of Section 4) 9 times, turn. [44 sc, 43 sp]
- Rows 2-19 Work repeating Rows 2 and 3 as for Section 2, cut yarn after Row 19. [53 sc, 52 sp]
Section 6

- Row 1 With RS facing, join Yarn A with ss in the final sc of Section 5, ch1, sc in first sp, (ch1, sc in next sp) across to end, turn. [52 sc, 52 sp]
- Rows 2-19 Work repeating Rows 2 and 3 as for Section 4, cut yarn after Row 19. [43 sc, 43 sp]
Section 7

- Row 1 With RS facing, join Yarn E with ss in the first sp, sc in first sp, (ch1, sc in next sp) 21 times, ch1, sc into final sc of Row 1 of Section 5, (ch1, sc in final sc of next odd numbered row of Section 5) 9 times, ch1, sc into first sp of Row 1 of Section 6, (ch1, sc in first sp of next odd numbered row of Section 6) 9 times, turn. [42 sc, 41 sp]
- Row 2 Ch1, sc in first sp, (ch1, sc in next sp) across to end, turn. [41 sc, 41 sp]
- Row 3 Sc in first sp, (ch1, sc in next sp) across to end, turn. [41 sc, 40 sp]
- Rows 4-19 Repeat Rows 2 and 3, cut yarn after Row 19. [33 sc, 32 sp]
Section 8

- Rows 1-19 With WS facing and Yarn B, work exactly as for Section 4.
Section 9

- Row 1 With RS facing, join Yarn D with ss in the first sp, sc in first sp, (ch1, sc in next sp) 22 times, turn. [23 sc, 22 sp]
- Rows 2-23 Sc in first sp, (ch1, sc in next sp) across to end, turn. Cut yarn after Row 23. [1 sc]
Sections 10-12

- Row 1 With WS facing, join Yarn D with ss in first sp, sc in first sp, (ch1, sc in next sp) 41 times, ch1, sc into final sc of Row 1 of Section 7, (ch1, sc in final sc of next odd numbered row of Section 7) 9 times, ch1, sc into first sp of Row 1 of Section 8, (ch1, sc in first sp of next odd numbered row of Section 8) 9 times, turn. [62 sc, 61 sp]
- Rows 2-19 Sc in first sp, (ch1, sc in next sp) across to end, turn. Cut yarn after Row 19. [44 sc, 43 sp]
- Rows 20-38 With RS facing, join Yarn C with ss in first sp, work as for Row 2. Cut yarn after Row 38. [25 sc, 24 sp]
- Rows 39-62 With WS facing, join Yarn A with ss in first sp, work as for Row 2. Cut yarn after Row 62. [1 sc]
Weave ends! Alternatively, use a surgeon’s knot as shown below. This will not come undone, and you can cut the ends short. I add in an extra pass on the top also.

Border
Make simple 2-round border as follows:
Rnd 1 With RS facing, join contrast color yarn with ss in final sc of section 9, (make 83 ss across, working into sc sts, ss in corner) 4 times, ss in first ss.

Rnd 2 Working under entire ss (working in both lps of ss), (make 83 sc across. make 3 sc in corner ss) 4 times, ss in first sc, cut yarn and weave ends.

Leave as is, or add any border you like! I prefer to let the neat layout do the talking for this piece.

Additional Pattern Adjustments
- How to make the blanket any size
- How to use any yarn weight to get your desired blanket size
- How to make the Mega version a rectangle instead of a square
Any size, using any yarn weight
This seems like a long process, but follow the steps, and you can make your Mega blanket any size, with any weight yarn. Yes!!!
I recommend you make the Mega Version as it is written one time before you try these steps – even if you use waste DK yarn – just to get a feel for the method.
Step 1: Determine what width you want your blanket to be (it will end up a square if you follow these steps. If you want a rectangle, scroll down for those instructions.) Let’s say you want you blanket 60in square.
Step 2: Multiply that measurement by .28 so in our example .28 x 60 equals 16.8in. You can round this number to make it easier, so I will use 17in for this example.
Step 3: Work Section 1 of your blanket until the bottom edge of your base triangle measures as close to 17in as possible, ending with a RS (odd-numbered) row. For our example, I will say it took me 25 rows to reach 17in. It’s okay if you’re a little over or under your measurement.
Step 4: Take the number of Rows you have in Section 1, and multiply that number by 1.57 and round it to the nearest odd whole number. So for our example, 25 rows x 1.57 equals 39.25, so I will round to 39 rows.
Step 5: This number of rows from Step 4 is how many rows each of your Sections 2-12 will be. My example would be 39 rows for Sections 2-12.
Now you can make your blanket following the methods of the Mega Version, using the Section 1 Row count, and then the row counts of sections 2-12.
If you want to use any weight yarn to make any size French Braid Blanket square, you can start with the desired measurement of your square, and then follow the same steps above. Let’s say you want a blanket that is 3x4ft, and you want to make 12 squares (3 x 4 square formation) – this means each square will be about 12in. Taking this measurement through the steps above:
- Step 1: 12in desired square measurement
- Step 2: 12in x .28 = 3.36in
- Step 3: Using DK weight yarn (not held triple), Section 1 is a little over 3in after 7 rows
- Step 4: 7 rows x 1.57 = 11 rows
- Step 5: Sections 2-12 are 11 rows wide
Once you do it, it gets easier every time!
Make a Rectangle Blanket
Make the French Braid Blanket, Mega Version into a rectangle instead of a square

I recommend making the original square version one time, just to get used to the methods.
Use the methods from the square version to continue the blanket upward, making 16 sections instead of 12, as shown in the schematic above.
I hope you enjoyed this pattern! You will love every moment of this one. It’s such a fast and fun make.
THANK YOU for your support, and remember you can find this French Braid Blanket pattern at my Etsy Shop and Ravelry Page. All 3 PDFs are included – Mini, Mondo, and Mega.
Happy Crafting!
Rachele C.
2 Comments