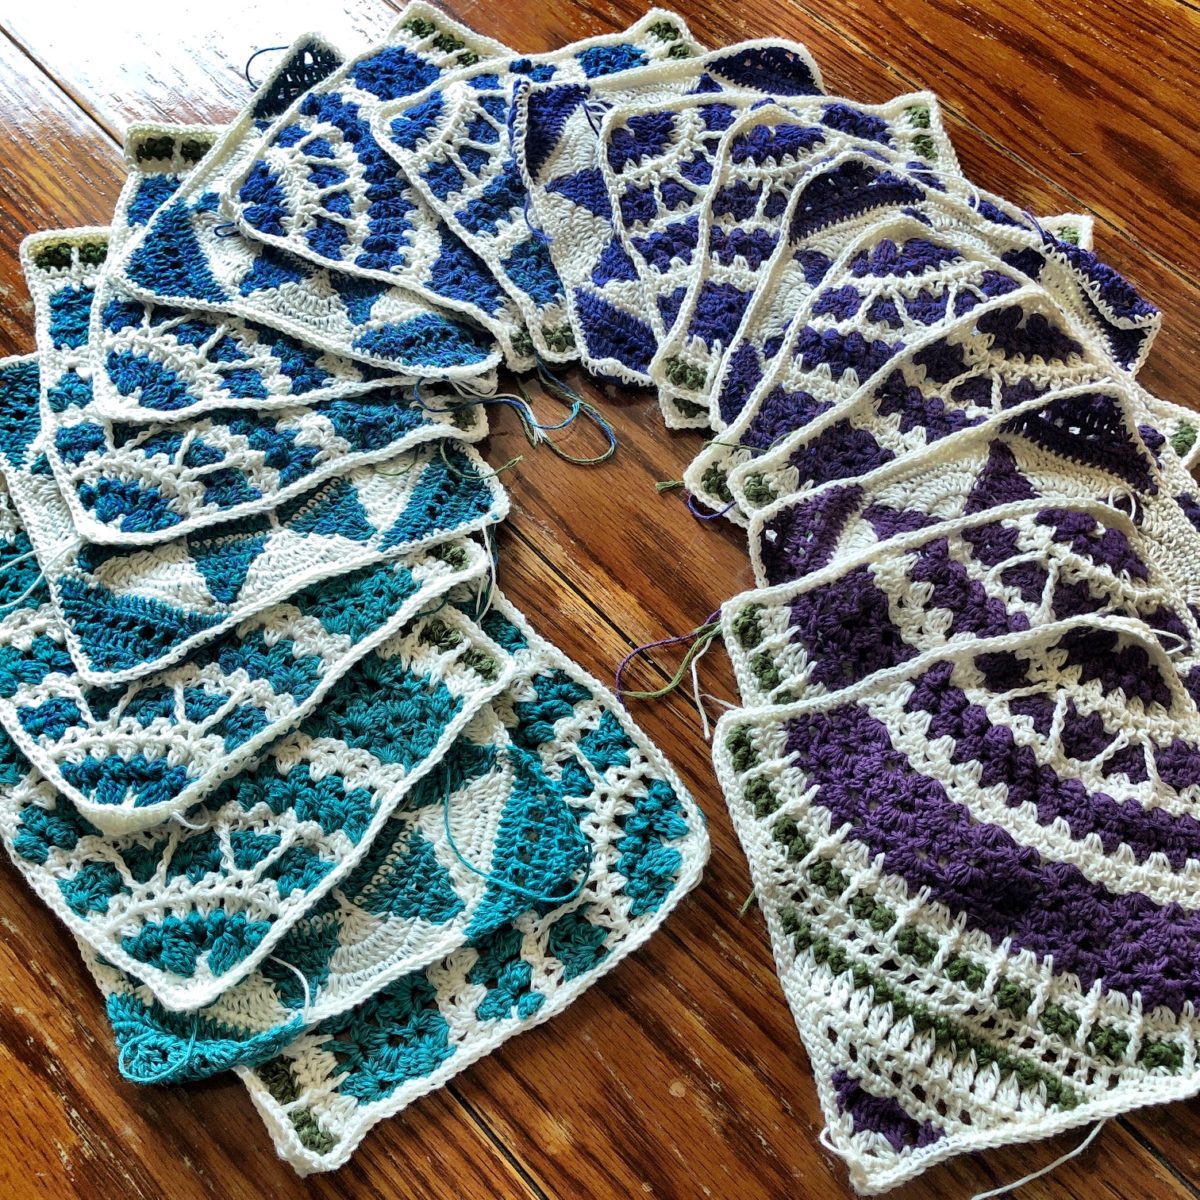
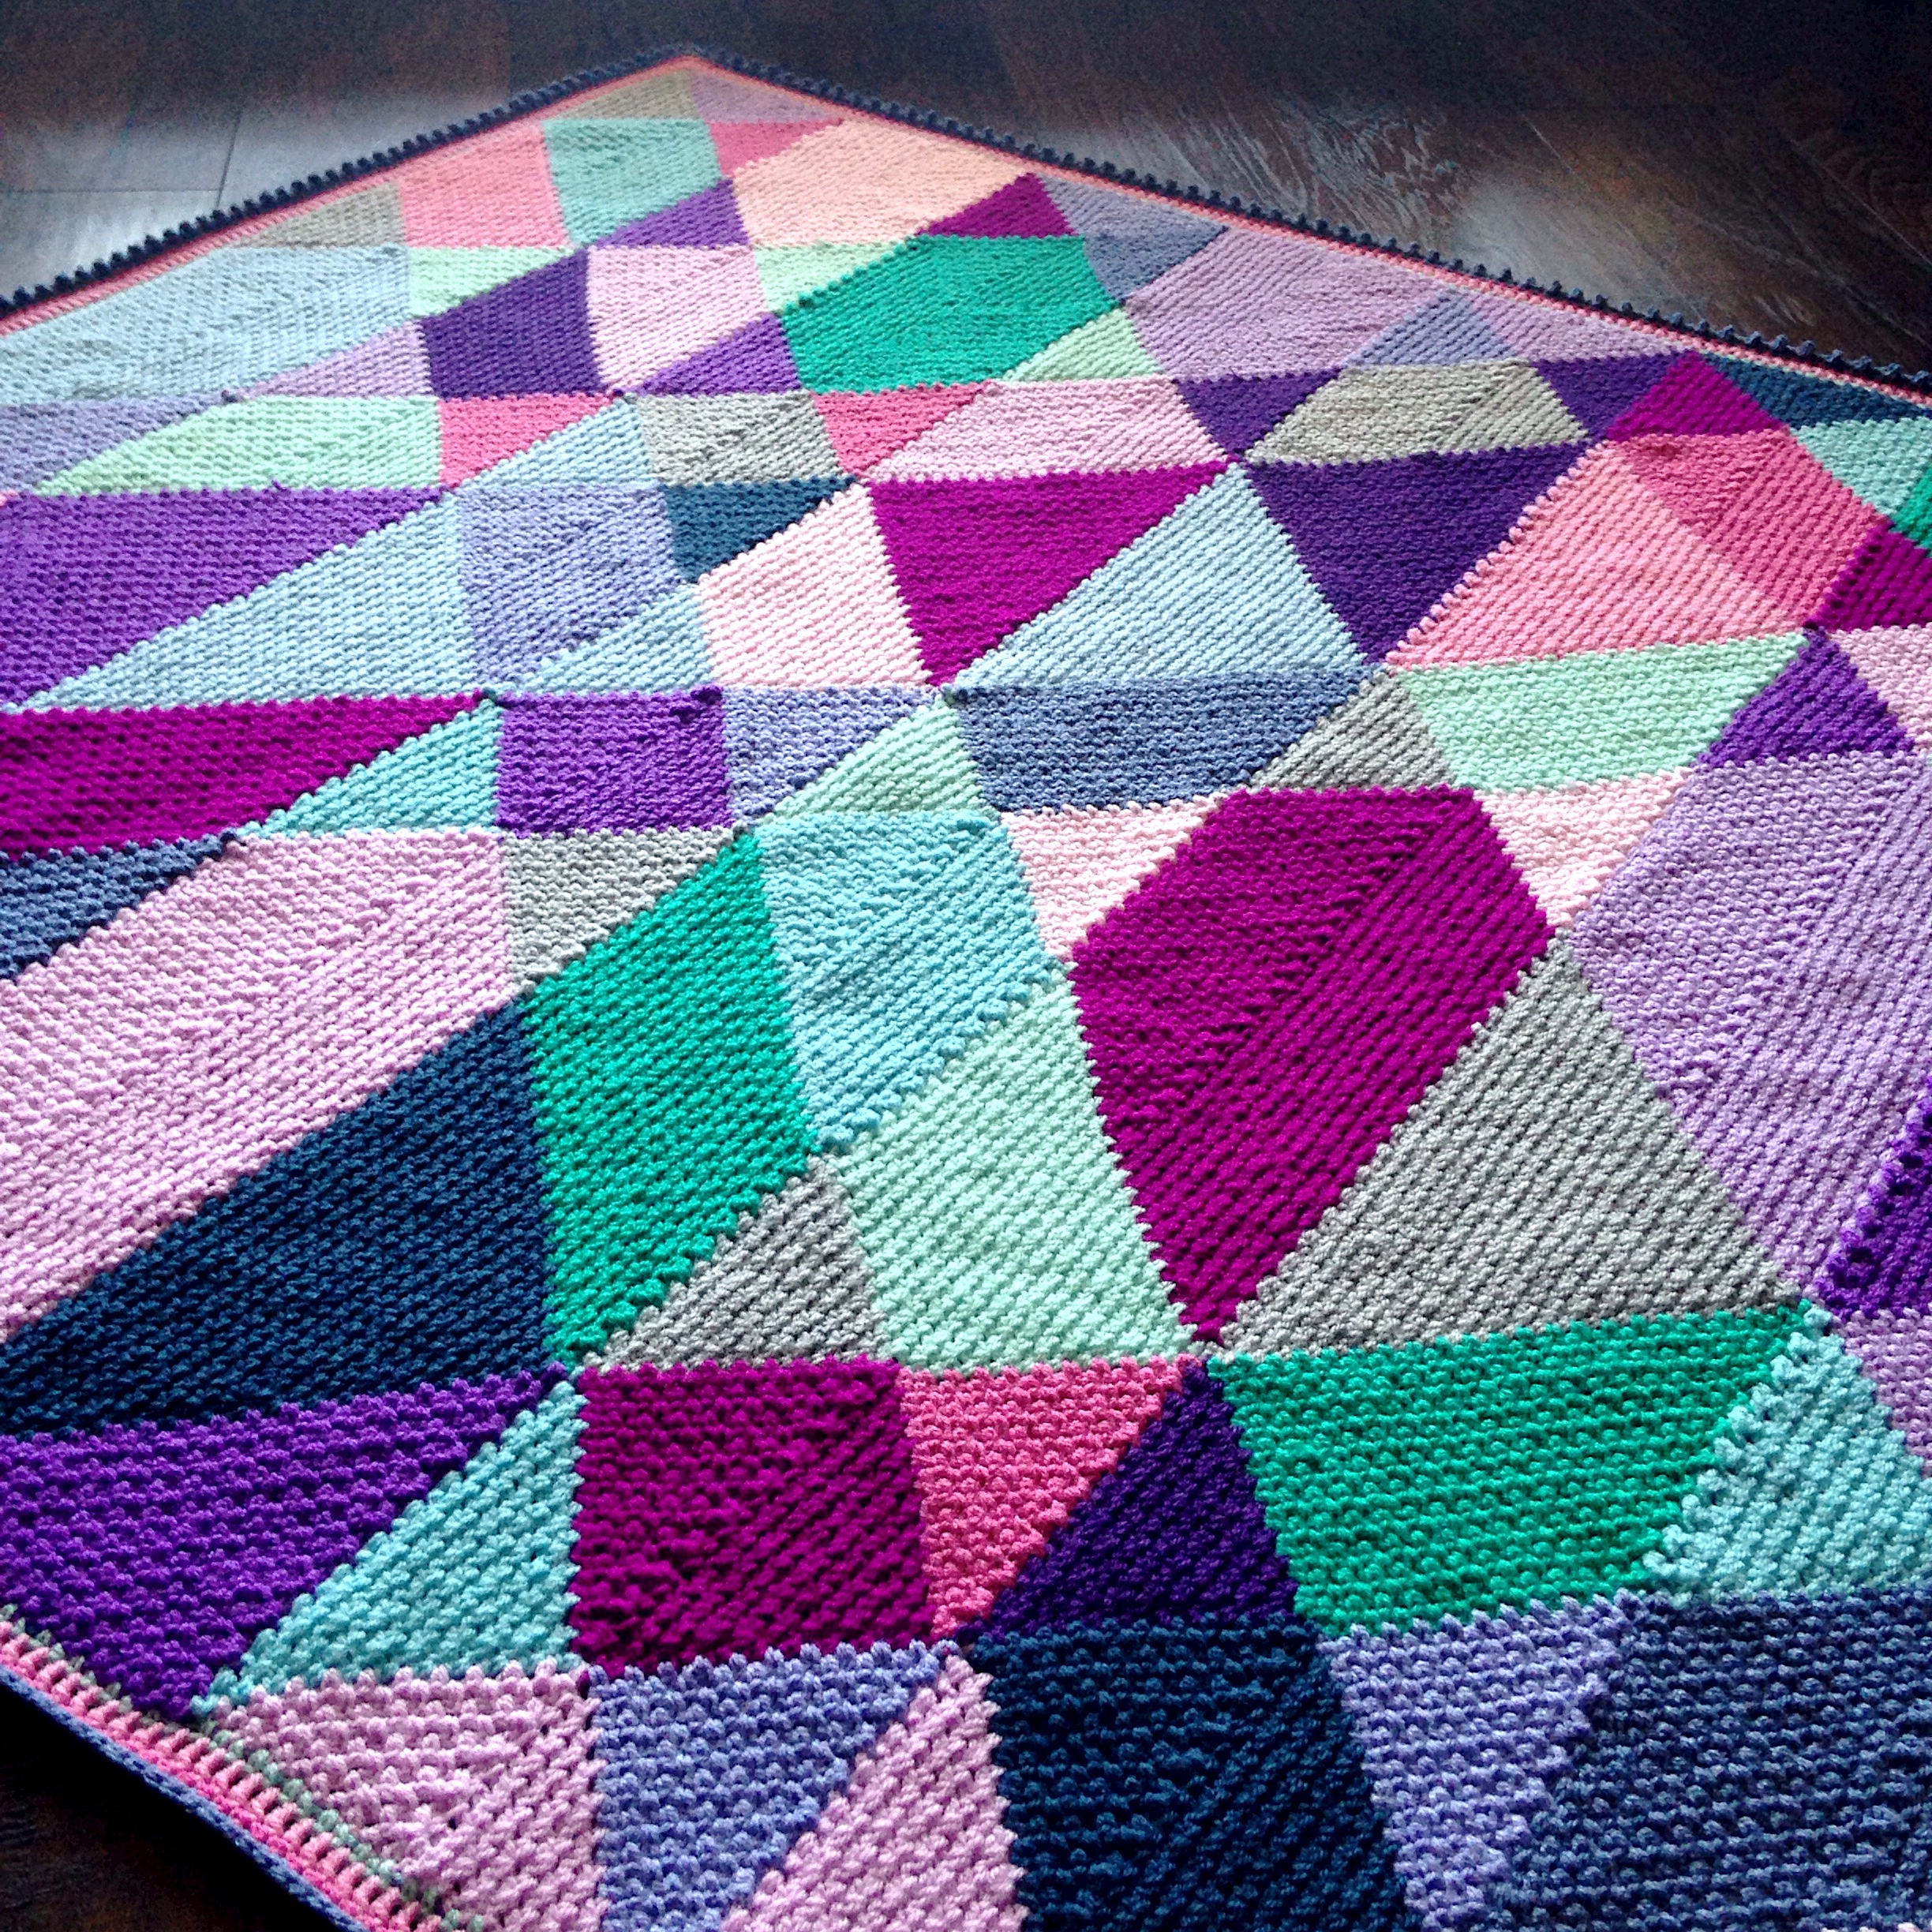
Well the blanket is in full swing, and I was even able to pry myself away from the project and take a few progress pics! I’m super excited to show you, so read on..
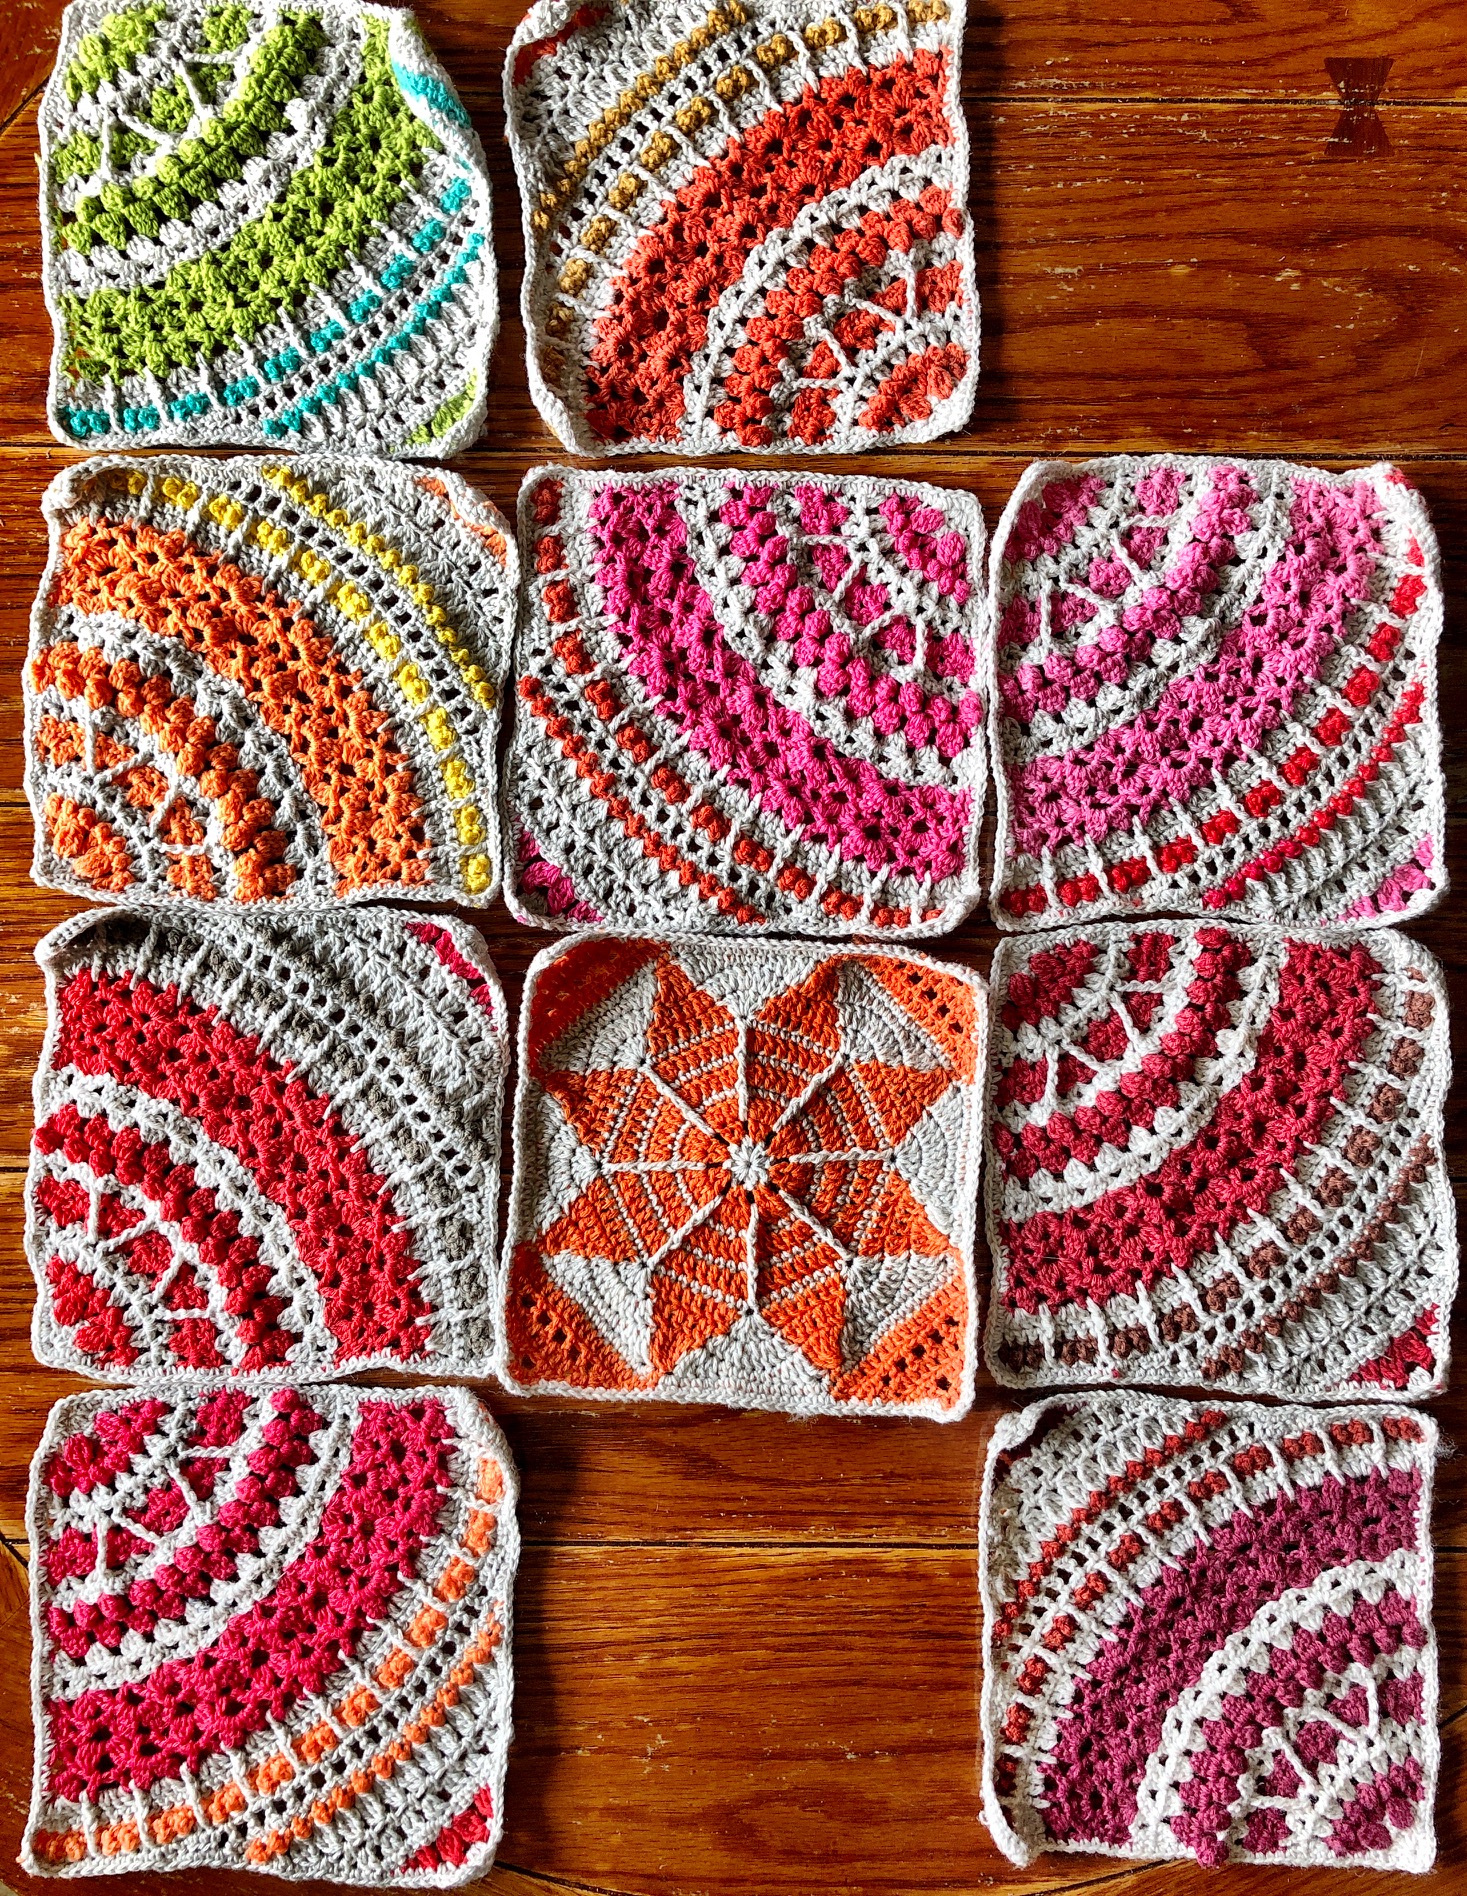
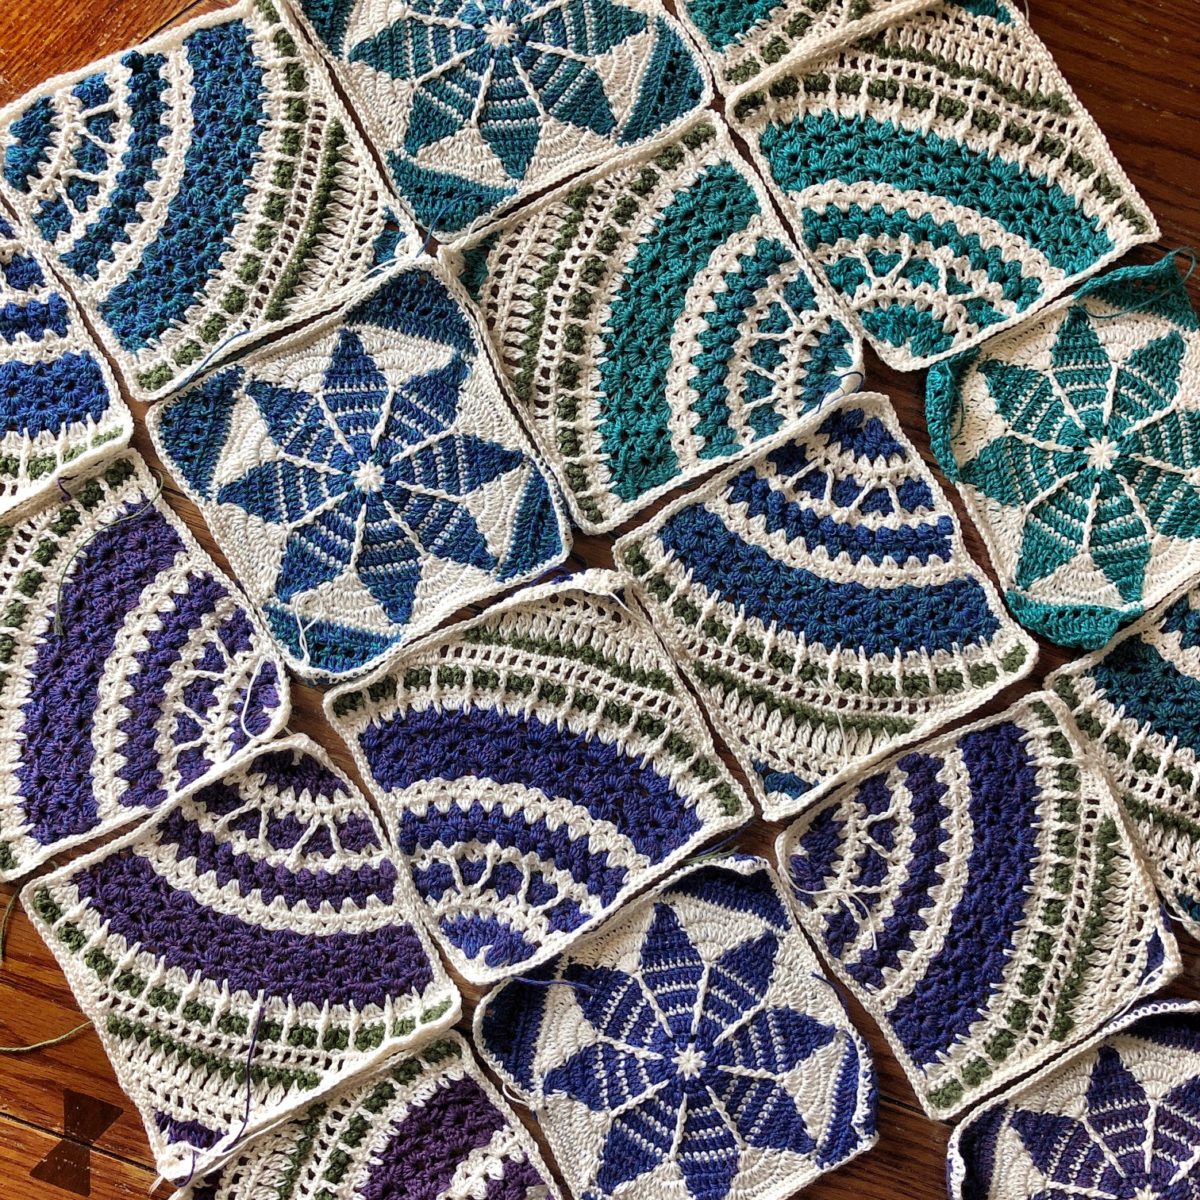
Hello, and welcome to the Ninth week of my Gloria Blanket Crochet-Along! This week we will make a mix of Quarter Mandala Squares and Snowflake Squares. I am so pumped to get started and I’m very thankful that you’re joining me for this CAL. Have fun and share pics!
Hello, and welcome to the Eighth week of my Gloria Blanket Crochet-Along! This week we will make a mix of Quarter Mandala Squares and Snowflake Squares. I am so pumped to get started and I’m very thankful that you’re joining me for this CAL. Have fun and share pics!
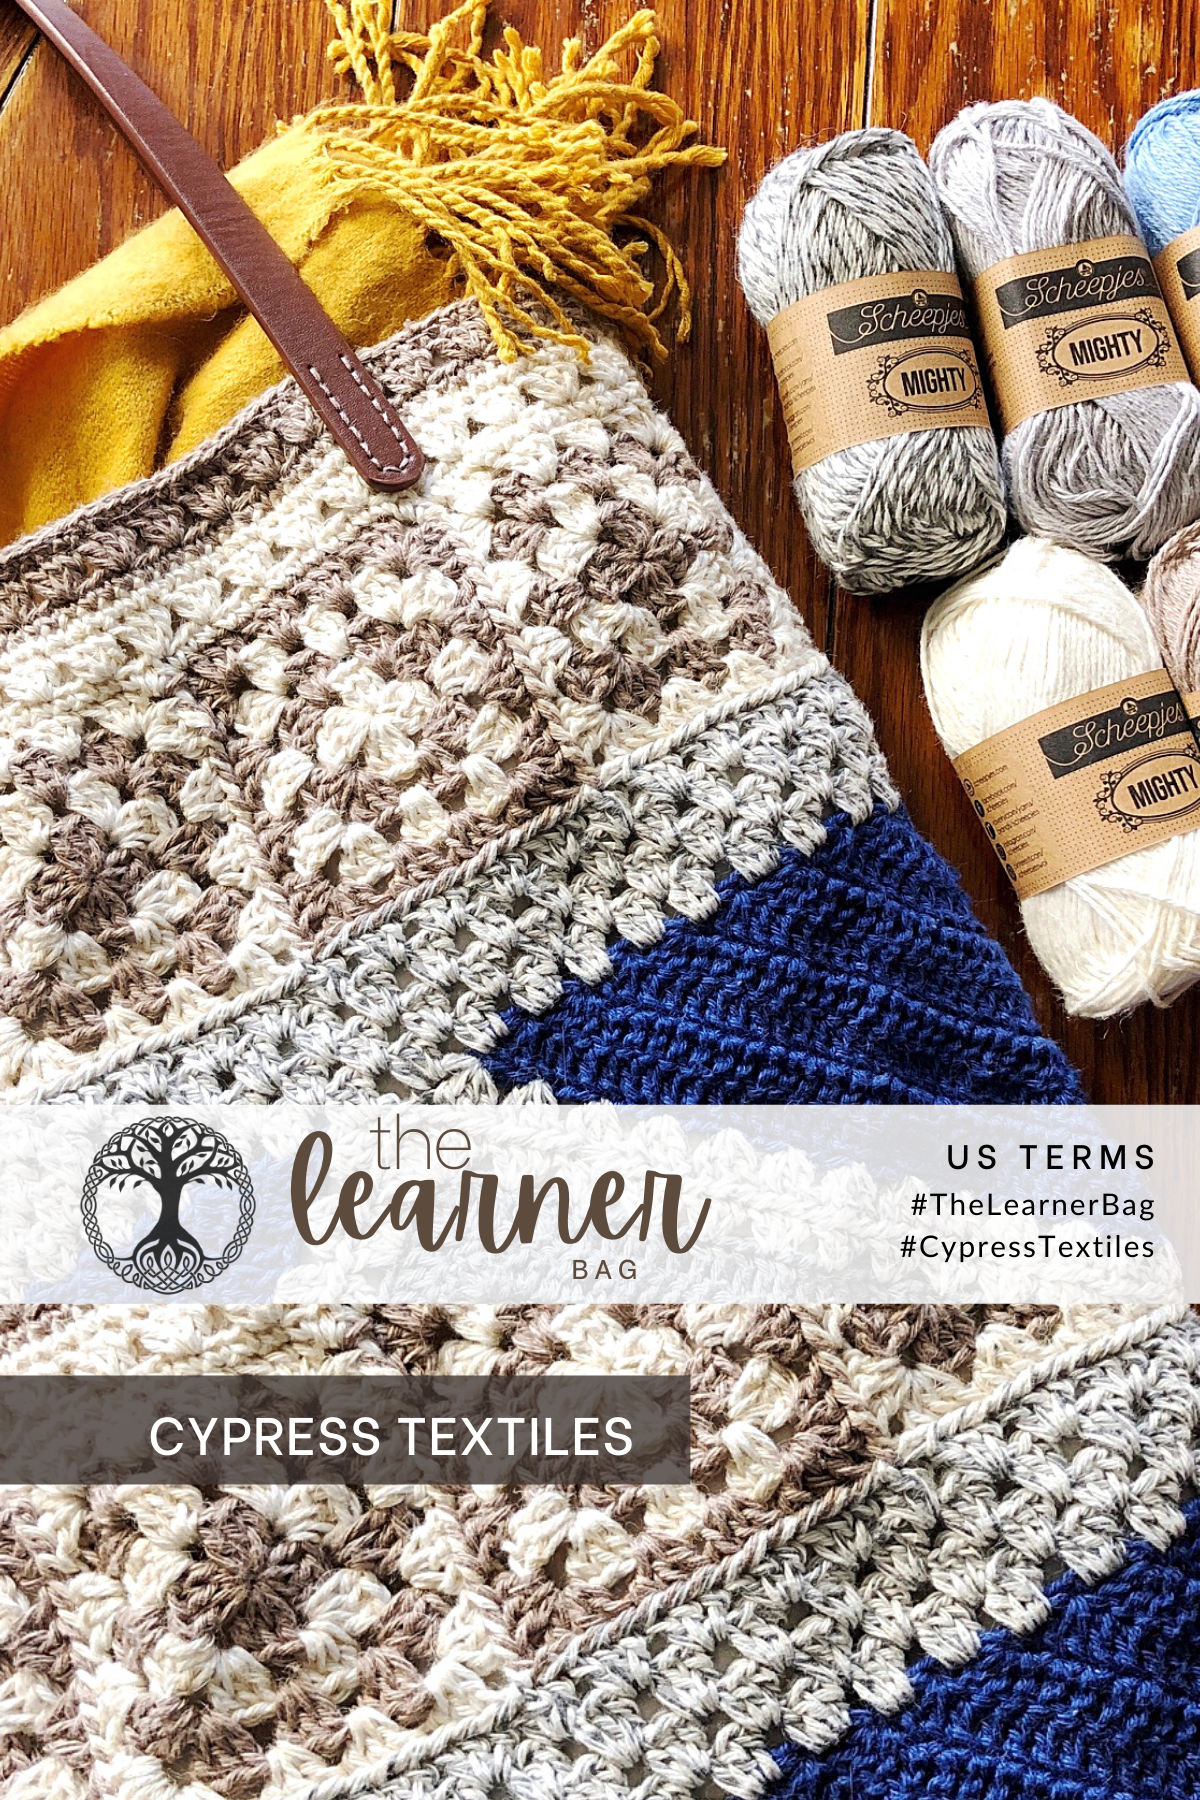
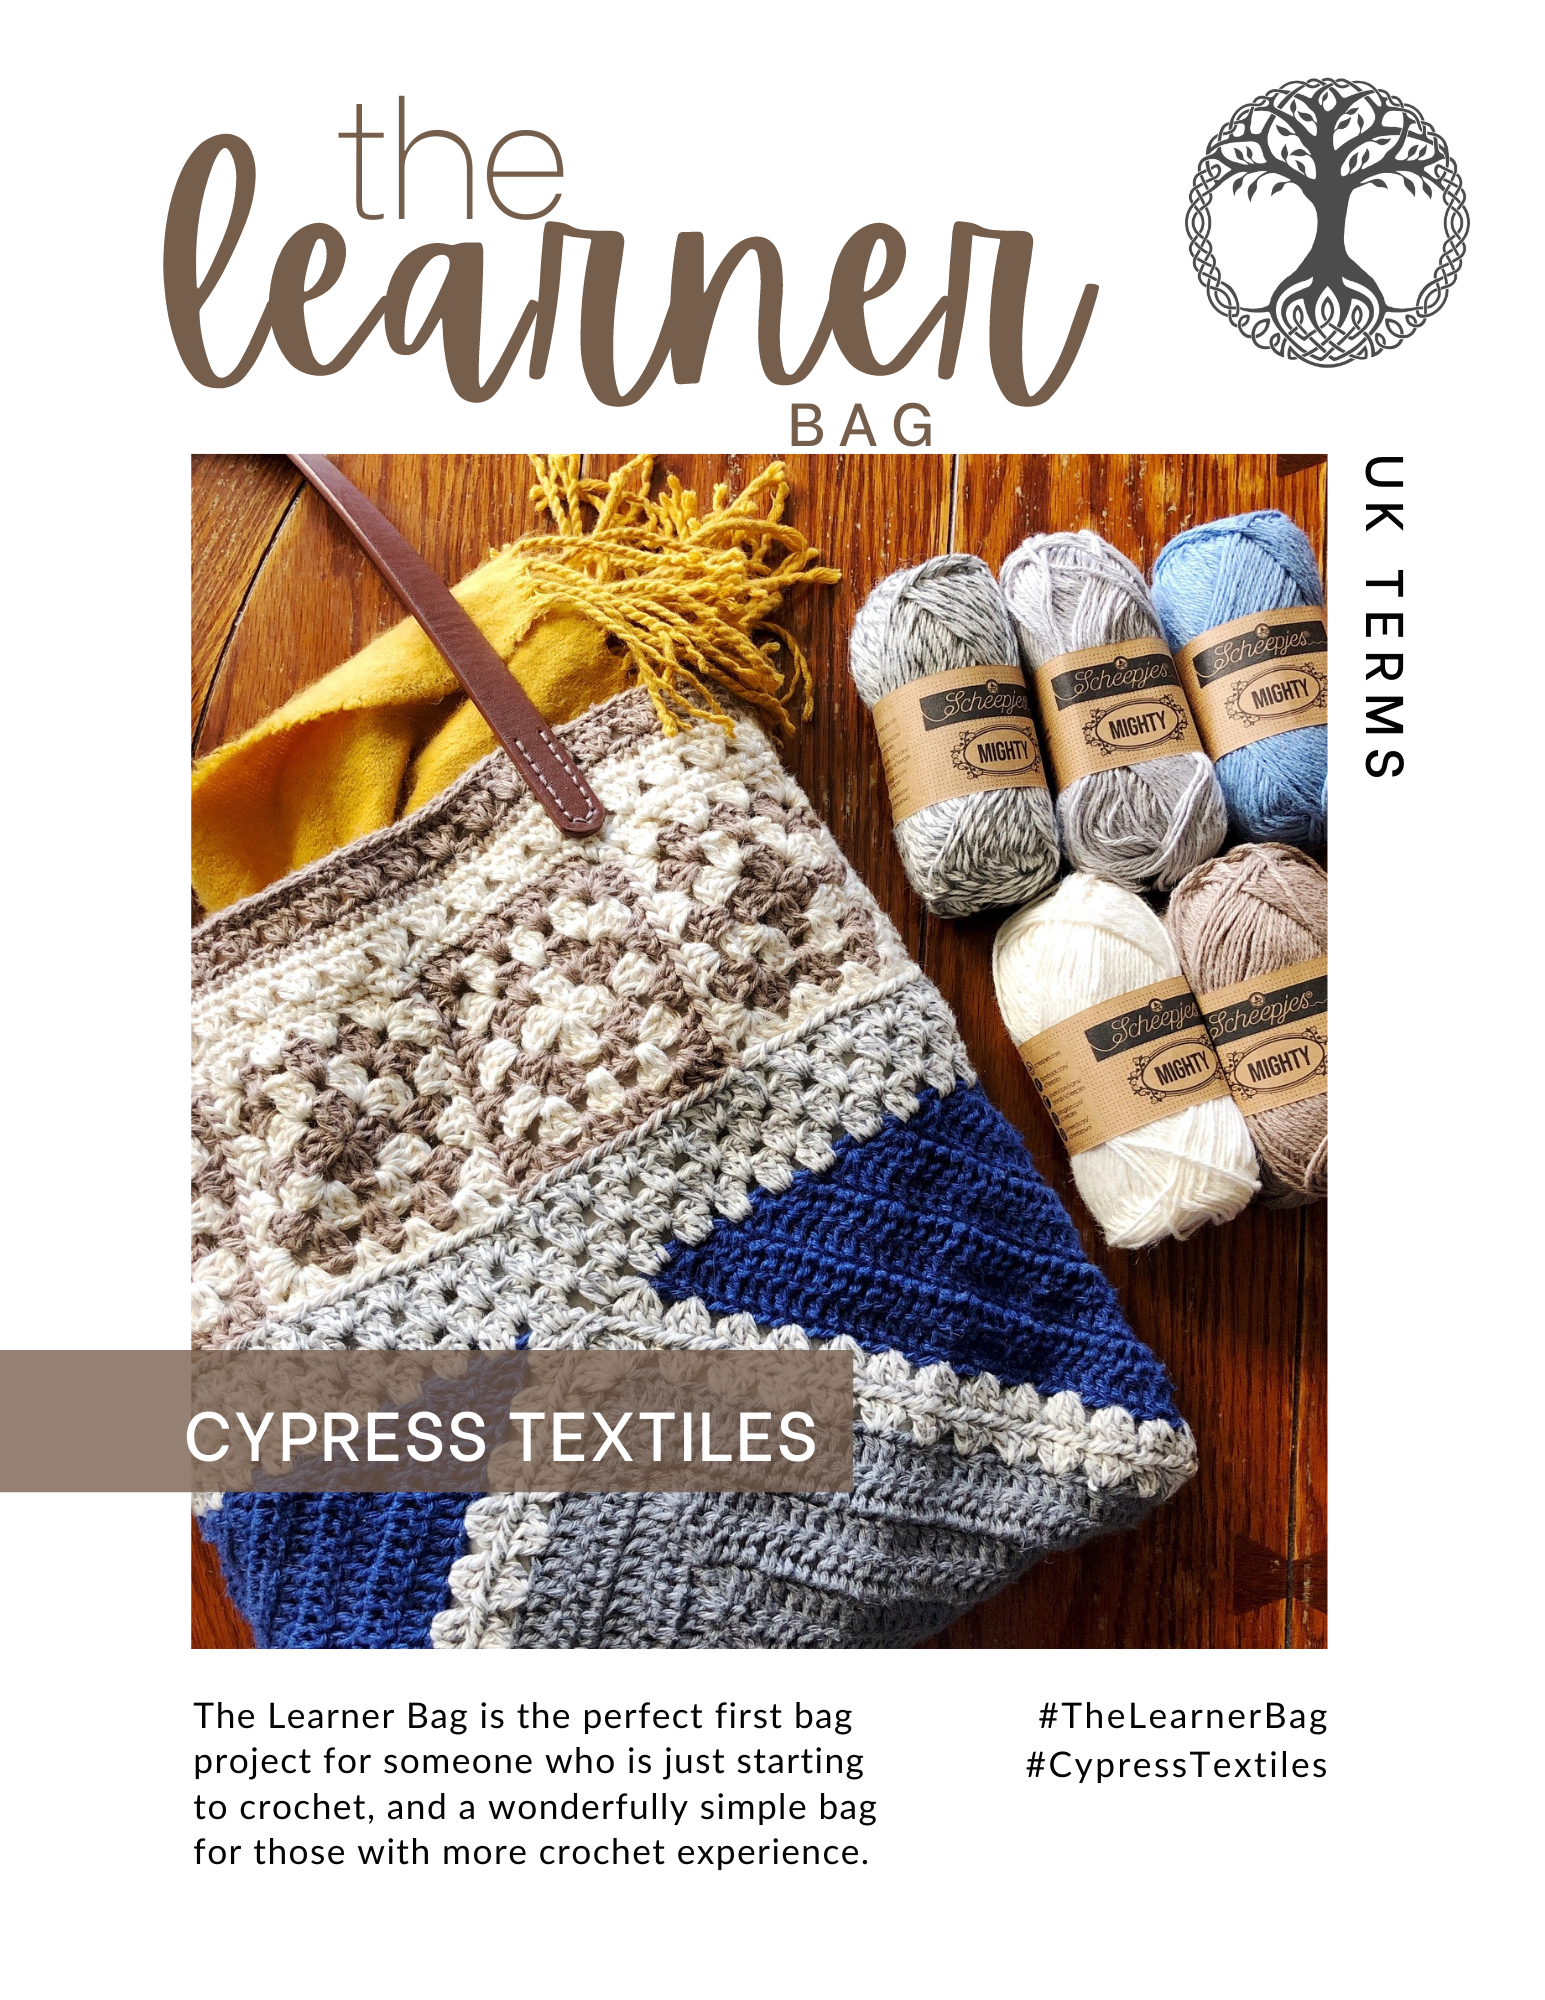
Hello, lovely! As promised, today I have the free pattern for The Learner Bag for you. This is the perfect bag project for someone who is just learning to crochet, and also a wonderfully simple bag for experienced crochet artists. Made in a durable Jute blend yarn, Scheepjes Mighty, this stylish bag will last through daily use.
Find the PDF version here for easy print or just to help support CypressTextiles: Etsy, Ravelry, CypressTextiles Pattern Shop. Both US and UK Terms are included in the download.
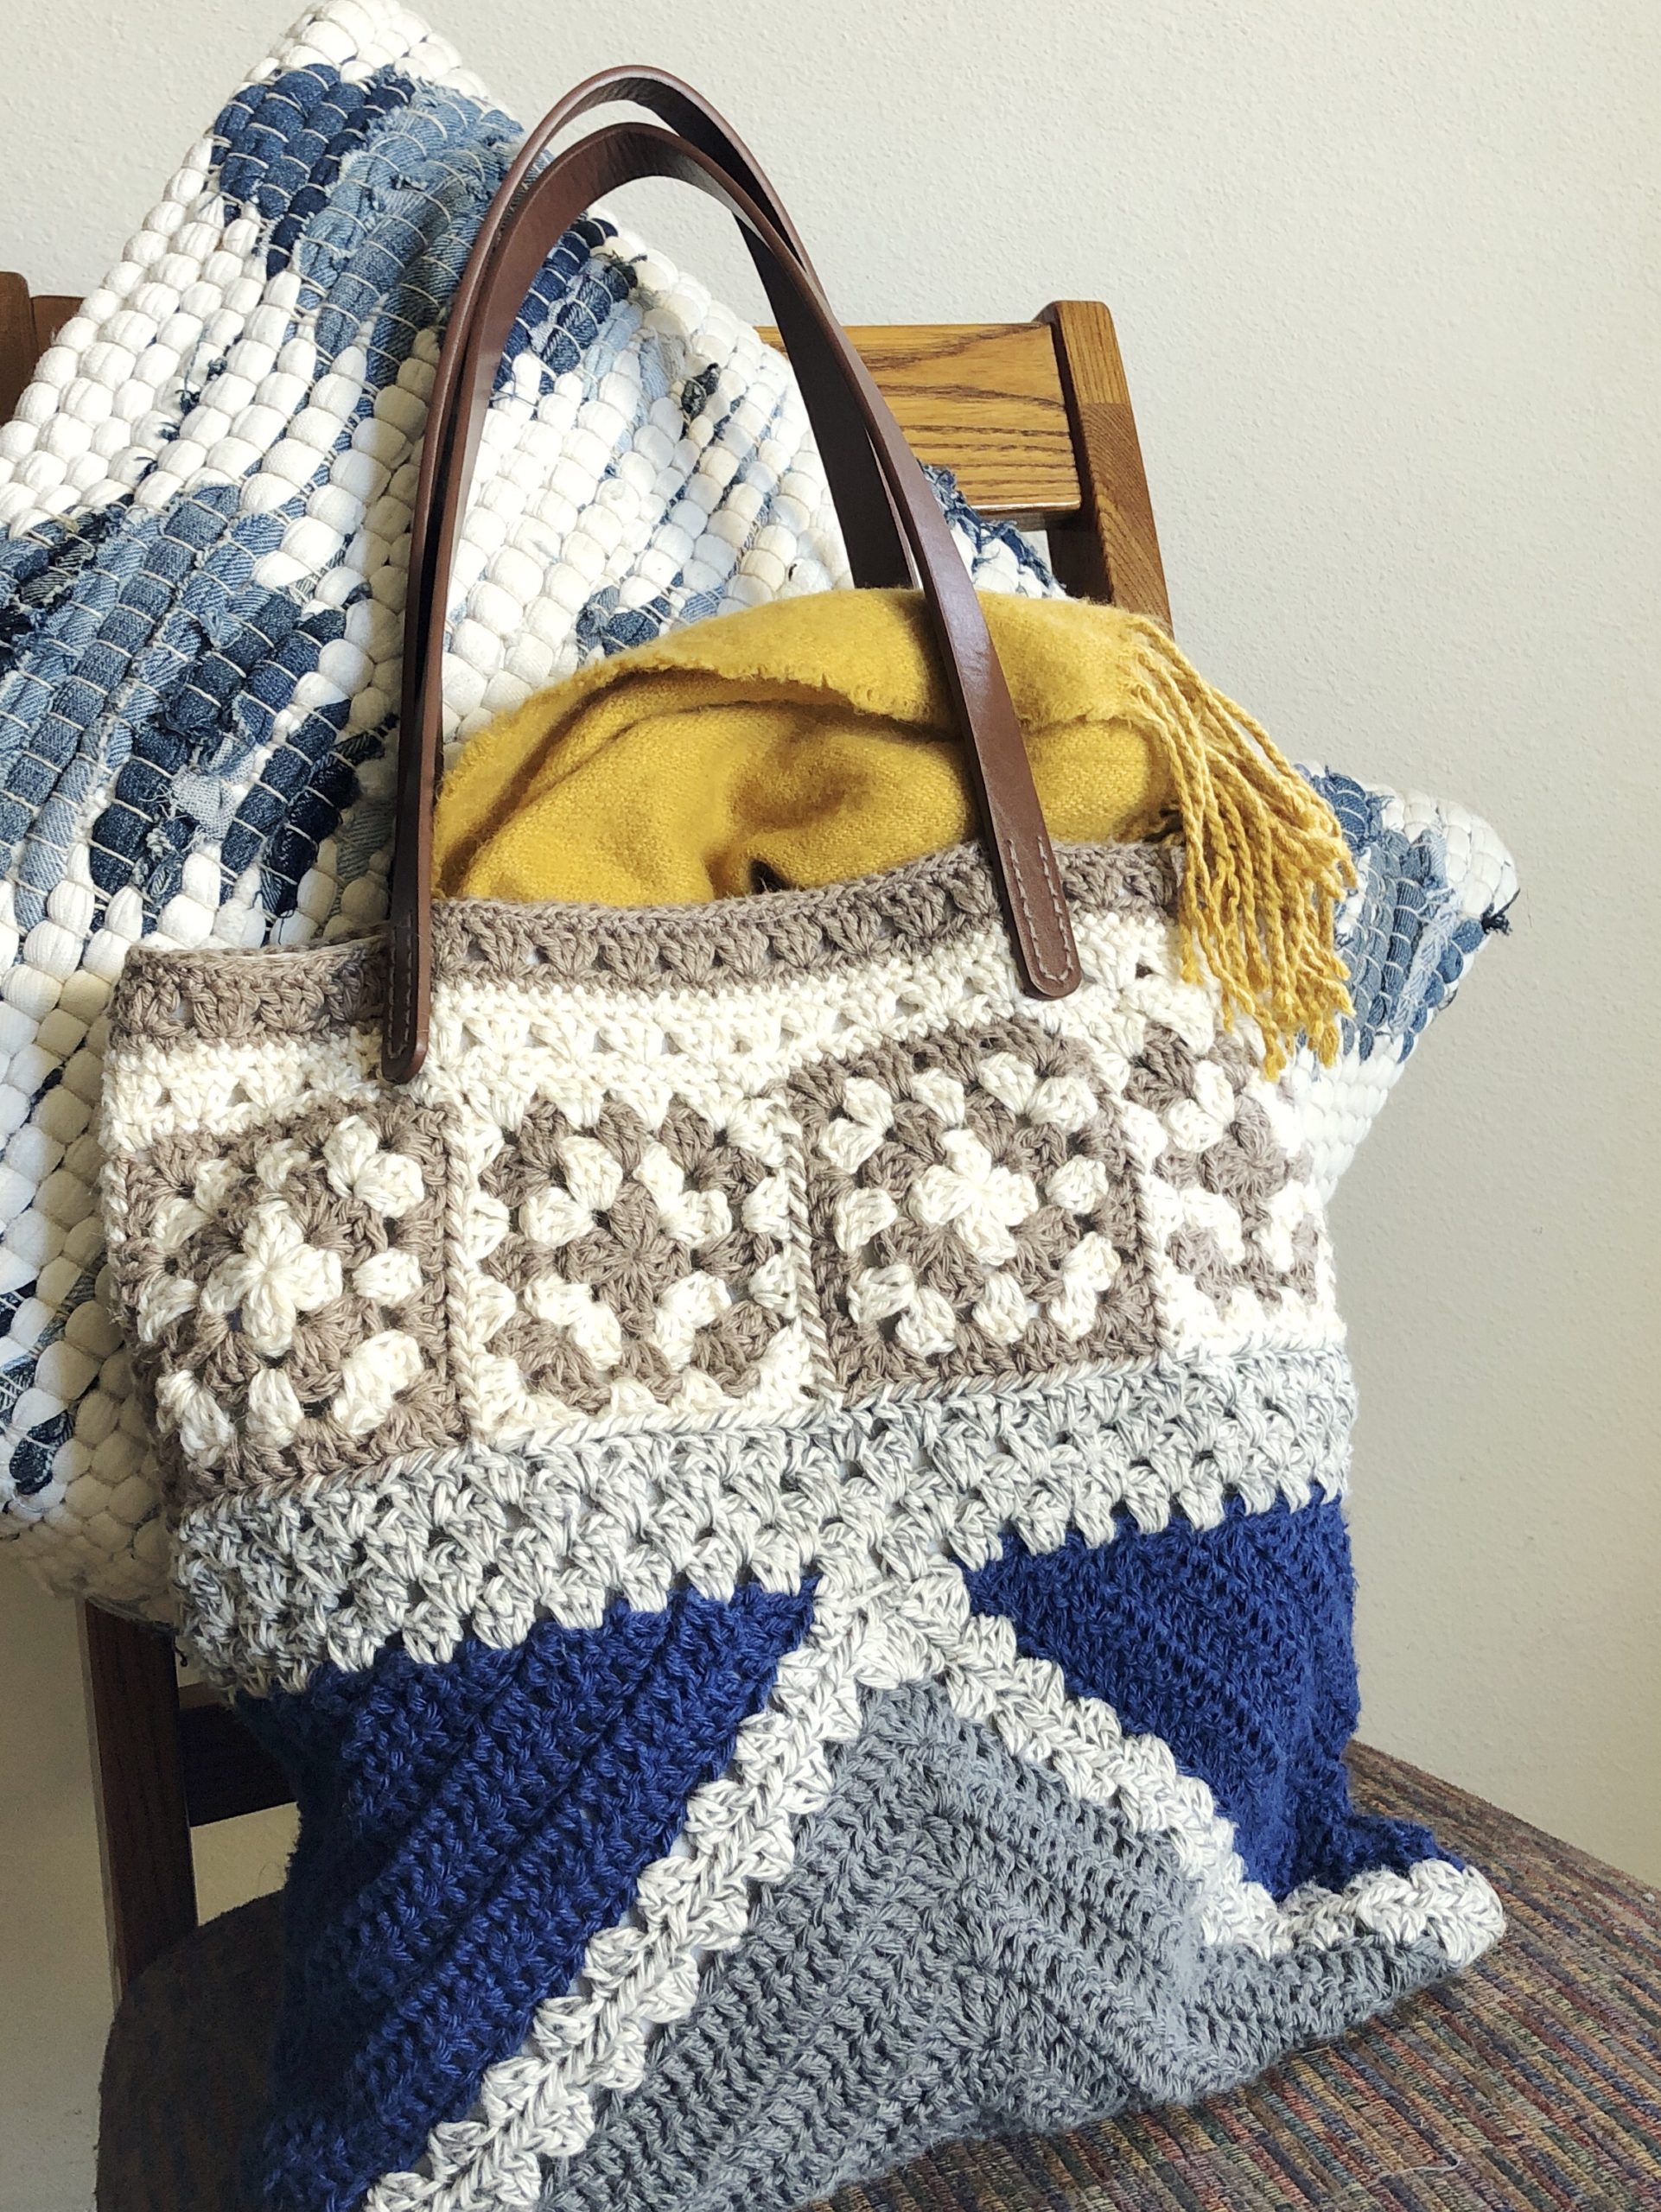
Hello, lovely! Today I wanted to share a finish with you! I know you might be in the middle of my Gloria Blanket CAL, but I have had this FO in the vault for a long time, just because I wanted to put it to the test (more on that later), and now I just have to share it.
The Learner Bag was a project that stemmed from a desire to branch out from making blankets and into creating something new. I don’t think I am alone when I say that crafting is my safe and happy place, and I don’t like to rock the boat too much for fear of inviting discomfort in. So, to take baby steps, I decided to choose a project that would effectively be two small, erm.. bag-sized.. blankets sewn together. I even used an old pillow case for the lining; I am that dead-set on making this thing as painless as possible.
Hello, and welcome to the Seventh week of my Gloria Blanket Crochet-Along! This week we will make a mix of Quarter Mandala Squares and Snowflake Squares. I am so pumped to get started and I’m very thankful that you’re joining me for this CAL. Have fun and share pics!
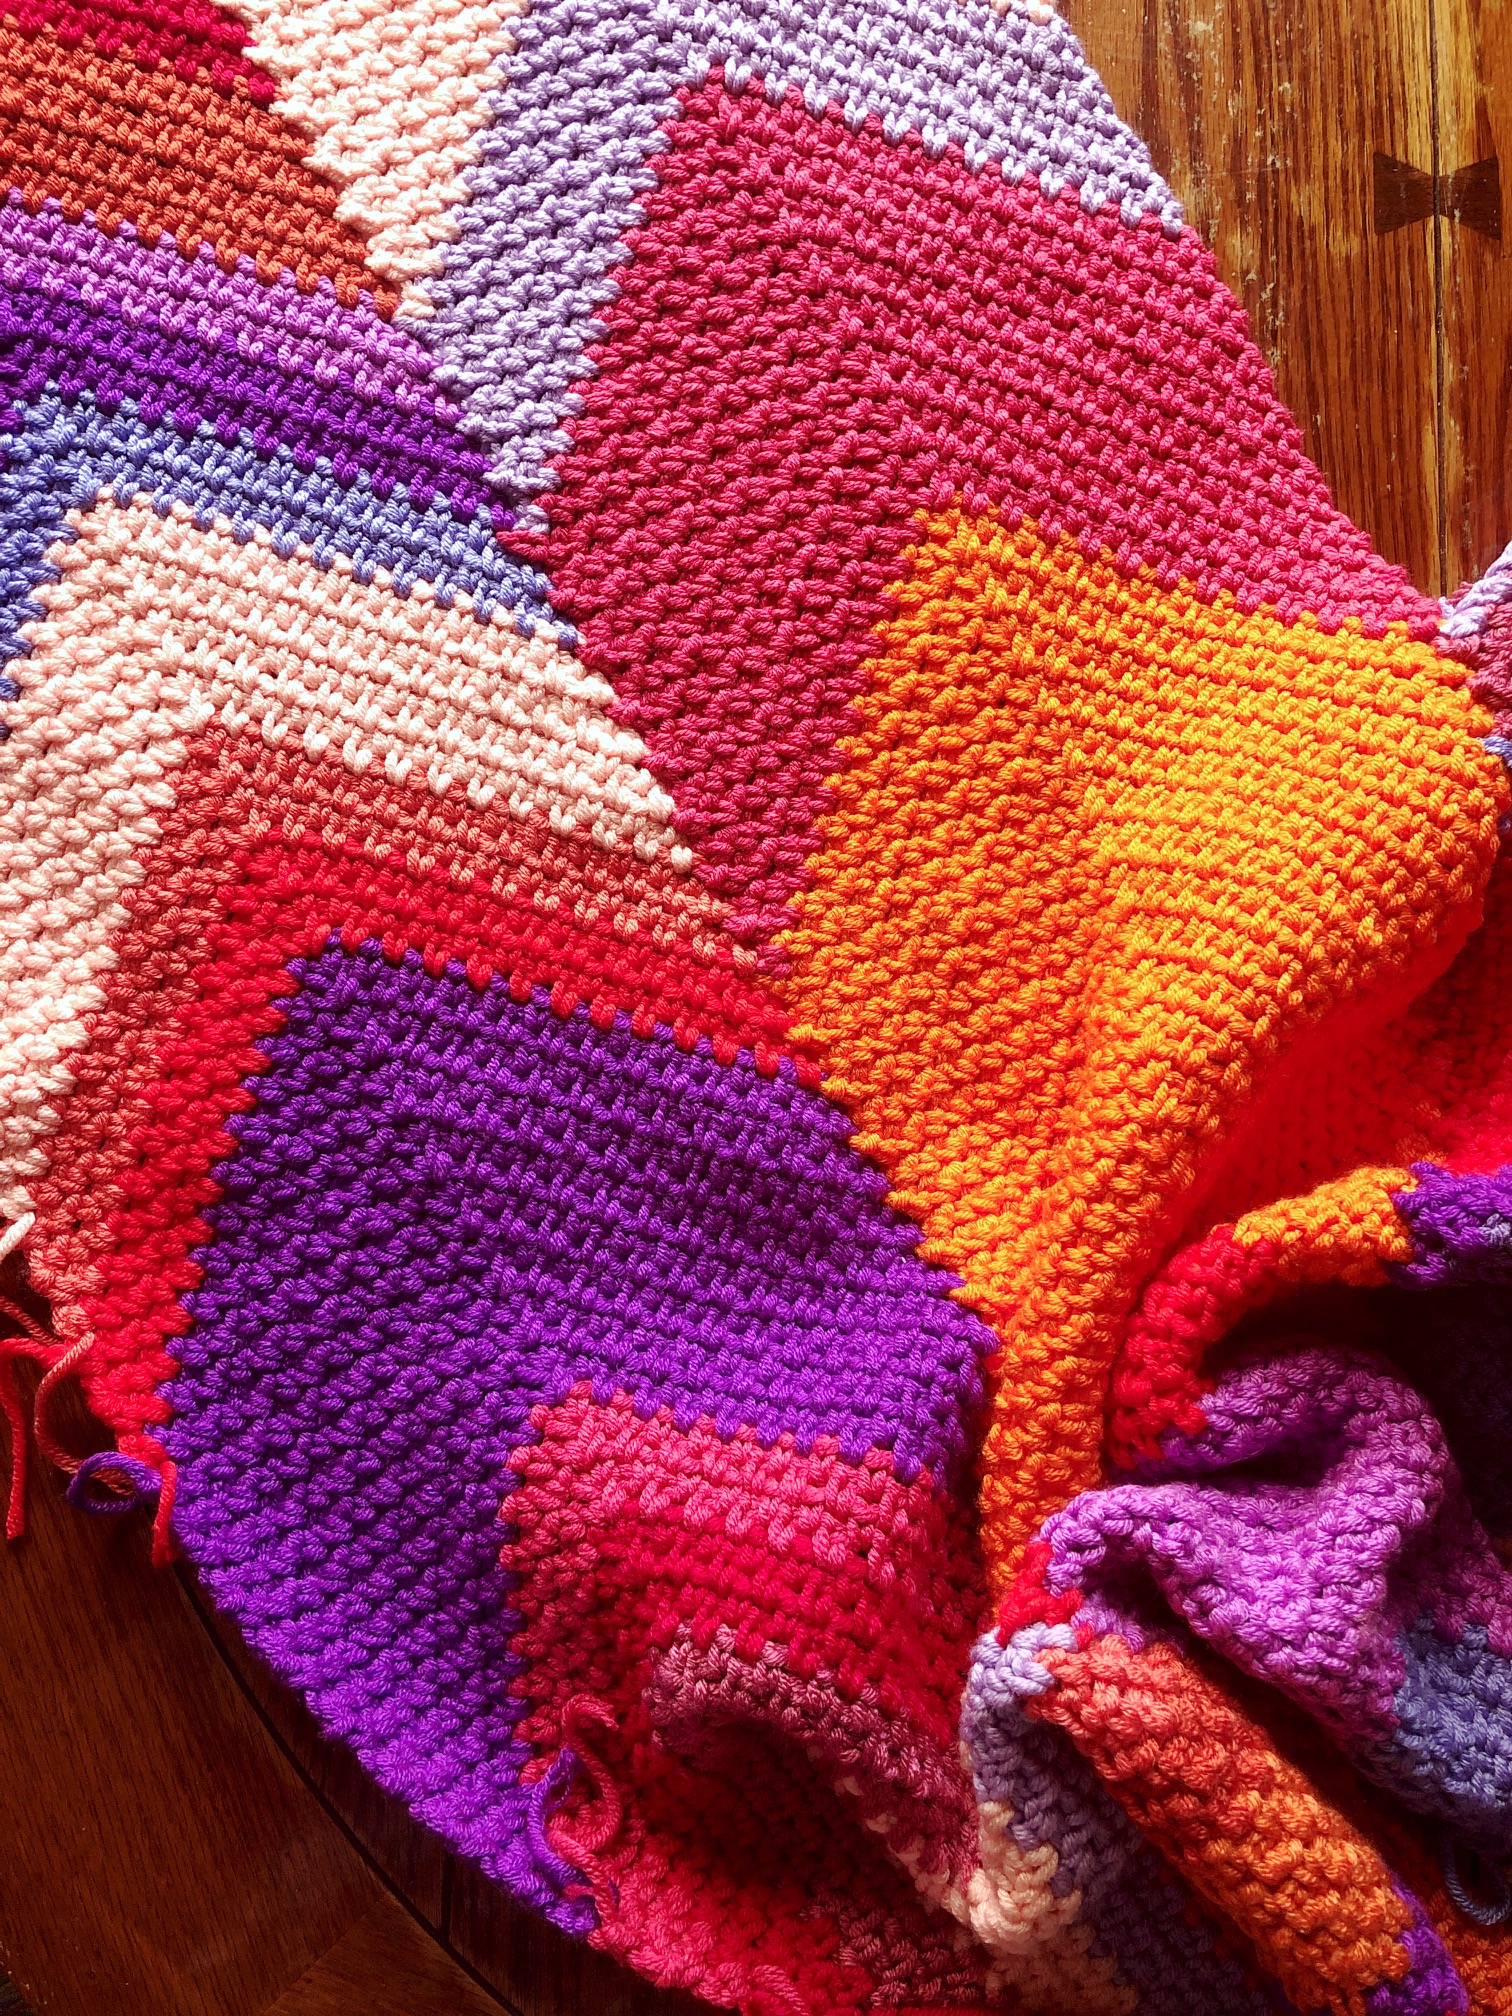
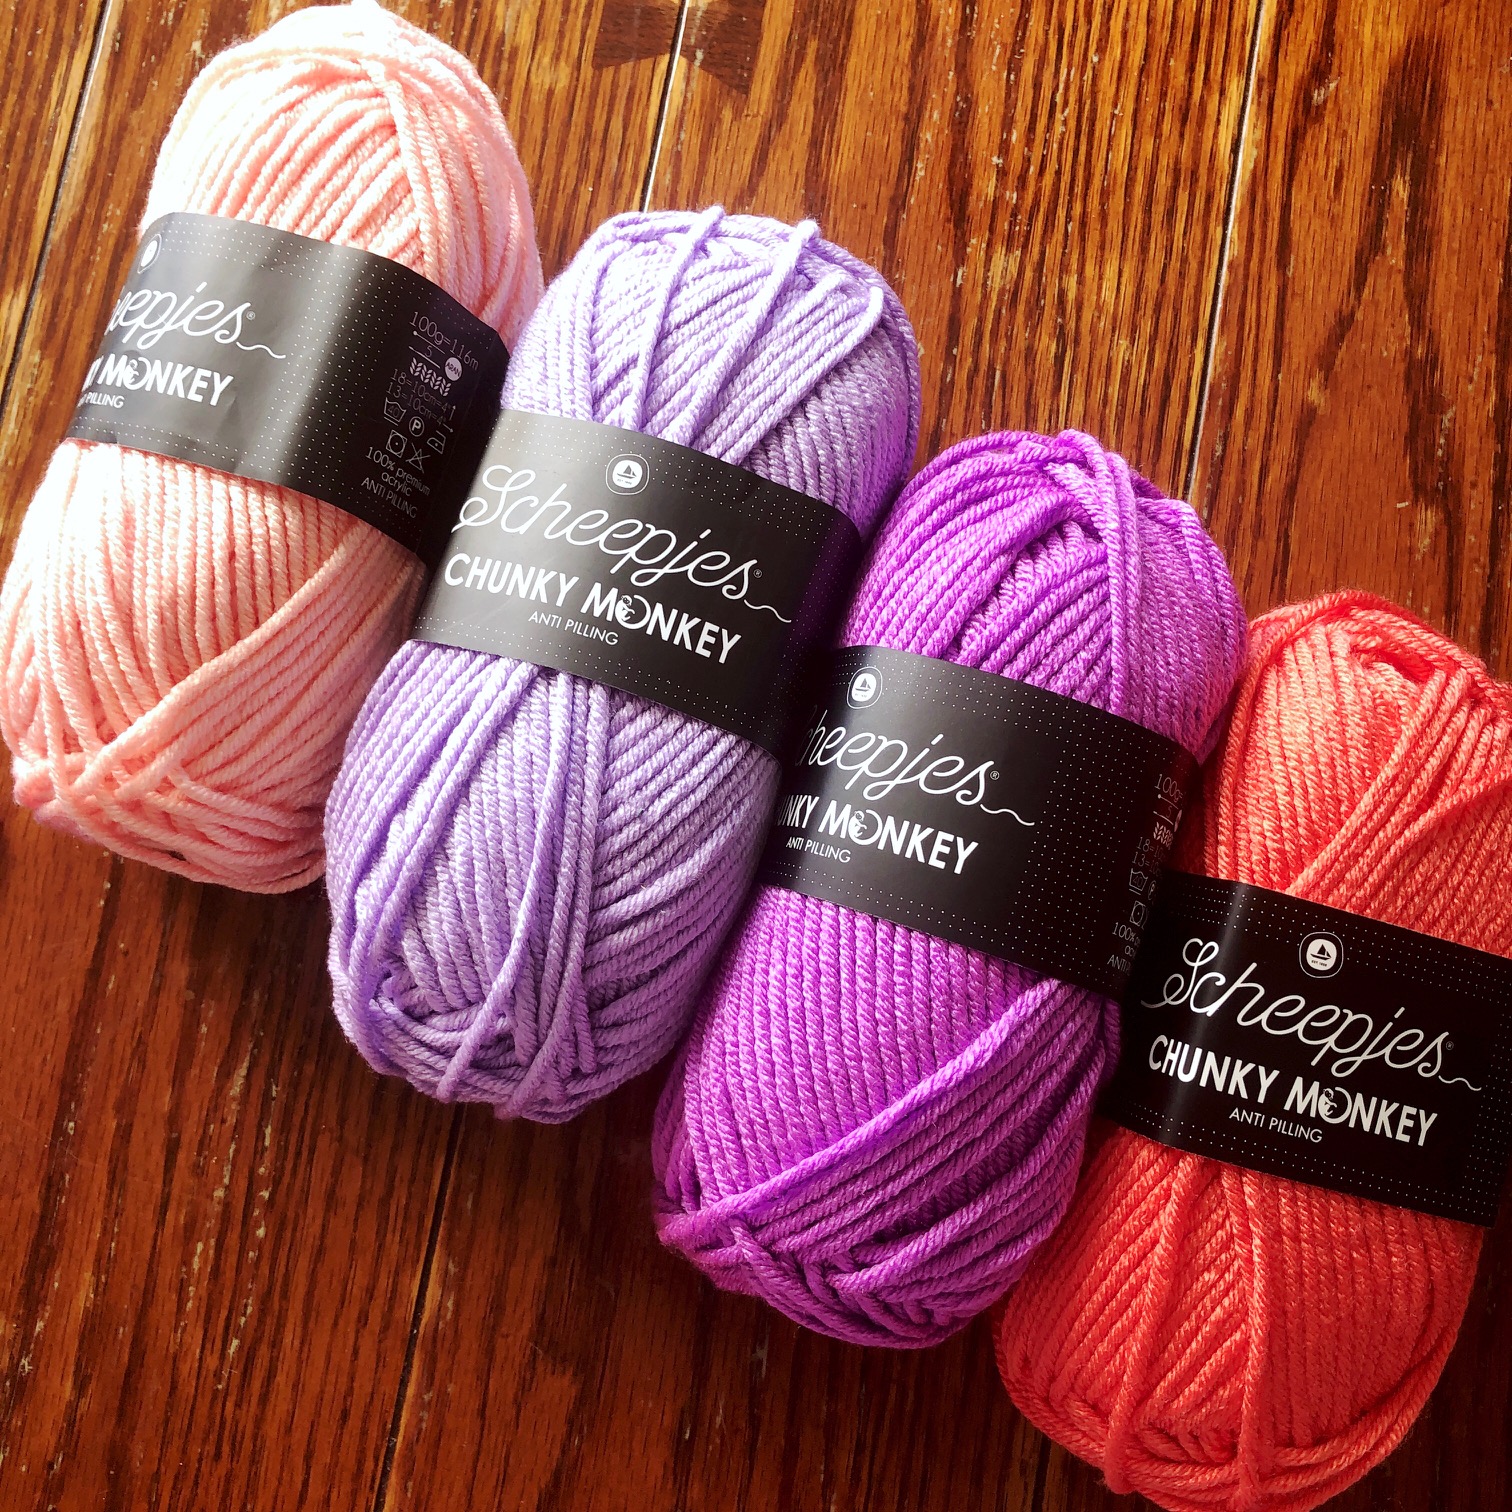
Hello, lovely! I recently got some yarn in the mail – always a joy! – and I just have to tell you about it. You might have seen my Linen Stitch Blanket series that launched in May of this year. It’s a collection of five free crochet blanket patterns using only Linen Stitch (also called Woven Stitch or Moss Stitch), and I have just one more pattern to release in the series! (Okay, I have one awesome bonus freebie that I will reveal after the series wraps – yay!)
For now, I wanted to show you the color palette for the final Linen Stitch Blanket, Chevronnie, a sweet and fun chevron blanket in Scheepjes Chunky Monkey. Read to the end for a sneak peek at the WIP!
Hello, and welcome to the sixth week of my Gloria Blanket Crochet-Along! This week we will make a mix of Quarter Mandala Squares and Snowflake Squares. I am so pumped to get started and I’m very thankful that you’re joining me for this CAL. Have fun and share pics!
Hello, and welcome to the fifth week of my Gloria Blanket Crochet-Along! This week we will make a mix of Quarter Mandala Squares and Snowflake Squares. I am so pumped to get started and I’m very thankful that you’re joining me for this CAL. Have fun and share pics!
Hello, and welcome to the fourth week of my Gloria Blanket Crochet-Along! This week we will make a mix of Quarter Mandala Squares and Snowflake Squares. I am so pumped to get started and I’m very thankful that you’re joining me for this CAL. Have fun and share pics!
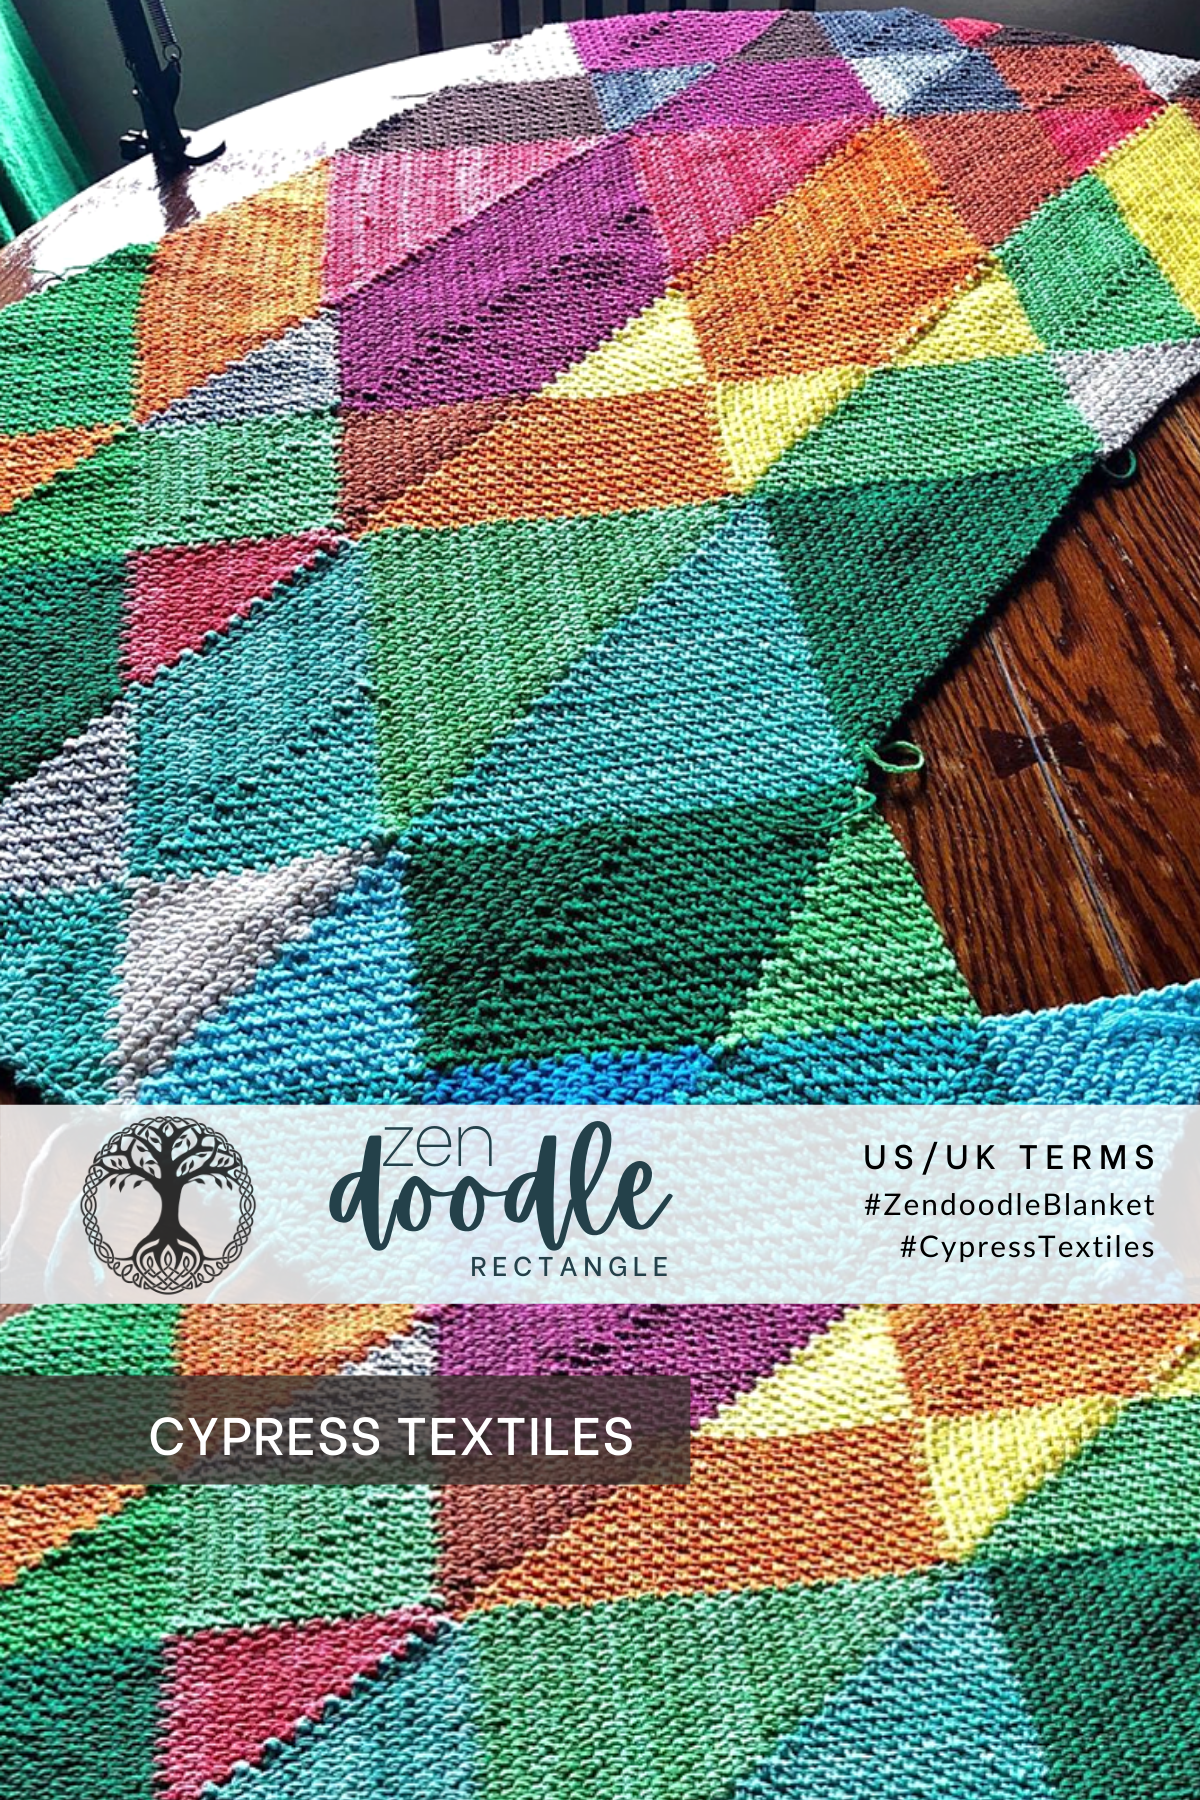
Hi, sweet crafter! As the 4-part Zendoodle Blanket series has come to a close, I have had messages regarding the rectangle POC inclusive rainbow version that I have been working up in Scheepjes Softfun and showing on my Instagram.
So I decided to create a free pattern version for this rectangle Zendoodle as well! It is just as wide as the original Zendoodle, but extended upward to make a big rectangle.
Here are links to the 4 parts of this free rectangle version:
Note: If you have previously purchased my Zendoodle Blanket on Etsy or Ravelry, I will send the updated PDF as soon as I am finished with it. Thank you! Good news: The update will include both PDFs for the Zendoodle Blanket and the Rectangle Version!
Use this hashtag to keep all of the Zendoodle Blankets progress photos together, whether you make the Original or the Rectangle.
#ZendoodleBlanket and #cypresstextiles
Find this pattern in a condensed ad-free PDF for a small fee on Etsy, and Ravelry.
Softfun Aquarel No. 804 – or simply omit and use Softfun No. 2426 in its place x 1
Stitch Guide (US Terms)
Note: This pattern is only in US Terms, but there is only 1 stitch used: single crochet, so if you are used to reading UK Terms, please know that you are using UK dc for this entire project. (US) sc = (UK) dc
chN chain N number of times
MR make ring: slip knot, ch3, ss in third ch from hook
PLT Join “Pull Loop Through” join (See more info within pattern)
Rep repeat
Rnd round
RS right side
sc single crochet
sk skip
sp space (chain space)
ss slip stitch
st stitch
WS wrong side
yoh yarn over hook
Instructions
Zendoodle is worked in strips from bottom edge to top edge. I give two options to construct this blanket. You can either work the first strip complete and then join all subsequent strips on as you go, or you can make all of the strips complete (separately) and then sew them together using my instructions. I provide full instruction for the join-as-you-go strips method, and then I give notes for the sewn strips method.
Note: for the remaining 5 strips, the shape location diagram will be omitted, as it should be clear now that we are working each sequential shape, working from bottom to top. The instruction will be abbreviated on shapes that have been worked previously. From the first 3 strips, the methods should be fairly clear.
Note: If you are working the blanket join-as-you-go, then this strip is joined onto Strip 3 at the left hand edge as per the instructions. Notes will be given if you’d like to work all of the strips separately and then sew them together
Step 1: Base Triangle
Row 1WS Using Softfun Denim No. 517, MR, (sc, ch1) 3 times, sc, turn. [4 sc, 3 sp] (Mark this row as the WS – this pattern is reversible and tough to tell which side is which.)
Row 2 (Sc, ch1, sc) in first sp, * ch1, (sc, ch1, sc) in next sp, rep from * 1 time, turn. [6 sc, 5 sp]
Rows 3-10 (Sc, ch1, sc) in first sp, (ch1, sc in next sp) across to center sp, ch1, (sc, ch1, sc) in center sp, (ch1, sc in next sp) across to final sp, ch1, (sc, ch1, sc) in final sp, turn. Cut yarn after Row 10. [22 sc, 21 sp]
Step 2: Bow Tie
First triangle of Bow Tie
Joining Note: There is no joining on this part, because the first triangle does not touch strip 3 at all.
Rows 1 With RS facing, join Softfun No. 2423 with ss in first sp, sc in same sp, (ch1, sc in next sp) 10 times, turn. [11 sc, 10 sp]
Row 2 (Ch1, sc in next sp) 10 times, turn. [10 sc, 10 sp]
Row 3 (Sc in next sp, ch1) 9 times, sc in final sp, turn. [10 sc, 9 sp]
Rows 4-21 Rep Rows 2 and 3. Cut yarn after row 21. [1 sc]
Second triangle of Bow Tie
Joining Note: If you are Joining as-you-go, then before you work all odd-numbered rows, be sure and work the PLT Join maneuver as shown in the photos below.
Rows 1-21 With WS facing and Softfun No. 2640, work as for first triangle of Bow Tie. Weave all ends.
Here is a photo of the work right before Row 1, with PLT Join in progress. This is an important photo because it shows that the PLT is worked before EVERY WS row – even is that means the first row. After you join your yarn with a slip st, you make the PLT Join maneuver.
Here is the second triangle in progress, and you can see the PLT Join worked before each odd-numbered row. Remember, this photo shows the WS of the work, because the PLT is always worked with WS facing.
Step 3: Trapezoid A, Tail pointing right
Joining Note: No joining on this shape.
Row 1 With RS facing, join Softfun No. 2535 with ss in first sp, (sc, ch1, sc) in same sp, (ch1, sc) 9 times evenly using above photo as a guide, ch1, sc in center sp of Row 10 of Base Triangle, (ch1, sc) 9 times evenly using above photo as a guide, ch1, sc in final sp, turn. [22 sc, 21 sp]
Row 2 (Ch1, sc in next sp) 9 times, sc2tog as follows: (Insert hook in next sp, yoh, pull up loop) 2 times, yoh, draw yarn through all 3 lps – sc2tog made, (ch1, sc in next sp) 9 times, ch1, (sc, ch1, sc) in final sp, turn. [20 sc, 20 sp, 1 sc2tog]
Row 3 (Sc, ch1, sc) in first sp, (ch1, sc in next sp) 9 times, ch1, sc2tog, (ch1, sc in next sp) across to end, placing final sc in final sp, turn. [20 sc, 20 sp, 1 sc2tog]
Row 4 (Ch1, sc in next sp) across to within 1 sp of sc2tog, sc2tog across next 2 sps, (ch1, sc in next sp) 9 times, ch1, (sc, ch1, sc) in final sp, turn. [19 sc, 20 sp, 1 sc2tog]
Rows 5-20 Rep Rows 3 and 4, using chart as a guide when needed. [11 sc, 12 sp, 1 sc2tog]
Row 21 (Sc, ch1, sc) in first sp, (ch1, sc in next sp) 10 times, ch1, join with ss to sc2tog of Row 20, cut yarn and weave ends. [11 sc, 11 sp, 1 sc2tog]
Step 4: Large Triangle, Tail pointing left
Row 1 With WS facing, join Softfun Denim No. 516 with ss in final sc of second triangle of Bow Tie, sc in same st, (ch1, sc in next sp) 20 times evenly across placing final sc in final sp of Trapezoid, turn. [21 sc, 20 sp]
Row 2 (Ch1, sc in next sp) across to end, turn. [20 sc, 20 sp]
Row 3 (Sc in next sp, ch1) across to final sp, sc in final sp, turn. [20 sc, 19 sp]
Rows 4-41 Rep Rows 2 and 3, cutting yarn after Row 41. [1 sc]
Step 5: Large Triangle, Tail pointing right
Joining Note: There is no PLT joining on this shape, because it does not touch the completed strip.
Row 1 With RS facing, join Softfun No. 2535 with ss in corner sc of Trapezoid from Step 3, sc in same st, (ch1, sc) 20 times evenly across placing final sc in first sp on final st of Large Triangle from Step 4, turn. [21 sc, 20 sp]
Row 2 (Ch1, sc in next sp) across to end, turn. [20 sc, 20 sp]
Row 3 (Sc in next sp, ch1) across to final sp, sc in final sp, turn. [20 sc, 19 sp]
Rows 4-41 Rep Rows 2 and 3, cutting yarn after Row 41. [1 sc]
Step 6: Trapezoid B, Tail pointing left
Joining Note: Be sure to work PLT Join before every WS row, unless you are making all your strips up and then sewing them together. .
Row 1 With WS facing, join Softfun Denim No. 506 with ss in first sp of Row 41 of Large Triangle from Step 4, sc in same sp, (ch1, sc) 20 times evenly across placing final sc in last st of Large Triangle from Step 5, turn. [21 sc, 20 sp]
Rows 2-20 Work exactly as for Large Triangle from Step 6 stopping after Row 20, cut yarn and weave all ends. [11 sc, 11 sp]
Step 7: Bow Tie
First triangle of Bow Tie
Joining Note: There is no joining on this shape as it does not touch the completed strip.
Rows 1-21 With RS facing, join Softfun No. 2426 with ss in first sp, sc in same sp, work as for previous Bow Tie.
Second triangle of Bow Tie
Joining Note: Work PLT Join before each WS row unless sewing.
Rows 1-21 With WS facing and Softfun No. 2634, work as for first triangle of Bow Tie. Weave all ends.
Step 8: Trapezoid A, Tail pointing left
Joining Note: If you are joining strips as-you-go, be sure to work the PLT Join maneuver before each WS row.
Row 1 With WS facing, join Softfun Denim No. 506 with ss in final st of second triangle on Bow Tie from Step 7, (sc, ch1, sc) in same st, (ch1, sc) 9 times evenly across, ch1, sc in center sp of Trapezoid from Step 6, (ch1, sc) 10 times evenly across placing final sc in final st of first triangle of Bow Tie, turn. [22 sc, 21 sp]
Row 2 (Ch1, sc in next sp) 9 times, sc2tog as follows: (Insert hook in next sp, yoh, pull up loop) 2 times, yoh, draw yarn through all 3 lps – sc2tog made, (ch1, sc in next sp) 9 times, ch1, (sc, ch1, sc) in final sp, turn. [20 sc, 20 sp, 1 sc2tog]
Row 3 (Sc, ch1, sc) in first sp, (ch1, sc in next sp) 9 times, ch1, sc2tog, (ch1, sc in next sp) across to end, placing final sc in final sp, turn. [20 sc, 20 sp, 1 sc2tog]
Row 4 (Ch1, sc in next sp) across to within 1 sp of sc2tog, sc2tog across next 2 sps, (ch1, sc in next sp) 9 times, ch1, (sc, ch1, sc) in final sp, turn. [19 sc, 20 sp, 1 sc2tog]
Rows 5-20 Rep Rows 3 and 4, using chart as a guide when needed. [11 sc, 12 sp, 1 sc2tog]
Row 21 (Sc, ch1, sc) in first sp, (ch1, sc in next sp) 10 times, ch1, join with ss to sc2tog of Row 20, cut yarn and weave ends. [11 sc, 11 sp, 1 sc2tog]
Step 9: Parallelogram, Tail pointing left
Row 1 With RS facing, join Softfun No. 2634 in the first sp of Row 21 of Trapezoid A from Step 8, sc in same sp, (ch1, sc in next sp) 19 times evenly across, ch1, (sc, ch1, sc) in final sc, turn. [22 sc, 21 sp]
Row 2 (Sc, ch1, sc) in first sp, (ch1, sc in next sp) 20 times, turn. [22 sc, 21 sp]
Row 3 (Sc in next sp, ch1) across to final sp, (sc, ch1, sc) in final sp, turn. [22 sc, 21 sp]
Row 4-21 Rep Rows 2 and 3 for pattern, cut yarn and weave ends. [22 sc, 21 sp]
Step 10: Large Triangle, Tail pointing right
Joining Note: There is no PLT joining on this shape, because it does not touch the completed strip.
Rows 1-41 With RS facing, join Softfun No. 2650 with ss first sp and work as for previous Large Triangle, Tail pointing right. [21 sc, 20 sp]
Step 11: Parallelogram, Tail pointing right
Joining Note: If you are Joining as-you-go, then before you work all WS rows, be sure and work the PLT Join maneuver as shown in the photos below.
Row 1 With WS facing, join Softfun No. 2623 in the first sp, sc in same sp, (ch1, sc in next sp) 19 times evenly across, ch1, (sc, ch1, sc) in final sp, turn. [22 sc, 21 sp]
Row 2 (Sc, ch1, sc) in first sp, (ch1, sc in next sp) 20 times, turn. [22 sc, 21 sp]
Row 3 (Sc in next sp, ch1) across to final sp, (sc, ch1, sc) in final sp, turn. [22 sc, 21 sp]
Row 4-21 Rep Rows 2 and 3 for pattern, cut yarn and weave ends. [22 sc, 21 sp]
Step 12: Trapezoid B, Tail pointing left
Joining Note: Be sure to work PLT Join before every WS row, unless you are making all your strips up and then sewing them together. .
Row 1 With WS facing, join Softfun Denim No. 505 with ss in first sp, sc in same sp, (ch1, sc) 20 times evenly across placing final sc in last sp, turn. [21 sc, 20 sp]
Rows 2-20 Work exactly as for Large Triangle from Step 6 stopping after Row 20, cut yarn and weave all ends. [11 sc, 11 sp]
Step 13: Bow Tie
First triangle of Bow Tie
Joining Note: There is no joining on this shape as it does not touch the completed strip.
Rows 1-21 With RS facing, join Softfun Denim No. 510 with ss in first sp, sc in same sp, work as for previous Bow Tie.
Second triangle of Bow Tie
Joining Note: Work PLT Join before each WS row unless sewing.
Rows 1-21 With WS facing and Softfun No. 2492, work as for first triangle of Bow Tie. Weave all ends.
Step 14: Fill C
Row 1 With RS facing, join Softfun Denim No. 505 in final st of First Triangle of Bow Tie, (sc, ch1, sc) in same st (ch1, sc) evenly across 9 times, ch1, sc in center st/sp, (ch1, sc) evenly across 9 times, ch1, (sc, ch1, sc) in final st of Second Triangle of Bow Tie, turn. [21 sc, 20 sp]
Row 2 (Sc, ch1, sc) in first sp, (ch1, sc in next sp) 9 times, ch1, sc2tog over next 2 sps, (ch1, sc in next sp) 9 times, ch1, (sc, ch1, sc) in final sp, turn. [22 sc, 21 sp, 1 sc2tog]
Rows 3-21 Rep Row 2.
Row 22 (Sc in next sp, ch1) 10 times, sc2tog over 2 sps, (ch1, sc in next sp) 10 times, turn. [20 sc, 20 sp, 1 sc2tog]
Rows 23-31 (Sc in next st, ch1) across to ch-sp before center, sc2tog over 2 sps, (ch1, sc in next sp) across to end, turn. [2 sc, 2 sp, 1 sc2tog]
Row 32 Sc2tog over 2 sps, cut y arn and weave ends.
Strip 4 is complete! Do a happy dance!
Strip 5
Note: If you are working the blanket join-as-you-go, then this strip is joined onto Strip 2 at the left hand edge as per the instructions. Notes will be given if you’d like to work all of the strips separately and then sew them together.
Step 1: House
Note: The House shape is made by working up a Base Triangle, but instead of cutting the yarn after the Base Triangle, continue vertically as to make the House shape as instructed.
Row 1WS Using Softfun Denim No. 517, MR, (sc, ch1) 3 times, sc, turn. [4 sc, 3 sp] (Mark this row as the WS – this pattern is reversible and tough to tell which side is which.)
Row 2 (Sc, ch1, sc) in first sp, * ch1, (sc, ch1, sc) in next sp, rep from * 1 time, turn. [6 sc, 5 sp]
Rows 3-10 (Sc, ch1, sc) in first sp, (ch1, sc in next sp) across to center sp, ch1, (sc, ch1, sc) in center sp, (ch1, sc in next sp) across to final sp, ch1, (sc, ch1, sc) in final sp, turn. DO NOT cut yarn after Row 10. [22 sc, 21 sp]
If you are working Join-as-you-go strips, join to Strip 1 at this point as follows:
Turn both Strip 1 and Base Triangle to the WS, and align them as in the photo below.
Release the loop from the hook, insert the hook front to back through the left corner of the base triangle on strip 1, and grab the loop. Now your work should look like the photo below.
Pull Loop Through to the front like in the second photo below. PLT Join maneuver complete!
This is how you will join Strip 2 to Strip 1 as you go. Before every WS Row, when the row touches the completed strip, you will work the PLT maneuver in the space of the corresponding row that you are about to work. I have plenty of photos, don’t worry.
If you are working the strips separately and sewing them afterward, simply omit this PLT Join maneuver and work the strips as instructed.
Rows 11-31 Sc in first sp, (ch1, sc in next sp) 9 times, ch1, (sc, ch1, sc) in next sp, (ch1, sc in next sp) 9 times, ch1, sc in final sp, turn [22 sc, 21 sp]
Here are some photos of the PLT Join process for the House shape.
This photo shows that before you begin Row 13, you release the loop to prepare to PLT Join.
This next photo shows the PLT Join in progress. You can see that the loop is being pulled through the corresponding row that is about to be worked.
Here is Row 3 being worked, and you can see that the first sc of Row 3 is simply continued after the PLT Join maneuver is worked. It is a common mistake to make a chain after you pull the loop through. Instead, you just work the first sc of the next row.
Here is the House shape when it’s done! The work is turned to the RS in this photo. You can see that the House shape is joined on the left hand side, before every WS Row, when the row touches the completed
Step 2: Bow Tie
First triangle of Bow Tie
Joining Note: There is no joining on this part, because the first triangle does not touch strip 4 at all.
Rows 1-21 With RS facing, join Softfun No. 2640 with ss in first sp, and work as for previous Bow Tie.
Second triangle of Bow Tie
Joining Note: If you are Joining as-you-go, then before you work all WS rows, be sure and work the PLT Join maneuver.
Rows 1-21 With WS facing and Softfun Denim No. 506, work as for first triangle of Bow Tie. Weave all ends.
Step 3: Trapezoid A, Tail pointing right
Joining Note: No joining on this shape.
Row 1-21 With RS facing, join Softfun No. 2605 with ss in first sp, work as for previous Trapezoid A, Tail pointing right.
Step 4: Large Triangle, Tail pointing left
Joining Note: Make PLT Join before WS rows.
Rows 1-41 With WS facing, join Softfun Denim No. 516 with ss in first st/sp, work as for previous Large Triangle, Tail pointing left.
Step 5: Trapezoid B, Tail pointing right
Joining Note: There is no joining on this shape because it doesn’t touch the completed strip.
Row 1 With RS facing, join Softfun Denim No. 516 with ss in first st/sp, sc in same st, (ch1, sc) 20 times evenly across, turn. [21 sc, 20 sp]
Rows 2-20 Work exactly as for Large Triangle stopping after Row 20, cut yarn and weave all ends. [11 sc, 11 sp]
Step 6: Bow Tie
First triangle of Bow Tie
Joining Note: There is no joining on this part, because the first triangle does not touch strip 4 at all.
Rows 1-21 With RS facing, join Softfun Aquarel No. 804 with ss in first st/sp, work as for previous Bow Tie.
Second triangle of Bow Tie
Joining Note: If you are Joining as-you-go, then before you work all WS rows, be sure and work the PLT Join maneuver.
Rows 1-21 With WS facing and Softfun Denim No. 506, work as for first triangle of Bow Tie. Weave all ends.
Step 7: Diamond
Joining Note: There is no joining on this part, because the Diamond does not touch the completed strip.
Row 1 With RS facing, join Softfun Denim No. 516 in final sc of first triangle of Bow Tie from Step 6, sc in same st, (ch1, sc) 9 times evenly across using photo as a guide, ch1, sc in center st of Trapezoid B from Step 5, (ch1, sc) 9 times evenly across, ch1, sc in final sc of second triangle on Bow Tie from Step 6, turn. [21 sc, 20 ch]
Rows 2-21 (Ch1, sc in next sp) up to final sp before center st, ch1, sc2tog as follows: (Insert hook in next sp, yoh, pull up loop) 2 times, yoh, draw yarn through all 3 lps – sc2tog made, (ch1, sc in next sp) to end, placing final sc in last sp. On Row 21, work sc in ch-sp, cut yarn, and finish off. [1 sc]
Step 8: Bow Tie
First triangle of Bow Tie
Joining Note: There is no joining on this part, because the first triangle does not touch strip 4 at all.
Rows 1-21 With RS facing, join Softfun No. 2634 with ss in first st/sp, work as for previous Bow Tie.
Second triangle of Bow Tie
Joining Note: If you are Joining as-you-go, then before you work all WS rows, be sure and work the PLT Join maneuver.
Rows 1-21 With WS facing and Softfun No. 2650, work as for first triangle of Bow Tie. Weave all ends.
Step 9: Long Hexagon
Note: This photo and chart are of a shorter version of the hexagon. The methods are the same, but for the long hexagon, there are more straight rows worked. Pay attention to the written instruction and use the chart and photo as a guide to the general shape, keeping in mind your hexagon will be taller.
Joining Note: Be sure to PLT join before every WS row that touches the completed strip.
Row 1 With RS facing, join Softfun No. 2651 in final st of First Triangle of Bow Tie, (sc, ch1, sc) in same st (ch1, sc) evenly across 9 times, ch1, sc in center sp, (ch1, sc) evenly across 9 times, ch1, (sc, ch1, sc) in final st of Second Triangle of Bow Tie, turn. [21 sc, 20 sp]
Row 2 (Sc, ch1, sc) in first sp, (ch1, sc in next sp) 9 times, ch1, sc2tog over next 2 sps, (ch1, sc in next sp) 9 times, ch1, (sc, ch1, sc) in final sp, turn. [22 sc, 21 sp, 1 sc2tog]
Rows 3-40: Rep Row 2.
Row 41 (Sc, ch1, sc) in first sp, (ch1, sc in next sp) 9 times, ch1, sc2tog over next 2 sps, (ch1, sc in next sp) 10 times, turn. [21 sc, 21 sp, 1 sc2tog]
Row 42 (Ch1, sc) 9 times evenly across using photo as a guide, ch1, sc2tog over 2 sps, (ch1, sc in next sp) 10 times, turn. [19 sc, 20 ch, 1 sc2tog]
Rows 43-60 (Ch1, sc in next sp) up to final sp before center st, ch1, sc2tog over 2 sps, (ch1, sc in next sp) to end, placing final sc in last sp, turn. [1 sc, 2 sp, 1 sc2tog]
Row 61 Ch1, sc2tog over 2 sps, cut yarn and weave ends. [1 sp, 1 sc2tog]
Step 10: Bow Tie
First triangle of Bow Tie
Joining Note: There is no joining on this part, because the first triangle does not touch strip 4 at all.
Rows 1-21 With RS facing, join Softfun Aquarel No. 804 with ss in first st/sp, work as for previous Bow Tie.
Second triangle of Bow Tie
Joining Note: If you are Joining as-you-go, then before you work all WS rows, be sure and work the PLT Join maneuver.
Rows 1-21 With WS facing and Softfun No. 2650, work as for first triangle of Bow Tie. Weave all ends.
Step 11: Trapezoid A, Tail pointing right
Joining Note: No joining on this shape.
Rows 1–21 With RS facing, join Softfun Denim No. 505 with ss in first st/sp, work as for previous Trapezoid A, Tail pointing right.
Step 12: Parallelogram, Tail pointing right
Joining Note: If you are Joining as-you-go, then before you work all WS rows, be sure and work the PLT Join maneuver as shown in the photos below.
Rows 1-21 With WS facing, join Softfun No. 2650 in the first st/sp, work as for previous Parallelogram, Tail pointing right.
Step 13: Fill Triangle A, Tail pointing left
Joining Note: PLT Join before each WS row.
Row 1 With WS facing, join Softfun Denim No. 510 in the first sp, sc in same sp, (ch1, sc) 20 times evenly across, turn. [21 sc, 20 sp]
Row 2-21 Sc in first sp, (ch1, sc in next sp) across, turn. Work until 1 sc remains, cut yarn and weave ends.
Strip 5 is complete! Give yourself a fist bump!
I can’t wait to share more with you, but for now, Part 3 is finished!
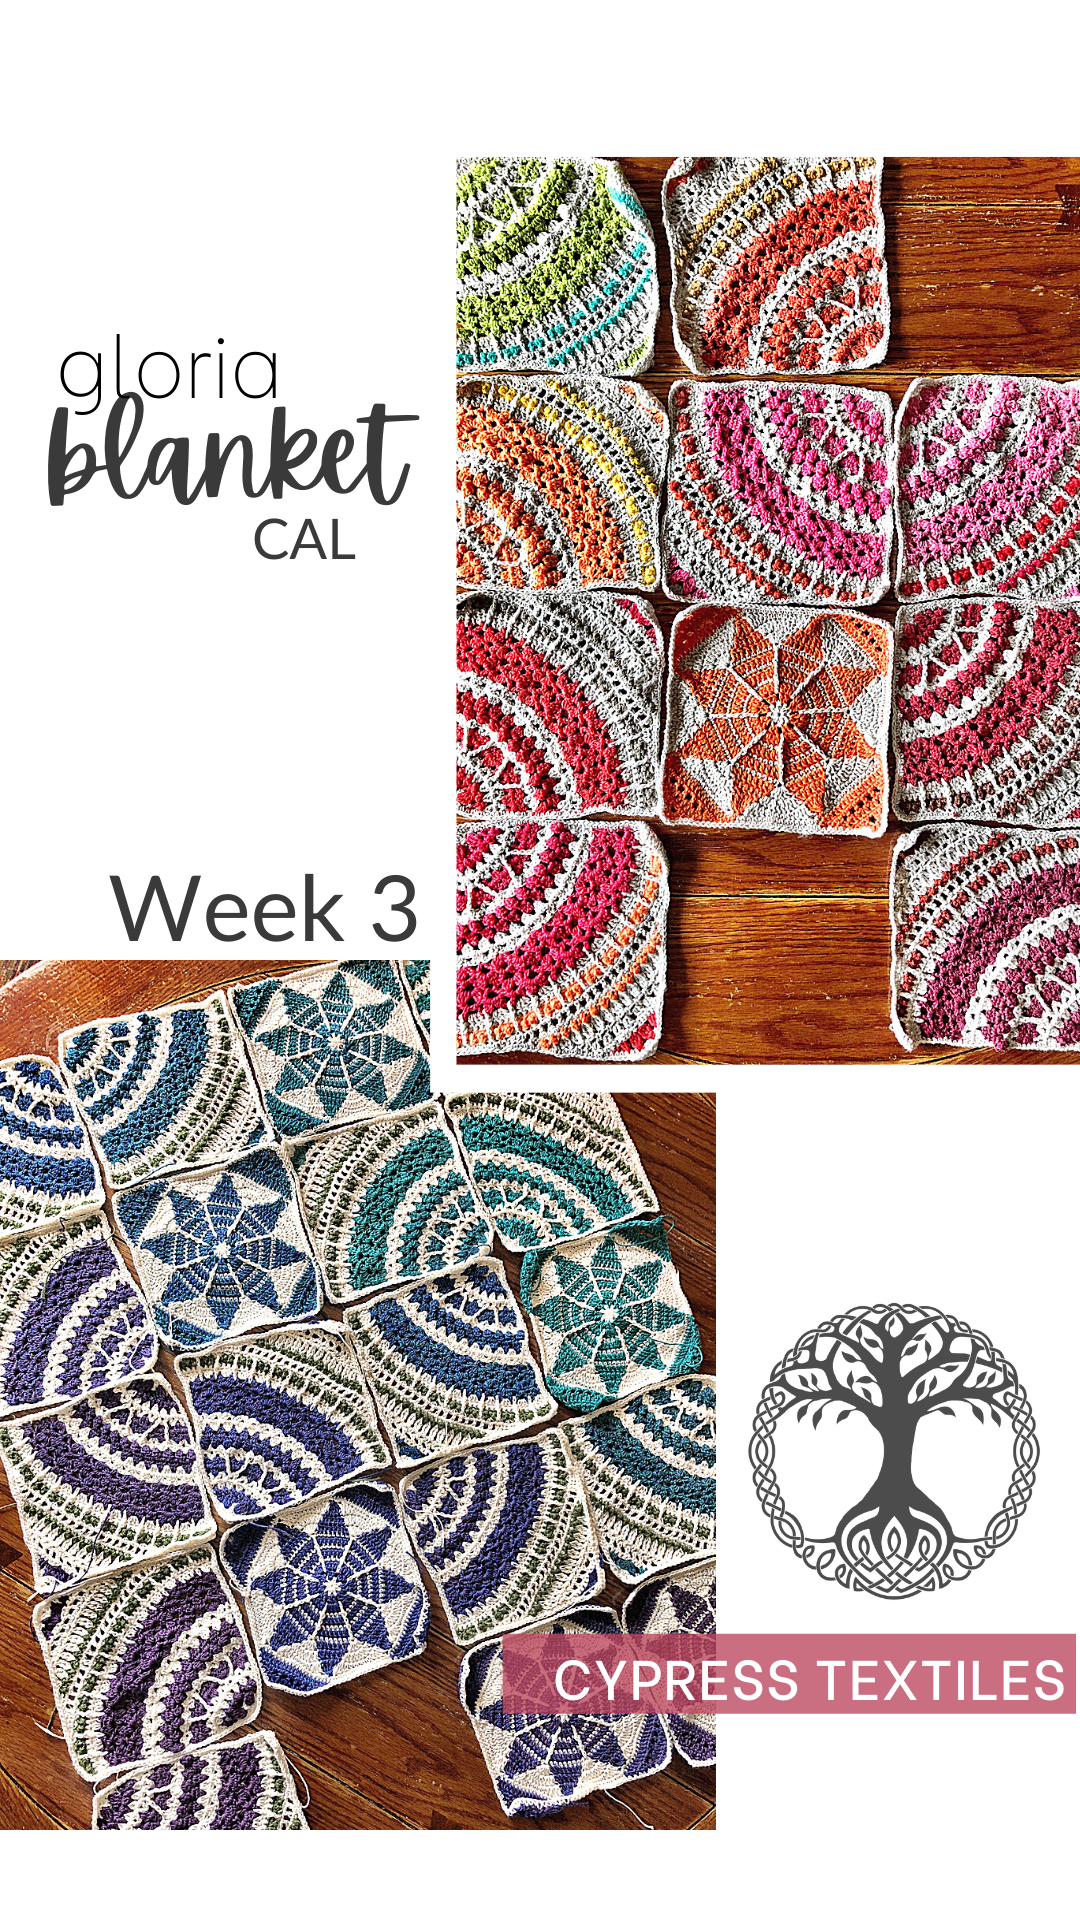
Hello, and welcome to the third week of my Gloria Blanket Crochet-Along! This week we will make a mix of Quarter Mandala Squares and Snowflake Squares. I am so pumped to get started and I’m very thankful that you’re joining me for this CAL. Have fun and share pics!
Gloria Blanket PDF Pattern Ravelry / Etsy / My Shop– As usual, the CAL will be released free every week here on my website, but I will offer the full blanket pattern in PDF form as soon as I write it up (I’ll have a date soon!)
Instagram Sharing – I’m on Insta as @CypressTextiles. Hashtag your WIP and FO pics with #GloriaBlanket and #CypressTextiles so I can share and save them in my story highlights!
CypressTextiles Tree Huggers Facebook Group – This is my main FB group (join!). Share your progress pics in this group if you like, and I will share CAL highlights there as well.
YouTube Channel (Subscribe!) – Here I will be posting Gloria Blanket CAL pattern videos releasing shortly after the Friday CAL release. Yay!
Social Media Hashtags: #GloriaBlanket and #CypressTextiles
How This CAL Works
Find your chosen yarn down below. I list separate instruction for each of the yarns that I discussed in the main info post. If you aren’t working any of the listed yarns, you can check out the Stash Yarn Version section, or go completely rogue! I often say that’s my favorite part of hosting a CAL, the variety of blankets that everyone presents in the Facebook group or on Instagram.
There are 3 suggested yarns for which I am making a sample blanket during the CAL. These yarns have a full CAL schedule for the 12 weeks. You can see that schedule on the Main Info Post. (Scroll all the way down on that post.) There are some yarns for which I am not making a sample blanket, but I do give advice on them below to help you.
Under each Gloria Blanket version section below, you will find the following information:
How to organize your yarn into groups by color, if applicable
How many squares to make this week, in which color (MC, CC1, CC2), plus link to pattern for Quarter-Mandala Motif (US and UK Terms)
Where to share pics
If you need yarn quantity info and yarn ordering info, please refer to the Main Info Post.
Once you make your squares, you can take pics and share them in my Facebook Group, or on Instagram with hashtags #GloriaBlanket and #CypressTextiles
Now begin the yarn sections with instructions for Week 3 – read everything carefully – and have fun!!
Metropolis 10g Colour Pack Version
This version uses one Scheepjes Metropolis 10g Colour Pack and 14 x 50g balls of Metropolis, with a size 3mm hook. For more yarn info and where to order, head to the Main Info Page.
Follow the steps below to complete your work for Week 3.
Step 1: Organize your yarn for this week
Color Group 1 – Pull the Color Group 3 colors from Week 2: 034, 077, 036, 076, 046, 047, 037.
Color Group 2 – Pull colors 035, 052, 032, 040, 038, 031, 028 from the Colour Pack and store them together.
I am storing my separate color groups in reusable zip-lock bags. There are 9 total color groups just in case that helps you sort out your storage system.
Step 2: Make 6 Quarter-Mandala Squares
The Quarter-Mandala Square Pattern will note when to change colors between MC (Main Color), CC1 (Contrast Color 1), and CC2 (Contrast Color 2). Follow the Color Notes in the pattern.
For this version, CC1 colors are from Color Group 3, and CC2 colors are from Color Group 4 (see below). Save all remnants in an organized fashion with their ball bands, as we will use the colors again in the following weeks. FYI, the CC1 and CC2 colors will vary week to week, but the MC and the color groups will always be the same.
For Week 2, use the following yarn colors for your 6 squares.
MC for all = Metropolis Color No. 025
Square 1: CC1 = 034, CC2 = 035
Square 2: CC1 = 077, CC2 = 052
Square 3: CC1 = 036, CC2 = 032
Square 4: CC1 = 076, CC2 = 040
Square 5: CC1 = 046, CC2 = 038
Square 6: CC1 = 047, CC2 = 031
Here is a sample Quarter-Mandala Square labeled with the CC1 and CC2 color placement. This sample is a Whirl + Whirlette square, but the CC1/CC2 placement is the same for the Metropolis Version.
Here is the Quarter-Mandala Square Pattern: US Terms // UK Terms
Gauge
Check your gauge! The first 8 Rows of the Quarter Mandala pattern measure 3in on either straight side with Metropolis and a 3mm hook.
If your motif is taller, but still makes a 90 degree angle at the corner, then going down a hook size will help.
If your motif is taller and narrow, or if you know yourself to make very tall dc sts, please check out this Golden Loop video. If you are a “lifter” your square will be elongated into a diamond. Changing hook size won’t help much. Working on controlling your Golden Loop will be your solution to having a nice square shape.
Note: The square needs a light blocking to make straight, neat edges and open the lace; however, if the square is too much of a diamond due to very tall dc sts, focus on the Golden Loop may be required.
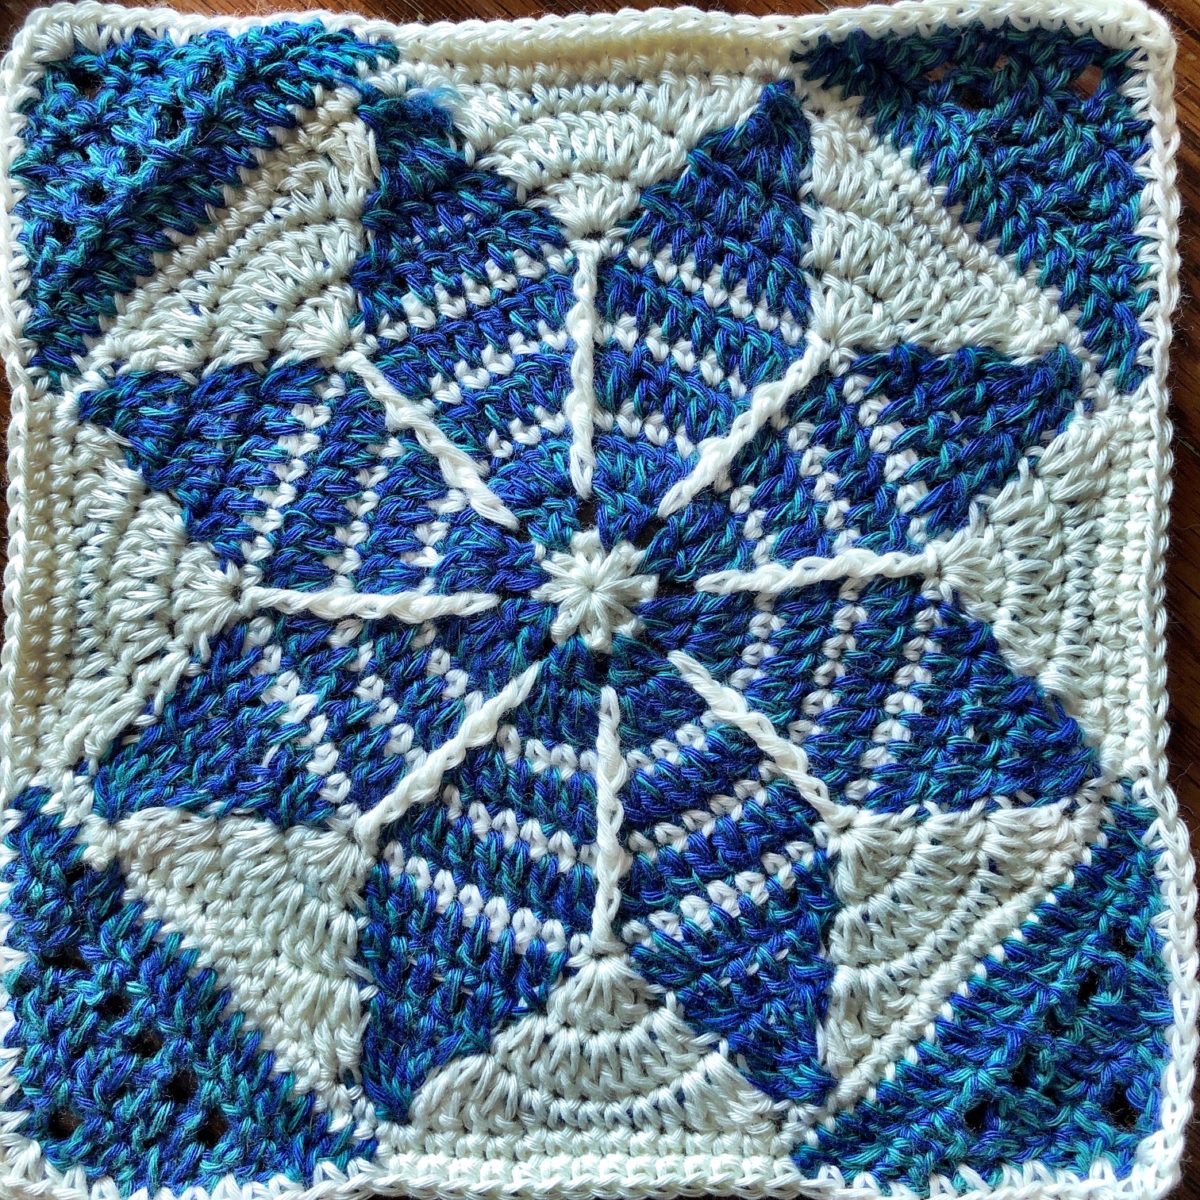
Step 3: Make 1 Snowflake Square
The Snowflake Square Pattern will note when to change colors between MC (Main Color), and CC (Contrast Color). Follow the Color Notes in the pattern.
Save all remnants in an organized fashion with their ball bands, as we will use the colors again in the following weeks. FYI, the CC1 and CC2 colors will vary week to week, but the MC and the color groups will always be the same.
For Week 3, use the following yarn colors for your Square.
MC = Metropolis Color No. 025
CC = 028
Here is a sample Snowflake Square labeled with the MC and CC color placement. This sample is a Whirl + Whirlette square, but the MC/CC placement is the same for the Metropolis Version.
Instagram Sharing – I’m on Insta as @CypressTextiles. Hashtag your WIP and FO pics with #GloriaBlanket and #CypressTextiles so I can share and save them in my story highlights!
CypressTextiles Tree Huggers Facebook Group – This is my main FB group (join!). Share your progress pics in this group if you like, and I will share CAL highlights there as well.
Whirl+Whirlette Version
This version uses two Scheepjes Whirl and 6 x 100g balls of Whirlette OR 12 x 50g of Scheepjes Cotton 8, with a size 3mm hook. For more yarn info and where to order, head to the Main Info Page.
Follow the steps below to complete your work for Week 3.
Step 1: Organize your yarn for this week
This week, we will be working from the inside of one Whirl, and the outside of the other Whirl. During Week 1, you labeled one Whirl “A” and the other Whirl “B”.
Here is the diagram for CC1/CC2 for WEEK 3
You will pull from the same Whirls this week as for Week 2.
Step 2: Make 7 Squares in Order as Instructed
The Quarter-Mandala and Snowflake Square Patterns will note when to change colors between MC (Main Color), CC1 (Contrast Color 1), and CC2 (Contrast Color 2) – see below. Follow the Color Notes in the pattern. The label “Whirl A” and “Whirl B” will not change throughout the CAL, but the CC1 and CC2 will vary week to week. The MC will be the same throughout the CAL.
For Week 3, use the following yarn colors for your Quarter Mandala squares.
MC for all = Scheepjes Whirlette in Ice, OR Scheepjes Cotton 8 in preferred background color
Squares 1-7: CC1 = Whirl B, pulled from inside, CC2 = Whirl A, pulled from outside
Note: For this Yarn Version, the Snowflake Square only uses MC and CC1.
In order to create a flow of color and spread the Snowflake Square evenly throughout the blanket, we need to work the squares in a certain order, dispersing the Snowflake Square evenly through the Whirl. Follow this sequence when making your squares. This will also break up the monotony of working the Quarter-Mandala Squares.
Work your squares in the following order:
Square 1: Quarter-Mandala
Square 2: Snowflake
Square 3: Quarter-Mandala
Square 4: Quarter-Mandala
Square 5: Snowflake
Square 6: Quarter-Mandala
Square 7: Quarter-Mandala
In the photo below, if you look closely at the squares, you can see how they fade beautifully and they are organized in the QM, QM, S, QM, QM, S, order.
Here is a diagram of how the placement of CC1 and CC2 look for the squares.
Check your gauge! The first 8 Rows of the Quarter-Mandala pattern measure 2.5in on either straight side with Whirl/Whirlette and a 3mm hook.
If your motif is taller, but still makes a 90 degree angle at the corner, then going down a hook size will help.
If your motif is taller and narrow, or if you know yourself to make very tall dc sts, please check out this Golden Loop video. If you are a “lifter” your square will be elongated into a diamond. Changing hook size won’t help much. Working on controlling your Golden Loop will be your solution to having a nice square shape.
Note: The square needs a light blocking to make straight, neat edges and open the lace; however, if the square is too much of a diamond due to very tall dc sts, focus on the Golden Loop may be required.
Step 3: Share pics!
Instagram Sharing – I’m on Insta as @CypressTextiles. Hashtag your WIP and FO pics with #GloriaBlanket and #CypressTextiles so I can share and save them in my story highlights!
CypressTextiles Tree Huggers Facebook Group – This is my main FB group (join!). Share your progress pics in this group if you like, and I will share CAL highlights there as well.
Catona 10g Colour Pack Version
This version uses one Scheepjes Catona 10g Colour Pack and 20 x 50g balls of Catona, with a size 3mm hook. For more yarn info and where to order, head to the Main Info Page.
Follow the steps below to complete your work for Week 3.
Step 1: Organize your yarn for this week
Color Group 3 – Pull colors 100, 280, 106, 403, 105, 257, 505, 406, 130, 248, 101, 522, from the Colour Pack and store them together. Note: If your desired background color is not 404 and it is in this group, replace it with No. 404.
I am storing my separate color groups in reusable zip-lock bags. There are 9 total color groups just in case that helps you sort out your storage system.
Step 2: Make 5 Quarter-Mandala Squares
The Quarter-Mandala Square Pattern will note when to change colors between MC (Main Color), CC1 (Contrast Color 1), and CC2 (Contrast Color 2) – see below. Follow the Color Notes in the pattern. The CC1 and CC2 will vary week to week. The MC will be the same throughout the CAL.
For this version, CC1 and CC2 colors are all from Color Group 3. Save all remnants in an organized fashion with their ball bands, as we may use the colors again in the following weeks.
For Week 3, use the following yarn colors for your 5 squares.
MC for all = Catona Color No. 404
Square 1: CC1 = 100, CC2 = 280
Square 2: CC1 = 106, CC2 = 403
Square 3: CC1 = 105, CC2 = 257
Square 4: CC1 = 505, CC2 = 406
Square 5: CC1 = 130, CC2 = 248
Here is a sample Quarter-Mandala Square labeled with the CC1 and CC2 color placement for this version.
Check your gauge! The first 8 Rows of the Quarter Mandala pattern measure 2.75in on either straight side with Catona and a 3mm hook.
If your motif is taller, but still makes a 90 degree angle at the corner, then going down a hook size will help.
If your motif is taller and narrow, or if you know yourself to make very tall dc sts, please check out this Golden Loop video. If you are a “lifter” your square will be elongated into a diamond. Changing hook size won’t help much. Working on controlling your Golden Loop will be your solution to having a nice square shape.
Note: The square needs a light blocking to make straight, neat edges and open the lace; however, if the square is too much of a diamond due to very tall dc sts, focus on the Golden Loop may be required.
Step 3: Make 1 Snowflake Square
The Snowflake Square Pattern will note when to change colors between MC (Main Color), and CC1/CC2 (Contrast Color). Follow the Color Notes in the pattern.
Save all remnants in an organized fashion with their ball bands, as we will use the colors again in the following weeks. FYI, the CC1 and CC2 colors will vary week to week, but the MC and the color groups will always be the same.
For Week 3, use the following yarn colors for your square
MC = Catona No. 404
Square: CC1 = 522, CC2 = 101
Here is a sample Snowflake Square labeled with the CC1/CC2 color placement.
Instagram Sharing – I’m on Insta as @CypressTextiles. Hashtag your WIP and FO pics with #GloriaBlanket and #CypressTextiles so I can share and save them in my story highlights!
CypressTextiles Tree Huggers Facebook Group – This is my main FB group (join!). Share your progress pics in this group if you like, and I will share CAL highlights there as well.
**Suggested Yarns Without a Sample Blanket**
Here is some advice on these yarn versions for this week. Feel free to follow along with one of the versions above!
Stone Washed / River Washed 10g Colour Pack Version
For this yarn, if you are making 30 squares, you can make 3 of the Quarter-Mandala Squares this week and 1 Snowflake Square. Pick 2 similar contrast colors for CC1 and CC2 or even use 2 completely different colors! It will look amazing.
You can follow along with the Catona 10g colour pack version above if you like. Just make fewer squares. MC will remain the same week to week, but the CC1 and CC2 will be unique to each square.
Here is an example of how your square will look if you follow the Catona 10g pack version:
Catona 50g Skeins Version
For this yarn, if you are making 56 squares, you should make 5 Quarter-Mandala Squares this week. CC1 and CC2 follow the Whirl + Whirlette Version.
Make 2 Snowflake Squares as well. CC1 and CC2 follow the Whirl/Whirlette version.
For this yarn, I gave several layout options on the Main Info Page. You can follow the color combos CC1 and CC2 for the Catona 10g Colour Pack Version as the colors are the same for these 2 packs, but the quantity of squares will depend on how many will be in your blanket.
Here is the Quarter-Mandala Square Pattern: US Terms // UK Terms
If you are going rogue (YAY!) you can make anywhere between 5-7 Quarter-Mandala Squares this week and 2 Snowflake Squares, depending how many squares your blanket will be. I can’t wait to see the fun color combos!
Here is the Quarter-Mandala Square Pattern: US Terms // UK Terms
Have fun making your squares this week! Be sure to share progress pics as we love them in the FB group and IG. I share them in my IG story highlights as well if you post them and add the hashtags.
THANK YOU for joining me in the Gloria Blanket CAL!
Are you arriving here from Pinterest? That’s because this blog post is viral on that platform! Wowzers – thank you all for your continued support. This post has now become the most viewed content on babylovebrand.net, so I have updated it so that it’s fresh and new.
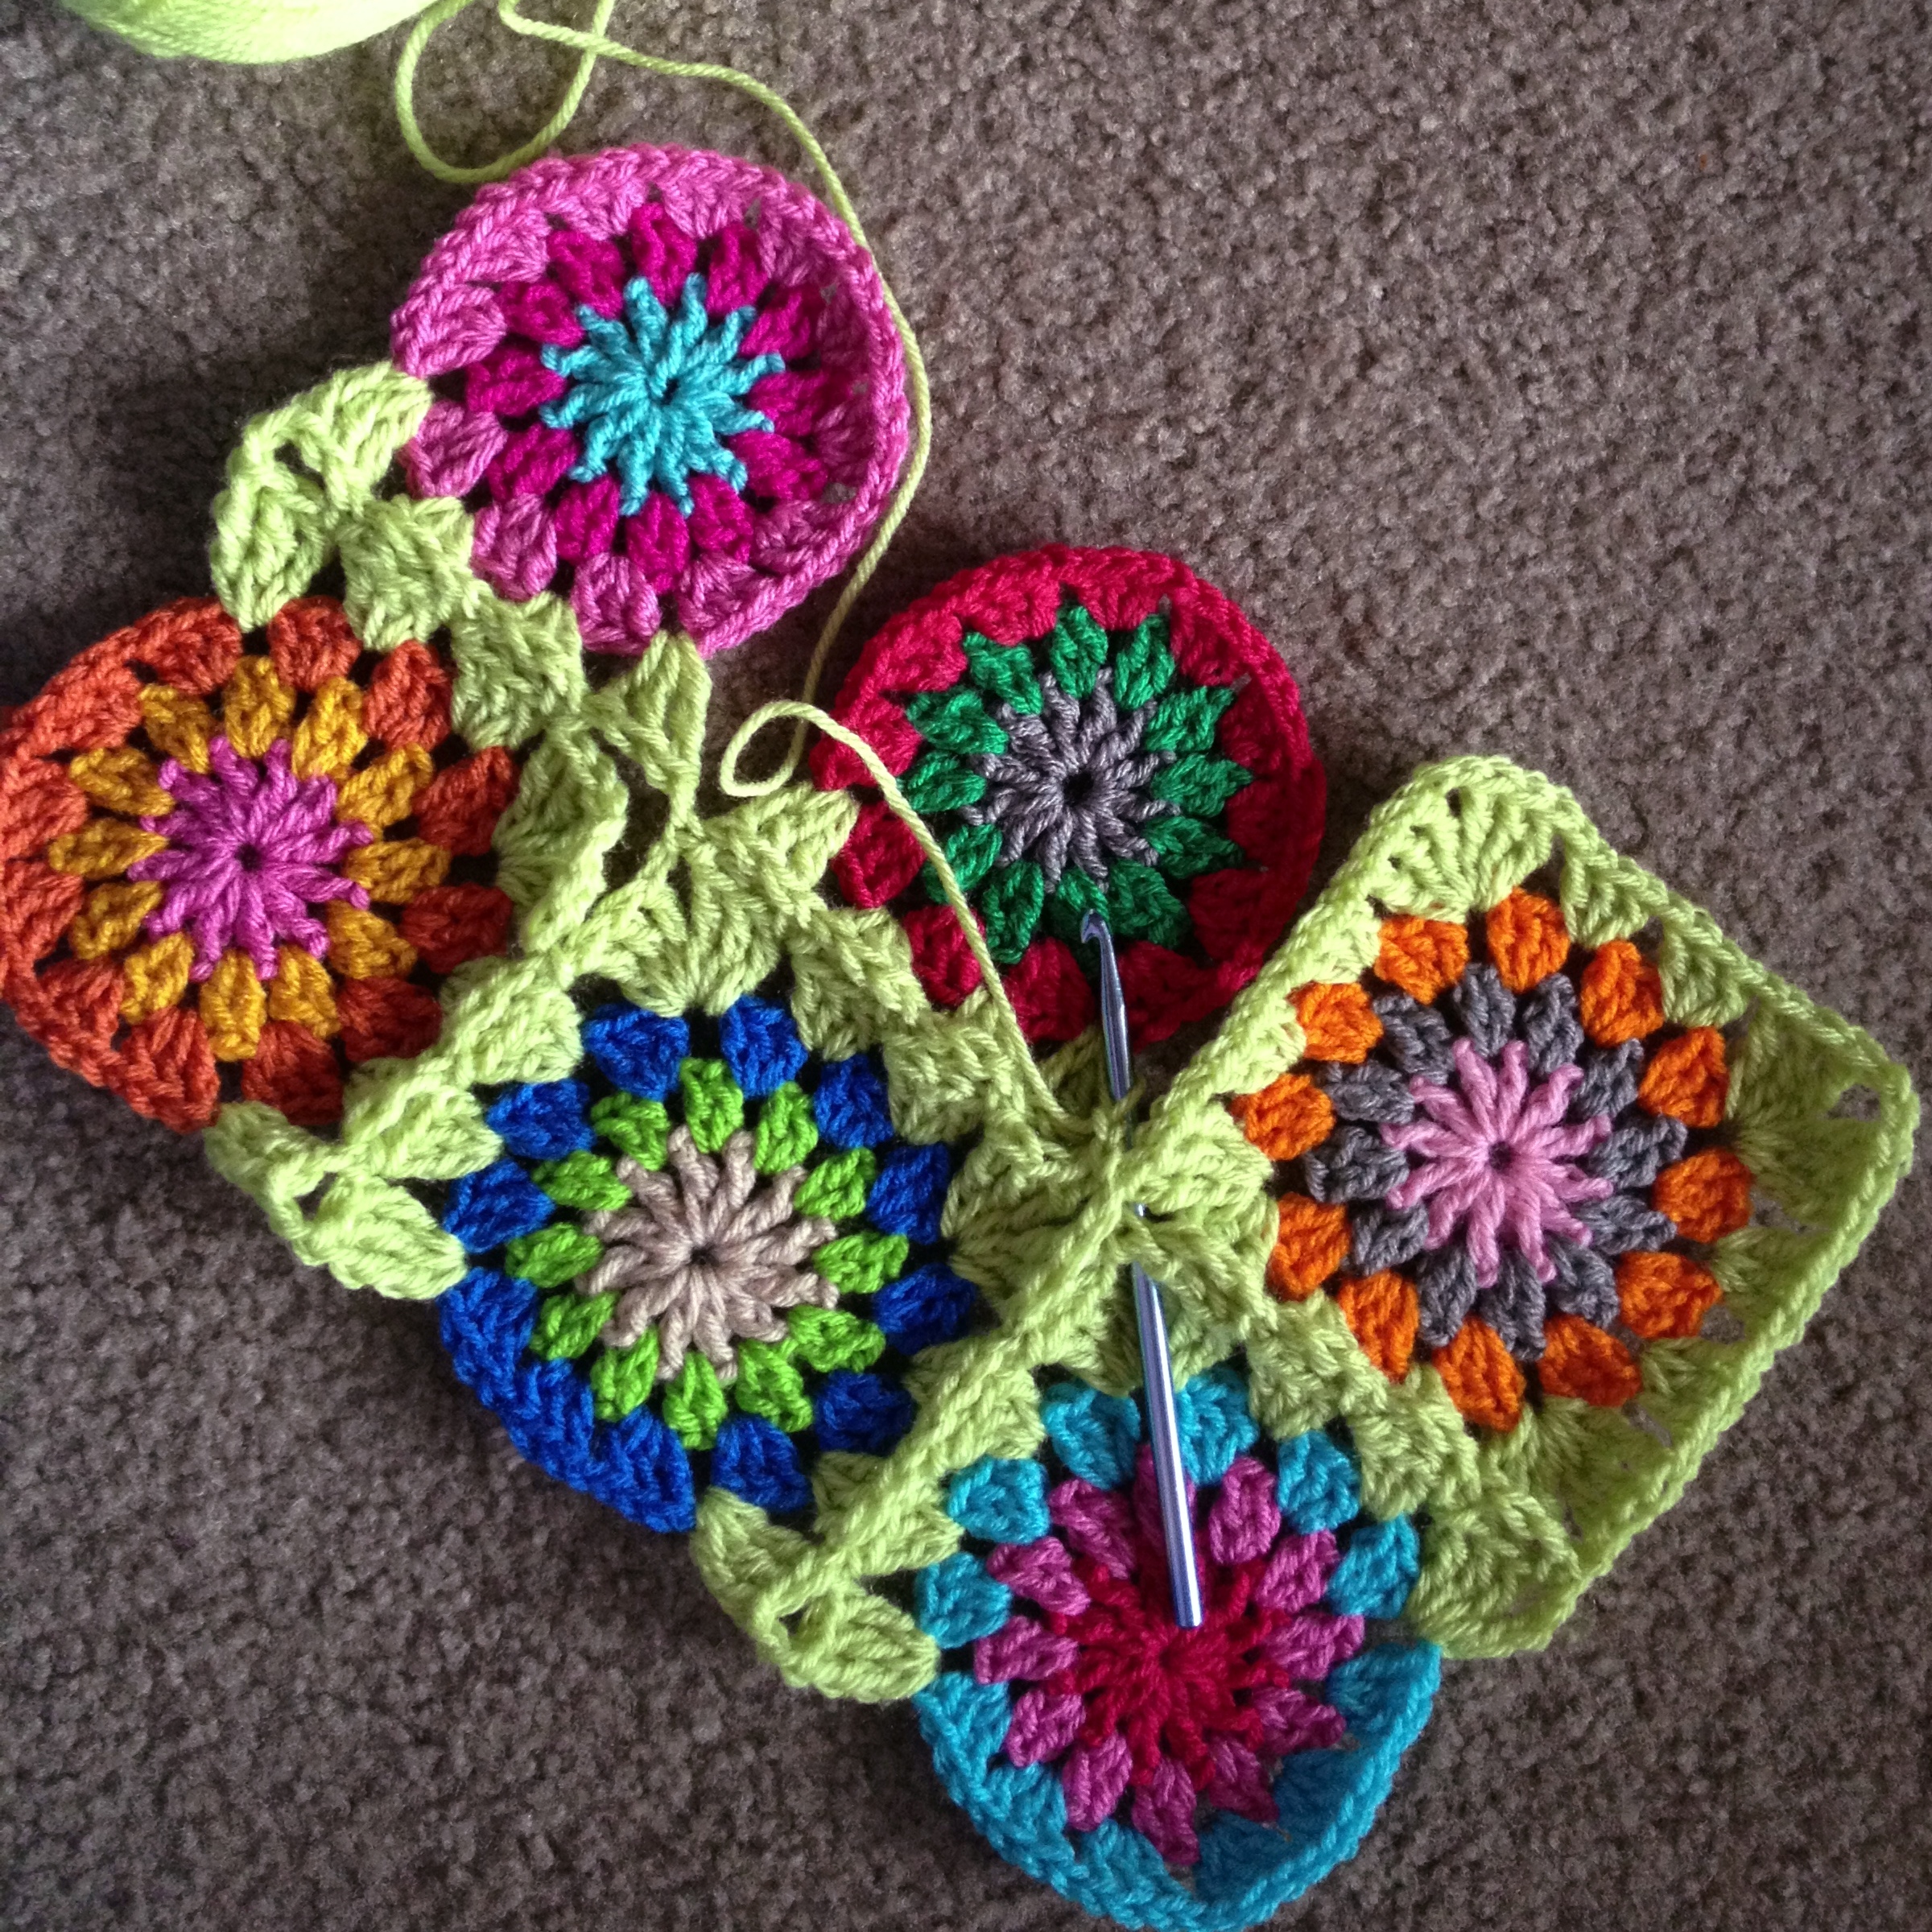
This tutorial will show you the method behind the crochet continuous join as you go, but there are an infinite amount of ways you can use this method. My tutorial here is just a strong foundation to springboard to more uses.
Objective: Make a 20″ cushion cover with me and learn the CJAYG method along the way.
This picture that I lifted off of the CrochetCabana.com website shows a SCARY visual of the path that we will be taking with this join. It is super-scary, but once you get it, it’s a great visual aid.
Okay, let’s get started!
Pattern Notes/Terms
US Terminology, Worsted weight yarn remnants, K/6.5mm hook
beg dc = beginning dc = sc, ch1 (counts as 1 dc)
beg tr = beginning tr = sc, ch2 (counts as 1 tr)
ch n = chain n times
dc = double crochet
rnd = round
RS = right side of work
sc = single crochet
ss = slip stitch
sp = chain space
tr = treble crochet
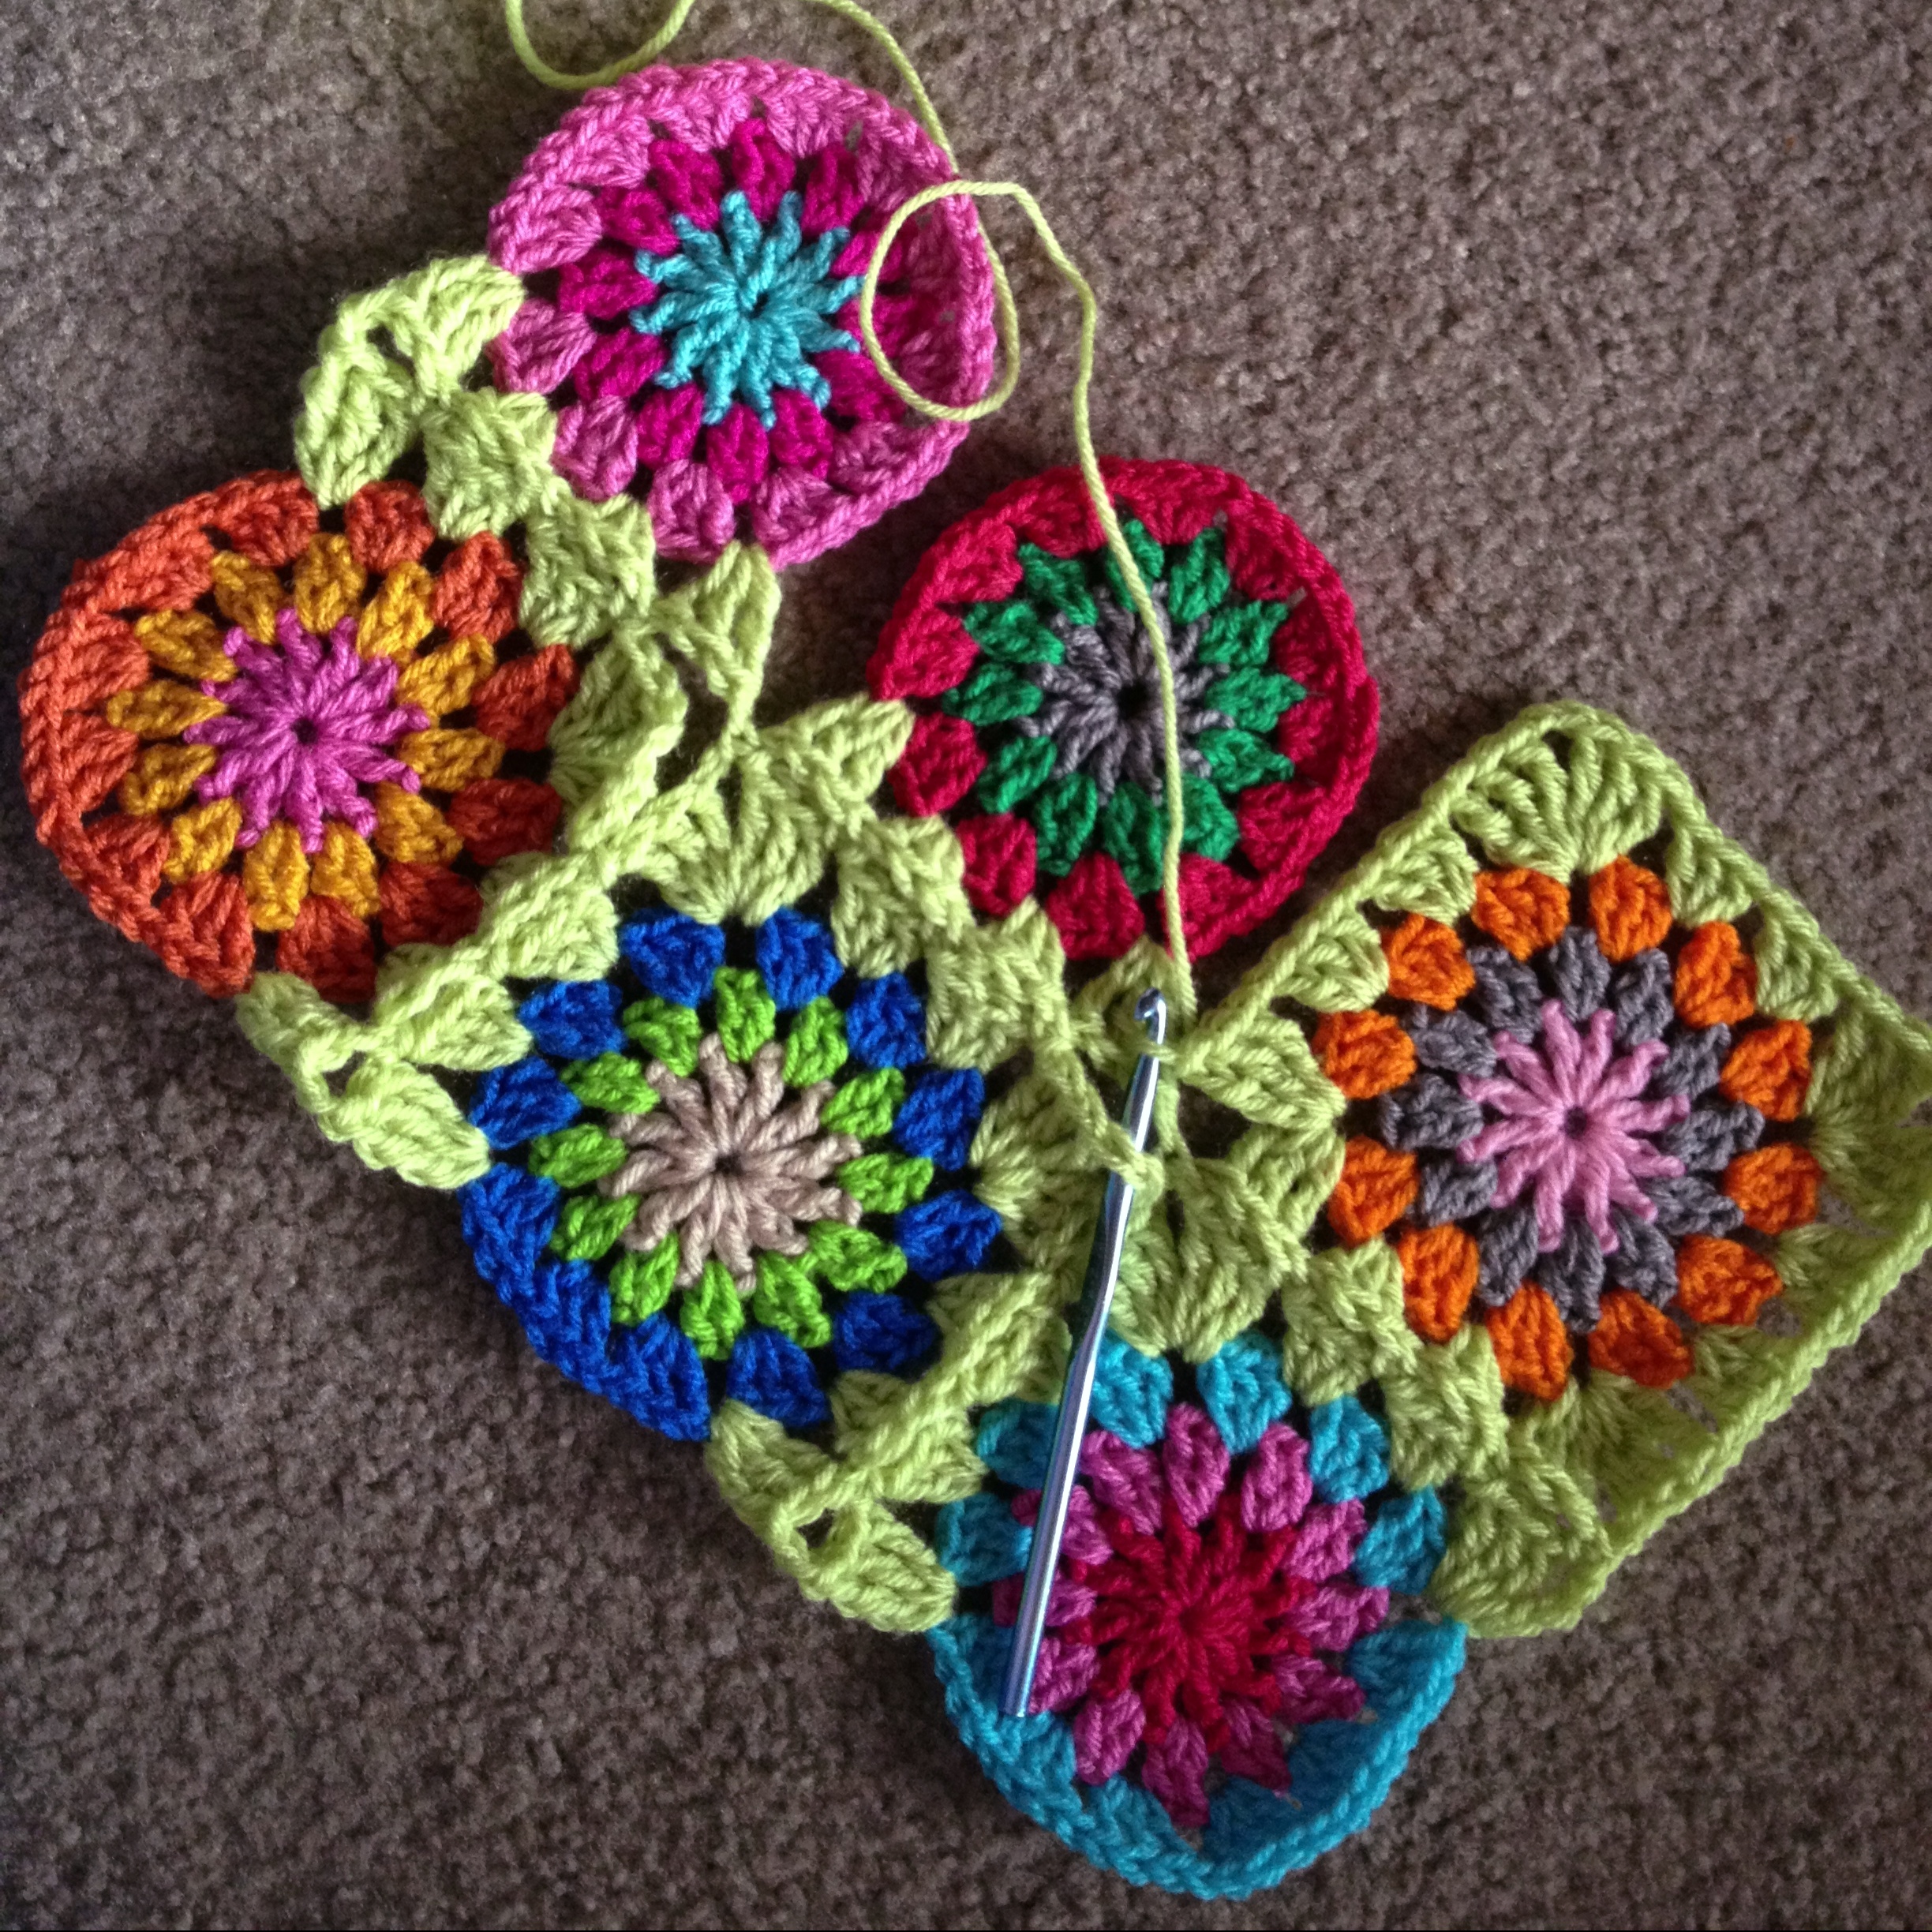
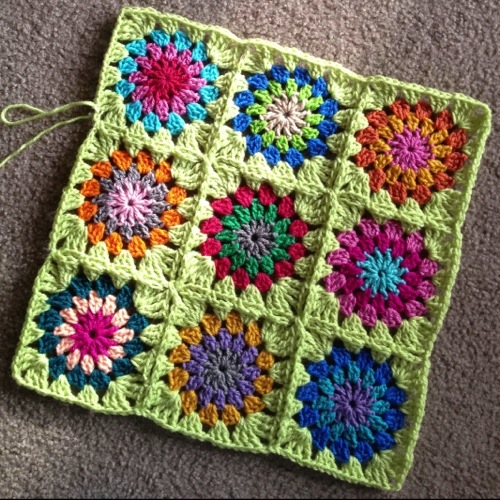
Motif (Make 9)
Note: Different color used for each round if desired. Just cut yarn after each rnd, and join new yarn with ss in any sp, then begin next rnd.
Rnd 1 Slip knot, ch3, ss in third ch from hook to make ring. All in ring: beg dc, (ch1, dc) 11 times, ch1, ss in beg dc. [12 dc, 12 sp]
Rnd 2 Beg dc in sp, (ch1, 2dc in next sp) 11 times, ch1, dc in first sp, ss in beg dc. [24 dc, 12 sp]
Rnd 3 Beg dc in sp, (ch1, 3dc in next sp) 11 times, ch1, 2dc in first sp, ss in beg dc. [36 dc, 12 sp]
Weave ends.
Begin Continuous Join As You Go
Note: This join is made in one continuous movement from start to finish. If possible, have enough yarn to join all motifs for the fewest yarn ends to weave. We will work in rows to join the motifs, so lay out your circles in rows.
Row 1, Step 1
Pick up your first motif and attach the joining yarn with a ss in any sp from rnd 3. (Beg tr, ch2, 3tr) in same sp, ch1, (3dc in next sp, ch1) 2 times, (3tr, ch2, 3tr) in next sp, ch1, (3dc in next sp, ch1) 2 times, 3tr in next sp, ch2.
See my scissors in the photo below? You are now at the top of the handle.
Row 1, Step 2
Pick up the next motif, 3tr in any sp, position your motifs end to end like in the photo below, and ss in the space across the way (this is a joining maneuver). Note: the ss replaces your ch1. (3dc in the next sp on your motif-in-progress, ss in the sp across) 2 times, (3tr, ch2, 3tr) in next sp.
Now, you are at the edge up and to the left of the scissors handle.Notice I did not join corners. I don’t do it yet because I like for diagonal corners to “reach” out to each other in the form of an X. I’ll get to that later.
Ch1, (3dc in next sp, ch1) 2 times, (3tr, ch2, 3tr) in next sp, ch1, (3dc in next sp, ch1) 2 times, 3tr in next sp, ch2.
Now you are at the same point as I am in the photo below.
Row 1, Step 3
Pick up your next motif and join 1 side in the same way as previous motif. You can see that I end with a ch2. My motif grid is only 3×3 for this cushion, so this ch2 marks the end of my Row 1 of motifs.
Note: No matter how many motifs you have, you will work 3 sides of each motif, and working only 2 sides on the last motif as shown in the photo below.
Row 2, Step 1
Note: The next motif that you join will be in the position of the pink circle with the turquoise center in the photo below.
Pick up the next motif and work 3tr in any sp, ss in the sp across (this is the same joining method from before), (3dc in the next sp, ss to join) 2 times, 3tr in the next sp, ch1, ss in the ch2 corner sp that is located diagonally (to the upper left).
Row 2, Step 2
Pick up your next motif, 3tr in any sp, ss to join, (3dc in next sp, ss to join) 2 times, 3tr in next sp, ch1, ss in diagonal ch2 corner sp.
Now, you are where I am in the photo below.
You can see that I leave the top right corner un-worked. I’ll get to that later.
Row 2, Step 3
Pick up your next motif (in my case it is the orange-edge one). 3tr in any sp, ss to join, (3dc in next sp, ss to join) 2 times, 3tr in next sp.
Now, you are meeting the place where you started.
Ss in the ch2 sp, ch1, 3tr in the same sp to complete the corner, ch1, (3dc in next sp, ch1) 2 times, (3tr, ch2, 3tr) in next sp.
Now you are where I am in the photo below.
Row 2, Step 4
Ch1, (3dc in next sp, ch1) 2 times, 3tr in the corner sp.
Here’s where we do some corner magic.
Release the loop from the hook. Insert your hook in the un-worked corner from before, put the loop back on your hook.
Now you are where I am in the photo below.
Pull the loop through that corner space and ch2. Release the loop from your hook again and insert your hook in the corner as it is shown in the photo below. Put the loop back on the hook.
Now you are where I am in the photo below.
In the photo above, my hook is under everything. After you pull that loop through, ch2. 3tr in the sp where your 3tr is in the next motif down (mine is the center motif) and ss to join.
Now you are where I am in the photo below. Admire your beautiful corner. 🙂
Fast-forwarding here, I’ll just say the next part is nothing new. Ss to join, notice that the corners at the upper right of the photo below are un-worked because this is not my final motif row. I’ll be picking those corners up just like I did on this row. In the photo below, you are ready to pick up your next motif which for me will be the one located above the pink motif with the turquoise center. You have chained 2 and you’re ready to go.
Row 3
Pick up your next motif and 3tr in any sp (for me this was the dark blue motif with the purple center shown in the bottom right of the photo below). Work just like you did before, joining your motifs on, picking up diagonal corners, and leaving the other corner un-worked to be picked up later. I’ve shown this all below.
At the end of the row, ss in the outer ch2 sp, ch1, 3tr in the same sp to complete the corner. Again, you pick up this corner because it’s on the perimeter of the piece.
In the photo below, I have worked my zig-zag back down my piece, completing my corners. Review the photos above.
For me, this is my last row of motifs, so now, when I come back down the side, I won’t be attaching more motifs.
All of my perimeter corners are now joined as well as you can see in the upper right of the photo.
Make the (3tr, ch2, 3tr) corner as shown in the upper left of the piece. Work the usual 3dc groups and 3tr in the same sp as the other 3tr to complete the corner.
Now you are where I am in the photo below.
At this point, ch1, ss in ch2 sp, ch1, 3tr in same sp as previous 3tr to complete corner.
3dc in the sps with the ch1 in between, and work your way around the blanket – this is the home stretch.
In the photo below, you are done! Join with a ss in the beg tr.
Instagram
Make a border around your cushion front
I worked sc, ch1, dc2tog over the next two spaces, dc in second corner sp – If you are confused here, please refer to the Bunny Mummy tutorial on how to make an edge on a granny square blanket that does not ripple/ruffle.
(3dc, ch1) in all spaces around, performing your Bunny Mummy trick in the points where you have two grannies meeting. This can be seen in the photo below as the funny-looking 3dc toward the upper left…..
At this point, feel free to sc around, making 3sc in the corners, and then make a reverse sc round. Make another identical side, sew them together with right sides together (leaving one side open), make ch2 loops as button holes down one side of the opening, sew buttons down the other side, shove a 20-22″ pillow in, close your buttons up, and call it a night! (LOL)