
Are you arriving here from Pinterest? That’s because this blog post is viral on that platform! Wowzers – thank you all for your continued support. This post has now become the most viewed content on babylovebrand.net, so I have updated it so that it’s fresh and new.
This tutorial will show you the method behind the crochet continuous join as you go, but there are an infinite amount of ways you can use this method. My tutorial here is just a strong foundation to springboard to more uses.
You can also find this pattern on AllFreeCrochetAfghanPatterns.com.
Related Links for CJAYG
YouTube Tutorials (Link goes to part 1)
- CJAYG with sc for triangles //// Blog post link
- CJAYG Flat Braid Join for hexagons //// Blog post link
- CJAYG with sc for hexagons //// Blog post link
- CJAYG granny st for hexagons //// Blog post link
Blog Posts (Written/photo instruction only)
- CJAYG for squares using sc and my PLT Join
- CJAYG Flat Braid Join for squares
- CJAYG tutorial for Sunburst Flower Blanket
Suggested Yarns
- KnitPicks Brava Sport (affiliate) – See my full review of this yarn
- Scheepjes Colour Crafter (affiliate) – See my full review of this yarn
CJAYG Tutorial
Objective: Make a 20″ cushion cover with me and learn the CJAYG method along the way.
This picture that I lifted off of the CrochetCabana.com website shows a SCARY visual of the path that we will be taking with this join. It is super-scary, but once you get it, it’s a great visual aid.

Okay, let’s get started!
Pattern Notes/Terms
US Terminology, Worsted weight yarn remnants, K/6.5mm hook
- beg dc = beginning dc = sc, ch1 (counts as 1 dc)
- beg tr = beginning tr = sc, ch2 (counts as 1 tr)
- ch n = chain n times
- dc = double crochet
- rnd = round
- RS = right side of work
- sc = single crochet
- ss = slip stitch
- sp = chain space
- tr = treble crochet
Motif (Make 9)
Note: Different color used for each round if desired. Just cut yarn after each rnd, and join new yarn with ss in any sp, then begin next rnd.
Rnd 1 Slip knot, ch3, ss in third ch from hook to make ring. All in ring: beg dc, (ch1, dc) 11 times, ch1, ss in beg dc. [12 dc, 12 sp]
Rnd 2 Beg dc in sp, (ch1, 2dc in next sp) 11 times, ch1, dc in first sp, ss in beg dc. [24 dc, 12 sp]
Rnd 3 Beg dc in sp, (ch1, 3dc in next sp) 11 times, ch1, 2dc in first sp, ss in beg dc. [36 dc, 12 sp]
Weave ends.
Begin Continuous Join As You Go
Note: This join is made in one continuous movement from start to finish. If possible, have enough yarn to join all motifs for the fewest yarn ends to weave. We will work in rows to join the motifs, so lay out your circles in rows.
Row 1, Step 1
Pick up your first motif and attach the joining yarn with a ss in any sp from rnd 3. (Beg tr, ch2, 3tr) in same sp, ch1, (3dc in next sp, ch1) 2 times, (3tr, ch2, 3tr) in next sp, ch1, (3dc in next sp, ch1) 2 times, 3tr in next sp, ch2.
See my scissors in the photo below? You are now at the top of the handle.
Row 1, Step 2
Pick up the next motif, 3tr in any sp, position your motifs end to end like in the photo below, and ss in the space across the way (this is a joining maneuver). Note: the ss replaces your ch1. (3dc in the next sp on your motif-in-progress, ss in the sp across) 2 times, (3tr, ch2, 3tr) in next sp.
Now, you are at the edge up and to the left of the scissors handle. Notice I did not join corners. I don’t do it yet because I like for diagonal corners to “reach” out to each other in the form of an X. I’ll get to that later.
Ch1, (3dc in next sp, ch1) 2 times, (3tr, ch2, 3tr) in next sp, ch1, (3dc in next sp, ch1) 2 times, 3tr in next sp, ch2.
Now you are at the same point as I am in the photo below.

Row 1, Step 3
Pick up your next motif and join 1 side in the same way as previous motif. You can see that I end with a ch2. My motif grid is only 3×3 for this cushion, so this ch2 marks the end of my Row 1 of motifs.
Note: No matter how many motifs you have, you will work 3 sides of each motif, and working only 2 sides on the last motif as shown in the photo below.

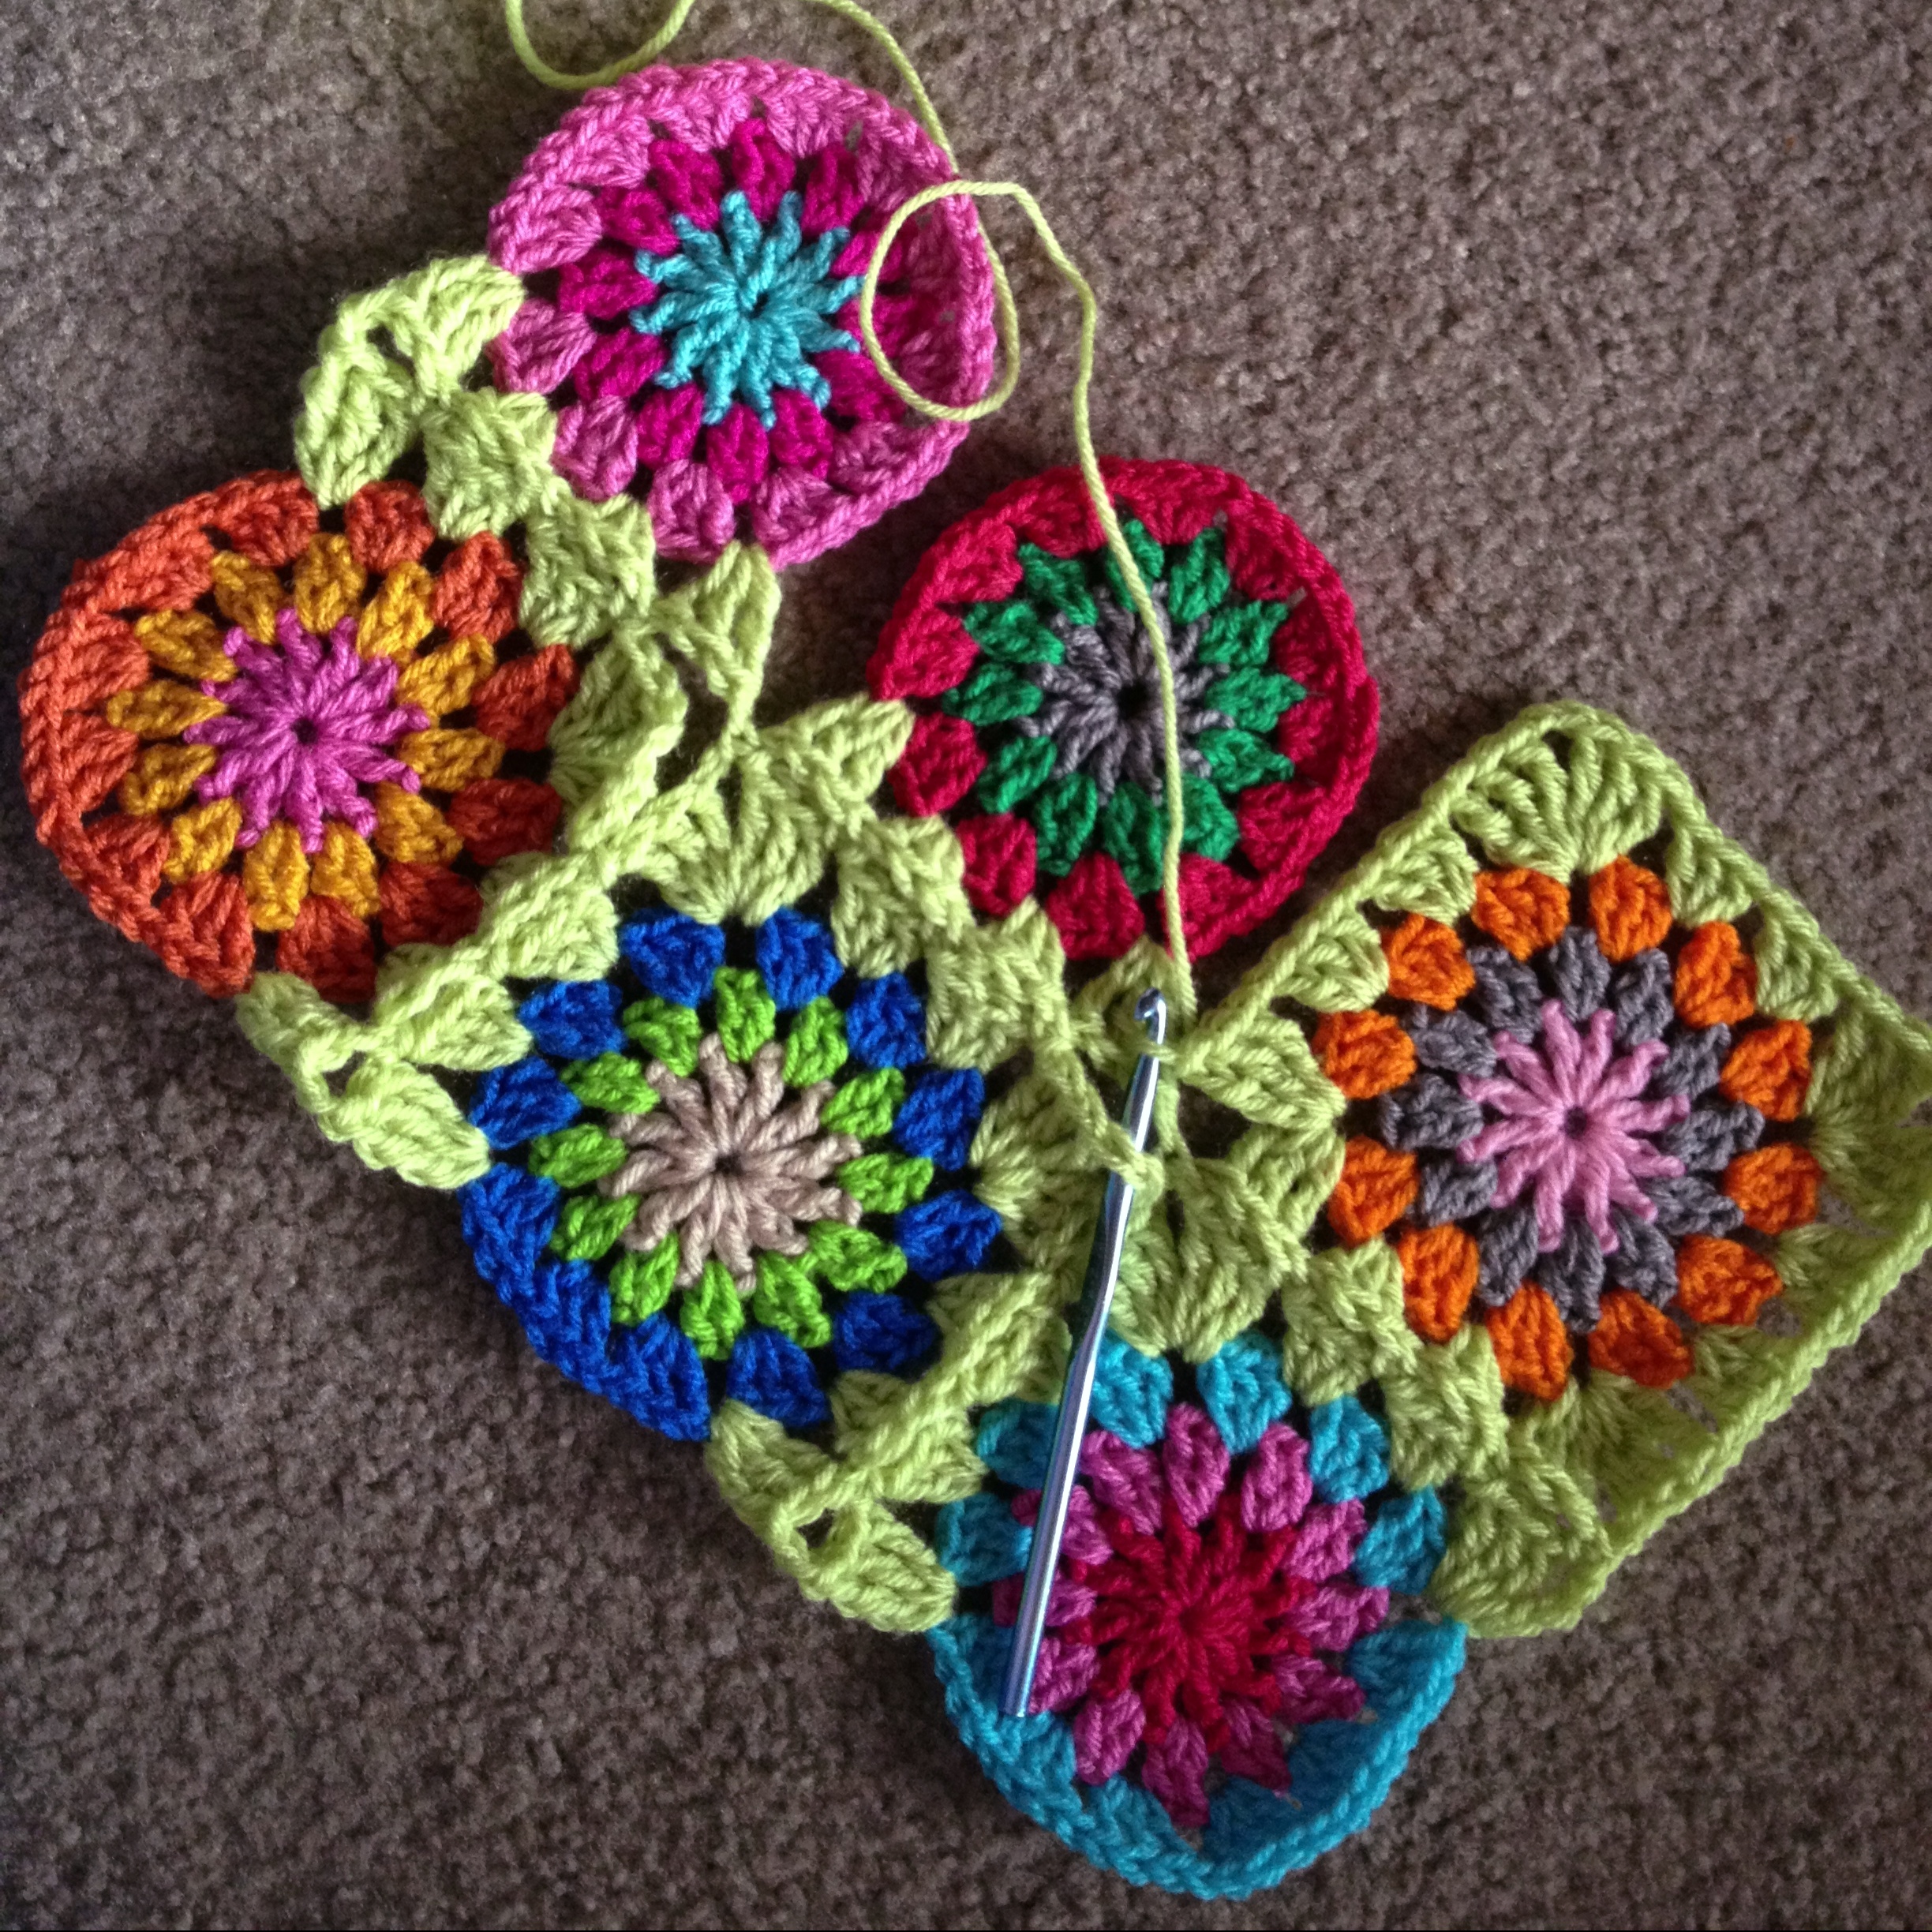
Row 2, Step 1
Note: The next motif that you join will be in the position of the pink circle with the turquoise center in the photo below.
Pick up the next motif and work 3tr in any sp, ss in the sp across (this is the same joining method from before), (3dc in the next sp, ss to join) 2 times, 3tr in the next sp, ch1, ss in the ch2 corner sp that is located diagonally (to the upper left).
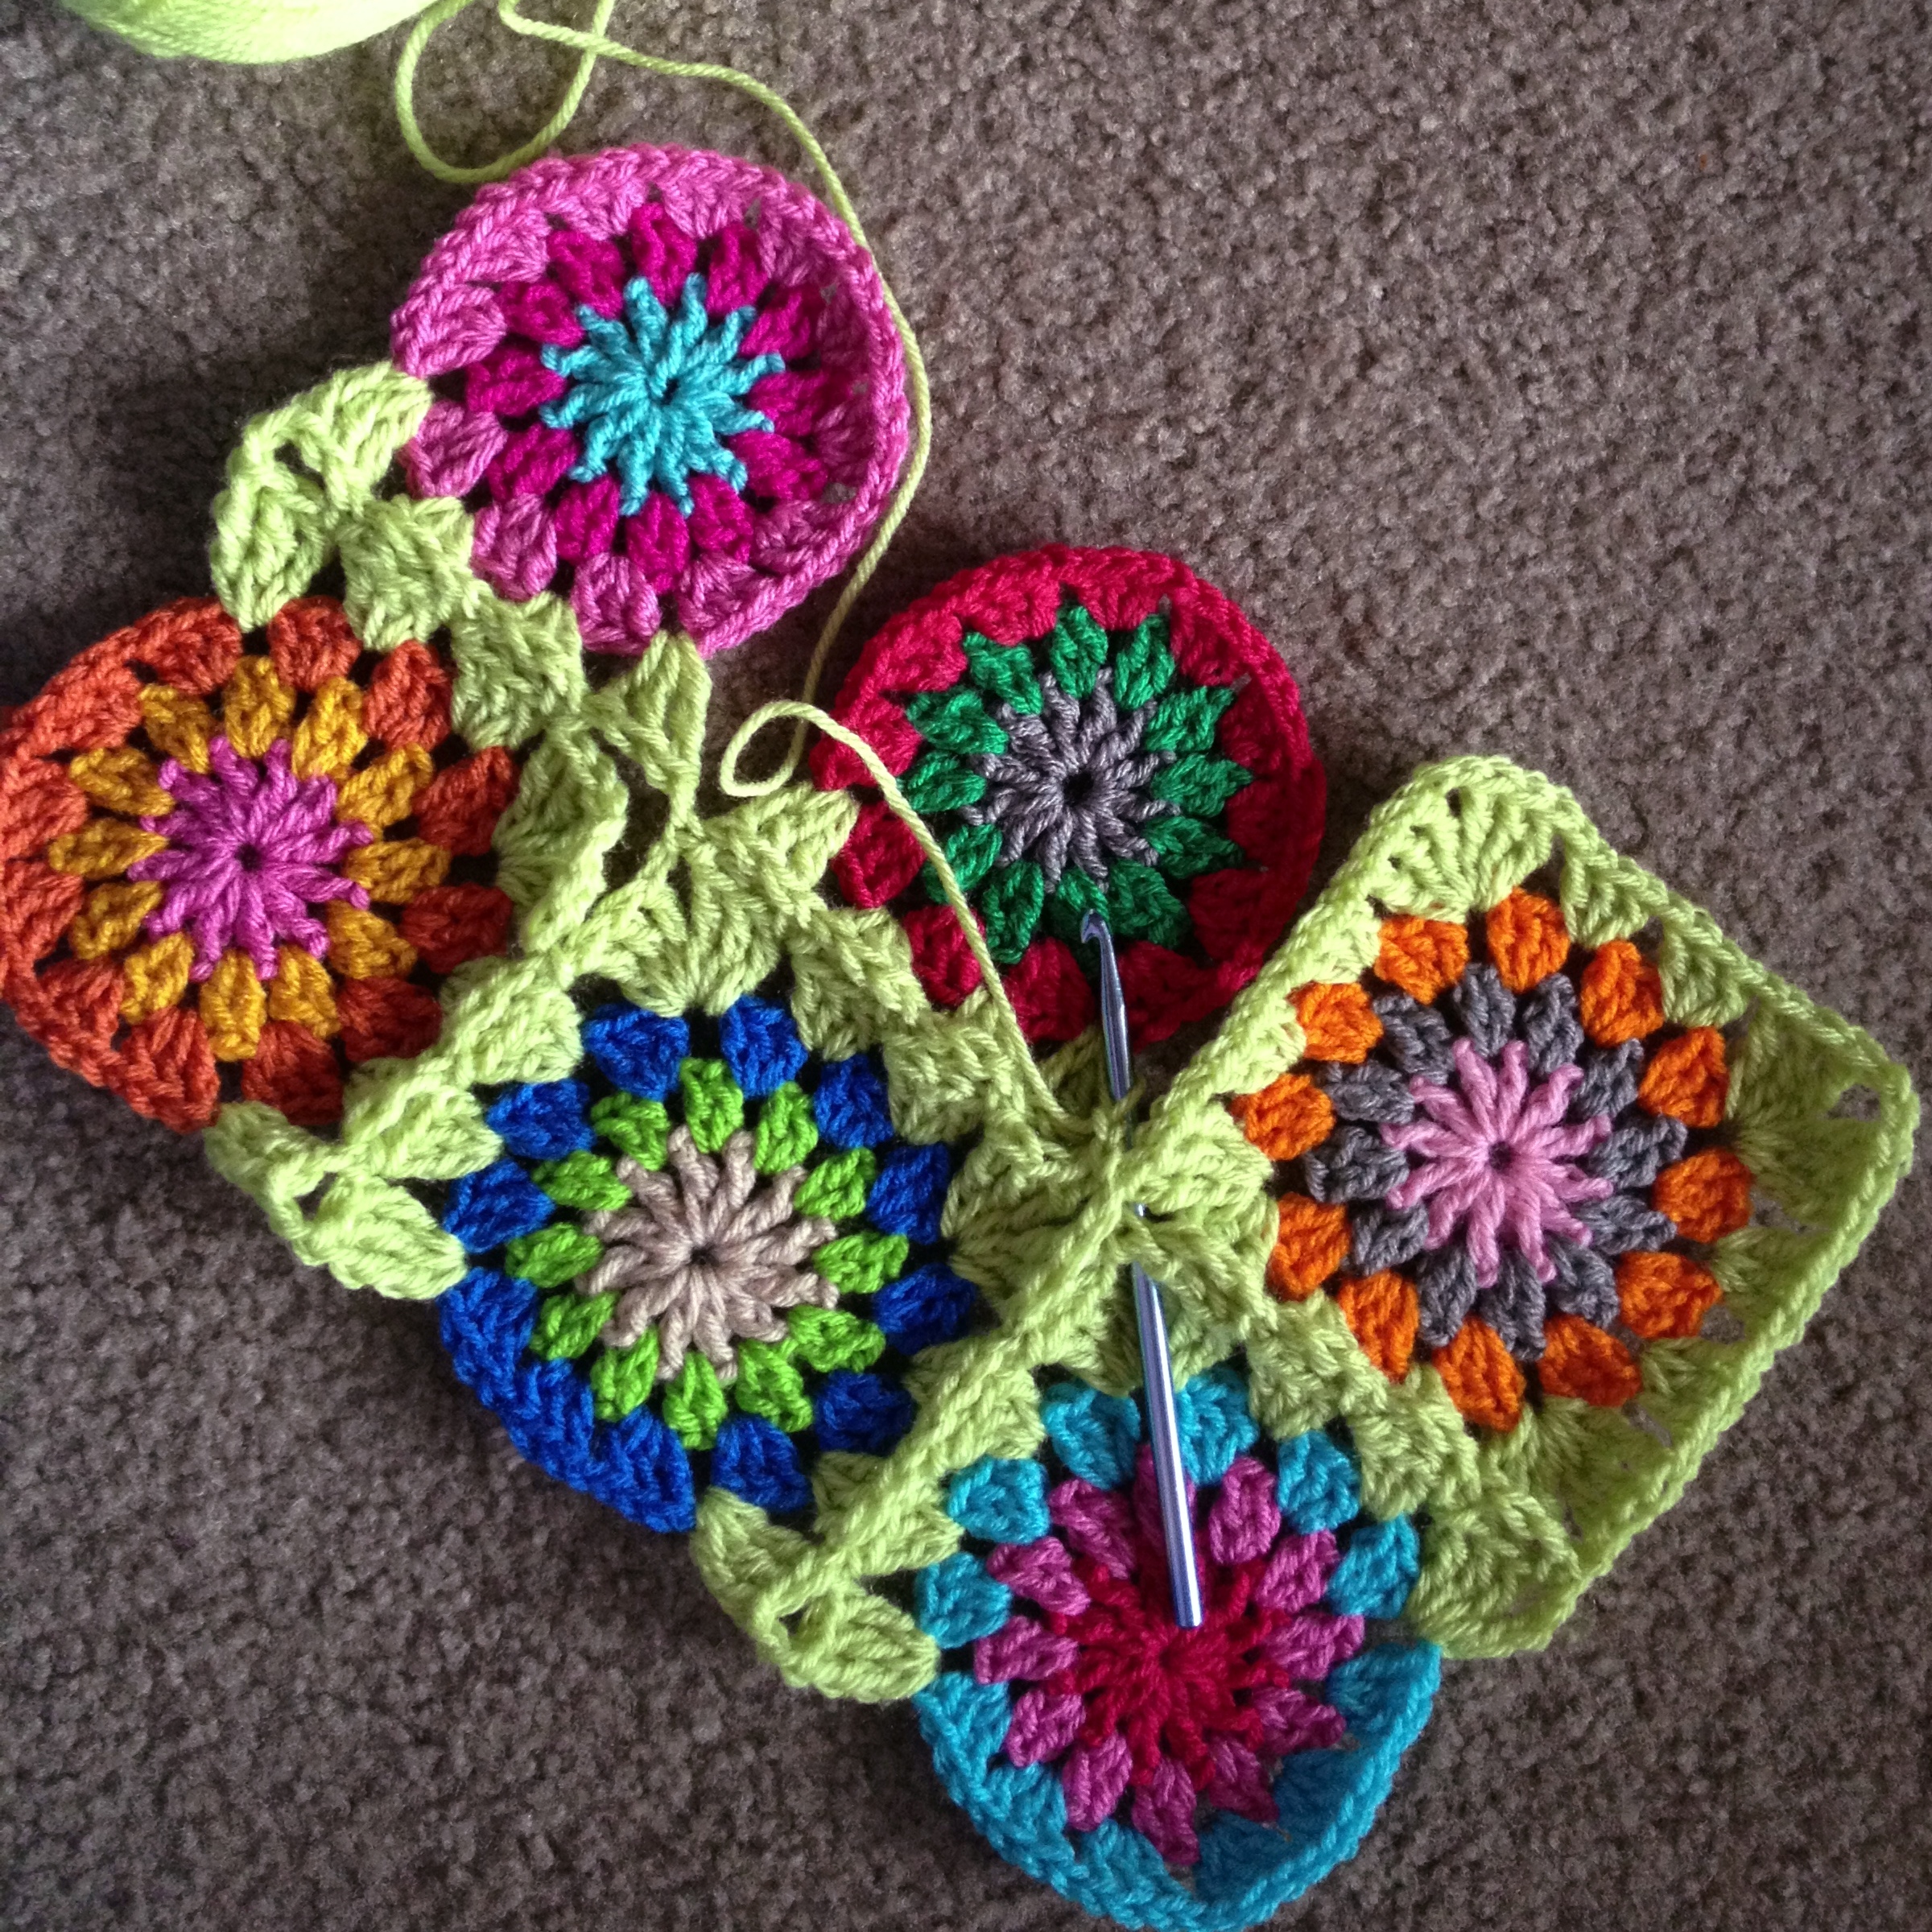
Row 2, Step 2
Pick up your next motif, 3tr in any sp, ss to join, (3dc in next sp, ss to join) 2 times, 3tr in next sp, ch1, ss in diagonal ch2 corner sp.
Now, you are where I am in the photo below.
You can see that I leave the top right corner un-worked. I’ll get to that later.

Row 2, Step 3
Pick up your next motif (in my case it is the orange-edge one). 3tr in any sp, ss to join, (3dc in next sp, ss to join) 2 times, 3tr in next sp.
Now, you are meeting the place where you started.
Ss in the ch2 sp, ch1, 3tr in the same sp to complete the corner, ch1, (3dc in next sp, ch1) 2 times, (3tr, ch2, 3tr) in next sp.
Now you are where I am in the photo below.

Row 2, Step 4
Ch1, (3dc in next sp, ch1) 2 times, 3tr in the corner sp.
Here’s where we do some corner magic.
Release the loop from the hook. Insert your hook in the un-worked corner from before, put the loop back on your hook.
Now you are where I am in the photo below.
Pull the loop through that corner space and ch2. Release the loop from your hook again and insert your hook in the corner as it is shown in the photo below. Put the loop back on the hook.
Now you are where I am in the photo below.
In the photo above, my hook is under everything. After you pull that loop through, ch2. 3tr in the sp where your 3tr is in the next motif down (mine is the center motif) and ss to join.
Now you are where I am in the photo below. Admire your beautiful corner. 🙂

Fast-forwarding here, I’ll just say the next part is nothing new. Ss to join, notice that the corners at the upper right of the photo below are un-worked because this is not my final motif row. I’ll be picking those corners up just like I did on this row. In the photo below, you are ready to pick up your next motif which for me will be the one located above the pink motif with the turquoise center. You have chained 2 and you’re ready to go.

Row 3
Pick up your next motif and 3tr in any sp (for me this was the dark blue motif with the purple center shown in the bottom right of the photo below). Work just like you did before, joining your motifs on, picking up diagonal corners, and leaving the other corner un-worked to be picked up later. I’ve shown this all below.
At the end of the row, ss in the outer ch2 sp, ch1, 3tr in the same sp to complete the corner. Again, you pick up this corner because it’s on the perimeter of the piece.

In the photo below, I have worked my zig-zag back down my piece, completing my corners. Review the photos above.
For me, this is my last row of motifs, so now, when I come back down the side, I won’t be attaching more motifs.
All of my perimeter corners are now joined as well as you can see in the upper right of the photo.
Make the (3tr, ch2, 3tr) corner as shown in the upper left of the piece. Work the usual 3dc groups and 3tr in the same sp as the other 3tr to complete the corner.
Now you are where I am in the photo below.
At this point, ch1, ss in ch2 sp, ch1, 3tr in same sp as previous 3tr to complete corner.
3dc in the sps with the ch1 in between, and work your way around the blanket – this is the home stretch.

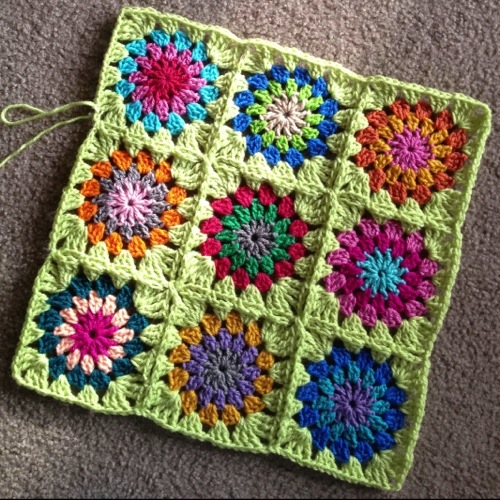
In the photo below, you are done! Join with a ss in the beg tr.
Make a border around your cushion front
I worked sc, ch1, dc2tog over the next two spaces, dc in second corner sp – If you are confused here, please refer to the Bunny Mummy tutorial on how to make an edge on a granny square blanket that does not ripple/ruffle.
(3dc, ch1) in all spaces around, performing your Bunny Mummy trick in the points where you have two grannies meeting. This can be seen in the photo below as the funny-looking 3dc toward the upper left…..
At this point, feel free to sc around, making 3sc in the corners, and then make a reverse sc round. Make another identical side, sew them together with right sides together (leaving one side open), make ch2 loops as button holes down one side of the opening, sew buttons down the other side, shove a 20-22″ pillow in, close your buttons up, and call it a night! (LOL)

