
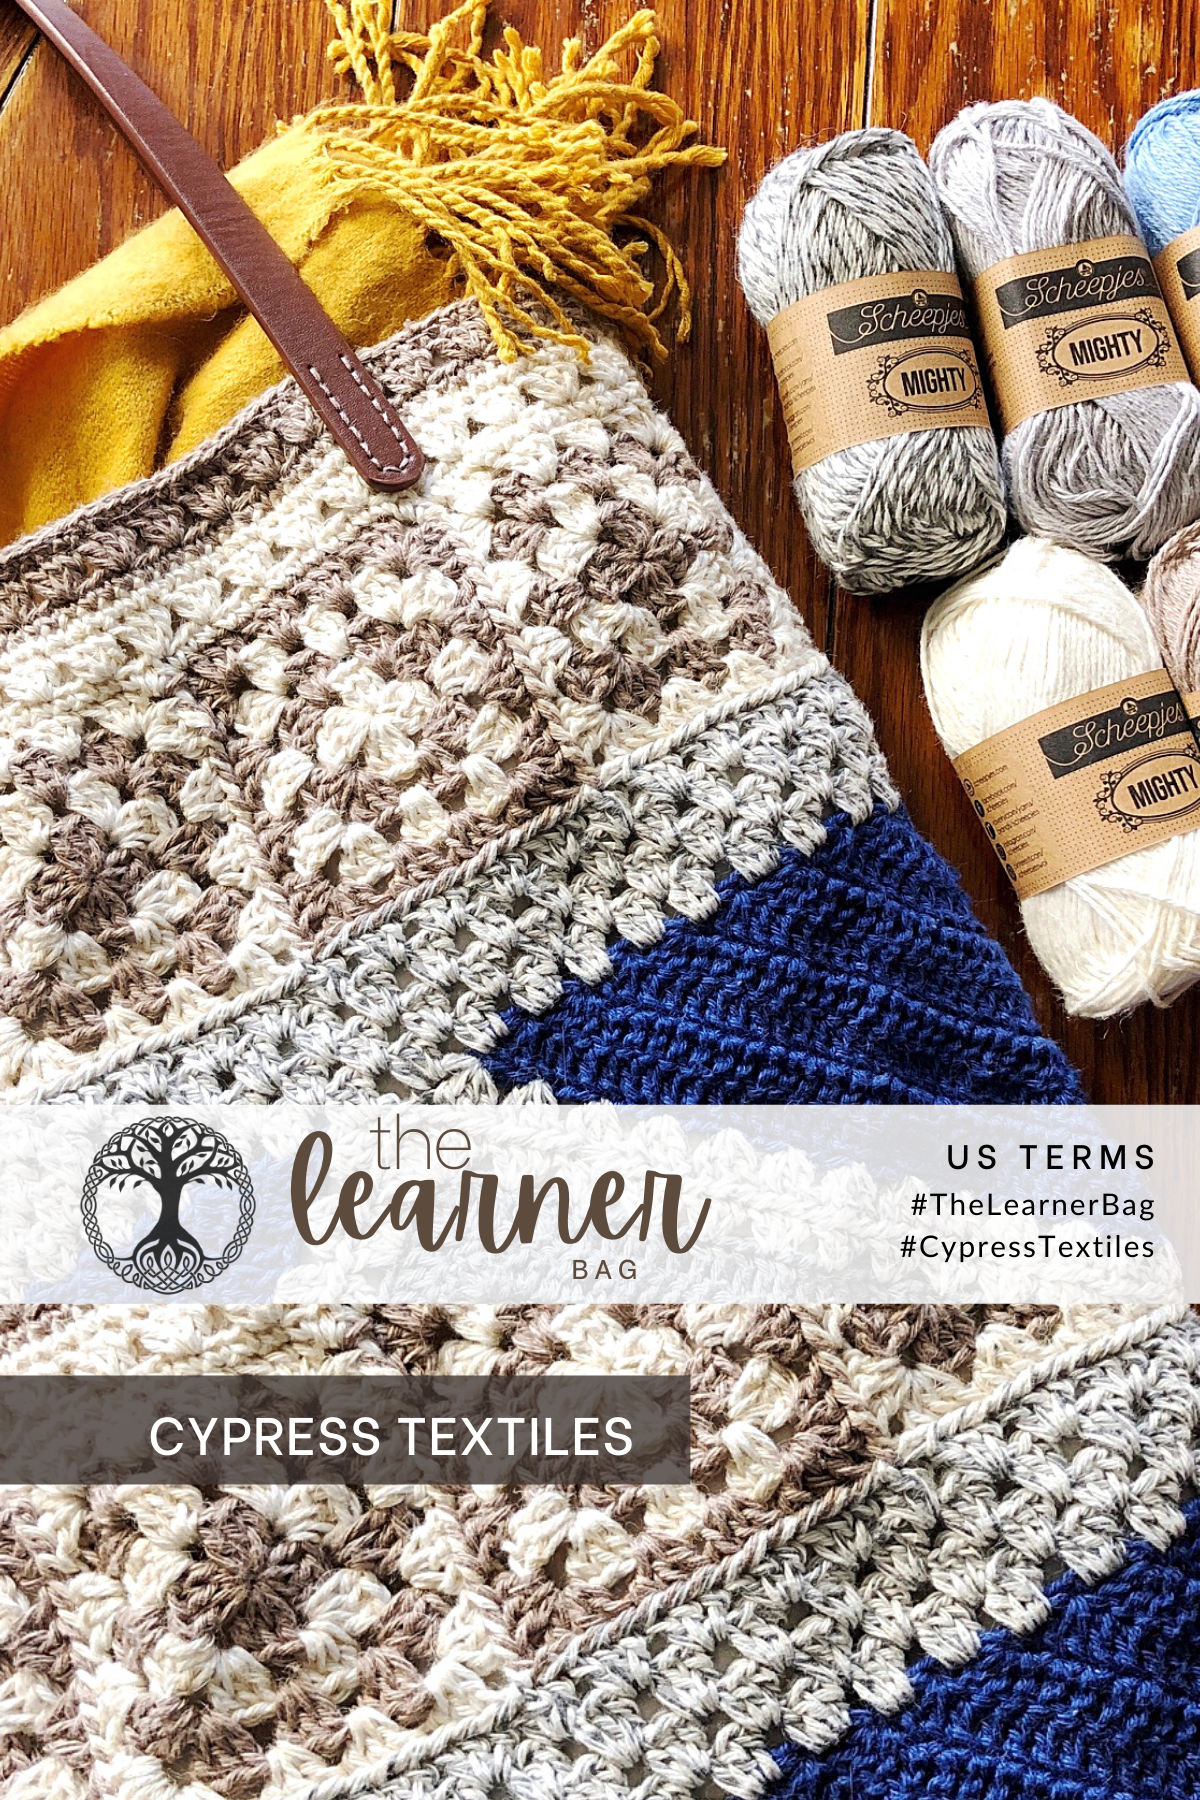
Hello, lovely! As promised, today I have the free pattern for The Learner Bag for you. This is the perfect bag project for someone who is just learning to crochet, and also a wonderfully simple bag for experienced crochet artists. Made in a durable Jute blend yarn, Scheepjes Mighty, this stylish bag will last through daily use.
This pattern is in US Terms. Click here for UK Terms version.
The Learner Bag: PDF Version
Find the PDF version here for easy print or just to help support CypressTextiles: Etsy, Ravelry, CypressTextiles Pattern Shop. Both US and UK Terms are included in the download.

Social Media Sharing
Please use these hashtags when posting about The Learner Bag on Social Media:
#TheLearnerBag and #CypressTextiles

About The Learner Bag
Clever construction and timeless simplicity combine in this fun and easy project. Learn new skills if you’re a novice bag maker, and delight in this quick and stylish make if you’re more experienced.
- Skill Level Easy
- Finished Measurements 14in wide, 15in tall without handles
- US Hook size 4mm, tapestry needle for weaving ends, sewing needle and a small amount of embroidery thread to sew liner and handles (Amazon affiliate link)
- Gauge is not necessary with this project

Scheepjes Mighty Yarn

You will need Scheepjes Mighty 50g balls in the following colors for the bag pictured above.
One Ball Each:
- Yarn A: Ocean 757
- Yarn B: Mountain 755
- Yarn C: Glacier 753
- Yarn D: Oak 752
- Yarn E: Ice 750
For a bag like the one in the step-by-step photos, you will need the following colors:
One Ball Each:
- Yarn A: River 756
- Yarn B: Oak 752
- Yarn C: Glacier 753
- Yarn D: Desert 760
- Yarn E: Volcano 758
Shop Mighty Yarn
Shopping through the following affiliate links helps support CypressTextiles at no additional cost to you!
Or find a Scheepjes retailer near you!

Pattern Notes
- Weave in loose ends as work progresses.
- Do not make a turning chain when beginning the row with a single crochet. This creates neater edges without rippling or puckering.
- Consistently turn work counter-clockwise for neater edges.
Special Stitches
My Pull Loop Through join (PLT join): release lp from hook, insert hook front to back in st/sp indicated, grab lp, pull lp to front of work, continue as instructed in pattern. Loop joins pieces as you go.
Key Stitch Descriptions (US Terms)
Click here for UK Terms.
- beg beginning
- beg dc (1sc, 1ch) – counts as 1dc
- beg tr (1sc, 2ch) – counts as 1tr
- ch chain
- dc double crochet
- PLT = “Pull Loop Through” See more info above
- MR make ring: 3ch, join with ss to first ch
- rep repeat
- rnd round
- sc single crochet
- sk skip
- sp space
- ss slip stitch
- st(s) stitch(es)
- tr treble crochet
- yoh yarn over hook
Repeat and Bracket Guide
- Square brackets [ ] are used for small repeats: 4dc, [2dc, 3tr, 2dc] 2 times
- Asterisks *are used for repeats that include small repeats: *5dc, [1ch, 1dc] 3 times in next ch, rep from * 3 times
- Round brackets ( ) are used when a string of stitches are worked into the same spot: (3tr, 3ch, 3tr) in next st
Tips and Notes
- Weave your ends after each time you cut the yarn to avoid having to do them all at the end.
- Please read the stitch guide for any abbreviations.
- To get a neater result, I do not “chain up” for the first sc of the round/row. Jump straight into the first sc.

Instructions
Notes: This bag starts with four triangles joined with my PLT Join, then a granny stitch band is worked off the top edge. Eight granny squares are added followed by a simple border, and then for the finishing, an old pillowcase becomes the liner and faux leather handles are sewn on to complete the bag.

Triangle
Make 2 with Yarn A and 2 with Yarn B
Row 1 (RS) MR, beg tr, 3dc, 1tr, 3dc, 1tr, turn. [3 tr, 6 dc]
Row 2 (Beg tr, 2dc) in first st, 1dc in all sts up to tr, (2dc, 1tr, 2dc) in tr st, 1dc in all sts to final st, (2dc, 1tr) in final st, turn. [3 tr, 14 dc]
Rows 3-9 Rep Row 2. [3 tr, 70 dc]
After Row 9, cut yarn and weave ends. Triangle complete.


Join Triangles
Step 1: Make Row 10 on both Yarn B Triangles as follows: Holding Triangle with RS facing, join Yarn C with ss in first st, (beg tr, 3dc) in same st, [sk2, 3dc in next st] 11 times, (3dc, 1tr, 3dc) in tr st, [sk2, 3dc in next st] 11 times, (3dc, 1tr) in final st, cut yarn and weave ends. [3 tr, 78 dc]
Step 2: Line up Triangles as shown in diagram above. Make Row 10 on Yarn A Triangles just as for Yarn B Triangles, but make PLT Join after each stitch to join Triangles together as follows: Holding Triangle 1 (see diagram) with RS facing, join Yarn C with ss in first st, beg tr in same st, release working lp from hook, insert hook front to back in corresponding adjacent st on Triangle 3, grab lp, Pull Loop Through to front of work to join – PLT Join made (See “Photos of PLT Join” section below), 3dc in same st making PLT Join after each st, sk2, 3dc in next st making PLT Join after each st, continue in this manner, working Row 10 as for Yarn B Triangles, making PLT Join after each stitch to Join as-you-go. When end of this side of Triangle 3 is reached, pick up Triangle 4 and continue joining. See photos below as a guide. Triangles are numbered for clarity.
See diagram below for clearer picture of joining.


Step 3: When the final st of first side of Triangle 4 has been joined, pick up second Yarn A Triangle and work Row 10 as before, making PLT Join after each stitch to join as-you-go to second side of Triangle 4. When end of this side is reached, fold work so it makes a tube, bringing Triangle 3 around to join, work across Triangle 3, making PLT Join as you go. This is thr final step to join the Triangles together. When Triangles are completely joined to make a tube, cut yarn and weave ends.
Photos of PLT Join
- Photo 1: Release working lp from hook and insert hook front to back through corresponding adjacent st
- Photo 2: Grab working lp
- Photo 3: Pull Loop Through to front of work to join

![]() Granny Stitch Band
Granny Stitch Band
Note: This portion is worked in the round, working up from the top of the Triangles tube. See photo below.

Rnd 1 Holding Triangle tube with RS facing and Yarn A Triangles at the top, and treating tr sts as chain spaces, join Yarn C with ss in a ch-sp close to the side of the bag, beg dc in same sp, 3dc in all ch-sps around to beg, 2dc in first ch-sp, ss in beg dc. – 120 dc
Rnd 2 Beg dc between beg dc and first dc of Rnd 1 working into the space between 3-dc groups, 3dc between all 3-dc groups around to beg, 2dc in same spot as beg dc, ss in beg dc. – 120 dc
Rnds 3 and 4 Rep Rnd 2. Cut yarn and weave ends after Rnd 4.
![]() Granny Square Band
Granny Square Band
Note: Bottom edge of first 4-Round Granny Squares is joined to the Granny Stitch Band as-you-go on the final round with PLT Join. Remaining 7 Granny Squares are joined as-you-go on 2 sides to the previous Granny Square and the Granny Stitch Band.

First Granny Square
Rnd 1 With Yarn D, MR, beg dc, [2dc, 2ch, 1dc] 4 times omitting final dc, ss in beg dc, cut yarn. – 12 dc, 4 sp
Rnd 2 Join Yarn E with ss in any sp, beg dc in same sp, [2ch, 3dc in same sp, 3dc in next sp] 4 times omitting final dc, ss in beg dc, cut yarn. – 24 dc, 4 sp
Rnd 3 Join Yarn D with ss in any sp, beg dc in same sp, [2ch, 3dc in same sp, 3dc between 3-dc groups, 3dc in next sp] 4 times omitting final dc, ss in beg dc, cut yarn. – 36 dc, 4 sp
Rnd 4 (Joining Round) Join Yarn E with ss in any sp, beg dc in same sp, [2ch, 3dc in same sp, 3dc between next 2 3-dc groups, 3dc in next sp] 4 times omitting final dc, making PLT Join after every st on third side of square to join to Granny Stitch Band as-you-go. See joining diagram below for clarity. Ss in beg dc, cut yarn and weave all ends. – 48 dc, 4 sp
Second – Seventh Granny Squares
Rnds 1-3 Work as for First Granny Square, but alternate colors for each square as seen in bag photos.
Rnd 4 Join Yarn D/E with ss in any sp, work as for First Granny Square, making PLT Join after every st on second side to join to adjacent Granny Square, and third side to join to Granny Stitch Band. Complete round as normal, cut yarn and weave ends.
Eighth Granny Square
Rnds 1-3 Work as for First Granny Square, but alternate colors for each square as seen in bag photos.
Rnd 4 Join Yarn D with ss in any sp, work as for First Granny Square, making PLT Join after every st on second side to join to Seventh Granny Square, third side to join to Granny Stitch Band, and fourth side to join to First Granny Square. Complete round as normal, cut yarn and weave ends.
Granny Square Joining Schematic

![]() Top Border Band
Top Border Band

Rnd 1 Join Yarn E with ss in a Granny Square ch-2 sp near the side of the bag, 1sc in same sp, [12sc, 1sc in sp, sc2tog over same and next sp as follows: insert hook in same sp, pull up lp, insert hook in next sp, pull up lp, yoh, draw yarn through all 3 lps on hook, sc in same sp] 8 times omitting final sc, ss in first sc. – 8 sc2tog, 112 sc
Rnd 2 Ss in next st, (beg dc, 2dc) in next st, [sk2, 3dc in next st] 39 times, ss in beg dc. – 120 dc
Rnd 3 Sc in next st and in all sts around, ss in first sc, cut yarn and weave ends. – 120 sc
Rnd 4 Join Yarn D with ss in next st, sc in same st and all sts around, ss in first sc.
Rnds 5 and 6 Rep Rnds 2 and 3, cut yarn and weave ends.
![]() Line Bag
Line Bag

Step 1: Cut old pillow case so it will fit inside your bag, making sure to preserve side seam and bottom seam. Sew up other side seam to complete lining. You can use a “back stitch” as it is very easy to learn from YouTube and holds strong.
Step 2: Place lining inside your bag and neatly work back stitch, taking care to fold raw edge of pillow case in as you go. Perfection is the enemy of finished, so do take care, but don’t stress over it. You can see mine is not the neatest thing. I live by the motto “start where you’re at”, which means each time I hand sew something, my stitching will improve! Yay!
Step 3: Knot and sew in any hanging threads and admire your handiwork!
![]() Add Handles
Add Handles
Step 1: Make sure your handles are pre-punched where they are to be sewn on the bag. Those holes will make it a snap to sew the handles on. These are the ones I used – from Amazon. (affiliate)
Step 2: Space your handles appropriately, and sew them on, using your back stitch. Take care to keep things neat on the inside of the bag – this is optional but will look neater.
Step 3: Knot and sew in any hanging threads.
Enjoy your new bag! This will last a long, long time as Scheepjes Mighty yarn is very durable. Give yourself a fist bump!
FIN!

Copyright Information
No pattern or other material may be reproduced — mechanically, electronically, or by any other means, including photocopying — without written permission of Rachele Carmona. This applies to all content on CypressTextiles.net, BabyLoveBrand.net, and all other sites used by Rachele Carmona including social media. Paid patterns are for personal use only. You may sell your finished crocheted items.
Pin this Pattern!

Thank you for stopping in for this freebie!
Until then, happy crafting,
Rachele C.