
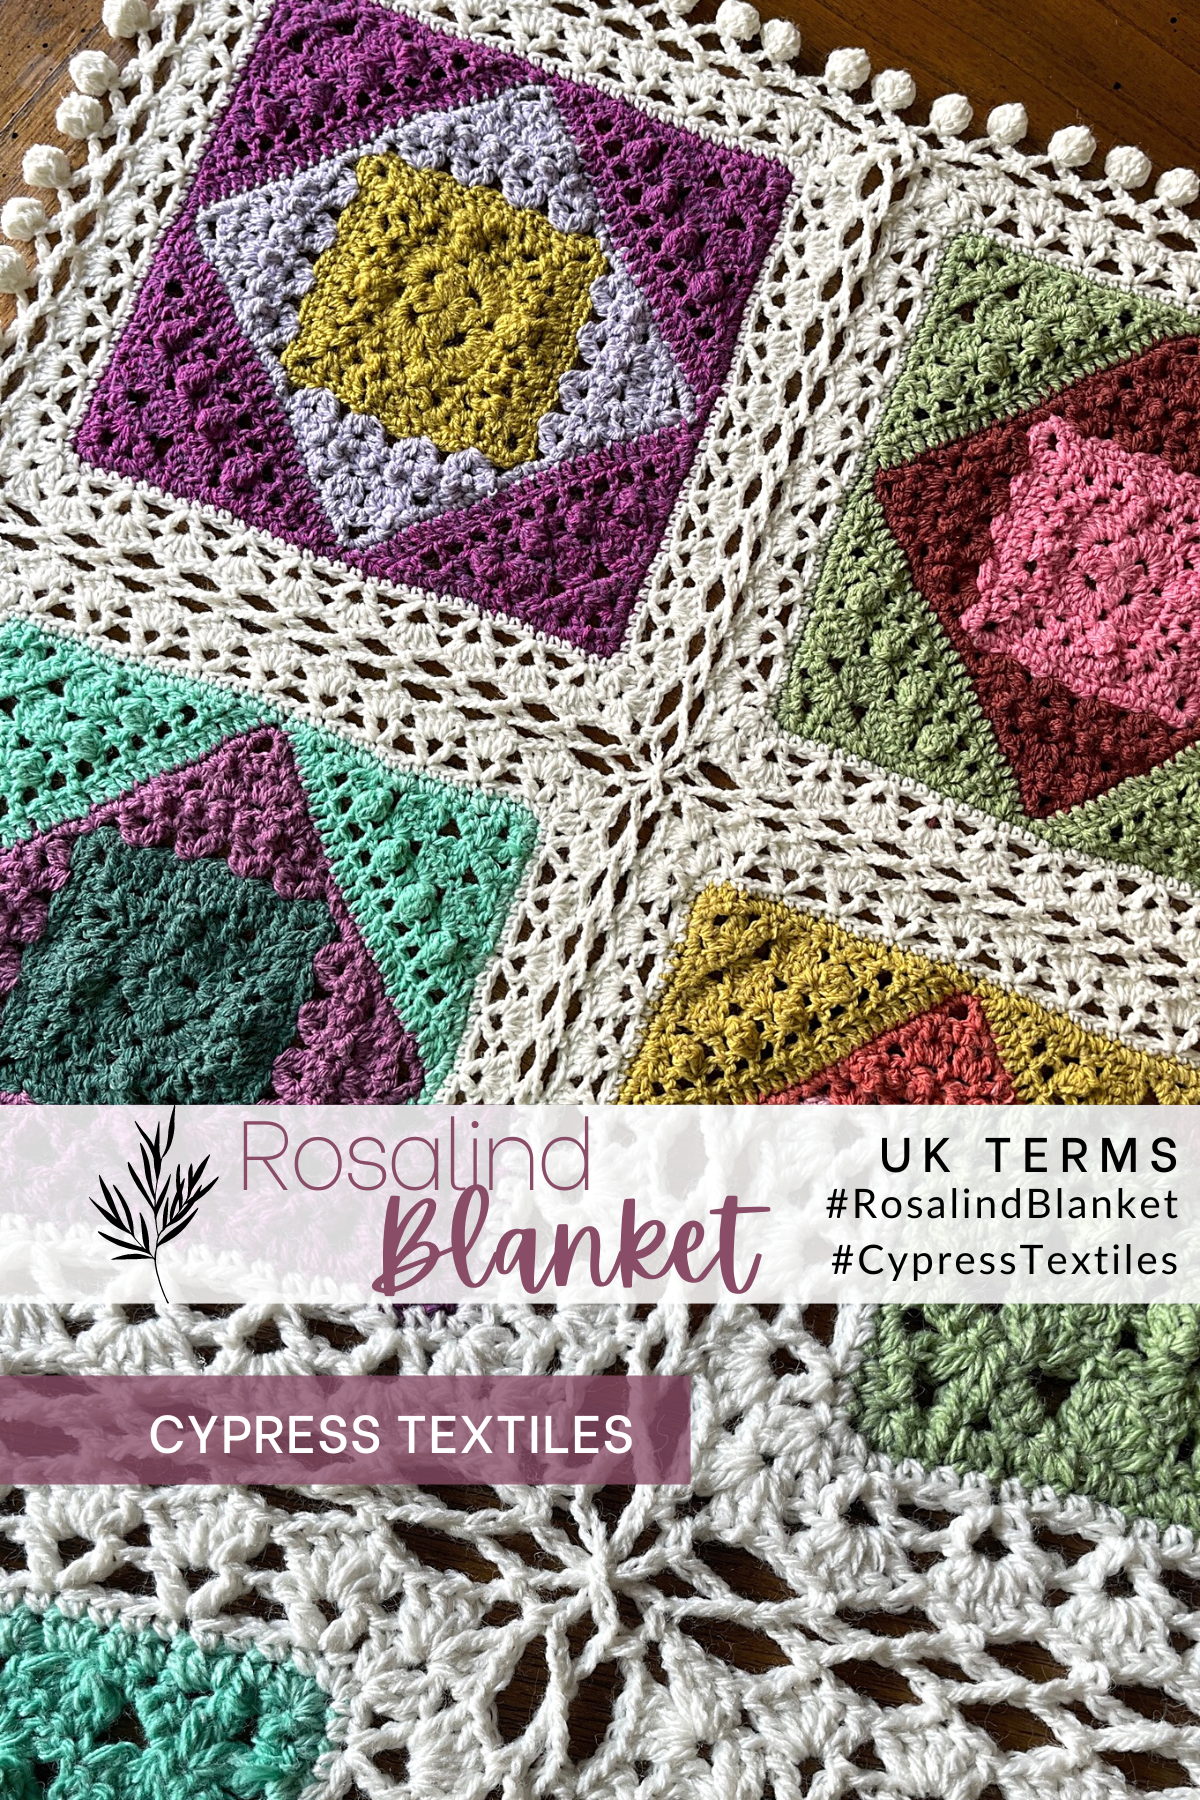
Hello lovely crafter! I can’t believe the Colour Lab CAL is already over, but there is a way to ride the wave for a little while longer. With every Scheepjes CAL there is a small bonus pattern, and today I want to share mine with you. I wrote the Rosalind Motif just for you all, and I hope you enjoy it!
This motif is a great way to use up leftover remnants of your Scrumptious Kit if you got one, or just add it to your pattern collection as a freebie on me.
The name comes from British chemist and X-ray crystallographer, Rosalind Franklin, whose work was central to the understanding of the molecular structures of DNA. Unfortunately, her discovery of the structure of DNA went largely unrecognized during her life, as others took credit for her works.
More Free Pattern Versions
- Click here for US Terms
- Click here for German language version
- Click here for Dutch language version
- Video version: The video link is after the written/photo version
PDF Format
The condensed PDF version of this pattern is available for convenient printing on Etsy and Ravelry, and the English Language US Terms and UK Terms versions are included in the purchase.

Related Links
As these sites become live, I will hyperlink them.
- Main Page with yarny info, kit info, and more
- Colour Lab CAL Blog Posts UK Terms: Main Page, Part 1, Part 2, Part 3, Part 4, Part 5, Part 6, Part 7 US/UK Terms, Part 8 US/UK Terms, Bonus Project
- Colour Lab CAL Blog Posts US Terms: Main Page, Part 1, Part 2, Part 3, Part 4, Part 5, Part 6, Part 7 US/UK Terms, Part 8 US/UK Terms, Bonus Project
- The Scheepjes website page for the CAL
- Scheepjes official Tips and Tricks PDF
- My Tips and Tricks Post US Terms with some photo tutorials of tricky stitches
- My Tips and Tricks Post UK Terms with some photo tutorials of tricky stitches
- Scheepjes International Facebook Group
- Scheepjes Dutch Facebook Group
- YouTube videos for the CAL (Videos are in UK Terms): Right-Handed // Left-Handed
- Ravelry Pattern Page
- USA: Jimmy Beans Wool Metropolis Kit / Scrumptious Kit
- UK/Worldwide: WoolWarehouse Metropolis Kit / Scrumptious Kit
- View the Scheepjes Shops page to find a retailer near you!

Where to Find Me
- Instagram: @cypresstextiles
- Facebook Page: CypressTextiles
- YouTube Channel: Rachele Carmona
- Pinterest: CypressTextiles
- Tumblr: CypressTextiles
- Etsy: CypressTextiles
- Ravelry: Rachele Carmona
- Teachable: Creative Art Blanket Course
PDF Format
The condensed PDF version of this pattern is available for convenient printing on Etsy and Ravelry, and the English Language US Terms and UK Terms versions are included in the purchase.

Project Details
- Skill Level Adventurous Beginner
- Measurements Approximately 9x9in before blocking (Gauge is not necessary for this project)
- Materials Scheepjes Scrumptious Yarn, Size 3.5mm Crochet Hook
- Social Media Instagram, Facebook, Twitter, Pinterest, Etsy, Ravelry: CypressTextiles
- Hashtags #RosalindBlanket #CypressTextiles
Yarn + Affiliate Links
Shopping through these links will gain me a small commission to support CypressTextiles, at no additional cost to you! Yarn amounts are given for Colour Crafter Yarn and Scrumptious Yarn. The Scrumptious Yarn is also an alternate colorway.

Scheepjes Scrumptious Yarn
Motifs:
- 1 Scrumptious Kit: Jimmy Beans Wool – 50% off while supplies last!
- Or at least 9 x 100g balls of Scrumptious in different colors from WoolWarehouse
Joining and Border:
- 6 x 100g balls of Scrumptious in color 302 Buttercream Icing

Repeat and Bracket Guide
Square brackets [ ] are used for small repeats: 4dc, [2dc, 3tr, 2dc] 2 times
Asterisks *are used for repeats that include small repeats: *5dc, [1ch, 1dc] 3 times in next ch, rep from * 3 times
Round brackets ( ) are used when a string of stitches are worked into the same spot: (3tr, 3ch, 3tr) in next st
Stitch Counts are given at the end of rows where necessary, in the following format: [12 dc, 3 sp]

Tips and Notes
- Weave your ends after each time you cut the yarn to avoid having to do them all at the end.
- Please read the stitch guide for any abbreviations.
- To get a neater result, I do not “chain up” for the first sc of the round/row. Jump straight into the first sc.

Stitch Descriptions (UK Terms)
- 2tr-cl 2 treble crochet cluster: (yoh, insert hook in st/sp, yoh, pull up lp, yoh, draw through 2 lps) twice, yoh, draw through 3 lps
- 3tr-cl 3 treble crochet cluster: (yoh, insert hook in st/sp, yoh, pull up lp, yoh, draw through 2 lps) 3 times, yoh, draw through 4 lps
- 4tr-cl 4 treble crochet cluster: (yoh, insert hook in st/sp, yoh, pull up lp, yoh, draw through 2 lps) 4 times, yoh, draw through 5 lps
- beg beginning
- beg 2tr-cl beginning 2 treble crochet cluster:(beg tr, 1tr) in st/sp indicated – when joining round, ss into full tr st
- beg 4tr-cl beginning 4 treble crochet cluster: (beg tr, 3tr-cl) in same st/sp – counts as 1 4tr-cl
- beg dtr beginning double treble crochet: (1dc, ch2) – counts as 1 dtr
- beg tr beginning treble crochet: (1dc, ch1) – counts as 1 tr
- beg tr2tog beginning treble crochet 2 together to decrease by 1 st:beg tr, 1tr in next st – join in full tr to finish round
- beg tr3tog beginning treble crochet 3 together to decrease by 2 sts:beg tr, (yoh, insert hook in next st/sp, yoh, pull up lp, yoh, draw through 2 lps) twice, yoh, draw through 3 lps on hook – join in full decrease to finish round
- ch(s) chain stitch(es)
- ch-sp(s) chain space(s)
- dc double crochet
- dtr double treble crochet
- lp(s) loop(s)
- pc popcorn: 4tr in st/sp, remove lp from hook, insert hook from front to back through first tr, pick up lp, draw through to front of work to close st
- rep(s) repeat(s)
- RS right side
- sp(s) space(s)
- ss slip stitch(es)
- st(s) stitch(es)
- tr treble crochet
- tr2tog treble crochet 2 together to decrease by 1 st:(yoh insert hook into next st/sp, yoh, pull up lp, yoh, draw through 2 lps) twice, yoh, draw through 3 lps on hook
- tr3tog treble crochet 3 together to decrease by 2 sts:(yoh insert hook into next st/sp, yoh, pull up lp, yoh, draw through 2 lps) 3 times, yoh, draw through 4 lps on hook
- WS wrong side
- yoh yarn over hook

Instructions
Make 30 motifs, then join as per instructions using my Celtic Lace Join. Add the pompom border to complete the piece.
The following are written and photo instructions. Scroll down for Video Instruction link. The video is spoken in US Terms.
Motif (MAKE 30)
Base Square

Ch3, ss in third ch from hook to make ring.
Round 1 (RS) Beg 4tr-cl, (ch4, 4tr-cl) 3 times, ch4, ss in beg 4tr-cl to join. [4 4tr-cl, 4 ch-sps]

–

–

–

–

–

Round 2 (RS) Beg tr in first ch-sp, 6tr in same ch-sp, ch1, (7tr in next ch-sp, ch1) 3 times, ss in beg tr. [28 tr, 4 ch-1 sps]

–

Round 3 *1dc in next st, ch3, sk 1 st, (1dc, ch5, 1dc) in next st, ch3, sk 1 st, 1dc, ch3, pc in ch-1 sp, ch3, sk 1 st; rep from * 3 more times, ss in first dc. [4 pc, 16 dc, 20 ch-sps]

–

Round 4 Ss in first ch of ch-sp, 1dc in same ch-sp, *ch3, (1dc, ch3, 1dc) in ch-5 sp, (ch3, 1dc in next ch-sp) 4 times; rep from * 3 more times omitting final dc, ss in first dc. [24 dc, 24 ch-sps]

–

–

Round 5 Ss in first ch of ch-sp, beg tr in same ch-sp, *1tr in same sp, (2tr, ch3, 2tr) in corner sp, 2tr in next 2 ch-sps, 3tr in next ch-sp, 2tr in next ch-sp, 1tr in next ch-sp; rep from * 3 more times omitting final tr, ss in beg tr. [60 tr, 4 ch-sps]

–

–

Round 6 (3dc, 5dc in next ch-sp, 12dc) 4 times, ss in first dc. [80 dc]

–

Fasten off and weave in ends.
Inner Fill Triangles

These are joined to edges of Base Square.
Row 1 (RS) Join yarn with ss in any corner dc of Base Square, beg tr in same st, *sk 3 sts, (2tr-cl, ch2, 2tr-cl) in next st, ch1; rep from * 3 more times omitting final ch1, 1tr in final st (the cnr st), turn. [8 2tr-cls, 2 tr, 7 ch-sps]

–

Row 2 (WS) 3dc in ch-2 sp, (1dc in ch-1 sp, 3dc in ch-2 sp) 3 times, turn. [15 dc]

Note: dtr sts on Row 3 form tiny bobbles on RS of work; push each dtr forward to RS.
Row 3 (RS) 1dc in next st, (1dtr, 1dc) 6 times, turn. [6 dtr, 7 dc]

Row 4 (WS) Ss in first dtr, (1dc in next dc, ch2) 4 times, 1dc in next dc, turn. [5 dc, 4 ch-sps]

Row 5 (RS) Ss in first ch of ch-sp, beg tr in same ch-sp, (ch1, 2tr-cl in next ch-sp) twice, ch1, 1tr in next ch-sp, turn. [2 2tr-cl, 2 tr, 3 ch-sps]

Row 6 (WS) 1dc in next ch-sp, 2dc in next ch-sp, 1dc in next ch-sp, turn. [4 dc]

Row 7 (RS) 1dc in first st, ch3, 1dc in final st, do not turn. [2 dc, 1 ch-sp]

Fasten off and weave in ends.
Rep Inner Fill Triangle for 3 remaining sides of Base Square.

Edging round (RS) Join yarn with ss in any corner sp, (3dc in corner sp, 2dc in dc, 2dc around front posts of next 2 tr, 1dc in next 4 sts, 2dc in next tr, 1dc in corner st of Base Square, 2dc in next tr, 1dc in next 4 sts, 2dc in next 2 tr, 2dc in next dc) 4 times, ss in first dc to join. [112 dc] Fasten off and weave in ends.

–

–

Fasten off and weave in ends.
Outer Fill Triangles

These are joined to edges of Inner Fill Triangles.
Row 1 (RS) Join yarn with ss in any corner dc of an Inner Fill Triangle, beg tr3tog over first 3 sts, 23tr, tr3tog, turn. [2 tr3tog, 23 tr]

–

Row 2 (WS) beg Tr3tog over first 3 sts, (ch1, sk 1 st, 1tr) 9 times, ch1, sk 1 st, tr3tog, turn. [2 tr3tog, 9 tr, 10 sp]

Row 3 (RS) beg Tr3tog over first 3 sts/sps, (ch1, pc in next tr, ch1, 1tr in next tr) 4 times omitting final tr, tr3tog over final 3 sts/sps, turn. [2 tr3tog, 4 pc, 3 tr, 8 ch-sps]

Row 4 (WS) Beg tr2tog over first st/sp, 4tr in next 3 tr, tr2tog over final st/sp, turn. [2 tr2tog, 12 tr]

Row 5 (RS) Beg tr, (tr4tog, ch3) twice, tr4tog, 1tr in final st, turn. [3 tr4tog, 2 tr, 2 ch-sps]

Row 6 (WS) (1dc, 3dc in ch-sp) twice, 1dc, turn. [9 dc]

Row 7 (RS) Beg tr in next st, sk 2 sts, (2tr-cl, ch3, 2tr-cl) in next st, sk 2 sts, 1tr, turn. [2 2tr-cls, 2 tr, 1 ch-sp]

Row 8 (WS) 3dc in ch-sp, turn. [3 dc]

Fasten off and weave in ends.
Rep Outer Fill Triangle for 3 remaining Inner Fill Triangle sides.
Border round (RS) Join yarn with ss in any corner dc, (3dc in corner st, 1dc, 2dc in tr st, 1dc in next 2 sts, 2dc in next 2 tr, 3dc in outer ‘leg’ of next 2 tr3tog, 2dc in next tr3tog, 1dc in corner st of previous Border round, 2dc in next tr3tog, 3dc in next 2 tr3tog, 2dc in next 2 tr, 1dc in next 2 sts, 2dc in next tr, 1dc) 4 times, ss in first dc to join. [152 dc]

Video Instruction
Video is spoken in English and in US Terms.
Join Squares
Refer to Joining Schematic for numbered motif joining order and placement of first corner.
JOINING SCHEMATIC

Motif 1

Round 1 (RS) Join Background color with ss in any corner st, [3dc in corner st, 1dc in all sts across to next st] 4 times, ss in first dc. [160 dc]

Round 2 Beg tr in corner st, * ch1, 2tr in same st, [(1tr, ch2, 1tr, ch1) in next st, sk3] 10 times omitting final ch1, 2tr in corner st, rep from * 3 times omitting final tr, ss in beg tr. [96 tr, 80 sp]

Round 3 Beg tr in corner sp, [ch3, 3tr in same sp, 5tr in each ch-2 sp across to next corner sp, 3tr in corner sp] 4 times omitting final tr, ss in beg tr. [224 tr, 4 sp]

Round 4 Ss in ch-sp, * (1dc, ch5, 1dc) in corner sp, ch5, sk5, [1dc, ch5, sk4] across to next corner ch-sp, rep from * 3 times, ss in first dc, fasten off and weave ends. [48 dc, 48 sp]

For all remaining motifs, joining as you go will occur on the fourth round. Stitch counts will remain the same, but PLT Join will be performed as instructed.
Motifs 2-5

Rounds 1-3 Work as for Motif 1.
Round 4 Work as for Motif 1 up to third corner, Join Corner as follows: 1dc in corner sp, ch2, make PLT Join as follows: remove lp from hook, insert hook front to back through arrow indicated corner, grab lp, Pull Loop Through to front of work – PLT Join made, ch3, 1dc in same corner sp – Join Corner complete, Join Side as follows: ch2, PLT in corresponding ch-sp on adjacent completed motif, ch3, sk5, [1dc, ch2, PLT as before, ch3, sk4] 10 times – Join Side complete, work fourth corner and fourth side without joining, ss in first dc, fasten off and weave ends.

–

–

–

–

–

–

–

–

–

Motif 6

Rounds 1-3 Work as for Motif 1.
Round 4 Work as for Motif 1 up to second corner, Join Corner, Join Side, Join Corner, work third side, fourth corner, and fourth side without joining, ss in first dc, fasten off and weave ends.
–

–

–

–

–

–

–

–

–

Motifs 7-10
Rounds 1-3 Work as for Motif 1.
Round 4 Work as for Motif 1 up to second corner, Join Corner, Join Side, Join Corner, Join Side, work fourth corner, and fourth side without joining, ss in first dc, fasten off and weave ends.

–

–

–

–

–

–

–

–

–

–

–

–

Motifs 11-26
Continue to join following applicable instructions for Motifs 6-10.
Motifs 27-30
Rounds 1-3 Work as for Motif 1.
Round 4 Work as for Motif 1 up to second corner, Join Corner, Join Side, Join Corner, Join Side, Join Corner, work fourth side without joining, ss in first dc, fasten off and weave ends.
Blanket Border
Border is just one round and is worked with the WS of the blanket facing.

Special Stitches
- 5trcl: (yoh, insert hook, yoh, pull up lp, yoh, pull yarn through 2 lps on hook) 5 times, yoh, pull yarn through all lps
- pompom: (ch3, 5trcl in third ch from hook) 2 times, ss in same ch as first 5trcl – Note: This final ss will fold the second 5trcl over the first 5trcl, creating the pompom
- special dc2tog: insert hook in first corner sp, yoh, pull up lp, insert hook in second corner sp, yoh, pull up lp, yoh, pull yarn through all 3 lps

Work Border Round as follows: (WS) Join background color with ss in any corner sp, ** 1dc in same corner sp, * [ch3, make pompom, ch3, 1dc in next ch-sp] 11 times, ch3, make pompom, ch3, make special dc2tog, rep from * 4 times omitting final special dc2tog, 1dc in corner sp, ch3, make pompom, ch3, rep from ** 3 times, ss in first dc, fasten off and weave ends.

Fasten off and weave in ends.
Yay! All done! Give yourself a fist bump!
Copyright Information
No pattern or other material may be reproduced — mechanically, electronically, or by any other means, including photocopying — without written permission of Rachele Carmona. This applies to all content on CypressTextiles.net, BabyLoveBrand.net, and all other sites used by Rachele Carmona including social media. Paid patterns are for personal use only. You may sell your finished crocheted items, but do not use my photos to sell your items.
RACHELE CARMONA
Crochet Designer & Fiber Artist
More Free Pattern Versions
- Click here for US Terms
- Click here for German language version
- Click here for Dutch language version
PDF Version
Coming soon!
The condensed PDF version of this pattern is available for convenient printing on Etsy and Ravelry, and the US Terms, UK Terms, German, and Dutch PDFs are included in the purchase.
Happy crafting,
Rachele C.
You may also enjoy:
Support My Work
You’re supporting by just being here! You can read my blog (Start Here!), like and comment on socials, and message me for a chat. All of this supports my work free of charge!
- Affiliate links – Shopping through my links supports me at no additional cost to you as I get a small commission through my affiliates. Jimmy Beans Wool // WoolWarehouse // Amazon.com
- Buy my pattern book – I wrote a super neat crochet blanket pattern book, published under Penguin Random House. You can buy it here!
- Browse my self-published patterns – I have over a hundred patterns on Etsy and Ravelry
- Creative Art Blanket Course – Check it out on Teachable
Where to Find Me
- Instagram: @cypresstextiles
- Facebook Page: CypressTextiles
- YouTube Channel: Rachele Carmona
- Pinterest: CypressTextiles
- Tumblr: CypressTextiles
- Etsy: CypressTextiles
- Ravelry: Rachele Carmona
- Teachable: Creative Art Blanket Course