
Hello, and a huge welcome to this week of the 2026 Vibrant Vintage Crochet-A-Long (VVCAL)! I’m so glad you’re here! I love spending this time with the VVCAL community. We are going to have so much fun relaxingly working through these motifs each week.
Quick Links to Each Week: 1/2/3/4/5/6/7/8/9/10/11/12/13/14/15/16/17/18/19/20
PDF Version
2026 VVCAL PDF is now available! In US and UK terms
- 36 hexies to mix and match
- 3 Joining methods
- Wide Lace Border
- US and UK Terms included
MEGA PACK! Of course I have also created a value bundle for you – 2022, 2024, and 2026 VVCAL PDFs US and UK Terms – Hexagon VVCAL Mega Pack Available on:
What to Expect Today
- 2 blog posts: This week’s instructions post with details for Joining Suggestions.US and UK Terms
- Patterns include: written instructions in US and UK Terms.
Social Media Hashtags: #VVCAL and #CypressTextiles

–
2026 VVCAL Quick Links
- 2026 VVCAL Main Information Page
- 2026 VVCAL FAQ Tips & Tricks Page
- 2026 VVCAL Ravelry ebook Motifs link back to their blog posts. Favorite the hexagon, add it to your Ravelry queue, see others’ projects, and more!
- Vibrant Vintage CAL (Official) Facebook Group Post VVCAL WIP/FO pics, ask questions, post your FO pic of the previous years’ VVCAL blankets.
- CypressTextiles Tree Huggers Facebook Group – This is my main FB group (join!). Share your VVCAL progress pics in this group if you like, and I will share CAL highlights here, but the weekly action will be in the other group linked above.
- YouTube Channel (Subscribe!) – Here I will be posting CAL pattern videos weekly for the duration of the CAL.
New 2026 VVCAL Procedures
I am running the VVCAL a little differently this year, and a little more relaxed, and more in line with my energy level. and current attention span. Each week, I will be working on my demo hexies, but I will only show one example of the motifs, and you can work along with whichever demo blanket you’d like. Head to the main page to choose a demo blanket to follow along with, based on yarn thickness or layout size.
As I stated, I am only working up 3 demos this year, as opposed to the 6 or so in the past, but each week, I will still give the motif count info for the demos that I am not myself making.
In the past, for the layouts, I have given color numbers of each motif, however, the final layouts for the packs are based solely on the color, and not the “design” of the motif. The designs are completely scattered randomly through the layouts, and so they can truly be any color. For the non-pack color palette demos, the color placement has always been evenly dispersed, and randomly laid out. Because of these facts, I will no longer be providing color numbers for motifs. If you’re using a pack, simply choose any colors for the motifs, and if you’re not using a pack, be sure to use the colors up evenly.
Yes, this means our projects won’t all look alike, but – is this a safe space? – I don’t love it when there’s a CAL and the photos are a sea of identical projects. One of my favorite things about the VVCAL is seeing all of the varied WIPs.
Regarding videos, I am still deciding if I will be making videos for the motifs this year. If you’ve been following me for any length of time, you know the videos are the hardest part for me, and so I’ll decide by next week if I am going to provide them or not.
Thank you for understanding these changes! I’m perimenopausal and my brain is wilding.. So I’ve made these changes to protect my peace and sanity lol..
Here are the three Joining Method suggestions:
Use layouts from beginning of PDF file to lay your motifs out, ready to join using my either my Double Crochet with PLT Join, Granny Stitch Continuous JAYG or Continuous Flat Braid JAYG for Hexagons, depending on the demo you are working. You can sub in any join, but adjust yarn quantity as necessary.
Double Crochet JAYG for Hexagons
–
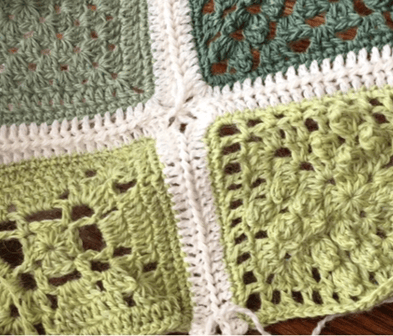
Join motifs in the order that they are shown numbered in the schematic below. Note the first motif is worked complete without joining. Photo shows an approximation of the join – demo uses square motifs.
Joining Schematic

–
Key:
- Green Circle = Start/End of final round
- Blue Circle = First corner of joining side
- Blue Line = Joining side
- Purple Circle = Second, third, or fourth corner of joining side
- Red Circle = Final corner of joining side
- H1/2/3 = Half Hexagon Motifs
- Orange Circle = Start of Half Hexagon
- Maroon Circle = End of Half Hexagon
Special Stitches
PLT Pull Loop Through: Release lp from hook, insert hook into corresponding adjacent st or sp on completed motif, grab lp, Pull Loop Through the st to the front of the work. Do not slip st or chain. Simply carry on with the next st as normal.
Join as you go Instructions
Note: As shown in Layout Schematic, the amount of hexies going across making a zig-zag formation will vary. The Joining Schematic only shows 5 hexagons across. This is for demonstration purposes only. All Hexagon Motifs will be joined in the layout as shown in the Layout Schematic for the demo you are following.
Motif 1 (No Joining) Join MC with ss in any cnr sc, beg dc in same st, [ch1, 1dc in same st, 13dc, 1dc in cnr st] 6 times omitting final dc on sixth rep, ss in beg dc, cut yarn.
Note: On all subsequent motifs, work first side plain, and then for sides that are joined to another motif, a PLT Join maneuver is worked after every st and cnr ch-sp. Where a cnr ch-sp meets two already joined ch-sp cnrs, insert the hook through both ch-sps to make the PLT.
Motifs 2-6 (1 Side Joined) Join MC with ss in any cnr sc, (beg dc, ch1, 1dc), 13dc, 1dc in cnr st, PLT in ch-sp, 1dc in same cnr st, [PLT, 1dc] 14 times, PLT, PLT in ch-sp, finish rem 4 sides plain without joining as for Motif 1, cut yarn.
Motif 7 (4 Sides Joined) Join MC with ss in any cnr sc, (beg dc, ch1, 1dc) in cnr st, 13dc, 1dc in cnr st, * PLT in ch-sps, 1dc in same cnr st, [PLT, 1dc] 14 times, PLT, rep from * 3 times, PLT in ch-sp, finish rem side plain and ss to join, cut yarn.
Join remaining motifs in this manner, until all full Hexagon Motifs are joined according to the Layout Schematic.
Join all Half Hexagon Motifs on final row in this manner:
Final row, H1 (as shown on Joining Schematic) Join MC with ss in first st, (beg dc, ch1, 1dc) in same st, 13dc, 1dc in cnr st, PLT, PLT in cnr ch-sp, 1dc in same cnr st, PLT, as with previous motifs on blanket body: join next side, work next cnr, join next side, (1dc in next cnr, PLT), PLT in ch-sp, 1dc in same cnr, cut yarn.
Join rem half hexagons onto blanket body in this manner, adjusting join to accommodate which sides are joined onto the blanket.
Fill the Triangle Gaps
The top and bottom edge of your blanket is a zig-zag making triangle gaps that should be filled to make a squared-off edge.
Row 1 With RS facing, join MC with ss in cnr sc of the motif at the right-hand side of the gap, 1sc in next 2 sts, 1hdc, 13dc, sk4, 13dc, 1hdc, 2sc, turn. [26 dc, 2 hdc, 4 sc]
Row 2 Ss in first 3 sts, 2sc, 1hdc, 9dc, sk2, 9dc, 1hdc, 2sc, turn. [18 dc, 2 hdc, 4 sc]
Row 3 Ss in first 3 sts, 2sc, 1hdc, 5dc, sk2, 5dc, 1hdc, 2sc, turn. [10 dc, 2 hdc, 4 sc]
Row 4 Ss in first 5 sts, 2sc, sk2, 2sc, cut yarn and weave ends.
Fill all triangle gaps until all sides of the blanket are squared off.
Single Crochet Border Foundation Round
Make sc border around the blanket as follows, before continuing to the border section.
SC Border Round: Join background yarn with ss in corner sc, [3sc in corner st, 1sc evenly in all sts across to next corner] 4 times, ss in first sc. Double check that opposing sides have an equal amount of sts and adjust as necessary.
Move on to “Blanket Border” section.
Granny Stitch Continuous JAYG for Hexagons
More on this join for a deeper dive and videos.
For this continuous join, all motifs are joined onto the blanket body, one row at a time, following a path that allows you to join continuously without cutting the yarn after every motif.
I have drawn this path at left for a visual This join starts and stops in the same corner of the blanket.

–
Note, in the schematic above, the top and bottom of the schematic are the right and left sides of your blanket.
Note: Below is a demo shown on flower motifs, the concept is the same, but the sts are placed in certain sc sts on your motifs, as indicated in the instructions.

–
Joining
Pick up Motif 1 as shown in schematic above: Join MC with ss in any cnr st, beg dc in same st, * ch1, 2dc in same st, sk2, 3dc in next st, [sk3, 3dc in next st] 2 times, 2dc in cnr st, rep from * 3 times, ch1
Pick up Motif 2: 2dc in cnr st, ss in between granny st “groups” on corrosponding adjacent motif, sk2, 3dc in next st, ss between granny st groups, [sk3, 3dc in next st, ss to join as before] 2 times, 2dc in cnr st, ss in cnr sp, 2dc in same st, work 3 sides plain without joining, ch1, and your work should look like the first photo below.
Join all rem motifs onto the row in the same manner until you reach the final motif in the row, which is Motif 3 in the schematic so I will refer to it as Motif 3 here for demo purposes.

–

–
Pick up Motif 3: Join 1 side as for Motif 2, work 2 sides plain as shown in schematic. Ch1,
Pick up Motif 4: Join 1 side, ss in cnr sp,
Pick up Motif 5: Join 1 side, ss through both cnr sps treating them as one, join second side, ss in cnr sp,
Continue joining with Motif 6 and all subsequnt motifs in this row until the top-most motif is reached, which is number 7 in the schematic.
Pick up Motif 7: Join 1 side, and work rem 5 sides plain, ss in cnr sp,
Join top side of Motif 6, and work rem 3 sides plain, ss in cnr sp,
Complete the sides of all rem motifs in this manner until bottom-most motif is reached, which is Motif 4 in the schematic.
Join top side of Motif 4 and work 1 side plain,
Join next row of motifs onto the blanket working in that zig-zag motion up the blanket until top-most motif is reached, which is Motif 10 in the schematic.
Pick up Motif 10 and join 2 sides, then work 4 rem sides plain,
Join all rem motifs to the blanket body as before, following the path in the schematic until all rows are joined onto the blanket. Once the bottom left motif is joined on, which is Motif 15 in the schematic, the rem 2 sides of the blanket are worked across, as shown in the schematic, until the starting point is reached. Join with ss in the starting beg dc, and cut yarn.
Fill the Triangle Gaps
The top and bottom edge of your blanket is a zig-zag making triangle gaps that should be filled to make a squared-off edge.
Row 1 With RS facing, join MC with ss in cnr sc of the motif at the right-hand side of the gap, 1sc in next 2 sts, 1hdc, 13dc, sk4, 13dc, 1hdc, 2sc, turn. [26 dc, 2 hdc, 4 sc]
Row 2 Ss in first 3 sts, 2sc, 1hdc, 9dc, sk2, 9dc, 1hdc, 2sc, turn. [18 dc, 2 hdc, 4 sc]
Row 3 Ss in first 3 sts, 2sc, 1hdc, 5dc, sk2, 5dc, 1hdc, 2sc, turn. [10 dc, 2 hdc, 4 sc]
Row 4 Ss in first 5 sts, 2sc, sk2, 2sc, cut yarn and weave ends.
Fill all triangle gaps until all sides of the blanket are squared off.
Single Crochet Border Foundation Round
Make sc border around the blanket as follows, before continuing to the border section.
SC Border Round: Join background yarn with ss in corner sc, [3sc in corner st, 1sc evenly in all sts across to next corner] 4 times, ss in first sc. Double check that opposing sides have an equal amount of sts and adjust as necessary.
Move on to “Blanket Border” section.
Continuous Flat Braid JAYG for Hexagons
Original post for more on the method if you need additional assistance. (Plus videos)
Lay Motifs out as shown in Schematic. I have made a video for this join, using an orange and blue blanket. Search “Rachele Carmona” on YouTube and you will find my channel.

Special Stitches for joining section only
PLT “Pull Loop Through” chain: remove working lp from hook, insert hook from front to back in adjacent/corresponding ch-lp on finished edge, and replace lp on hook. Pull Loop Through to front of work and complete 1 ch st.
FBJ Flat Braid Join: ch 1, PLT to adjacent ch-3 lp, ch1, sk2 or 1 as indicated in pattern, sc in next st.
Note: Your blanket is larger than the blanket in the schematic. Refer to motif numbers as they relate to your blanket, so for example, “Motif 4” in the schematic will refer to the bottom-most motif in that column of motifs, and so on.
Joining
Pick up motif 1: * (Sc, ch 3, sc) in cnr st, (ch3, sk2, sc) 2 times, ch3, sk1, sc, (ch3, sk2, sc) 1 time, ch3, rep from * 3 times, ch3,
Pick up motif 2: sc in cnr st, FBJ 5 times across, ch3, sc in same st, work 3 more sides plain without PLT join, ch3,
Join all rem motifs in this row onto the blanket body in this manner until final motif in the row is reached, which is Motif 3 in the schematic so I will refer to it as Motif 3 here for demo purposes.

Pick up Motif 3: Join 1 side as before, work 2 sides plain without joining, ch3,
Pick up motif 4, sc in corner st, FBJ 5 times, ch3.
Pick up motif 5, sc in corner st, FBJ 5 times, ch1, PLT through cnr ch-sps of Motifs 3 and 4, ch1, sc in same st as previous, FBJ 5 times, ch3.
Work across rem motifs in this row until the top-most motif is reached, which is Motif 7 in this schematic.
Pick up motif 7, sc in cnr st, FBJ 5 times, ch1, PLT through cnr ch-lp of Motif 1, ch1, sc in same st as previous, work rem 5 sides plain without joining, PLT in cnr sp on motif 1,
FBJ across top side of Motif 6, work rem 3 sides plain,
Work around rem motifs in this row until Motif 4 is reached.
Join across top side of Motif 4, work 1 side plain, ch3,
Join Motifs 8-10 onto the blanket, which will be your entire next row, in the same manner that motifs 5-6 were joined onto the blanket.
Work down the column, following the path as shown in the schematic to complete the sides of the motifs and join them all.
At this point, all of the skills needed to join rem motifs have been practiced, ending at the bottom right corner of Motif 15.
Move around the bottom edge and the right-hand edge of the blanket, making (ch3, sk2, sc) around. When a corner is met, sc in corner, ch1, ss in PLT, ch1, sc in corner of next motif. When beginning of join is reached, ss in first sc.
Join Half Hexagons to piece
Half Hexies where first 2 sides are joined: With MC, ss in first st, (sc, ch1, PLT, ch1, sc), (FBJ 5 times, ch1, FBJ, Ch1, sc in same st as previous) 2 times, work third side plain, ch3, sc in same corner, cut yarn.
Half Hexies where second 2 sides are joined: Work as for previous, but work your plain side first, and PLT join the next 2 sides, cut yarn.
Half Hexies where all 3 sides are joined: Work as for previous motifs, but PLT join all 3 sides, picking up all corners, cut yarn.
Fill Triangle Gaps
Turn blanket to the zig-zag side and begin on the right hand corner. Fill each individual “V” gap as follows:
Row 1 (RS) Using Yarn J, ss in corner ch-lp, (ch 3, sc in next ch-sp) 5 times, ch3, sk “valley” corners, (sc in next ch-sp, ch 3) 5 times, sc in corner ch-lp, turn.
Row 2 Ss in first ch, sc in same ch-sp, (ch 3, sc in next ch sp) 4 times, ch 3, sk “valley” sp, (sc in next ch-sp, ch 3) 4 times, sc in final ch-sp, turn.
Row 3 Ss in first ch, sc in same ch-sp, (ch 3, sc in next ch sp) 3 times, ch 3, sk “valley” sp, (sc in next ch-sp, ch 3) 3 times, sc in final ch-sp, turn.
Rows 4-5 Work in this manner, until only 3 ch-sps remain.
Row 6 Ss in first ch, sc in same ch-sp, ch 3, skip valley ch-sp, sc in final ch-sp, cut yarn.
Repeat for remaining “V” side gaps on both sides of blanket.
–
Thank you so much for stopping in for this week of the 2026 VVCAL! Be sure to share you progress on FB and IG, and Pin as well to share!

–
2026 VVCAL Quick Links
- 2026 VVCAL Main Information Page
- 2026 VVCAL FAQ Tips & Tricks Page
- 2026 VVCAL Ravelry ebook Motifs link back to their blog posts. Favorite the hexagon, add it to your Ravelry queue, see others’ projects, and more!
- Vibrant Vintage CAL (Official) Facebook Group Post VVCAL WIP/FO pics, ask questions, post your FO pic of the previous years’ VVCAL blankets.
- CypressTextiles Tree Huggers Facebook Group – This is my main FB group (join!). Share your VVCAL progress pics in this group if you like, and I will share CAL highlights here, but the weekly action will be in the other group linked above.
- YouTube Channel (Subscribe!) – Here I will be posting CAL pattern videos weekly for the duration of the CAL.
You may also enjoy these completed CALs
- VVCAL (2016)
- VVCAL (2018)
- VVCAL (2020)
- VVCAL (2022)
- VVCAL (2024)
- Dutch Rose CAL
- Botanica Blanket CAL
Happy crafting,
Rachele C.
Support My Work
You’re supporting by just being here! You can read my blog (Start Here!), like and comment on socials, and message me for a chat. All of this supports my work free of charge!
- Affiliate links – Shopping through my links supports me at no additional cost to you as I get a small commission through my affiliates. Jimmy Beans Wool // WoolWarehouse // Amazon.com
- Buy my pattern book – I wrote a super neat crochet blanket pattern book, published under Penguin Random House. You can buy it here!
- Browse my self-published patterns – I have over a hundred patterns on Etsy and Ravelry
- Creative Art Blanket Course – Check it out on Podia
Where to Find Me
- Instagram: @cypresstextiles
- Facebook Page: CypressTextiles
- YouTube Channel: Rachele Carmona
- Pinterest: CypressTextiles
- Tumblr: CypressTextiles
- Etsy: CypressTextiles
- Ravelry: Rachele Carmona
- Podia: Creative Art Blanket Course