
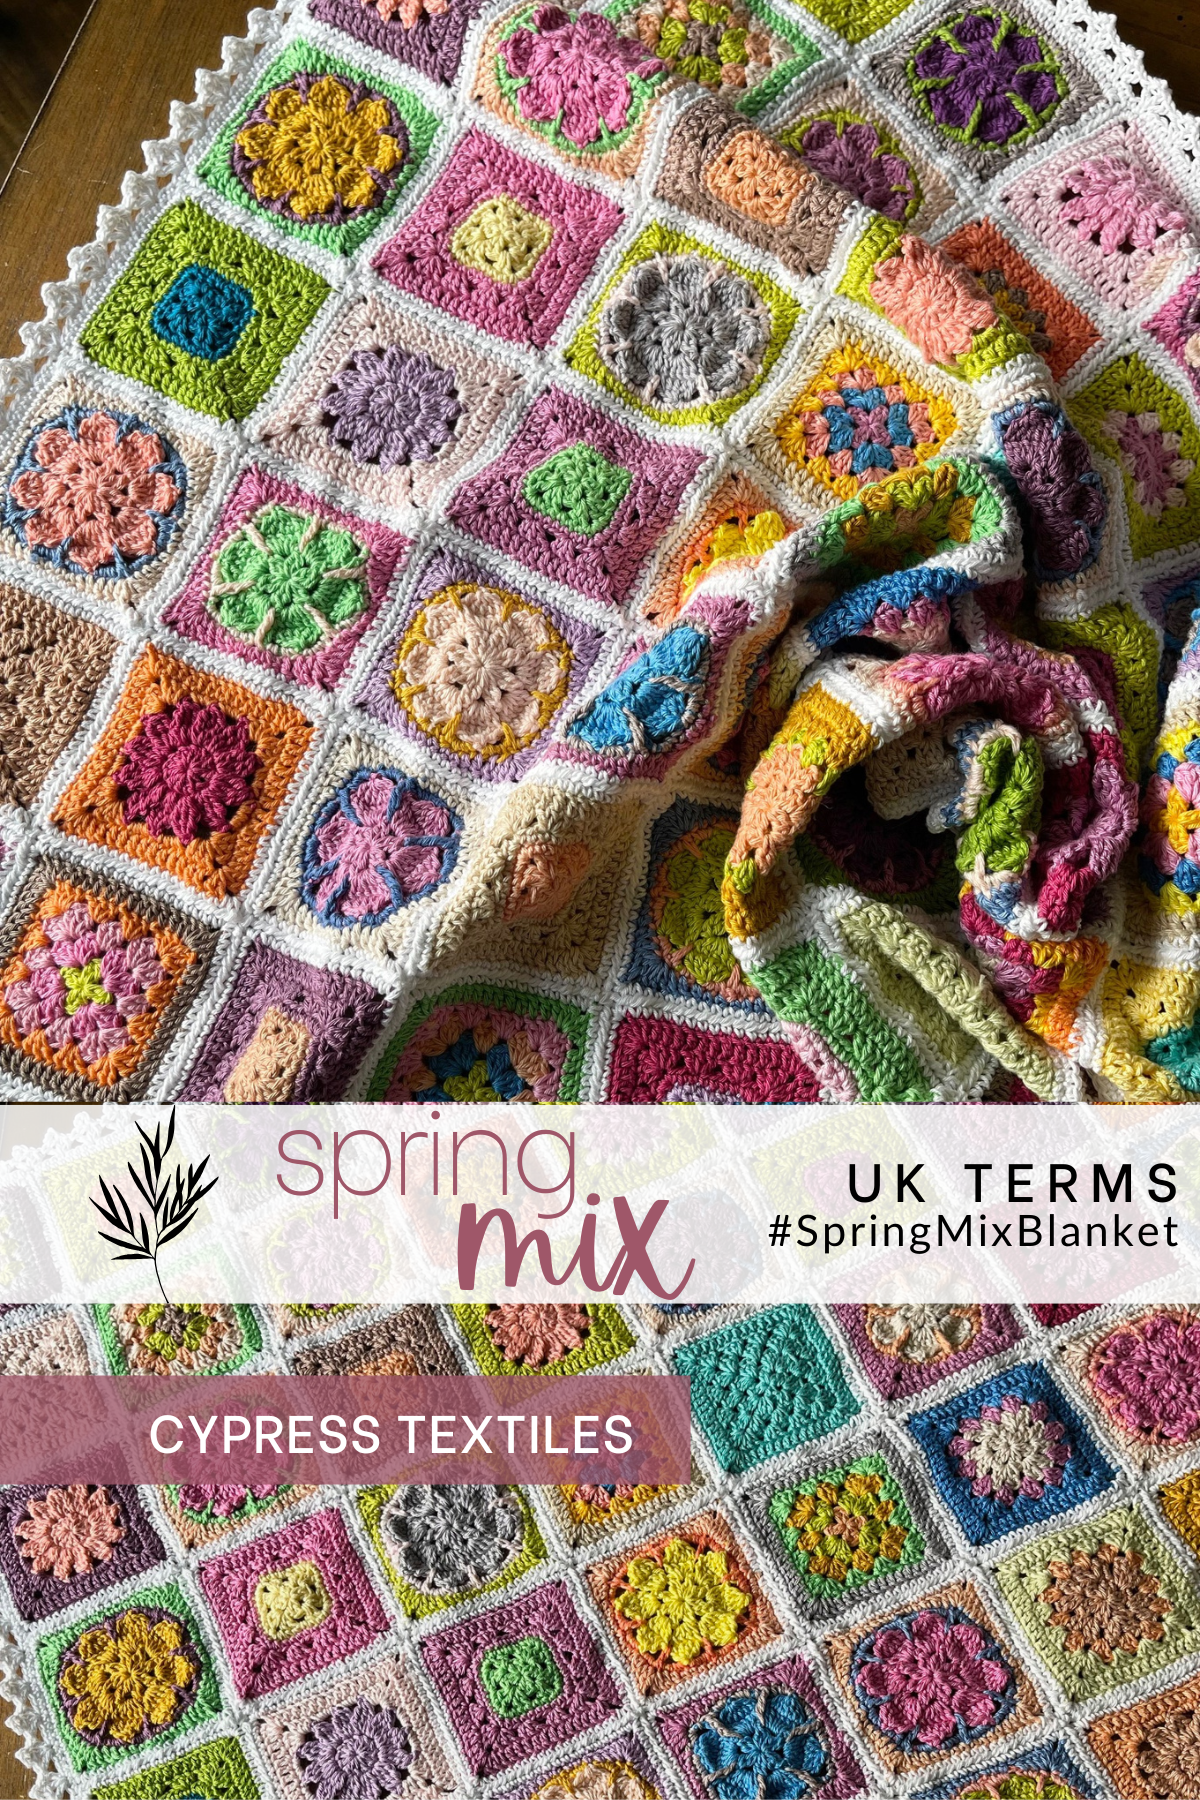
Hello, gorgeous crafter! Today I want to share with you my latest crochet pattern. I was playing with these blocks recently, and I made a blog post detailing the WIP on the way to making this pattern. This blanket was born from a bin of half-used Scheepjes Catona – cotton yarns in every color from sunbeam yellow to cloud pink to lilac dusk. As I sorted through the skeins, I wasn’t thinking of perfection or planning a palette. I just wanted to play. What emerged was a lively mix of brights and pastels that feels exactly like spring: soft, bold, unexpected, and full of movement.
PS – This blanket is one of my 19 WIPs that I am working on finishing this year! So I will call this FO Number 4. You can check out the Main WIP -> FO Page to see all of my WIPs and FO updates.
Happy crafting!
PDF Format
The PDF version of this pattern is available on Etsy, Ravelry, and in my online shop, and both US and UK Terms PDFs are included.
This pattern is in UK Terms – Click here for US Terms
If you are saying “All Those Ends!!” I have a blog post for you!

–
Pattern By Rachele Carmona of CypressTextiles.net
Project Details
- Skill Level Beginner
- Measurements About36x442in // Motifs measure 4in
- Materials Scheepjes Catona remnants 3mm hook, tapestry needle for weaving ends
- Social Media Instagram, Facebook, Twitter, Pinterest, Etsy, Ravelry: CypressTextiles
Yarn + Affiliate Links
Shopping through these links will gain me a small commission to support CypressTextiles, at no additional cost to you!

–
Yarn used in pattern:
1 x Scheepjes Catona Remnants – Or the 10g color pack! – WoolWarehouse (aff)
5 x 50g balls of Scheepjes Catona in color 106 – WoolWarehouse (aff)
Or browse other Scheepjes retailers – including brick and mortar shops!

–
Repeat and Bracket Guide
- Square brackets [ ] are used for small repeats: 4dc, [2dc, 3tr, 2dc] 2 times
- Asterisks *are used for repeats that include small repeats: *5dc, [1ch, 1dc] 3 times in next ch, rep from * 3 times
- Round brackets ( ) are used when a string of stitches are worked into the same spot: (3tr, 3ch, 3tr) in next st
- Stitch Counts are given at the end of rows where necessary, in the following format: [12 dc, 3 sp]

–
Tips and Notes
- Weave your ends after each time you cut the yarn to avoid having to do them all at the end.
- Please read the stitch guide for any abbreviations.
- To get a neater result, I do not “chain up” for the first sc of the round/row. Jump straight into the first sc.

–
Copyright Information
No pattern or other material may be reproduced — mechanically, electronically, or by any other means, including photocopying — without written permission of Rachele Carmona. This applies to all content on CypressTextiles.net, BabyLoveBrand.net, and all other sites used by Rachele Carmona including social media. Paid patterns are for personal use only. You may sell your finished crocheted items, but do not use my photos to sell your items.

–
Stitch Descriptions (UK Terms)
- 2trcl (yo, insert hook in st, yo, pull up lp, yo, draw yarn through 2 lps) 2 times, yo, draw yarn through 3 lps
- 3dtrcl * yoh 2 times, insert hook in st, yoh pull through, (yoh, pull through 2 lps on hook) 2 times, rep from * 2 times, yoh and pull through all 4 lps
- beg beginning
- beg 2trcl (1dc, ch1, 1tr) in st/sp indicated
- beg 3dtrcl beg dtr, * yoh 2 times, insert hook in st, yoh pull through, (yoh, pull through 2 lps on hook) 2 times, rep from * 2 times, yoh and pull through all 3 lps – Counts as 1 3trcl
- beg tr (1sc, ch1) – counts as 1tr
- beg dtr (1sc, ch2)– counts as 1dtr
- ch-sp / sp chain space / space
- dc double crochet
- dtr double treble crochet
- tr4tog tr 4 together
- tr6tog tr 6 together
- lp loop
- MR make ring: 3ch, join with ss to first ch
- rem remaining
- rep repeat
- rnd round
- sk skip
- ss slip stitch
- st(s) stitch(es)
- tr treble crochet
- yoh yarn over hook

–
The PDF version of this pattern is available on Etsy, Ravelry, and in my online shop, and both US and UK Terms PDFs are included.
Instructions
Instead of one repeating square, I designed seven different motifs, each with its own vibe, but all the same size so they join up effortlessly. It’s the kind of blanket that keeps you curious as you make it. No two squares feel quite the same.
This blanket is created by making any amount of the given square patterns, in any colors. Use those remnants and leftovers – do some stash busting! Then, the motifs are joined by single crochet JAYG with PLT Join, and a pretty picot border is added. I will give you the 7 motif patterns, and you can decide how many of each you want to make, and in which colors.

–
Motif 1, Solid Granny Square
Rnd 1 MR,beg tr, [ch1, 3tr] 4 times omitting final tr, ss in beg tr. [12 tr, 4 sp]
Rnd 2 Beg tr in ch-sp, [ch1, 3tr in same sp, 3tr in next sp] 4 times omitting final tr, ss in beg tr. [24 tr, 4 sp]
Rnds 3-4 Beg tr in ch-sp, [ch1, 3tr in same sp, 3tr between 3-tr “groups” across to corner sp, 3tr in corner sp] 4 times omitting final tr, ss in beg tr. [60 tr, 4 sp]
Rnd 5 Beg tr in ch-sp, [ch2, 2tr in same sp, 12tr, 2tr in next sp] 4 times omitting final tr, ss in beg tr, cut yarn and weave ends. [64 tr, 4 sp]

–
Motif 2, Striped Granny Square
Rnd 1 MR,beg tr, [ch1, 3tr] 4 times omitting final tr, ss in beg tr, cut yarn. [12 tr, 4 sp]
Rnd 2 Join new color with ss in any ch-sp, beg tr in same sp, [ch1, 3tr in same sp, 3tr in next sp] 4 times omitting final tr, ss in beg tr, cut yarn. [24 tr, 4 sp]
Rnds 3-4 Join new color with ss in any ch-sp, beg tr in same sp, [ch1, 3tr in same sp, 3tr between 3-tr “groups” across to corner sp, 3tr in corner sp] 4 times omitting final tr, ss in beg tr, cut yarn. [60 tr, 4 sp]
Rnd 5 Join new color with ss in any ch-sp, beg tr in same sp, [ch2, 2tr in same sp, 12tr, 2tr in next sp] 4 times omitting final tr, ss in beg tr, cut yarn and weave all ends. [64 tr, 4 sp]

–
Motif 3, Circle-to-Square Granny Square
Rnd 1 MR, beg tr, [1tr, ch1, 1tr] 6 times omitting final tr, ss in beg tr, cut yarn. [12 tr, 6 sp]
Rnd 2 Join new color with ss in any ch-sp, beg tr in same sp, [1tr in same sp, ch1, 2tr in same sp, ch1, 1tr in next sp] 6 times omitting final tr, ss in beg tr, cut yarn. [24 tr, 12 sp]
Rnd 3 Join new color with ss in any ch-sp, beg tr in same sp, [2tr in same sp, ch1, 1tr in next sp] 12 times omitting final tr, ss in beg tr, cut yarn. [36 tr, 12 sp]
Rnd 4 Join new color with ss in any ch-sp, beg tr in same sp, [ch1, 3tr in same sp, 3tr between next 2 3-tr groups, 3tr in next ch-sp] 4 times omitting final tr, ss in beg tr. [48 tr, 4 sp]
Rnd 5 Join new color with ss in any ch-sp, beg tr in same sp, [ch2, 2tr in same sp, 12tr, 2tr in next sp] 4 times omitting final tr, ss in beg tr, cut yarn and weave ends. [64 tr, 4 sp]

–
Motif 4, Square in a Square
Rnd 1 MR,beg tr, [ch1, 3tr] 4 times omitting final tr, ss in beg tr. [12 tr, 4 sp]
Rnd 2 Beg tr in ch-sp, [ch1, 2tr in same sp, ch1, 2tr in next sp] 4 times omitting final tr, ss in beg tr. [16 tr, 8 sp]
Rnd 3 [3dc in corner ch-sp, 5dc] 4 times, ss in first dc, cut yarn. [32 dc]
Rnd 4 Join new color in corner dc, [3dc in corner st, 7dc] 4 times, ss in first dc. [40 dc]
Rnd 5 Beg tr in corner dc, [ch1, 3tr in same st, sk2, 3tr in next st, sk3, 3tr in next st, 3tr in corner dc] 4 times omitting final tr on fourth rep, ss in beg tr. [48 tr, 4 sp]
Rnd 6 Beg tr in ch-sp, [ch2, 2tr in same sp, 12tr, 2tr in next sp] 4 times omitting final tr on fourth rep, ss in beg tr, cut yarn and weave ends. [64 tr, 4 sp]

–
Motif 5, 12-Petal Flower
Rnd 1 MR,beg tr, 11tr, ss in beg tr. [12 tr]
Rnd 2 Beg 3dtrcl in next st, [ch3, 3dtrcl in next sp] 11 times, ch3, ss in beg 3dtrcl, cut yarn. [12 3dtrcl, 12 sp]
Rnd 3 Join new color with ss in any ch-sp, beg tr in same sp, [ch1, 3tr in same sp, 3dc in next 2 sps, 3tr in next sp] 4 times omitting final tr on fourth rep, ss in beg tr. [24 tr, 24 dc, 4 sp]
Rnd 4 Beg tr in ch-sp, [ch2, 2tr in same sp, 12tr, 2tr in next sp] 4 times omitting final tr on fourth rep, ss in beg tr, cut yarn and weave ends. [64 tr, 4 sp]

–
Motif 6, 8-Petal Flower
Rnd 1 MR, beg 2trcl [ch2, 2trcl] 7 times, ch2, ss in beg 2trcl. [8 2trcl, 8 sp]
Rnd 2 Beg tr in ch-sp, [3tr in same sp, ch1, 1tr in next sp] 8 times omitting final tr, ss in beg tr. [32 tr, 8 sp]
Rnd 3 Ch2 (doesn’t count as a st), tr4tog over first 4 sts, [ch5, tr4tog] 7 times, ch5, ss in beg tr4tog, cut yarn. [8 tr4tog, 8 sp]
Rnd 4 Join new color with ss in any tr4tog, [3dc in ch-5 sp, 1tr in both ch-5 sp and ch-1 sp from Row 2 treating them as one, 3dc in same ch-5 sp] 8 times, ss in first dc, cut yarn. [8 tr, 48 dc]
Rnd 5 Join new color with ss in any tr, beg tr in same st, [ch2, 2tr in same st, 2tr, 2htr, 4dc, 2htr, 2tr, 2tr in tr st] 4 times omitting final tr on fourth rep, ss in beg tr, cut yarn and weave ends. [32 tr, 16 htr, 16 dc, 4 sp]

–
Motif 7, 6-Petal Flower
Rnd 1 MR, beg 2trcl [ch2, 2trcl] 5 times, ch2, ss in beg 2trcl. [6 2trcl, 6 sp]
Rnd 2 Beg tr in ch-sp, [5tr in same sp, ch1, 1tr in next sp] 8 times omitting final tr, ss in beg tr. [36 tr, 6 sp]
Rnd 3 Ch2 (doesn’t count as a st), tr6tog over first 6 sts, [ch5, tr6tog] 5 times, ch5, ss in beg tr6tog, cut yarn. [6 tr6tog, 6 sp]
Rnd 4 Join new color with ss in any tr6tog, [3dc in ch-5 sp, 1dtr in next 2trcl on Row 1, 3dc in same ch-5 sp] 6 times, ss in first dc, cut yarn. [6 dtr, 36 dc]
Rnd 5 Join new color with ss in second dc of Rnd 4, beg tr in same st, [ch2, 3tr in same st, 2tr, 1htr, 4dc, 1htr, 2tr, 3tr in next st] 4 times omitting final tr on fourth rep, ss in beg tr, cut yarn and weave ends. [40 tr, 8 htr, 16 dc, 4 sp]
–

Double Crochet Continuous Join as-you-go (CJAYG) with PLT Join
If you’ve never worked a Continuous Join as you go, you should note it is different from a regular Join as you go because you do not cut yarn and finish off until all of your squares are joined together. Think of drawing a line around the squares, without picking up your pencil. The path that you will take around the squares can be the most confusing part! I’ll try to include as many photos as I can in order to be clear.
The squares in the demo photos for this join are larger with more sts on each side, but the process is the same.
Work around 3 sides of the first square as follows:
Join yarn with ss in corner st, (3dc in corner st, dc in all stitches across to next corner), 3 times, 2dc in corner st, ch1 (first photo below), get square 2 lined up under square 1.
2dc in corner st of square 2, dc in next stitch (second photo below). PLT Join in the corresponding stitch on square 1 as follows: Release lp from hook, insert hook from front to back into corresponding stitch on completed motif, grab lp, and Pull Loop Through to front of work. dc in next st as normal (third photo below).
Note: No slip stitch or chain is worked here. Simply continue with the next stitch.

–
(dc, PLT Join) in every stitch, up to the stitch just before the corner st, dc in next stitch, dc in corner st (first photo below), dc in corner st of completed motif – with wrong sides held together (second photo below), dc again in corner st of motif in progress (third photo below), dc in all sts to next corner st, 3dc in corner st, dc in all sts across, 2dc in corner, ch1 (fourth photo below).
Join your next squares down the column in the same way. STOP after 2 sides of the final square are worked. Check photo below to confirm – my columns have only 4 squares each in this piece.

–
The red square has only 2 sides worked. Make sure you ch1 at the end of that second side (first and second photos below).
Join 1 side of all squares in the second column as follows. They will hang like little flags or bunting. Join 1 side of the bottom square of column 2, as you have previously (third and fourth photos below). When you get to the end of side one, stop after 1 dc in corner stitch, and ch1 (fourth photo below).

–
Pick up the next square up in the column, dc in the corner, dc in next stitch (first photo below), PLT (second photo below) and join across the side as before. Add each square up the column until the top square is added (third photo below)

–
At the very top of the last square, (dc, dc in corner st on adjacent completed motif, dc on motif in progress to complete corner, work around 3 sides of the square as normal, without any PLT join (second photo below). Third photo shows a close-up

–
dc in the corner stitch of the square above, then DC AROUND the dc in between the squares to the right from their joined corners, encasing also the chain 1 between the squares. See this center dc location below. dc in the corner of the next square. Below you can see these 3 dc that make up the 4-corner join. Second photo below shows how the corner will look after you work it. Third photo below shows how it looks when oriented properly. You can see that center dc stitch is encasing the chain 1 and the dc.

–
Continue across the row, joining as you go (first photo below). Join all squares down the column in the same manner. Again, stop after 2 sides of the bottom square (third photo below)

–
Join 1 side of all squares in next column as before – shown below, I have already joined my top corner, and worked one side of the top square. Work around the squares as before, joining the 4-corner meetup spots as instructed (second photo below). Below, I have stopped after 2 sides of the bottom square (third photo below).

–
Join next column of squares up as shown. For me this is my final column. Join around the squares as before. Now all squares are joined up. All you need to do is crochet dc around the remaining 2 sides of your blanket, placing 3dc in each corner. You will work all across the bottom, and then up the right-hand side, to the very first corner where you joined your yarn ball. Once you get to the beginning dc, join with a slip stitch, and you’re done!

–

–

–
Blanket Border

–

–
Rnd 1 Join yarn with ss in any corner, [3dc in corner st, dc across to next corner] 4 times, ss in first st.
Rnd 2 Beg tr in corner st, * 2tr in same st, (ch3, 1dc in top side of prev st) – picot made, 3tr in same st, [sk3, (2tr, picot, 1tr) in next st] across to next corner, sk3, 1tr in corner st, rep from * 3 times omitting final tr on third rep, ss in beg tr, cut yarn and weave ends.
Thank you for checking out my pattern! Happy crafting 🙂
RACHELE CARMONA
Crochet Designer & Fiber Artist
Rachele C.
Buy my pattern book – I wrote a super neat crochet blanket pattern book, published under Penguin Random House. You can buy it here!
You may also enjoy:
- Treble Scallop Edging – Free Crochet Pattern
- VVCAL 2016 – Free Crochet Blanket Pattern
- Happy Little Tree – Free Crochet Blanket Pattern
Support My Work
You’re supporting by just being here! You can read my blog (Start Here!), like and comment on socials, and message me for a chat. All of this supports my work free of charge!
- Affiliate links – Shopping through my links supports me at no additional cost to you as I get a small commission through my affiliates. Jimmy Beans Wool // WoolWarehouse // Amazon.com
- Buy my pattern book – I wrote a super neat crochet blanket pattern book, published under Penguin Random House. You can buy it here!
- Browse my self-published patterns – I have over a hundred patterns on Etsy and Ravelry
- Creative Art Blanket Course – Check it out on Podia
Where to Find Me
- Instagram: @cypresstextiles
- Facebook Page: CypressTextiles
- YouTube Channel: Rachele Carmona
- Pinterest: CypressTextiles
- Tumblr: CypressTextiles
- Etsy: CypressTextiles
- Ravelry: Rachele Carmona
- Podia: Creative Art Blanket Course