
Hello, lovely! Today I wanted to share the pattern for the crochet nesting baskets that I made. I am really in love with these baskets, and I already have loads of ideas on how to improve them, but I’m definitely proud of this great set as it is! Hope you enjoy it!
This Crochet Nesting Baskets pattern is also available sold separately in a convenient, ad-free PDF on Ravelry, Etsy, and the CypressTextiles Pattern Shop. Both US and UK Versions are included in the digital download purchase.

Related Links
Materials and Pattern Notes
For these Crochet Nesting Baskets, I used a wooden bag base like this set. You can see they are oval shape, but they are also available as a circle, which I haven’t tested, but I think it would work.
Once I have a few more Nesting Basket ideas, I am going to stock these oval wooden bag bottoms in my shop, as many folks have said they cannot find them.

Scheepjes Colour Crafter Yarn
3 skeins of 100g Scheepjes Colour Crafter yarn (held triple as instructed) will make all 3 nesting baskets. I used small amounts of Scheepjes Stone Washed and River Washed to make the embelleshments.
Shop this Yarn
This yarn is a dream. It’s economical and very durable – which I love – and is soft, squooshy, and luxurious. For a 100% Acrylic DK weight yarn, it is the best one out there.
Browse the links below to get some for yourself – as always, these (*) are affiliate links, so shopping through them helps support CypressTextiles and all my yarny endeavors, and it doesn’t cost you any extra!

Project Details
- Skill Level Easy
- Materials 3.75mm hook, and 5.5mm hook for basket body
- Social Media Instagram, Facebook, Twitter, Pinterest, Etsy, Ravelry: CypressTextiles
- Hashtags #CrochetNestingBaskets #CypressTextiles
Key Stitch Descriptions (US Terms)
UK Terms Version coming soon!
- beg Beginning
- beg dc (sc, 1ch) – counts as 1 dc
- ch Chain
- st(s) Stitch(es)
- sp Space
- Rep repeat
- RS right side of work
- ss Slip stitch
- sc Single Crochet
- dc Double Crochet
- MR Make Ring: Chain 3 and join with Slip stitch to first Ch
- WS wrong side of work
Crochet Nesting Baskets
Note: These instructions are for all 3 nesting baskets, as they use the same method since there are a certain number of increasing holes punched in the various sizes of bases. This means your stitch count will automatically increase as you make the larger baskets.

Rnd 1 Using smaller hook, join Colour Crafter Yarn (held triple) with ss in any hole on the wooden bag base. I like to start somewhere in the “corner” because eventually I want to add a tag to cover the joining jog, and I think it would be cute in the corner. Sc in each hole around, without increasing, and ss in first sc.
This round moves slowly, but luckily, the baskets aren’t that large.
Rnd 2 Switch to larger hook, and make slip stitches in each stitch around. We will be working into those slip sts for the basket base, that way the sc round from Rnd 1 will show, neatening up the bottom edge of the basket. Ss in the first ss.
Rnd 3 Sc in every ss around, working into both lps, and making sure your sc sts face outward like they should. For Rounds 3-10, I did not join the round, rather I simply continued in a spiral.

Rnds 4-10 Sc in every stitch around, working in a spiral instead of joining as previously stated.
Rnd 11 Reverse sc in every stitch around, ss in first rev sc, and cut yarn.
Weave all ends.
Here is how the baskets look from the inside.

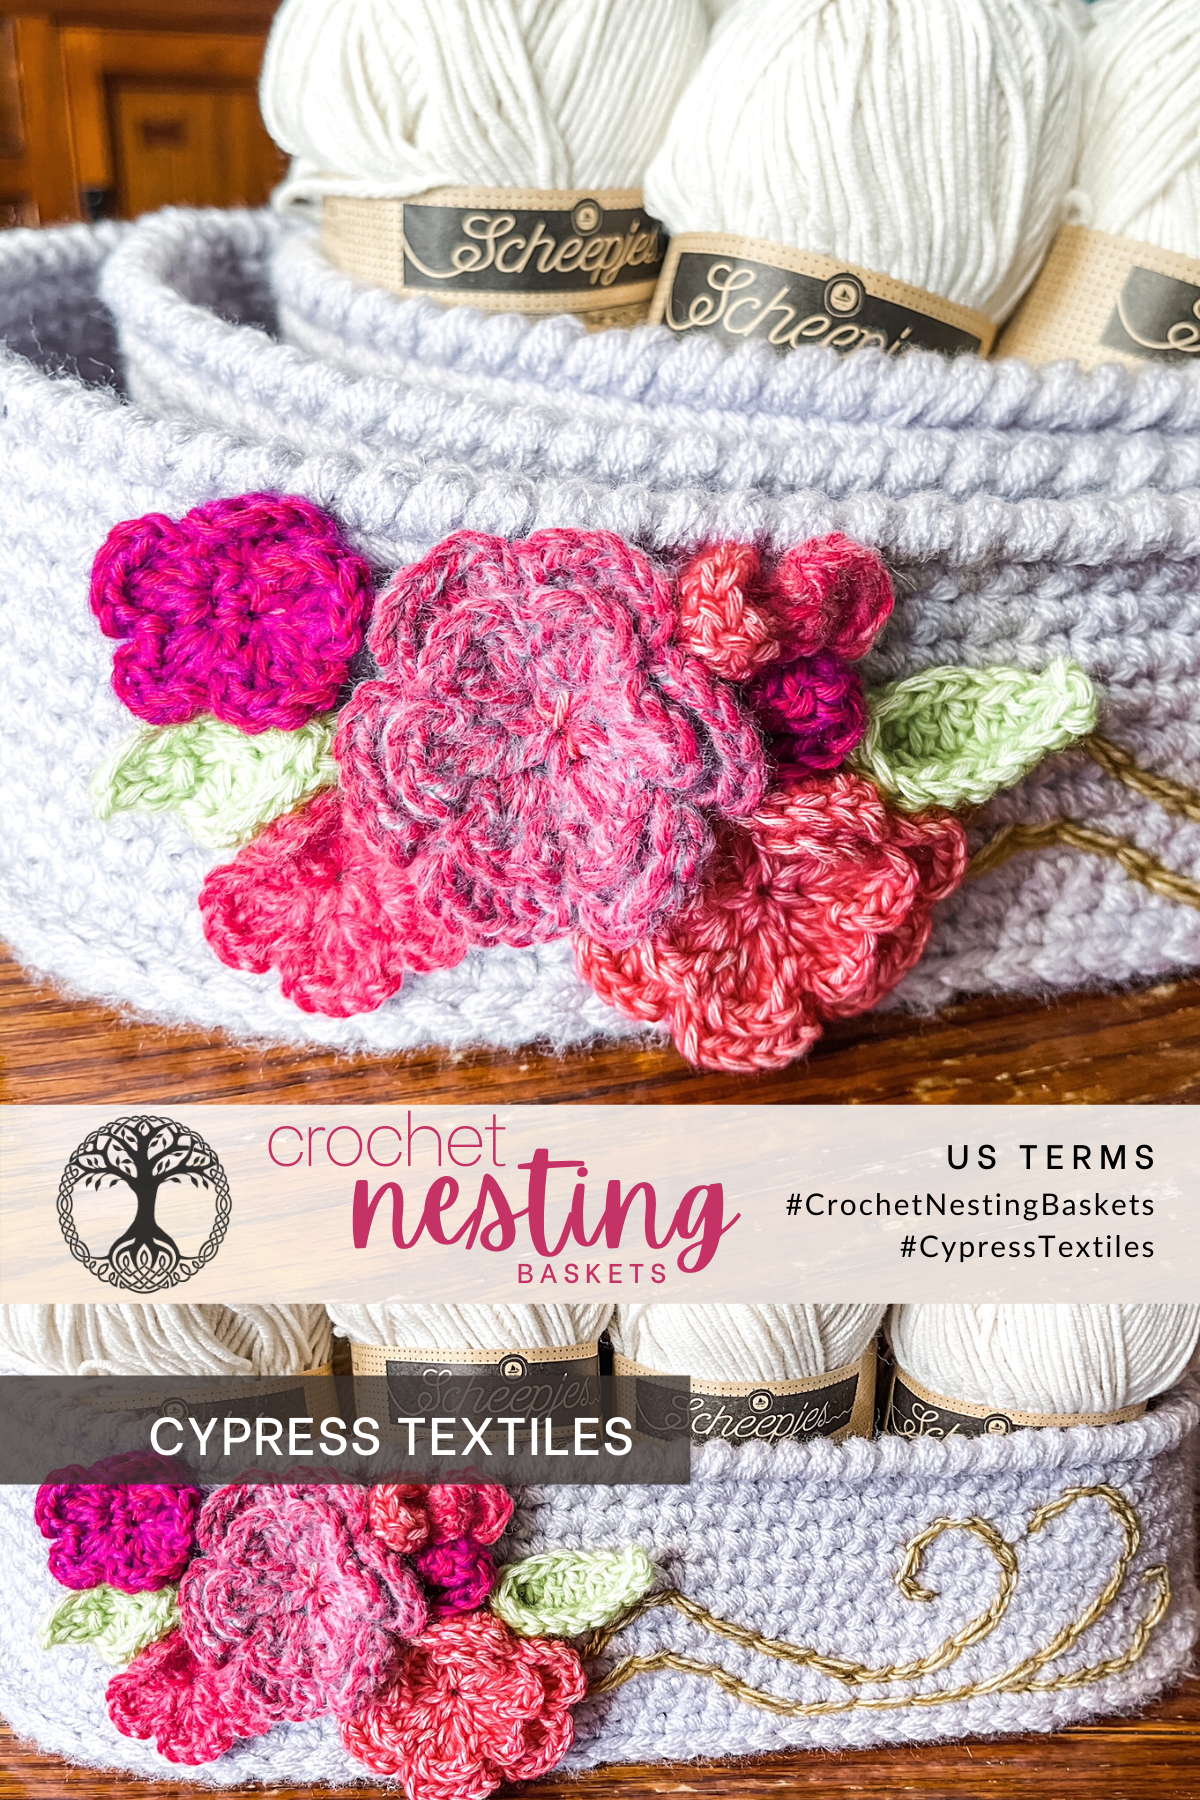
Embellishments
I used small amounts of Stone Washed and River Washed to make little roses, flower buds, and leaves, as well as a little golden flourish.
Any decoration will look beautiful, but remember, if your decoration is 3D, you should only make it on the largest nesting basket.

You can use any embellishments that you like, even buttons or ribbon, or another flower pattern that you love. Anything goes! I’d love to see what you come up with.

Rose
Make 2
Rnd 1 MR, (sc, ch1) 6 times, ss in first sc. [6 sc, 6 sp]
Rnd 2 (Sc, ch1, 3dc, ch1, sc) “petal” in 6 ch sps around, do not join rnd. [18 dc, 12 sc, 12 sp]
Rnd 3 Release lp, insert hook back to front through first sc of Rnd 2, grab lp, pull lp to back of work, ch3, sc in skipped sc from Rnd 1, but work behind the “petal” instead of working between petals. (Ch3, sc in next skipped sc st from Rnd 1) 4 more times, ch3, do not join rnd. [5 sc, 6 sp]
Rnd 4 Starting by working in the first ch-3 sp of Rnd 3, (sc, ch1, 5dc, ch1, sc) “petal” 6 times, join with ss in first sc. [30 dc, 12 sc, 12 sp]
Note: This is the first 4 rounds of my Happy Little Tree rose hexagon. You can check out the video here!
Rosebud
Make 3
Rnd 1 MR, 9dc, cut yarn, insert hook back to front through ring, grab yarn tail and pull through to back, pulling tightly to make curled up rosebud shape as in photo above.

Small Flower
Make 2
Rnd 1 MR, (sc, ch1) 5 times, ss in first sc. [5 sc, 5 sp]
Rnd 2 (Sc, ch1, 3dc, ch1, sc) “petal” in 5 ch sps around, ss in first sc. [15 dc, 10 sc, 10 sp]
Leaves
Make 2
Rnd 1 Ch6, 2sc in second ch from hook, dc in next 3 chs, 6dc in next ch, working into bottom lp of ch, dc in next 3 sts, 2sc in next st, ch3, sc in the side of previous sc to make picot, ss in first sc, cut yarn.
Tie Embellishments onto Large Basket
Note: You can weave all ends and use new yarn to tie embellishments onto basket, or you can use the tails to tie them on.

- Use the photos as a guide, and find where you want to place the embellishments.
- Pull the tails through to the inside of the basket, making sure to pull thrm so they are not through the same hole, rather leave 1 st space between the 2 tails. Optionally, you can weave all your yarn ends, and use a matching new piece of yarn for this. Simply thread the yarn piece through the embellishment, and pull the ends through to the inside like I’ve described above.
- Tie a surgeon’s knot on the inside of the basket, securing the piece neatly. Clip ends short. These knots will show on the inside of the basket, but they are very small.

Add Flourish
To create this golden flourish, I joined the yarn to the basket making sure to add it on under the flowers and leaves so that bit wouldn’t show. Then I made slip stitches overtop of the basket side, using the little holes between sc stitches as a guide for where to insert my hook to make the slip st.

You can use these closeups as a guide, especially since I am not an expert. I really just made it up as I went. When each of the 3 little flourishes was finished, I tied it off neatly at the back.

And here is how the 3 baskets look when they are perfectly nested! I love these so much, and I really cannot wait to release more basket designs. I have so many ideas!

Thank you so much for checking out this free pattern! The UK Terms version will follow shortly, and will be linked here as well.
I hope you enjoy these, and expect a few more to come as I get all the ideas out of my system.
Happy crafting!
Rachele C.

Copyright Information
No pattern or other material may be reproduced — mechanically, electronically, or by any other means, including photocopying — without written permission of Rachele Carmona. This applies to all content on CypressTextiles.net, BabyLoveBrand.net, and all other sites used by Rachele Carmona including social media. Paid patterns are for personal use only. You may sell your finished crocheted items.
Crochet Nesting Baskets Pattern PDF
You can find the easy-print ad free condensed PDF version for a small fee on:
Ravelry // Etsy // CypressTextiles Pattern Shop
PDF version includes both US and UK versions.