
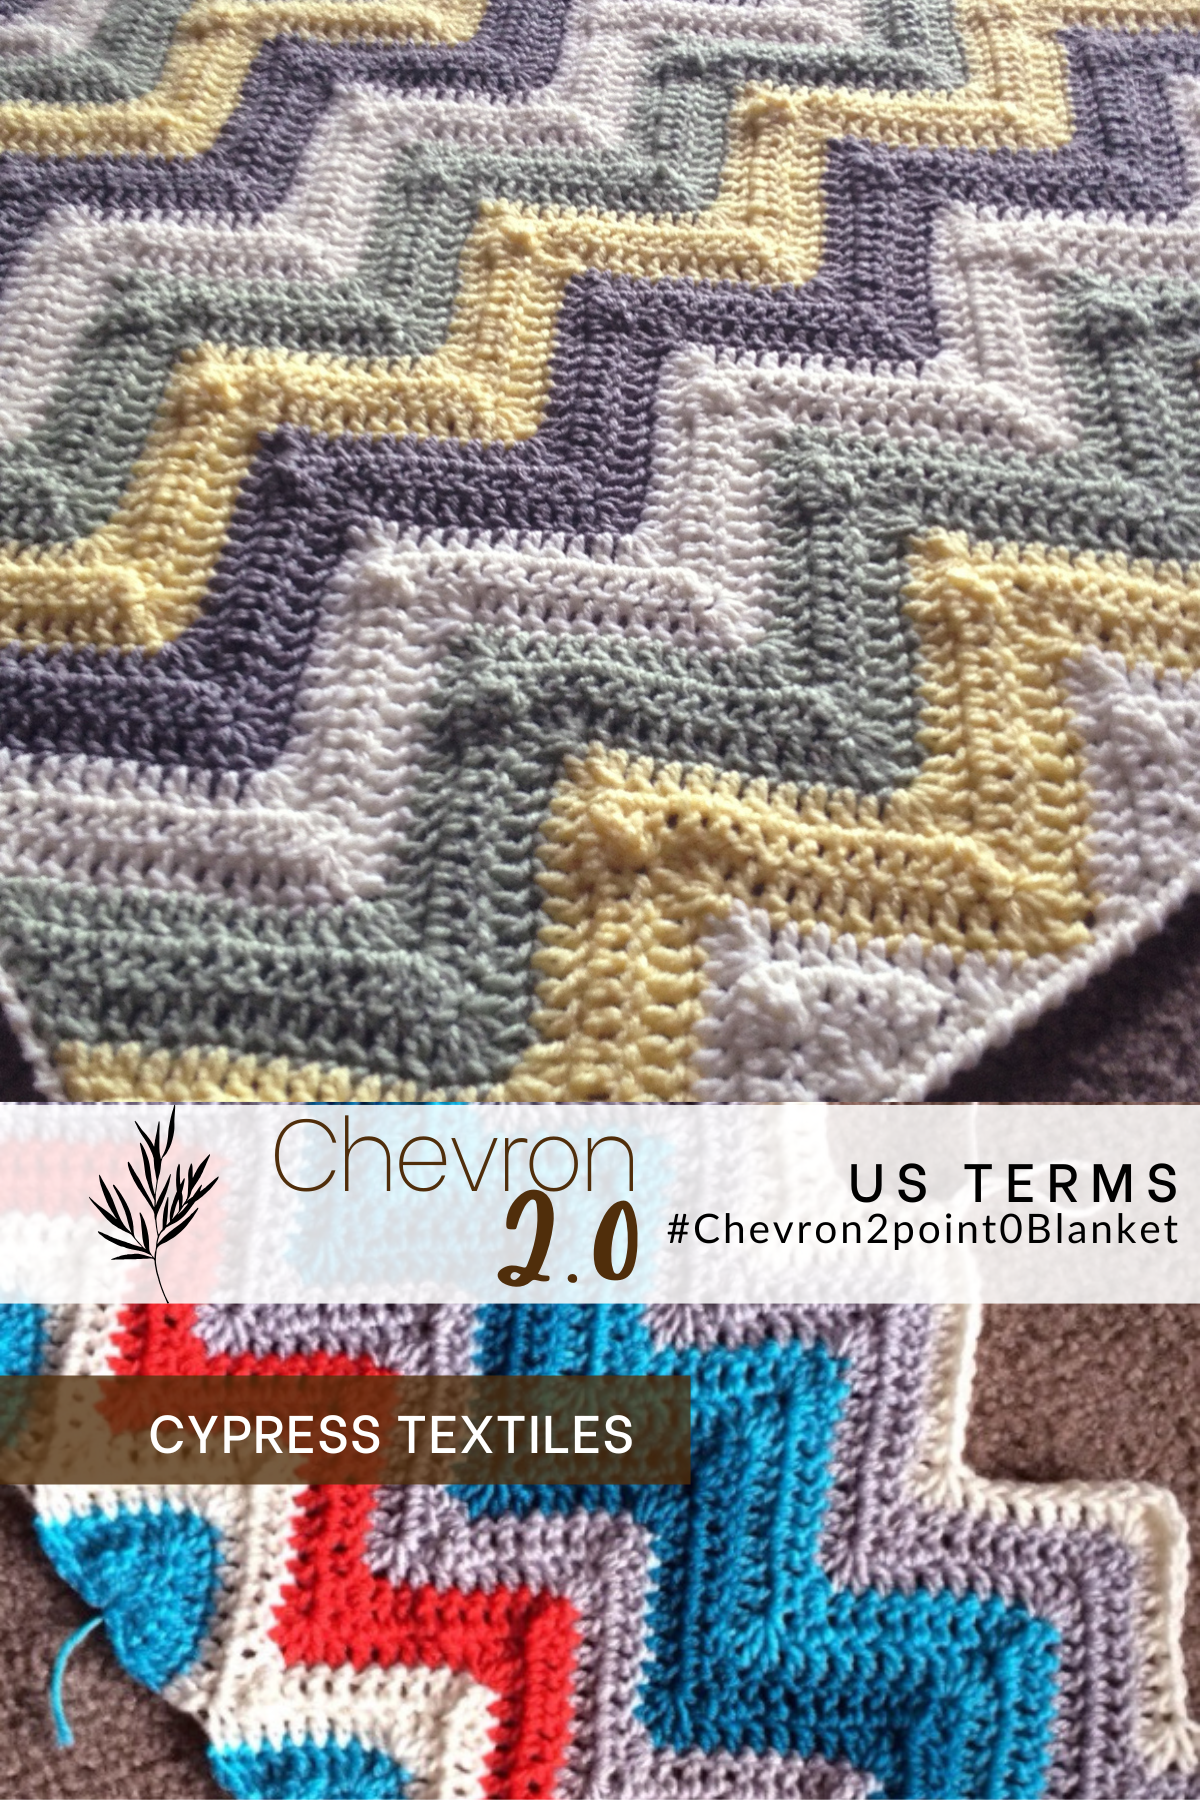
Hello, gorgeous crafter! I hope your week has been going well, and you’ve been able to get some hooky in. Working toward my efforts to make sure everyone has access to my crochet patterns, I am slowly making sure every single pattern of mine has a free version here on my website. Today, I want to offer my popular Chevron 2.0 Crochet Blanket Pattern now as a freebie! Scroll down for US Terms.
PDF Version
Find this pattern in a condensed ad-free PDF for a small fee in the CypressTextiles Shop, my Etsy Shop and on Ravelry. Pattern PDF for US Terms is included in the purchase. Help support my work by purchasing this convenient PDF if you like, but just being here on the website is plenty of support as well.
There is no UK Terms pattern for this blanket, but the only sts used involve (US) sc and (US) dc, which are (UK) dc, and (UK) tr, respectively.

–
Designing the Chevron 2.0 Crochet Blanket
The Chevron2.0 is so popular among custom-blanket-making crafters that I have added it in my pattern bundle on Etsy that is specially curated for folks who want to make a sell or gift blankets. Essentially, the patterns are simple and classic, and they’re crowd-pleasers. Chevron2.0 fits the bill!
3 Blankets to Make and Sell (etsy link). I have done the research and these are the top three CypressTextiles patterns that people use for making and selling/gifting custom blankets. You can see Chevron2.0 is there looking pretty!

–
5 Blankets to Make and Sell (etsy link) – This bundle includes two more very popular crochet blanket patterns for gifting and selling.

–
Chevron 2.0: A Better Way to Chevron
Okay, here is a short list of things you may not have even realized you don’t like about chevroning, but these things grind your gears, trust me.
- First (this is a biggie) – Chaining a zillion to start the blanket. Chaining a zillion, and then working across the chains, while your eyesight blurs, and your hands cramp is just no fun.
- Second – Working 5dc all into one chain – or 2dc, ch2, 2dc, or whatever increase your pattern calls for – to start the foundation of your “peaks”. It never comes out neat enough. That chain stretches out to an unholy size, and it just looks messy. Also, if you have to frog your first row, you can forget about working into those giant stretched out chains again. you’re forced to frog back the whole chain and start over. What a mess!
- Third – The unruly snake that your blanket is after just 3 rounds or so. That curled up, snakey mess that your blanket looks like at first – it’s just not desirable…
- Fourth – Some folks think of the holes at the increases as a design element, but I really prefer a solid chevron for a more modern look. Holes at the increase or decrease bugs me! This one is personal preference, I guess.

–
You may think I am making a big deal, but chaining over a hundred can stop me from even starting a project, y’all!! That baby is going to be born already by the time I hype myself up to make that long chain and work across it. The struggle is real, and I have a sneaking suspicion I’m not the only one!

–
For a baby shower gift, you can just abandon the chevron and switch to a different style of blanket, but what if you want to sell blankets and you get requests for chevron? What if your gift recipient asks for a chevron blanket specifically? What if you’re just really in love with the look of that gorgeous zig-zag and you really want to make one?

–
How do I eliminate the first three things on the list above? Two words: Base triangles. Base triangles will change your life. You’ll never go back to the long unruly chain!

–
Shop Scheepjes Colour Crafter
I wanted to introduce y’all to a durable DK yarn. Chances are if Scheepjes Colour Crafter isn’t already your go-to DK powerhouse, you have one that popped in your mind. I used to use a different one too, (probably the one you thought of!!) but the moment I laid hand on Colour Crafter, I never looked back.
Scheepjes Colour Crafter at Wool Warehouse* (affiliate)

Notions
US Size 4.25mm hook, Tapestry needle for weaving ends

–
Measurements
Finished piece measures about 36x54in, and is easily resized by using larger gauge yarn and hook, or by making more base triangles.
Stitch Guide (US Terms)
- ch chain
- beg beginning
- beg dc (sc, ch 1) – counts as 1 dc
- beg dc3tog beg dc, dc2tog
- dc double crochet
- dc2tog (yoh, insert hook in next st/sp, yoh, pull up loop, yoh, draw through 2 loops) twice, yoh, draw through all loops
- dc3tog (yoh, insert hook in next st/sp, yoh, pull up loop, yoh, draw through 2 loops) 3 times, yoh, draw through all loops
- dc5tog (yoh, insert hook in next st/sp, yoh, pull up loop, yoh, draw through 2 loops) 5 times, yoh, draw through all loops
- lp(s) loop(s)
- MR make ring: ch3, ss in third ch from hook
- rep repeat
- RS/WS right side/wrong side of work
- sc single crochet
- sk skip
- sp space
- ss slip stitch
- st(s) stitch(es)
- yoh yarn over hook
Instructions
We will be making some “solid half-granny triangles” for the flat “base” of the chevron pattern. Then, we start at the bottom right corner of the first triangle and start working in a chevron fashion, adding in each additional triangle until we are at the other corner of the blanket. Upon turning, we commence striped chevron as we normally would. Then when our peaks reach roughly as long as we want our blanket to be, we start the triangle space fill-in process to make the flat top.

–

–
Chevron2.0 Instructions
Skill level: Easy, Finished size: 36”x54”, Gauge: Not necessary for this project
Materials
- DK or Worsted weight yarn in one or various colors – please choose yarns that are comparable in weight
- Size K hook, or size that you would normally use with chosen yarn
- Size I hook for finishing ends – NOTE: If you use a blunt needle, that’s fine
Construction Notes
We will be making five “solid half-granny triangles” for the flat “base” of the chevron pattern. Then, we start at the bottom right corner of the first triangle and start working in a chevron fashion, adding in each additional triangle until we are at the other corner of the blanket. Upon turning, we commence striped chevron as we normally would. Then when our peaks reach roughly as long as we want our blanket to be, we start the triangle space fill-in process to make the flat top. This is the most complicated part of the pattern. There will be pictures. Finally, we will edge everything to finish our project in harmony with life and handmade goodness.

–

–
Your Own Adventure: Colors, Stripes, and Texture
1) Make a solid color blanket. The texture will speak for itself. You could even do your stitches through the back loop only to create ridges. Just a thought!
2) Pick multiple colors and make a repeating or random stripe pattern. Or, completely randomize for some good, clean fun. Whichever adventure you choose, keep in mind that your color changes will fall as you would have them in the pattern. I sometimes like to change colors every other row, so two rows per color stripe.
Solid Half-Granny Square – Make five

–

–
Row 1: MR, beg dc, 10dc, turn.
Row 2: Beg dc in first st, 1dc in same st, and in all sts up to center st, 5dc in center st, 1dc in all sts up to final st, 2dc in final st, turn.
Rows 3-?: Repeat row 2 until the triangle is as big as you want it to resize the blanket. For my demo blanket, I worked just 3 rows for each base triangle. Cut yarn and weave ends.
Join Triangles for Blanket Body
Lay your five solid half-grannies with the same side up (choose which side you like more). Your first chevron row will be the RS of the work.

–

–
Row 1: With next color, ss in first st, beg dc3tog across first 3 sts, 1dc in all sts up to center st, * 5dc in center st, 1dc in all sts down the other side of the triangle until you reach the last 2 sts, pick up the next triangle and hold it with the same side facing up, dc4tog over final 2 sts of this triangle and first 2 sts of the next triangle, 1dc across all sts to center st, rep from * until all base triangles are joined together, 5dc in center st, 1dc across second side of final base triangle until final 3 sts are reached, dc3tog, turn.
Rows 2-?: Beg dc3tog, 1dc in all sts up to center st, * 5dc in center st, 1dc in all sts to final 2dc before decrease, dc5tog, 1dc in all sts across to center st, rep from * until final triangle is reached, 5dc in center st, 1dc in all sts to final 3dc, dc3tog, turn.
Work as many rows as desired until the blanket is the length that you wish, changing colors to make stripes as you like.

–

–

–

–
Square Top Edge and Add Border
Top Right Triangle Space
Row 1: Beg dc3tog, 1dc in all sts until you reach the last 3 dc before the center st, dc3tog, turn.

–

–

–

–

–
Row 2: Beg dc3tog, 1dc in all sts to last 3 dc, dc3tog, turn.
Repeat row 2 until 3 sts rem, and then dc3tog to make the corner of the blanket.
Next Triangle Space
Join yarn with ss in the st to the left of the center dc and proceed.

–

–

–
Row 1: Beg dc3tog, 1dc across to 2 sts before decrease, dc5tog, 1dc in all sts across to 3 sts before center dc, dc3tog, turn.
Row 2-?: Work as row 1, until all sts are exhausted. You may have to work a decrease of 5-6 sts instead of the normal 4 on the last row.
Treat the next spaces identically until you reach the final triangle space at the left hand side. The procedure for this final space will be the same as first corner triangle space.
Blanket Border
Now you should have a rectangle with all ends worked in. I use a simple 2-round edging:
Round 1: Join yarn with ss in any corner of the blanket, (3sc in corner, sc evenly across to next corner) 4 times, ss in first sc.
Round 2: Beg dc in corner st, (4dc in same st, 1dc in all sts across to next corner st, 1dc in corner st) 4 times omitting final dc on fourth repeat, ss in beg dc, cut yarn and weave ends.
Now work in any remaining loose ends with your trusty hook, and call it a day! You’re done!

–

–

–

–
FIN!
Copyright Information
I made this pattern from my own brain. Feel free to keep, donate, gift, sell, trade, destroy anything that you make from it! It would be nice to have some linky love credit to babylovebrand.net for using my pattern, but I know that by the time you’re done with it, you’ll have made it your own, anyway. You’ve bought my pattern; do what you want with it. Thank you!
RACHELE CARMONA
Crochet Designer & Fiber Artist
Happy crafting,
Rachele C.
PS: Another pattern that has been getting a lot of love lately is my Trellis and Chevron Crochet Blanket Pattern. Find the free crochet pattern in US Terms or in UK Terms!

Order my crochet pattern book: The Art of Crochet Blankets
You may also enjoy:
Support My Work
You’re supporting by just being here! You can read my blog (Start Here!), like and comment on socials, and message me for a chat. All of this supports my work free of charge!
- Affiliate links – Shopping through my links supports me at no additional cost to you as I get a small commission through my affiliates. Jimmy Beans Wool // WoolWarehouse // Amazon.com
- Buy my pattern book – I wrote a super neat crochet blanket pattern book, published under Penguin Random House. You can buy it here!
- Browse my self-published patterns – I have over a hundred patterns on Etsy //Ravelry//My Podia Shop
- Creative Art Blanket Course – Check it out on Podia
Where to Find Me
- Instagram: @cypresstextiles
- Facebook Page: CypressTextiles
- YouTube Channel: Rachele Carmona
- Pinterest: CypressTextiles
- Tumblr: CypressTextiles
- Etsy: CypressTextiles
- Ravelry: Rachele Carmona
- Podia: Creative Art Blanket Course