
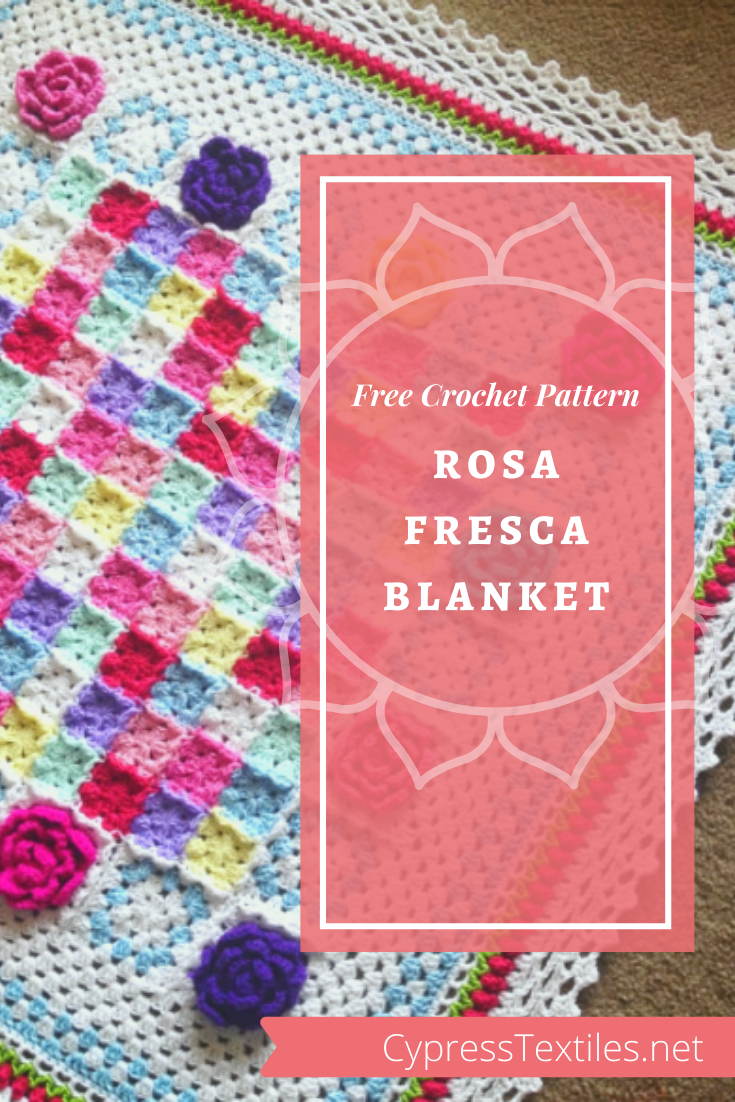
Hello, lovely! Today I have a gift for you. I have converted my Rosa Fresca Blanket paid pattern into a freebie! This is one of my favorite pieces of all time. Perfect for your Spring-time shabby chic home.
Rosa Fresca starts with an adorable and fun-to-create center panel of join as-you-go mini squares, moves on to some gorgeous roses, and then finishes off with a lovely wide border, which includes the sweetest little rosebuds and romantic lace. You will love every moment working on this beauty.
Find this pattern in a convenient, ad-free PDF on Etsy and Ravelry.
Share Your Rosa Fresca Blanket
Join the other crafters who have made Rosa Fresca.
- Instagram, Facebook, Twitter, Pinterest, Ravelry: CypressTextiles
- Hashtags: #RosaFrescaBlanket #CypressTextiles

Yarn: Scheepjes Colour Crafter
You will need the following colors in the the quantities listed for your Rosa Fresca Blanket.
- Yarn A: 1001 Weert x 4
- Yarn B: 1083 Tilburg x 1
- Yarn C: 2006 Luik x 1
- Yarn D: 1080 Venlo x 1
- Yarn E: 1019 Texel x 1
- Yarn F: 1277 Amstelveen x 1
- Yarn G: 1081 Gouda x 1
- Yarn H: 1316 Almelo x 1
Shop Colour Crafter
To shop this yarn, click below – I will receive a small commission on any purchase made, at no additional cost to you. Every little bit helps to support my work.

Notions and Sizing
- US size 4.25mm hook, 3.75mm hook
- Finished piece measures 52x52in and is easily resized

Stitch Guide (US Terms)
- ch chain
- beg beginning
- beg dc (sc, ch 1) – counts as 1 dc
- dc double crochet
- hdc half double crochet
- lp(s) loop(s)
- MR Make Ring: Ch3, ss in third ch from hook
- rep repeat
- RS/WS right side/wrong side of work
- sc single crochet
- sk skip
- sp space
- ss slip stitch
- st(s) stitch(es)
- tr treble crochet
- yoh yarn over hook

Rosa Fresca Blanket Instructions
We will be making a center piece of 196 small granny squares in a 14×14 configuration, with a join-as-you-go joining method. Adorning this center piece will be alternating large granny squares and rose granny squares. After that, we go around the whole thing with granny rounds, an awesome little mini-rose round, a couple more granny rounds, and a lattice lace round with a dainty picot to finish it all off
Schematic


Center Panel
Note: First small square is worked complete. Then, all subsequent small squares are joined on as-you-go on the final round following instructions below. First Small Square is the red one at top right of Center Panel. Use the schematic above to see which color to use for each square.
First Small Square

Round 1 Using Yarn B, MR, beg dc, ch1, (3dc, ch1) 3 times, 2dc, ss in beg dc. [12 dc, 4 sp]
Round 2 Beg dc in sp, (ch1, 3dc in same sp, 3dc in next sp) 4 times omitting final dc, ss in beg dc, cut yarn and finish off. [24 dc, 4 sp]
Second and Subsequent Small Squares


Round 1 Using Yarn indicated in schematic above, work as for First Small Square.
Round 2 Work as for First Small Square, but joining to the adjacent completed square on one or more sides following instructions below.
Joining Schematic
Note: Shows 10×10 squares, but our panel is 14×14 squares

Joining Schematic Key
Grey Arrow: Beginning side – (SC, Ch-2, 3DC) all in corner space, 3dc in next corner space
White Arrow: Joining sides – Keeping loop on hook and with wrong sides together, Slst in corner of adjacent square, 3DC in same corner space, Slst between 3DC groups of adjacent square, 3DC in next corner space, Slst in final corner of adjacent square
Black Arrow: Plain sides – Work plain without joining
Yellow Star: Special join – Insert hook in corner space of adjacent square to the right, YO, draw yarn through, insert hook through corner space of adjacent square above, YO, draw yarn through all loops on hook
Red Star: Join to complete square – Join with Slst in chain directly above beginning SC, cut yarn and finish off


Add Squares Around Center Panel
Note: These two motifs are joined onto the blanket as-you-go during their final round in the order indicated on the Joining/Placement Guide on page 5.
Large Granny Square

Rounds 1 and 2 Using Yarn A, work as for First Square of Small Square section, cut yarn and finish off.
Round 3 Using Yarn E, ss in any corner sp, beg dc in same sp, (ch1, 3dc in same sp, 3dc in between 3dc-groups from Round 2, 3dc in next sp) 4 times omitting final dc, ss in beg dc, cut yarn and finish off.
Round 4 Using Yarn A, ss in any corner sp, work one side plain as follows: beg dc in same sp, (ch1, 3dc in same sp, 3dc in between 3dc-groups from Round 2, 3dc in next sp), join next side in same manner as when joining Small Squares together, making ss in corner sps, and between 3-dc groups of completed adjacent motif and/or center panel. Either 1 or 2 sides will be joined, and the final motif will have 3 sides joined. When round is complete, ss in beg dc, cut yarn and finish off. For more details, refer to the section on page 6.

Rose Granny Square
Round 1 Using Yarn indicated in schematic on page 2, MR, 6sc, ss in first sc.
Round 2 Sc in same st as join, (ch2, sk1, sc) 2 times, ch2, ss in first sc.
Round 3: (Sc, 3dc, sc) in all 3 sps. Do not join. (3 Petals made)
Insert hook from back to front through the first sc of Round 3. Grab the lp and pull it through to the WS of the work.

Round 4 (Ss in the 2 back bars of the first dc of the Petal, ch3, ss in the 2 back bars of the third dc of the Petal, ch3) 3 times, ss in first ss. (6 sps made)
Round 5 (Sc, 3dc, sc) in 6 sps. Do not join. (6 Petals made).
Insert hook as before through the motif from back to front in the first sc of Round 5. Grab the lp and pull it to the WS of the work.
Round 6 Ch2 (ss in the 2 back bars of the center dc of the Petal, ch5) 6 times, ss in first ss. (6 sps made)
Round 7 (Sc, 5dc, sc) in 6 sps, ss in first sc, cut yarn and finish off. (Flower made)
Round 8 Using Yarn A, ss in 2 back bars of first dc of any Petal, (ch3, ss in 2 back bars of fifth dc of same Petal, ch3, ss in 2 back bars of first dc of next Petal) 6 times omitting final ss, ss in first ss. (12 sps made)
Note: As you work Round 9, you will join the motif in its position on the perimeter of the Center Panel, by making ss in corner sps and between 3dc-groups just as with the Center Panel and Large Squares. Refer to page 6 for placement diagram.
Round 9 Beg dc in first sp, (ch1, 3dc in same sp, 3dc in next 3 sps) 4 times omitting final dc and joining to any adjacent motifs or edge of center panel as described, ss in beg dc, cut yarn and finish off.

Joining Rose Granny and Large Granny Border – More details
Working as shown in the placement diagram, start with a Large Square (numbered 1). Join on one side of Round 4 of the Large Square. When first Rose Square is made, join it on 2 sides using the same instructions as for the center panel.
Along the perimeter of the Center Panel, where two Small Squares meet in the middle of a Rose Square or Large Square in progress, insert hook in the first small square corner sp, yoh, draw yarn through, insert hook in the second small square corner sp, yoh, and draw yarn through both loops on hook.
Continue joining Large Squares and Rose squares around the perimeter of the Center Panel until all 32 squares are joined.
Wide Border
Round 1 Using Yarn A, ss in top right corner sp, beg dc in same sp, (ch1, 3dc in same sp, 3dc in between 3dc-groups of the squares across side, — note: When you come to the place where two squares meet, dc in first corner sp, yoh, insert hook in first corner sp, yoh, draw up lp, yoh, draw yarn through 2 lps on hook, yoh, insert hook in second corner sp, draw up lp, yoh, draw yarn through 2 lps on hook, yoh, draw yarn through all lps on hook, dc in second corner sp (see first photo below) – 3dc in next corner sp) 4 times omitting final dc, ss in beg dc.
Rounds 2-5 Beg dc in corner sp, (ch1, 3dc in same sp, 3dc in between 3dc-groups across side to next corner sp, 3dc in corner sp) 4 times omitting final dc, ss in beg dc, cut yarn and finish off after Round 5.
Rounds 6-8 Work as for Round 2, using Yarn E, Yarn A, and then Yarn E again, cutting yarn after each round.
Round 9 Using Yarn A, ss in corner sp, (3sc in sp, sc in all sts across to next corner sp) 4 times, ss in first sc.
Round 10 Beg dc in next st, * ch1, 3dc in same st, (ch1, sk1, dc) across side until within 3 sts of corner st, Ch-1, 3dc in corner st, rep from * 3 times omitting final dc, ss in beg dc, cut yarn and finish off.
Round 11 Using Yarn H, ss in corner sp, beg dc in same sp, * ch1, 3dc in same sp, sk 2 dc, dc in next dc, (ch1, yoh, insert hook in same st as previous, yoh, draw up lp, yoh, draw yarn through 2 lps on hook, yoh, insert hook in next dc, yoh, draw up lp, yoh, draw yarn through 2 lps on hook, yoh, draw yarn through all 3 lps on hook) across side to within 2 sts of next corner, ch1, dc in same st as previous, 3dc in corner sp, rep from * 3 times omitting final dc, ss in first dc, cut yarn and finish off.
Round 12 Using Yarn B, ss in corner sp, beg dc in same sp, * ch1, 3dc in same sp, (ch2, 3dc in next ch1-sp, drop lp from hook, insert yarn front to back in first of three dc sts, put lp back on hook, pull lp through to close popcorn) rep across side to next corner sp, 3dc in corner sp, rep from * 3 times omitting final dc, ss in beg dc, cut yarn and finish off.
Round 13 Using Yarn A, ss in corner sp, beg dc in same sp, (ch1, 3dc in same sp, 3dc in first ch2-sp, 2dc in all ch2-sps across to within 1 ch2-sp of corner, 3dc in next ch2-sp, 3dc in corner sp) 4 times omitting final dc, ss in beg dc.
Round 14 Switch to smaller hook, beg dc in corner sp, * ch1, 3dc in same sp, ch3, sc between 2 3dc-groups, ch5, sk5, sc between 2 2dc-groups, (ch5, sk4, sc between 2 2dc-groups) rep across until within 8 dc of corner sp, ch5, sk5, sc between 2 3dc-groups, ch3, 3dc in corner sp, rep from * 3 times omitting final dc, ss in beg dc.
Rounds 15 and 16 Beg dc in corner sp, * ch1, 3dc in same sp, ch3, sc in ch3-sp, (ch5, sc in ch5-sp) across side until ch3-sp is reached, ch5, sc in ch3-sp, ch3, 3dc in corner sp, rep from * 3 times omitting final dc, ss in beg dc.
Round 17 Beg dc in corner sp, * ch1, 3dc in same sp, ch3, sc in ch3-sp, (dc in next sc, ch3, dc in same sc, sc in next ch5-sp) across side until ch3-sp is reached, sc in ch3-sp, ch3, 3dc in corner sp, rep from * 3 times omitting final dc, ss in beg dc.
Round 18 Beg dc in corner sp, * ch4, sc in 3rd ch from hook, ch2, 3dc in same sp, (2dc, ch3, sc in 3rd ch from hook, 2dc, ch1) in every ch3-sp across side to next corner, 3dc in corner sp, rep from * 3 times omitting final dc, ss in bed dc, cut yarn and finish off.
Jump up in the air and hug your new blanket!

To make a larger blanket:
- Work a larger Center Piece – Increase square rows and columns by multiples of 4 so that you can still get the same Large Square and Rose Square pattern around the perimeter of the Center Panel. Work the additional Rose and Large squares. Finish with the border of the blanket in the same manner as the original blanket.
Or…
- Work larger motifs – Make the Small squares 3 rounds instead of 2. Make the Rose and Large squares 6 rounds instead of 4.
Or…
- Work more white rounds in the border, between Rounds 5 and 6, making more granny stitch rounds in the same manner.
Use this blank schematic to color:


Copyright Information
No pattern or other material may be reproduced — mechanically, electronically, or by any other means, including photocopying — without written permission of Rachele Carmona. This applies to all content on CypressTextiles.net, BabyLoveBrand.net, and all other sites used by Rachele Carmona. Paid patterns are for personal use only. You may sell your finished crocheted items, but do not use my photos to sell your items.
Thank you!! Your support means the world, and I am living the dream of practicing my art while putting food on the table, all because you guys and gals enjoy my designs. Wild, huh? Well, I’m forever grateful. 🙂
Happy crafting as always,
Rachele C.
1 Comment