
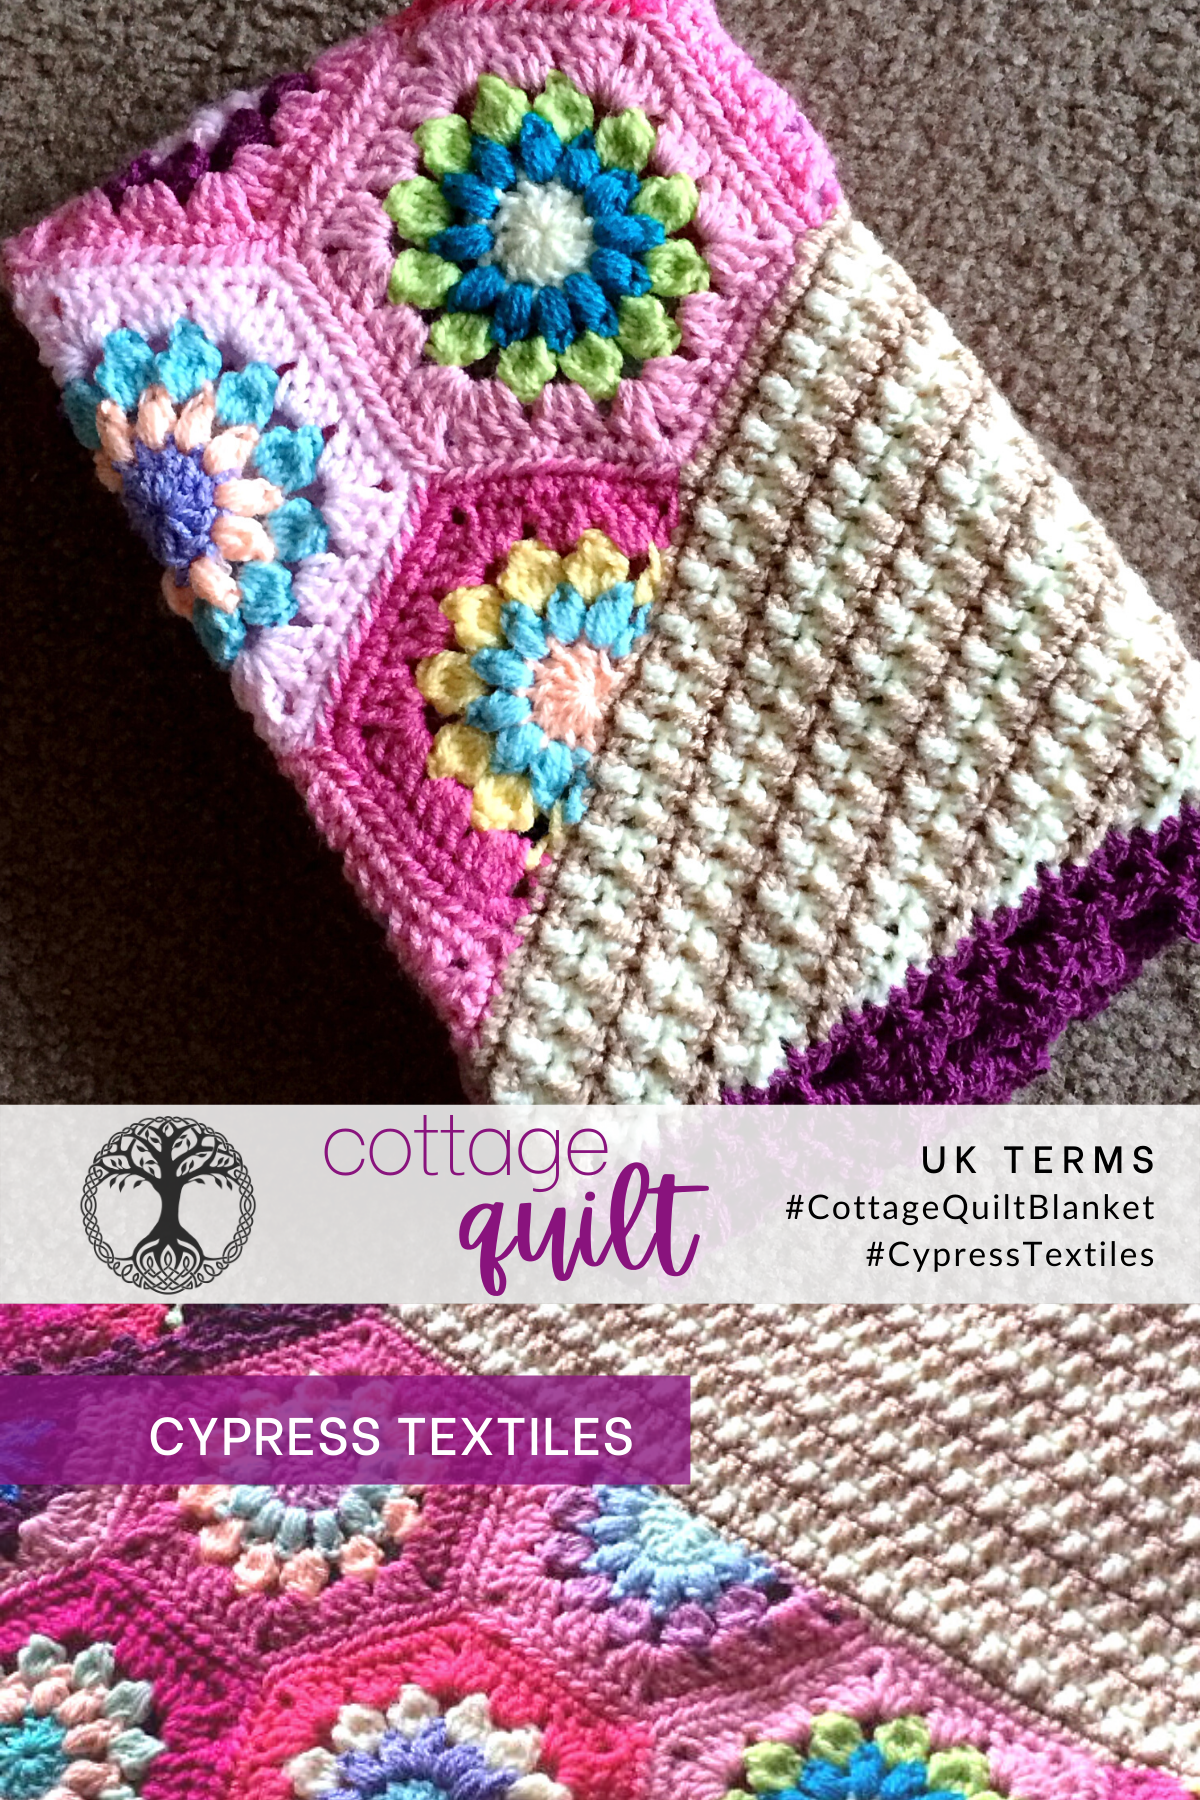
Hello, gorgeous crafter! Today I want to share a crochet pattern that is from 2014 – a full decade ago! Throughout all these years, there has only been a paid PDF version, but now I want to release the free version in an effort to continually make sure all of my patterns are accessible to everyone.
This versatile blanket pattern is inspired by fabric quilts which mix patterns together to make an eye-catching piece. There is a lot of thought that goes into every part of this blanket, and you will definitely enjoy the different ways you can use this pattern. Enjoy and happy crafting!
PDF Format
The PDF version of this pattern is available on Etsy, Ravelry, and in my online shop, and both US and UK Terms PDFs are included in the purchase.
This pattern is in UK Terms – Click here for US Terms.

–
Pattern By Rachele Carmona of CypressTextiles.net
If you look at this blanket and say, “All Those Ends!!” I have a blog post for you!
Project Details
- Skill Level Beginner
- Measurements Approximately 64x80in before blocking (Gauge is not necessary for this project)
- Materials Scheepjes Colour Crafter (details below), Size 3.5mm Crochet Hook
- Social Media Instagram, Facebook, Twitter, Pinterest, Etsy, Ravelry: CypressTextiles
- Hashtags #CottageQuiltBlanket #CypressTextiles
Yarn + Affiliate Links
Shopping through these links will gain me a small commission to support CypressTextiles, at no additional cost to you!

–
Yarn used in pattern:
Scheepjes Colour Crafter can be found at Wool Warehouse and Jimmy Beans Wool or at a Scheepjes retailer near you!
I used stash yarn for this project, because it is definitely the type of design that will help your remnants and scraps shine! The flowers are all made with different color remnants, and then I chose several shades of one color for the hexagon and join border. I will talk more about this further in the post!

–
Repeat and Bracket Guide
- Square brackets [ ] are used for small repeats: 4dc, [2dc, 3tr, 2dc] 2 times
- Asterisks *are used for repeats that include small repeats: *5dc, [1ch, 1dc] 3 times in next ch, rep from * 3 times
- Round brackets ( ) are used when a string of stitches are worked into the same spot: (3tr, 3ch, 3tr) in next st
- Stitch Counts are given at the end of rows where necessary, in the following format: [12 dc, 3 sp]

–
Tips and Notes
- Weave your ends after each time you cut the yarn to avoid having to do them all at the end.
- Please read the stitch guide for any abbreviations.
- To get a neater result, I do not “chain up” for the first sc of the round/row. Jump straight into the first sc.

–
Copyright Information
No pattern or other material may be reproduced — mechanically, electronically, or by any other means, including photocopying — without written permission of Rachele Carmona. This applies to all content on CypressTextiles.net, BabyLoveBrand.net, and all other sites used by Rachele Carmona including social media. Paid patterns are for personal use only. You may sell your finished crocheted items, but do not use my photos to sell your items.
Layout
You can choose how you want your layout to look, depending how large you want your blanket to be and depending on how many remnants/stash you are trying to bust through. The layout in the photo is just an example. There are 3 versions of this blanket – without the striped corner, with original striped corner, and with easy striped corner.

–
Without Striped Corner
I have made several of these blankets through the years, and these are some of them, so you can get inspiration for your own Cottage Quilt Blanket.
Pink Versions
Here are three pink versions that I have made. They all have totally random center flowers, but all three of them have a different placement of the pink ombre background. This first version features a dark pink corner which fades across to a diagonal pale pink corner.

–
The second pink version I want to show you has 2 opposing dark pink corners, and two opposing pale pink corners.

–
As you can see, I work all over the blanket at different times because it helps me not to get bored, which more likely results in a finished project, but here she is with the border added. This one may be my favorite!

–
For this next pink version, I again put the dark pink in one corner, but I made a more subtle transition to the opposing pale pink corner because I had more medium shades of pink to use up.

–
Also, in this version, I made my zig-zag sides pink as well, so when I squared off my blanket before joining, I used pink. You can compare how it looks with pink versus white. The pink maybe makes the border pop a bit more.

–
Orange Version
When I did custom work years back, I had a request for this blanket with an orange ombre background instead of pink. Here is that version! I quite love it.

–
I used a medium orange for the squaring off bit and it really made this piece for me. So juicy!

–
Purple Version
In order to bust through my purple yarn stash, I made a huge purple Cottage Quilt Blanket.

–
This one is so special! The background is a little more of a subtle ombre because I just didn’t have many medium to dark shades of purple, but it really came out lovely.

–
And those are a few of the Cottage Quilt versions that I made without the striped corner.
With Original Striped Corner
The blanket looks more whimsical and creative with the striped corner. You can see there is a lot of texture in the version of the corner, and you can choose any colors that you like.

–
I have used up some of my cream color stash here.

–
With Easy Striped Corner
In the pattern, I also include an easier version of the striped corner, which is more simple, but I did not actually create an entire blanket with it.
I made these small samples to showcase the two corner styles. Here is the original striped corner sample, and you can see it in a multicolor stripe here as well. My inspiration was if you were to take floral fabric and striped fabric and make a quilt, and then add lace to the edge for an ornate border.

–
The easier striped corner is a little more preppy looking and goes amazing with some simple solid hexies as I have shown here.

–
I used my Treble Scallop Edging for this blanket as well.

–
Those are all of the versions of Cottage Quilt that I have made! Hope you enjoyed them and can get inspo from them.
Stitch Descriptions (UK Terms)
- 4trcl (yoh, insert hook in same sp, yoh, pull yarn through, yoh, pull yarn through 2 loops) 4 times, YO and pull yarn through all 5 loops on hook
- beg beginning
- beg tr beginning treble crochet: dc, ch1 – counts as 1 tr
- beg 4trcl beginning 4tr cluster: beg tr, (yoh, insert hook in st/sp, yoh, pull up lp, yoh, draw yarn through 2 lps) 3 times, yoh, draw yarn through all lps
- beg puff elongate lp slightly, (yoh, insert hook in st/sp, yoh, pull up lp) 3 times, yoh, draw yarn through all lps, ch1 to close puff
- ch(s) chain(s)
- ch-sp(s) chain space(s)
- ch-1 sp(s) chain 1 space(s): number denotes number of chains in chain space
- dc double crochet
- tr4tog (yoh, insert hook in next st, yoh, pull up lp, yoh, draw yarn through 2 lps) 4 times, yoh, draw yarn through all lps
- tr5tog (yoh, insert hook in next st, yoh, pull up lp, yoh, draw yarn through 2 lps) 5 times, yoh, draw yarn through all lps
- dtr double treble crochet
- htr half treble crochet
- MR Make Ring: slip knot, ch3, ss in third ch from hook to make ring
- puff (yoh, insert hook in st, yoh, pull up lp) 3 times, yoh, pull yarn through all lps, ch1 to close puff
- rep(s) repeat(s)
- RS right side
- ss(s) slip stitch(es)
- st(s) stitch(es)
- tr treble crochet
- ttr triple treble crochet
- WS wrong side
- yoh yarn over hook

–
The PDF version of this pattern is available on Etsy, Ravelry, and in my online shop, and both US and UK Terms PDFs are included in the purchase.
Instructions
Motifs are constructed completely and then joined together one at a time as instructed. The border is then added to finish the piece.
Full Motif (Make 24)

Rnd 1 With first color, MR, beg tr, 11tr, ss in beg tr. [12 tr]

–
Rnd 2 Join new remnant color with ss in any st, beg puff, [ch1, puff] 11 times, ch1, ss in beg puff, cut yarn and weave ends. [12 puff, 12 sp]

–
Rnd 3 Join new remnant color with ss in any ch-sp, beg 4trcl, [ch2, 4trcl in next ch-sp] 11 times, ch2, ss in beg 4trcl, cut yarn and weave ends. [12 4trcl, 12 sp]

–
Join Full Hexagon Motifs for Blanket Body
This pattern follows the schematic below. You can make it however large you prefer.

Arrange Full Hexagon motifs as in the picture, with the “zig-zag” as the long side, and the “hex gaps/dips” as the short side, omitting the upper right corner, and leaving the gaps for the Half Hexagons (the five dark blue areas) to add later.
Begin joining motifs as you go using my PLT Join described below. Note: In this pattern, you can make the blanket ANY size by working however many hexies as you want, and making the cut off diagonal as large as you like.
1st Motif
Note: This is the top left Full Hexagon.
Rnd 4 Join background yarn with ss in any ch-sp, beg tr in same sp, * ch1, 2tr in same sp, 3tr in next ch-sp, 2tr in next sp, rep from * 5 times omitting final tr, ss in beg tr. [42 tr, 6 sp]
Note: Photos show (3tr, ch1, 3tr) in corners on this round. Please follow written instruction for (2tr, ch1, 2tr) corners.
Rnd 5 (3dc in ch-sp, 7dc) 6 times, ss in first dc, cut yarn and weave ends. [60 dc]
Joining 2nd – 5th Motifs
Note: Joining these motifs completes the left-most column of hexagons.
Rnd 4 Work as for 1st Motif.
Rnd 5 Work one side of Rnd 5 plain as follows: 3dc in ch-sp, 7dc, 2dc in next ch-sp, remove lp from hook, insert hook front to back through corresponding st on completed motif, grab lp, Pull Loop Through to front of work – PLT Join maneuver made. See photos below.

–
1dc in the same ch-sp, PLT Join to corresponding st on completed motif, (1dc, PLT) 7 times, 1dc in ch-sp, PLT, 2dc in same ch-sp, 7dc, continue around the motif as normal, without joining, ss in first dc, cut yarn and weave ends. [60 dc]

–
Motifs Joining 2 Sides
Rnd 4 Work as for 1st Motif.
Rnd 5 3dc in ch-sp, 7dc, 2dc in next ch-sp, PLT, 1dc in same ch-sp, PLT, (1dc, PLT) 7 times, 1dc in ch-sp, PLT, 1dc in same ch-sp, PLT in corner st on next completed motif, 1dc in same ch-sp, PLT in next st on completed motif, (1dc, PLT) 7 times, 1dc in ch-sp, PLT, 2dc in same ch-sp, 7dc, continue around the motif as normal, without joining, ss in first dc, cut yarn and weave ends. [60 dc]
Motifs Joining 3 Sides or More
Rnd 4 Work as for 1st Motif.
Rnd 5 Work as for Motifs Joining 2 Sides, joining subsequent sides in the same manner, when there are no more sides to join, 1dc in ch-sp, PLT, 2dc in same ch-sp, and continue around the motif as normal, ss in first dc, cut yarn and weave ends. [60 dc]
–
Half Hexagon
Note: If your blanket is larger, make as many half hexies as you need to fill your hex gaps at the top – including the diagonal cut-out if you have one – and bottom of your blanket.

–
Row 1 (RS) Using remnant, MR, beg tr, 8tr, cut yarn and weave ends. [9 tr]
Row 2 With RS still facing, join next color remnant with ss in first st, beg tr in same st, [ch1, puff] 7 times, 1tr in final st, cut yarn and weave ends. [7 puff, 2 tr, 8 sp]
Row 3 With RS still facing, join next color remnant with ss in first sp, beg 2trcl in same sp, ch2, (4trcl, ch2) in 6 ch-sps across, 2trcl in final sp, cut yarn and weave ends, turn. [2 2trcl, 6 2trcl, 7 sp]

Row 4 (WS) Join background color with ss in first ch-sp, beg tr in same sp, ch1, 2tr in same sp, [3tr in next sp, (2tr, ch2, 2tr) in next sp] 3 times omitting final tr, turn. Proceed to next section to join onto blanket.
Join Half Hexagons to Piece

Note: the instructional photos above are from my Geometric Lace blanket, but the concept is identical. You will be joining these half-hexes just like the join-as-you-go method when you joined your main hexagons.
Keeping your half-hex oriented facing up, attach your same color yarn with a ss to the turning chain on the far right side corner. 1dc in this St and drop loop from hook. Insert your hook in the middle dc of the right corner where you will be inserting your half-hex. Pull the loop up through. (See the left photo above.)
1dc in the next St of your half-hex in progress, drop the loop, insert hook front to back through the corresponding adjacent stitch on the completed motif, grab loop, pull loop through to front of work,
–
Striped Corner and Square Zig-Zag Edges
You are ready to pick up your blanket and work the striped upper corner. This section will also describe how to fill in the zig-zag long sides of your blanket. Reference the diagram on page 3 as a guide – you will be working the pale blue fill-in bits. When you are finished with this section, your blanket will be square and ready for the lace edging.

–
Row 1: With right side (RS) facing, attach first color with Slst to bottom right corner of cut diagonal section. Dc first two Sts together as follows: insert hook in first St, draw yarn through, insert hook in second St, draw yarn through, YO, pull yarn through all 3 loops on hook dc2tog decrease made. dc across, working as many Sts as you feel are necessary to keep the blanket flat. Where you have half-hexes, you will have sideways dc Sts to work into. I use 2 dc in the side of each dc . Do not decrease any Sts at the end of this row.

–

Row 2: Flip work to wrong side (WS). I like to turn counter-clockwise each time because it keeps the edges tidy, but the yarns will tangle, so be mindful. dc2tog, (dc through front loop only, dc) across until you reach the final 3 Sts, dc 3 together by pulling up a loop in each of the final 3 Sts and YO, draw yarn through all 4 loops on hook dc3tog decrease made. Do not cut yarn; rather carry up the yarn along the side to save yourself from having to work the ends. If you are striping multicolor, work 2 rows in each color.
Row 3: (RS) Join next color with Slst in first St (in bottom right corner of this section). dc2tog, (dc in plain dc , tr in unworked front loop from 2 rows below) across.
Row 4: (WS) dc2tog, (dc through front loop only, dc ) across until you reach the final 3 Sts, dc3tog.
Work rows 3 & 4, changing color before every odd row, until all of your Sts are used up.
In plain terms, on RS (odd) rows, decrease 1 at the bottom and none at the top. On WS (even) rows, decrease 1 at the top and 2 at the bottom. The right side edge decreases much faster than the top edge.
Fill Zig-Zag Edges
Start in a corner orienting your blanket so that you will begin with the zig-zag that occurs when hexes are placed end to end as in photo above. (This will be the left or right side of your piece.)
Using a color comparable to the surrounding hexagons so that this piece does not “jump out” at you, join with Slst to second dc of the corner. dc in joining St. Ch-3. Skip a St. In next 8 Sts: TTR 2, DTR, tr 2, Htr, dc 2. Skip center dc of peak corner. In the next 8 Sts: dc 2, Htr, tr 2, tr, ttr 2. Make ttr decrease as follows: work ttr in next St (first dc of first valley corner) until right before last step leaving final 2 loops on hook. Work ttr in third dc of second valley corner and at the final step, pull yarn through all 3 loops on hook. Fill in remainder of gap by working your graduated height stitches as before. Make sure to skip that top peak corner center dc. Work across until the end of the row.

On the left hand side of the blanket, this zig-zag goes all the way up. Reverse the shaping of this corner so that the point is oriented in the correct direction. In the final dc, work a ttr.

On the right hand side of the blanket there will be a few zig-zags before the striped corner starts. See above photo.
Work Blanket Border
Rnd 1: (dc Rnd) Attach yarn with Slst in a corner that comes right before the left side (the full side of zig-zags) and 3dc in joining St. Work dc all around as below, making 3dc in all the corners. Join with Slst to beg dc and do not cut.
How many Sts should you make around??? First Zig-zag side: Make 101 dc evenly between 3dc corners. If your blanket is bigger than this one, dc 8 at the beginning and end of the row (not including 3dc corners). dc 17 across each filled in gap.
First Half-hex side: Make 75 Sts evenly between 3dc corners. If your blanket is bigger, dc 5 at the beginning and end of the row (not including 3dc corners). dc 9 across top of each full hex, dc 19 across top of each half-hex. For example, if you have 5 full hexes and 4 half-hexes, you will make: 5, (9, 19) x4, 9, 5 = 131 dc between 3dc corners.
On the next two sides, you will encounter the striped edges… Please take care to make the same number of dc on these two sides as you have on the opposing sides, because your lace round will require some fudgery if you don’t…
Rnd 2: Take a deep breath. (Ch Sp Rnd) First side: (dc, Ch-2, dc) all in corner St. [(Ch-2, skip St, dc) 3 times, Ch-3 skip 2 Sts, dc, (Ch-2, skip St, dc) 3 times, Ch-3, skip 3 Sts, dc] repeat across to corner. (dc, Ch-2, dc) in corner St. You should be looking at 11 larger Ch-3 Sps, with 3 smaller Ch-2 Sps in between them. The large loops center over the hexagon peaks and the center TTR decreases 36 Ch-2 Sps, 11 Ch-3 Sps, 2 corner Ch-2 loops
Second side:Your corner loop is worked already. (Ch-2, skip St, dc) 4 times, [Ch-3, skip 3 Sts, dc, (Ch-2, skip St, dc) 5 times] repeat to corner. (dc, Ch-2, dc) in corner St. You should be looking at 5 large Ch-3 Sps, with 5 small Ch-2 Sps between them. These large Sps should be centered over the hexes (full and half) 28 small loops, 5 large loops
For the remaining two sides, carefully place your loops over the striped area in the same spacing at their opposing sides. After final Ch-2, join in beg dc and do not finish off. If your blanket is larger, follow the same guidelines for spacing.

Rnd 3: (Picot shell round) First side: All in corner loop: [(dc, Ch-2) counts as dtr, (Ch-3, dc in dtr) Picot made – see page ___ for visual, (dtr, Picot) 5 more times, dTR again for a total of 6 picot and 7 dTR. Skip Ch-2 Sp, dc in next Ch-2 Sp) Corner Shell made. [Skip next Ch Sp, All in next Ch-3 Sp: [(dTR, Picot) 4 times, dTR], skip next Ch Sp, dc in next Ch Sp] Large Shell made over five Ch Sps. Ch-2, dc in next Ch Sp. All in next Ch-3 Sp: [(tr, Picot) 3 times, tr, dc in next Ch Sp] Small Shell made over 3 Ch Sps. **Ch-2, dc in next Ch Sp. Large Shell, Ch-2, dc in next Ch Sp, Small Shell** across. 6 Large Shells, 5 Small Shells, 10 Ch-2 Sps
Second side: Make Corner Shell, Ch-2, dc in next Ch Sp, Large Shell, **Ch-2, (dc , Picot, dc) in next Ch Sp, Ch-2, dc in next Ch Sp, Large Shell** across to next corner. 5 Large Shells, 4 Picots Ch-2, dc in next Ch Sp, Make Corner, work remaining sides as opposing sides. Join and finish off – and you’re all done!
Yay! Give yourself a fist bump!
–
The PDF version of this pattern is available on Etsy, Ravelry, and in my online shop, and both US and UK Terms PDFs are included.
Copyright Information
No pattern or other material may be reproduced — mechanically, electronically, or by any other means, including photocopying — without written permission of Rachele Carmona. This applies to all content on CypressTextiles.net, BabyLoveBrand.net, and all other sites used by Rachele Carmona including social media. Paid patterns are for personal use only. You may sell your finished crocheted items, but do not use my photos to sell your items.
RACHELE CARMONA
Crochet Designer & Fiber Artist
Happy crafting,
Rachele C.
Buy my pattern book – I wrote a super neat crochet blanket pattern book, published under Penguin Random House. You can buy it here!
You may also enjoy:
- Treble Scallop Edging – Free Crochet Pattern
- VVCAL 2016 – Free Crochet Blanket Pattern
- Happy Little Tree – Free Crochet Blanket Pattern
Support My Work
You’re supporting by just being here! You can read my blog (Start Here!), like and comment on socials, and message me for a chat. All of this supports my work free of charge!
- Affiliate links – Shopping through my links supports me at no additional cost to you as I get a small commission through my affiliates. Jimmy Beans Wool // WoolWarehouse // Amazon.com
- Buy my pattern book – I wrote a super neat crochet blanket pattern book, published under Penguin Random House. You can buy it here!
- Browse my self-published patterns – I have over a hundred patterns on Etsy and Ravelry
- Creative Art Blanket Course – Check it out on Podia
Where to Find Me
- Instagram: @cypresstextiles
- Facebook Page: CypressTextiles
- YouTube Channel: Rachele Carmona
- Pinterest: CypressTextiles
- Tumblr: CypressTextiles
- Etsy: CypressTextiles
- Ravelry: Rachele Carmona
- Podia: Creative Art Blanket Course