
Hello, gorgeous crafter! I recently shared everything I know about creating multicolor motif blankets, or scrappy blankets, or however you would like to call it when you organize all of your remnants and make a blanket. Knowing how to make something out of nothing like this is a very good skill to have – and I say skill because it definitely is a learned skill! But once you get the feel for it, you can effortlessly whip up remnant motifs after each project, and once you have enough piled up, you can create a thing of beauty.
Head to my “All those ends!” post, so you can read all of my tips and tricks for making a multicolor motif blanket.
Current Crafty Events
Before I jump into the free demo pattern, I want to share a few crafty goodies with you! First, I want to remind you that the 2024 VVCAL starts on Friday, March 22nd.
You can read all about the 2024 VVCAL at the Main Info Post!

–
The VVCAL is my largest project, community-wise, every 2 years, and each VVCAL I have so much fun seeing everyone’s makes! You can use remnants or you can buy the yarn needed. All of the details are in the blog post. Have fun with it and I look forward to having you join!

–
Next up, I have this gorgeous Desert Bloom Blanket, the large version, made by IG crafter @hiladels, who always chooses the most amazing color palettes and is one of the fastest makers I know. Check out her gorgeous blanket. Pattern on Etsy, Ravelry, and My Online Shop

–
Isn’t it lovely? The border is so pretty in this darker color.
Lastly, I have an incredible beginnings of a WIP which combines my French Braid, Mondo square with the sashing motifs from the Color Riot Blanket. This make is by “The Yarn Juice” on Facebook.
Here is my French Braid Mondo Square – Etsy, Ravelry, My Online Shop:

–
Here is my Color Riot Blanket – Etsy, Ravelry, My Online Shop:

–
And look at the combo! Doesn’t it look amazing? I’m floored.

–
Thank you for checking out these awesome crafty goodies, and now let’s move on to the Free Demo Pattern!
7 Steps to a Scrappy No-Waste Blanket
I have broken the entire scrappy blanket process down into steps so that you can follow along for a pile of motifs that you already have, or so you can plan a scrappy blanket from the start. These steps are completely covered in the “All Those Ends?” and more blog post.
Here is a list of the steps, as I will be following them while I show you my demo remnant blankets. I wanted to show you this way so you can see exactly how to use the 7 steps.
- Step 1: Choose a Design
- Step 2: Plan a Color Palette
- Step 3: Organize an Intentional Color Layout
- Step 4: Plan the Physical Layout (Length x Width)
- Step 5: Create Motifs + Weave Ends
- Step 6: Joining Method + Prep for Border
- Step 7: Border Construction
Free Demo Pattern: Mini Hexies Blanket
In this post, I walk you through an example project showcasing the seven steps to a finished multicolor motif blanket. For the ultimate beginner’s guide, I didn’t want to just tell you the process, and then set you free to figure it out on your own.

–
I want to show you a demo blanket from start to finish, and dive into the details and questions that you may have while you work on your project. This pattern/tutorial is a simple hexagon stash buster and remnant eater that consists of either smallish motifs or miniature hexagon motifs.

–
Step 1: Choose a Design
This demo uses either Mini Hexagons or Small Hexagons, and below, I will give the patterns for both. You can choose which one you want to make based on how long your remnants are. My advice would be to make a sample Small Hexagon, and a sample Mini Hexagon, and then each time you work on a project, you can make a pile of Small Hexagons and a pile of Mini Hexagons with the remnants. You can also simply pull yarn from your stash and make motifs from it.
Working these small and mini hexagon motifs, then joining with a continuous single crochet join, then adding the simple border are all pattern components that are the most conducive to making and, most importantly, completing the remnant blanket.
This post’s patterns are in US Terms. Since this is just a free guide with very basic stitches, and not a full pattern, I didn’t make a UK Terms post.
Stitch Guide (US Terms)
- ch chain
- beg beginning
- beg dc (1sc, ch 1) – counts as 1 dc
- beg tr (1sc, ch 2) – counts as 1 tr
- dc double crochet
- hdc half double crochet
- lp(s) loop(s)
- MR Make Ring: Ch3, ss in third ch from hook
- rep repeat
- RS/WS right side/wrong side of work
- sc single crochet
- sp space
- ss slip stitch
- st(s) stitch(es)
- tr treble crochet
- yoh yarn over hook
Small Hexagon Pattern

–
Make as many small hexagons as you need for your desired size blanket. The layout schematic below is an example of how the hexagons will be laid out. You can see at the start and end of every other row, there is a half-hexagon.
Tip: Be sure to make an odd number of rows so that there is a half-hexagon at the top edge and bottom edge of your blanket. This will make the border easier later on.

–

–
Yarn amount: Make a sample Small Hexagon so that you can see how much yarn each motif will use, that way when you try to use remnants, you know if you have enough to make the motif, or a half motif, or if you should save the smaller remnants for the Mini Motif.
Note: Work over the first yarn end completely, so that you do not have to weave it in later on. This will help you reach your finished object goal, since you won’t be daunted by tons of ends to weave in.
Round 1 MR, beg dc, [ch1, 2dc] 5 times, ch1, 1dc, ss in beg dc. [12 dc, 6 sp]
Round 2 Beg dc in ch-sp, [ch1, 1dc in same sp, 2dc, 1dc in next ch-sp] 6 times omitting final dc, ss in beg dc. [24 dc, 6 sp]
Round 3 Beg dc in ch-sp, [ch1, 1dc in same sp, 4dc, 1dc in next ch-sp] 6 times omitting final dc, ss in beg dc, cut yarn. [36 dc, 6 sp]
Note: You can leave the cut yarn end until it is time to join the hexagons, and work over these tails while you are making the continuous single crochet join later on.
Small Half Hexagon Pattern

–
Make as many as are needed for your layout.
Row 1 MR, beg dc, [ch1, 2dc] 3 times, ch1, 1dc, turn. [8 dc, 4 sp]
Row 2 (Beg dc, ch1, 1dc) in first ch-sp, * 2dc, (1dc, ch1, 1dc) in next ch-sp, rep from * 2 times, turn. [14 dc, 4 sp]
Row 3 (Beg dc, ch1, 1dc) in first ch-sp, * 4dc, (1dc, ch1, 1dc) in next ch-sp, rep from * 2 times, cut yarn. [20 dc, 4 sp]
Mini Hexagon Pattern

–
Note: Work over the first yarn end completely, so that you do not have to weave it in later on. This will help you reach your finished object goal, since you won’t be daunted by tons of ends to weave in.
Round 1 MR, beg dc, [ch1, 2dc] 5 times, ch1, 1dc, ss in beg dc. [12 dc, 6 sp]
Round 2 Beg dc in ch-sp, [ch1, 1dc in same sp, 2dc, 1dc in next ch-sp] 6 times omitting final dc, ss in beg dc, cut yarn. [24 dc, 6 sp]
Note: You can leave the cut yarn end until it is time to join the hexagons, and work over these tails while you are making the continuous single crochet join later on.
Mini Half Hexagon Pattern
Make as many as are needed for your layout.
Row 1 MR, beg dc, [ch1, 2dc] 3 times, ch1, 1dc, turn. [8 dc, 4 sp]
Row 2 (Beg dc, ch1, 1dc) in first ch-sp, * 2dc, (1dc, ch1, 1dc) in next ch-sp, rep from * 2 times, turn. [14 dc, 4 sp]
Step 2: Plan a Color Palette
Sort your remnants for a no-waste approach to crafting. You can sort them into piles of rainbow colors, or in color family piles.
I like to put each color pile into re-usable bags, or fancy ceramic bowls, and then I can keep an eye on how many I have of each color family.
For the small hexie blanket demo, I am creating a simple rainbow blanket llayout.
Small Hexie Blanket – Simple Rainbow
Put your color piles into a circle like the color wheel, so that you can see where you are lacking if you want to make some more motifs.

–
Mini Hexie – Detailed Rainbow
For the Mini Hexies, I had a lot more different colors to work up, since I used smaller remnants from a lot of projects. There are probably 7 different yarn brands/lines in this hexie pile. You can definitely mix yarn lines as long as the care instructions are all the same, and the yarn thickness is similar enough.

–
Step 3: Organize an Intentional Color Layout
In my Creative Art Blanket Course, I have a TON of information on organizing a layout, but for the purposes of these demo blankets, I will compare and contrast the two color layouts I have chosen.
Small Hexie Blanket – Galaxy Style
I like to think of this style as putting the colors roughly in the order of the color wheel, with lighter tones toward the center. I put browns with the yellows, black with the dark blues, and white toward the center.
If you have a limited amount of colors, then you can choose the galaxy type layout, and your blanket will look amazing. For example, let’s say you have a lot of reds, and a lot of blues, but barely any green. That is my situation with the blanket below. You won’t necessarily be able to make a full rainbow, but you can still create a beautiful layout and have the colors flow in and out of each other.

–
My Happy Little Tree Blanket is made with the Stone Washed and River Washed Colour Pack, and it is also in the “Galaxy” layout. The main focus here is that the colors are swirling in a circle, rather than straight across in layers or stripes.

–
My Geometric Lace Blanket is also made with a Galaxy Layout:

–
And here is another one in the Galaxy Layout with slightly different colors, but you can see the colors swirl in a circle.

–
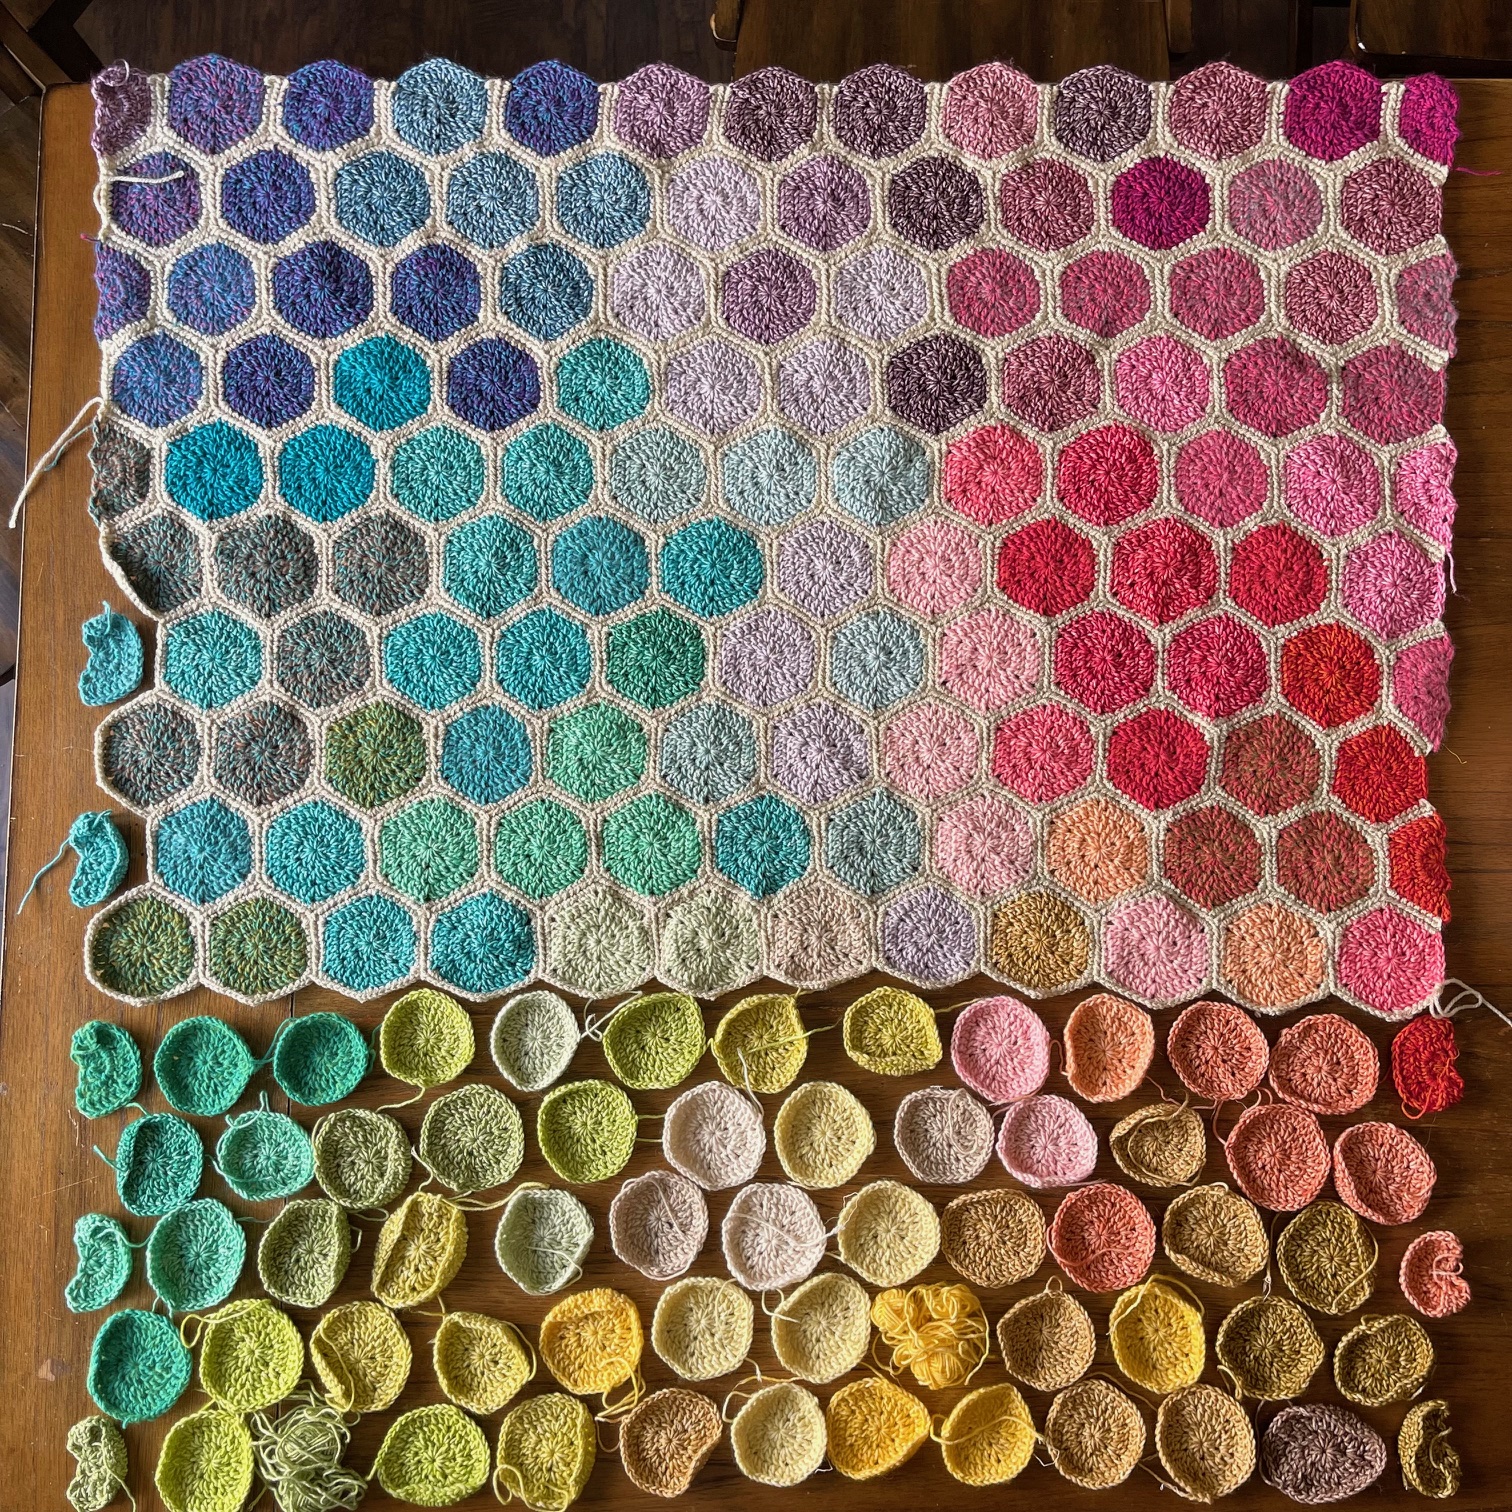
Mini Hexies – Split Rainbow
For the Mini Hexies Demo, I have a lot more colors, and I wanted to play with splitting the rainbow. Here are my color motifs arranged in a circle. We will be placing these colors in stripes on the final layout.

–
From a bird’s eye view, you can see that I have 10 color families or color groups.
- Violet
- Blue-red
- Orange-Red
- Orange
- Yellow
- Yellow-green
- Blue-Green
- Teal
- Blue
- Purple

–
What does “split the rainbow” mean?
It means that you take any of the white lines in the photo above and you make that the “split” – this means that your blanket will start at the top with that color and continue around reaching the final color at the split for the bottom edge of the blanket.
For example, you can split it this way, and make your stripes in this order:
- Blue-Green
- Teal
- Blue
- Purple
- Violet
- Blue-red
- Orange-Red
- Orange
- Yellow
- Yellow-green
That is how I split the rainbow for this blanket, with blue-greens at the top:

–
For this piece, I made so many demo hexagons for the 2022 VVCAL that I decided to use them all in one blanket, and I split the rainbow between yellow and yellow-green. Yellow is at the top, and yellow-green is at the bottom.

–
Typically, I split the rainbow to add visual interest to what would be the “normal” rainbow order. However, for my Mini Hexies, I decided to use a pretty standard rainbow order, and start with Violet, ending with purple.
I placed my color groups in reusable bags which I have had and reused for years and years, don’t come for me. I completely eyeballed these piles and did not count them out exactly, so when I had a few colors leftover on a row, I just used them on the next row. This also creates a smoother color-fade.

–
Normally I don’t add in a pink row but I had a lot of red and pink, so I made them into 2 separate color piles. If you have a lot of a certain color, like red, you can separate out the pinky-reds like this. You can also add more to other sections of the blanket to even it out.

–
You could also split red-orange and yellow-orange into 2 piles, but I often don’t have enough oranges to do this, so I just put these colors where they most make sense in the layout.
When I created the half hexies, I did not really look at what color to use. I just made a lot of different colors and will use them wherever they look best.

–
Step 4: Plan the Physical Layout
This is where you plan the physical layout, whether you are going to have 8 hexies wide, and 15 hexies long, depending on how you want the blanket schematics to be.
You can also pick whether you want the half hexies at the top edge of the blanket, or at the sides, as shown in these two schematics.

–

–
I show the schematic layout for the Small Hexies Blanket above, and for the Mini Hexies I will show you below. For your viewing pleasure, and educational purposes, I have a complete series of photos showing where I placed the colors in each group.
Violet

–
Pinky-Reds

–
Red

–
Orange

–
Yellow

–
Yellow-Green

–
Blue-Green

–
Teal

–
Blue

–
Purple

–
Another angle of this sea of beauty:

–
When I showed this WIP on socials, someone said it looks like the work of Spanish architect Antoni Gaudi, and I can see it, especially in this one. His works are really incredible; I recommend having a Google deep-dive!

–
Step 5: Create Motifs + Weave Ends
As I mentioned in the pattern above, there is a definite stigma against multicolor blankets due to folks thinking that weaving ends is the most daunting task. Therefore they see a multicolor blanket and think “all those ends!” and won’t make it.
For the Mini Hexies demo and the Small Hexies demo, I show that choosing your joining method wisely will help you work over the ends as you go.
The first yarn end is created by starting the motif, and you should work over it as you create the motif. the second yarn end is created when you cut the yarn after the motif is finished. You can leave this end until you join, and then work over these ends when you make your single crochet continuous join as you go.
Step 6: Joining Method + Prep for Border
The joining method is very important here. I like this chosen join because continuous joining makes it more likely that you will finish you blanket, and it lets you work over all those ends, without adding more ends to weave. Normally when joining motifs one by one, and cutting after each motif, you will add more ends to your blanket. With the continuous join, you only add 2 ends, 1 at the beginning and 1 at the end of your join.
Small Hexies Joining
For the small hexies, I’m using Colour Crafter yarn, even though I used Stone Washed for the motifs. It’s perfectly fine to use different yarns across lines, as long as your yarns are all easy care.

–
You can find instructions for this joining method here. There are videos linked in that post as well.
Here is the joining path:

–

–
Another view:

–
More joining progress!

–

–
Mini Hexies Joining
Here is how I am joining the mini hexies. I decided to use Scrumptious Yarn, and I also went through the back loop only when I was making my single crochet stitches, because the mini hexies are so small, they lost their shape when I didn’t go through BLO.

–
Another angle. I still have motifs to join on this demo!

–
Prep for the Border
To prep for the border, you need to add the half hexies onto the blanket after all of the full motifs are joined together. Do this by joining the border yarn at the edge, and joining on the 3 sides of the half motif. On the half motifs at the top and bottom, you will only need to join 2 edges.

–
Here is the half motif all joined in.

–
Fill zig-zag sides:
These photos are from my free Happy Little Tree Blanket pattern but the method is the same. I use gradually taller stitches as I work toward the “valley”, and then gradually shorter stitches as I reach the opposite end of each triangle dip.

–
This photo shows the end and how the zig-zag fill starts.

–
Once your half hexagons are all added in, and the triangle zig-zag sides are filled in, your blanket is squared off and ready for a border.
Step 7: Border Construction
On the Happy Little Tree Blanket, I used a zero-waste border, but since for these two demos, I used a solid color for joining, I will be making the Happy Little Tree Blanket border, but with the solid joining color.
A word on resizing blanket border – Round 1 st count: (3sc corner, sc an amount divisible evenly by 3) 4 times.
Rnd 1 Holding blanket with siz-zag side at the top, join yarn with ss in the top right corner. * 3sc in corner, sc in all sts across to next corner being sure to make a number of sts that is evenly divisible by 3, 3sc in corner, make 117 sc evenly across to next corner as follows: generally, you will make 13 sc across each half hexagon, and 8 sc across each full hexagon. Rep from * 1 time, ss in first sc.

–
Rnd 2 Beg dc in corner sc, * 8 dc in same corner st, (sk2, dc, ch1, dc in same st as previous) across to corner, sk2, dc in corner st, rep from * 3 times omitting final st, ss in beg dc.

–

–
Rnd 3 Beg tr in next st, ch3, sc in fourth ch from hook, * (tr, picot) in 6 more sts of corner, tr in final st of corner, sk 1 sp, (2tr, picot, tr) in all sps across to 1 sp before corner, sk 1 sp, (tr, picot) in first 2 sts of corner, rep from * 3 times omitting final tr and picot, ss in beg tr, cut yarn and finish off all ends.

–

–

–

–

–
Thank you for reading along with the demo blankets for my 7 steps to an easy multicolor motif blanket. I hope it was helpful and will make it easier to create these blankets! Using remnants in this way is very rewarding.
Happy crafting!
Rachele C.
The Art of Crochet Blankets (my book on Amazon)
Support My Work
You’re supporting by just being here! You can read my blog (Start Here!), like and comment on socials, and message me for a chat. All of this supports my work free of charge!
- Affiliate links – Shopping through my links supports me at no additional cost to you as I get a small commission through my affiliates. Jimmy Beans Wool // WoolWarehouse // Amazon.com
- Buy my pattern book – I wrote a super neat crochet blanket pattern book, published under Penguin Random House. You can buy it here!
- Browse my self-published patterns – I have over a hundred patterns on Etsy and Ravelry
- Creative Art Blanket Course – Check it out on Podia
Where to Find Me
- Instagram: @cypresstextiles
- Facebook Page: CypressTextiles
- YouTube Channel: Rachele Carmona
- Pinterest: CypressTextiles
- Tumblr: CypressTextiles
- Etsy: CypressTextiles
- Ravelry: Rachele Carmona
- Podia: Creative Art Blanket Course