
Hello, lovely crafter! Many of you have enjoyed my Desert Bloom Blanket crochet pattern over the years, and now I am happy to offer it to you as a free pattern! Written instructions are below for this blanket, suitable for the adventurous beginner. There are some charted guides, written instruction, and a lot of photos to use for this one. I challenge you to have a play with the colors to suit your preferences!
PDF Format
The PDF version of this pattern is available on Etsy and Ravelry, and both Large and Small blanket versions are included in the purchase. (PDF in US and UK Terms included – 4 PDFs total).
This pattern is in US Terms – Click here for UK Terms
Desert Bloom Blanket Free Pattern Versions
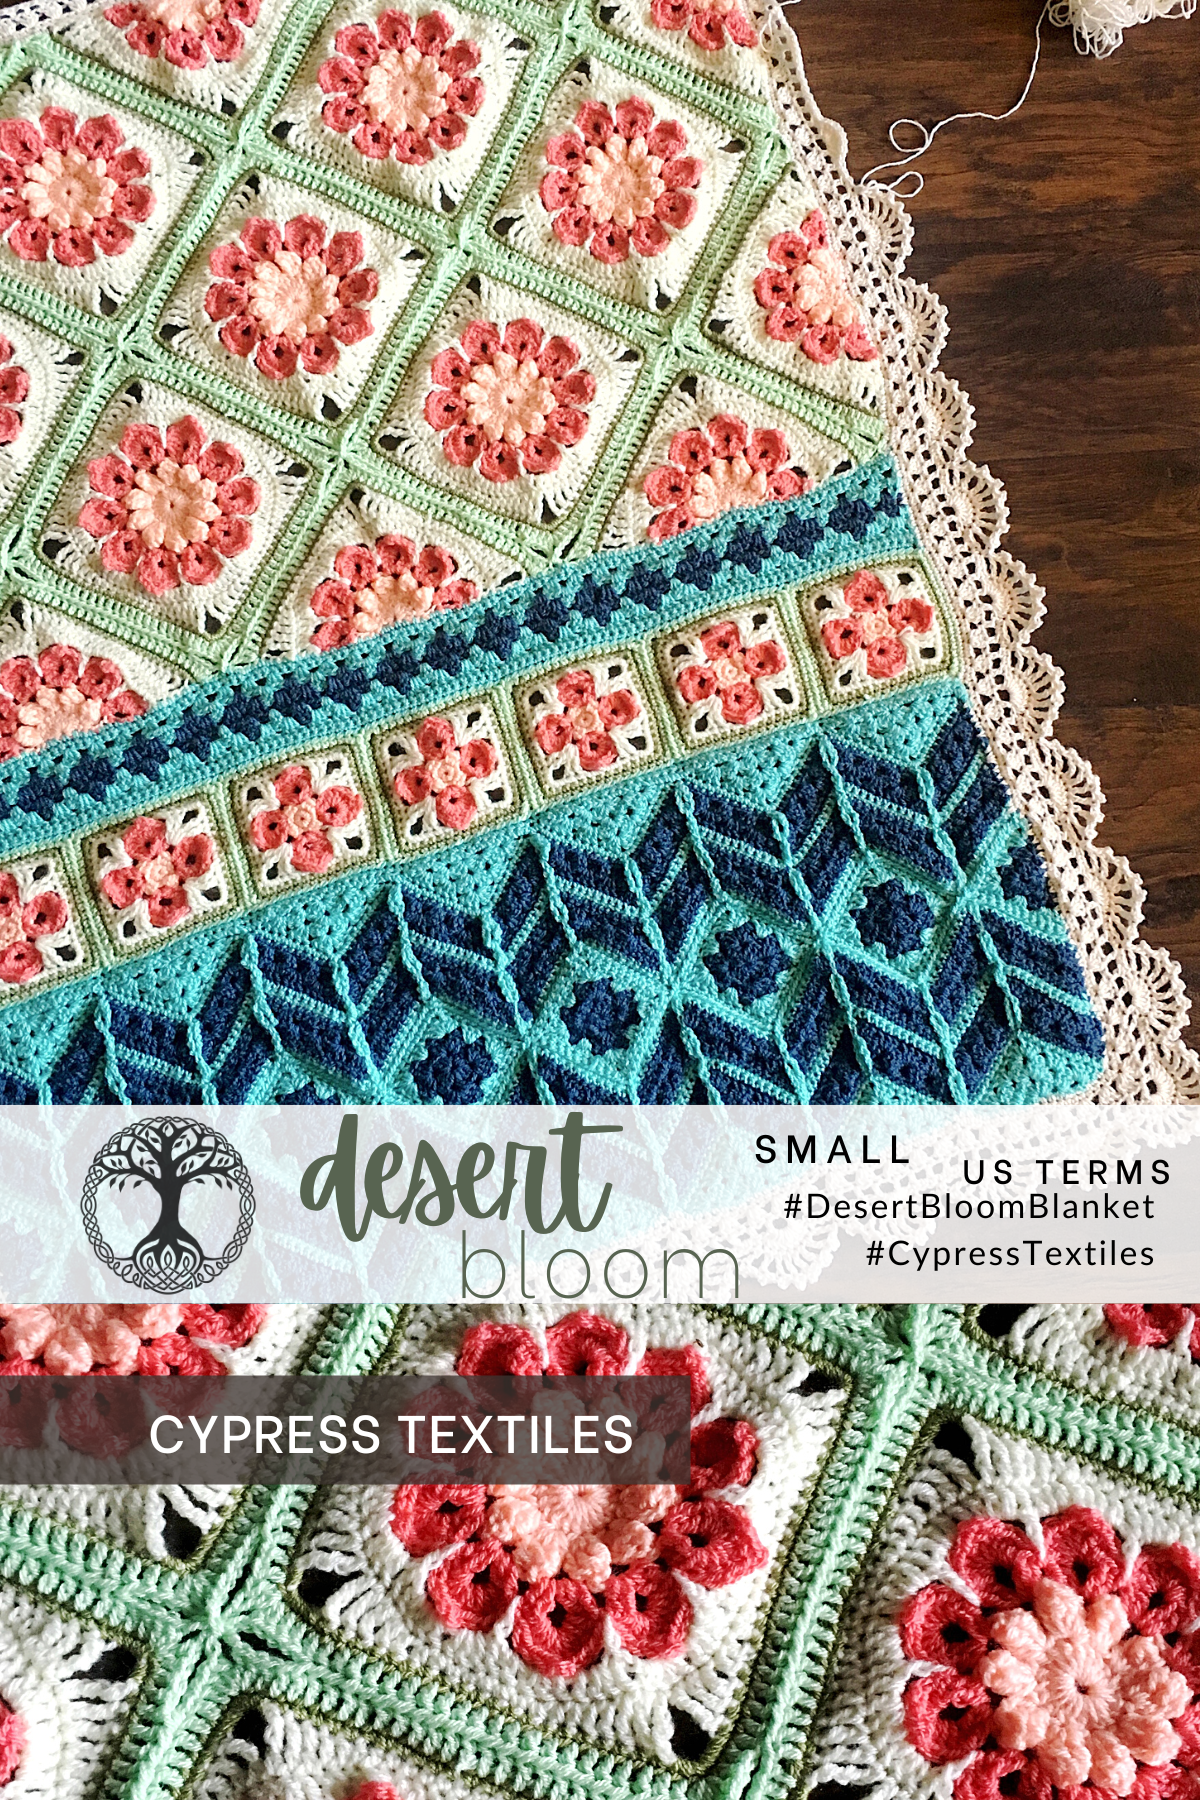
This version is the SMALL VERSION (36x46in), and the LARGE VERSION (70x70in) will be in a separate post, as shown below.
- Small Version, US Terms (You are here!)
- Small Version, UK Terms
- Large Version, US Terms
- Large Version, UK Terms

Desert Bloom is a great make for a baby or even housewarming as a gift. With all the different stitches, you’ll zoom through it in no time! Although it isn’t a piece designed for mindlessly crafting in front of your favorite TV show, the detailed patterning is worth all the attention. Included are joining and border instruction, and feel free to use the motifs in a blanket or bag. Have fun with it!

–
I created this blanket after being inspired by the cute dress in the photo above! You can see the echoes of the panels in the dress. Also shown is the initial sketch I drew up to begin my design process.

–
Project Details
- Skill Level Adventurous Beginner
- Measurements Finished piece is about 36x46in.
- Materials Scheepjes Colour Crafter (details below), Size 4.5mm Crochet Hook, and size 5mm hook
- Social Media Instagram, Facebook, Twitter, Pinterest, Etsy, Ravelry: CypressTextiles
- Hashtags #DesertBloomBlanket #CypressTextiles
Gauge
- Motif A measures 6in square using hook indicated in pattern.
- Motif C measures 4.75in square using hook indicated in pattern.

–
Yarn + Affiliate Links
Shopping through these links will gain me a small commission to support CypressTextiles, at no additional cost to you!

–
Scheepjes Colour Crafter Yarn
Head to Jimmy Beans Wool (USA) or WoolWarehouse (Worldwide) to shop Colour Crafter in the amounts shown below, through my affiliate link.
Scheepjes Colour Crafter (100% Acrylic; 300m/100g)
- Yarn A: 1005 x 1 ball
- Yarn B: 1026 x 1 ball
- Yarn C: 1132 x 1 ball
- Yarn D: 1065 x 1 ball
- Yarn E: 1316 x 1 ball
- Yarn F: 1725 x 1 ball
- Yarn G: 1708 x 1 ball

–
Repeat and Bracket Guide
Square brackets [ ] are used for small repeats: 4dc, [2dc, 3tr, 2dc] 2 times
Asterisks *are used for repeats that include small repeats: *5dc, [1ch, 1dc] 3 times in next ch, rep from * 3 times
Round brackets ( ) are used when a string of stitches are worked into the same spot: (3tr, 3ch, 3tr) in next st
Stitch Counts are given at the end of rows where necessary, in the following format: [12 dc, 3 sp]
Tips and Notes
- Weave your ends after each time you cut the yarn to avoid having to do them all at the end.
- Please read the stitch guide for any abbreviations.
- To get a neater result, I do not “chain up” for the first sc of the round/row. Jump straight into the first sc.

–
Stitch Descriptions (US Terms)
- as folls as follows
- beg beginning
- beg dc beginning double crochet: sc, ch 1 (counts as 1 dc)
- beg dc2tog beg dc, dc in next st, beg dc does not count as a st
- beg dtr beginning double treble crochet: sc, ch 3 (counts as 1 dtr)
- beg pop beginning popcorn: All in same st/sp: Beg tr, 3 tr, remove loop from hook, insert hook in beg tr and pull loop to front of work, closing popcorn
- beg tr beginning treble crochet: sc, ch 2 (counts as 1 tr)
- bet between
- ch(s) chain(s)
- ch-sp(s) chain space(s)
- ch-1 sp(s) chain 1 space(s): number denotes number of chains in chain space
- corner-sp corner space
- dc double crochet
- dc2tog double crochet 2 together: (yoh, insert hook in next st/sp, yoh, pull up loop, yoh, draw through 2 loops) twice, yoh, draw through all loops
- dc3tog double crochet 3 together: (yoh, insert hook in next st/sp, yoh, pull up loop, yoh, draw through 2 loops) 3 times, yoh, draw through all loops
- dec decrease
- dtr double treble crochet
- hdc half double crochet
- incl including
- lp(s) loop(s)
- MR Make Ring: Ch3, ss in third chain from hook
- picot ch 2, sc in top side bars of previous stitch
- pop popcorn: 4 tr in same st/sp, remove loop from hook, insert hook in first tr and pull loop to front of work, closing popcorn
- rep(s) repeat(s)
- RS right side
- sc single crochet
- sc2tog single crochet 2 together: (insert hook in next st/sp, yoh, pull up loop) twice, yoh, draw through all loops
- ss slip stitch(es)
- st(s) stitch(es)
- tog together
- tr treble crochet
- WS wrong side
- yoh yarn over hook

–
Instructions
The PDF version of this pattern is available on Etsy and Ravelry, and both Large and Small blanket versions are included in the purchase. (PDF in US and UK Terms included – 4 PDFs total).
Schematic and Construction Notes
There are 5 panels that make up this blanket, as shown in the schematic below. Read the notes about each panel carefully as these are helpful construction notes. This is the order in which we will create the Desert Bloom Blanket.

–
Yarn Colors for Reference
- Yarn A: 1005
- Yarn B: 1026
- Yarn C: 1132
- Yarn D: 1065
- Yarn E: 1316
- Yarn F: 1725
- Yarn G: 1708
Flower Panel No. 1
Note: Motif A and Motif B are worked separately and completely through rnd/row 8 without any joining as instructed below. Great to take along in your traveling WIP bag!
Motif A – Full Large Flower (Make 7)
Rnd 1 Using smaller hook and Yarn B, MR, beg dc, 19dc, ss in beg dc. [20 dc]

–
Rnd 2 In next st, beg pop, [ch3, sk1, pop] 9 times, ch3, ss in beg tr, cut yarn. [10 pop, 10 sps]

–
Rnd 3 Join Yarn C with ss in any ch-sp, beg dc in same sp, [ch3, 2dc in same sp, 2dc in next sp] 10 times omitting final dc, ss in beg dc.. [40 dc, 10 sps]

–

–
Rnd 4 Beg dc in first ch-sp, * (3dc, picot, 4dc) in same sp., sk 1 dc, sc in between next 2 dc, 1dc in next sp, rep from * 9 times omitting final dc, ss in beg dc, cut yarn. [80 dc, 10 sc, 10 picot]

–

–

–

–
Rnd 5 Join Yarn A with ss between any 2 “petals”, (around the sc from rnd 4 as shown below), beg dc in same spot, [ch6, 1dc around next sc] 9 times, ch6, ss in beg dc. [10 dc, 10 sps]

–
Tuck ch-6 sps behind “petals” as shown in photo below.

–
Rnd 6 Beg dc in first ch-sp, * [2 dc in same sp, note 3 horizontal bars behind Picot, and to anchor petal, 1dc in the lower 2 bars and around center of ch-6 lp, 3dc in ch-sp], 1dc in next dc, 1dc in ch-sp, rep from * 9 times omitting final dc, ss in beg dc. [80 dc]

–
Rnd 7 Changing to larger hook for rem rnds, beg dtr in next st, * ch3, 1dtr in next st, 2tr, 2dc, 2hdc, 6sc, 2hdc, 2dc, 2tr, 1dtr, rep from * 3 times, omitting final dtr, ss in beg dtr, cut yarn. [8 dtr, 16 tr, 16 dc, 16 hdc, 24 sc, 4 sps]

–
Rnd 8 Join Yarn D with ss in any ch-sp, [5sc in ch-sp, 20sc] 4 times, ss in first sc, cut yarn. [100 sc]

–
Full Large Flower Chart
Final round shown on chart is joining round, to be worked later.

–
Motif B – Half Large Flower (Make 10)
Row 1 (WS) Using smaller hook and Yarn B, MR, beg dc, 10dc, turn. [11 dc]

–
Row 2 Beg tr, ch1, pop, (ch3, sk1, pop) 4 times, ch1, 1tr in final st, cut yarn, turn. [2 tr, 5 pop, 6 sps]

–
Row 3 Join Yarn C with ss in first st, beg tr in same st, ch1, 2dc in ch-1 sp, (2dc, ch3, 2dc) in next 4 ch-sps, 2dc in ch-1 sp, ch1, 1tr in final st, turn. [2 tr, 20 dc, 6 sps]

–
Row 4 Beg dc, picot, 4dc in ch-sp, * sk 1 dc, 1sc between next 2 dc, (4dc, picot, 4dc) in next ch-sp, rep from * 3 times, sk 1 dc, 1sc between next 2 dc, 4dc in next ch-sp, picot, 1dc in final st, cut yarn, turn. [42 dc, 5 sc, 6 picot]

–
Row 5 Join Yarn A with ss in first st, 1sc in same st, ch3, [1dc bet 2 “petals” as before, ch6] 4 times, 1dc bet next 2 “petals”, ch3, 1sc in final st, turn. [2 sc, 5 dc, 6 sps]

–
Row 6 Beg dc in first st, 1dc to anchor petal as before, 3dc in ch-sp, * 1dc in next dc, (3dc, 1dc to anchor petal, 3dc) in next ch-sp, rep from * 3 times, 1dc in next dc, 3dc in ch-sp, 1dc to anchor petal, turn. [42 dc]

–
Row 7 Switch to larger hook, beg dtr in first st, ch 1, 1dtr in next st, [2tr, 2dc, 2hdc, 6sc, 2hdc, 2dc, 2tr, 1dtr, ch3, 1dtr] 2 times omitting final (ch3, 1dtr), ch1, 1dtr in final st, cut yarn, turn. [6 dtr, 8 tr, 8 dc, 8 hdc, 12 sc, 3 sps]

–
Row 8 Join Yarn D with ss in first st, 1sc in same st, 2sc in ch-1 sp, 20sc, 5sc in ch-sp, 20sc, 2sc in ch-sp, 1sc in final st, cut yarn. [51 sc]

–
Half Large Flower Chart
Final row shown on chart is joining row, to be worked later.

–
Join Motifs A and B to make Panel 1
Note: Motifs will be joined with Yarn E in the order that they are numbered in the Schematic, with RS facing, on Rnd/Row 9 with my “PLT Join” (Pull Loop Through) join-as-you-go method. I will describe the method and I also have a free tutorial on my website, CypressTextiles.net.
Lay out Motifs A and B using Schematic as a guide. Numbers in schematic indicate joining order as lined out in instructions.

–
Here is another small guide to show the joining. It shows which corner to join to.

–
Row 9, Motif 1 Using larger hook, join Yarn E with ss in first st, beg dc in same st, * (ch3, 2dc) in same st, 24dc, 2dc in corner st rep from * 1 time, ch3, 1dc in same st, cut yarn. [58 dc, 3 sps]
Row 9, Motifs 2 and 3 Work exactly as for Motif 1, working up to final st, 2dc, (ch1, drop lp from hook, insert hook in adjacent corner ch-sp of completed motif, grab lp, Pull Lp Through ch-sp to front of work, ch2), 1dc in same st on motif in progress, cut yarn. [58 dc, 3 sps]
Photos below show PLT join maneuver.

–

–
Rnd 9, Motif 4 Join Yarn E with ss in any corner st, beg dc in same st, (ch3, 2dc) in same st, 24dc, (2dc, ch3, 2dc) in corner st, 3dc, PLT as follows: (release lp from hook, insert hook in corresponding st on completed motif, grab lp, Pull Loop Through to join), [1dc, PLT] 18 times, 3dc, 2dc in corner st, ch1, ss bet 2 Motif B, ch1, 2dc in same corner st, 3dc, PLT, [1dc, PLT] 18 times, 3dc, (2dc, ch3, 2dc) in corner st, 24dc, 1dc in first corner, ss in beg dc, cut yarn. [112 dc, 4 sps]

–
Rnd 9, Motif 5 Work exactly as for Motif 4, BUT on second corner, make joined corner with diagonally located corner ch lp on Motif 4. Leave lower corners from Motifs 1-3 unworked for now.

–

–

–
Row 9, Motif 6 Join Yarn E with ss in first st, beg dc, ch1, PLT, ch2, 2dc in same corner st, 3dc, PLT, [1dc, PLT] 18 times, 3dc, (2dc, ch1, PLT to Motif 4, ch2, 2dc) in corner st, 24dc, (2dc, ch3, 1dc) in final st, cut yarn.

–

–

–
Row 9, Motif 7 Join Yarn E with ss in first st, beg dc in same st, ch3, 2dc in same st, 24dc, (2dc, ch1, PLT to Motif 5, ch2, 2dc) in corner st, 3dc, PLT, [1dc, PLT] 18 times, 3dc, (2dc, ch1, PLT to Motif 3, ch2, 1dc) in final st, cut yarn.
Rnd 9, Motif 8 Work as for Motif 4, BUT on third (upper) corner, join with PLT to Motif 1 by inserting hook through the corner and also under the horizontally joined corners of Motifs 6 and 4, then grab the lp to pull through. This way, the corner is secure, without any holes.

–

–
Rnd 9, Motifs 9, 10, 13, 14 Work as for Motif 5, joining third corner as for Motif 8.

–

–
Row 9, Motif 11 Work as for Motif 6, BUT to join first corner, pull the corner ch lp of Motif 6 through the corner ch lp of Motif 8, then work the PLT join in it. This way all 3 corners are picked up, and the ch lp corner of Motif 8 encases the joined corners of Motifs 6 and 13.

–

–

–
Row/Rnd 9, Rem Motifs Continue in this manner, joining Motifs in numbered order.
Flower Panel No. 1 is now complete!

–
Flower Panel No. 2
Motif C – Small Flower (Make 7, joining on Rnd 8)

–
Rnd 1 Using larger hook and Yarn B, MR, 8sc, ss in first sc.
Rnd 2 [2sc, ch2] 4 times, ss in first sc, cut yarn. [8 sc, 4 sps]
Rnd 3 Join Yarn C with ss in any ch-sp, beg dc in same sp, [ch3, 2dc in same sp, 2dc in next sp] 4 times omitting final dc, ss in beg dc. [16 dc, 4 sps]

–
Rnd 4 Beg dc in ch-sp, [3dc in same sp, picot, 4dc in same sp, sk 1 dc, 1sc between next 2 dc, 1dc in next sp] 4 times omitting final dc, ss in beg dc, cut yarn. [32 dc, 4 picot, 4 sc]

–
Rnd 5 Join Yarn A with ss bet any 2 “petals”, beg tr around same sc, [ch3, 2tr in same spot, ch6, 2tr around next sc between petals] 4 times omitting final tr, ss in beg tr. [16 tr, 8 sps]

–

–
Rnd 6 [5sc in ch-3 sp, 2sc, 2sc in ch-6 sp, 1sc to anchor petal as before, 2sc in ch-6 sp, 2sc] 4 times, ss in first sc, cut yarn. [56 sc]

–
Rnd 7 Join Yarn D with ss in any corner st, [3sc in corner st, 13sc] 4 times, ss in first sc, cut yarn. [64 sc]

–
Small Flower Chart
Final round on chart below is the joining round, and will be worked in the following step.

–
Join Motif C in a line to make Panel 2
Rnd 8, Motif 1 Join Yarn E with ss in any corner st, [3sc in corner st, 15sc] 4 times, ss in first sc, cut yarn. [72 sc]

–
Rnd 8, Motifs 2-7 Join Yarn E with ss in any corner st, 3sc in same st, 15sc, 2sc in corner st, PLT in center sc of corner on adjacent Motif, 1sc in same corner st, [PLT, 1sc] 15 times, PLT, [1sc in corner st, PLT] 2 times, 1sc in same corner st, 15sc, 3sc in corner st, 15sc, ss in first sc, cut yarn. [72 sc]

–

–

–

–
Flower Panel No. 2 is complete!
Important: Make sure Flower Panel No. 2 is the same width as Flower Panel No. 1, and adjust if necessary by blocking or reworking final round with a taller stitch height, like half or double crochet instead of single crochet.
Pasting the schematic here for reference so you don’t have to scroll so far!

–
Diamond Strip
Note; This strip is worked directly off of the bottom edge of Flower Panel No. 1, and then the bottom edge of the Diamond Strip is joined to the top edge of Flower Panel No. 2. The Diamond Strip connects Flower Panels No. 1 and 2 together. Reference schematic above for clarity.
Row 1 Hold Flower Panel No. 1 with RS facing, and join Yarn F with ss in the corner chain before a long side, 2sc in same sp, 116sc evenly across, 2sc in final sp, turn. [120 sc]
Tip: Use stitch markers or small pieces of yarn to mark the center and mid points of the long side to more easily work 116sc evenly across.
Row 2 120sc, turn.
Row 3 Beg dc, sk1, [3dc in next st, sk2] across, 1dc in final st, turn. [119 dc]
Note: On Rows 4-7, all sts except first and final st are worked *between* stitches.
Row 4 Beg dc, 1dc between next 2 dc, [3dc between next 2 3-dc “groups” changing to Yarn G by pulling Yarn G through on last step of final dc, 3dc between next 2 3-dc groups changing back to Yarn F on last step of final dc] across, being sure to “drop” the color that you are not working with, “float” the yarn, and then pick up the working color each time, when final dc is reached, continue in Yarn F, 1dc between second to last and final dc, 1dc in final st, turn, carrying yarn up. [61 dc in Yarn F, 57 dc in Yarn G]
Note: On the next row, when you make the 3dc between 3-dc groups, also work over the “float” yarn, this way you conceal the floats and they aren’t hanging at the back of the work.
Row 5 With Yarn G, beg dc, 3dc between next 2 dc, 3dc between next 2 3-dc groups 38 times, 1dc in final st, turn carrying yarn up. [119 dc]
Row 6 Work as for Row 4, cut Yarn G, turn carrying Yarn F up. [61 dc in Yarn F, 57 dc in Yarn G]
Row 7 With Yarn F, work as for Row 3, turn. [119 dc]
Row 8 120 sc, turn.
Row 9 On this Row, we will PLT Join to top edge of Flower Panel No. 2. With RS facing, 1sc in first st, PLT in corner st of Flower Panel No. 2. [1sc, PLT] across, being sure to use 17 sts per Small Flower Motif. Ensure that final st of Diamond Panel joins to final corner st of Flower Panel No.2, cut yarn. [120 sc]

–

–
Diamond Strip Chart:
Red sts indicate Yarn F, Purple sts indicate Yarn G

–
Diamond Strip is Complete!
Granny Square Strip
Note: This strip is worked separately and joined onto the blanket later, so it is perfect for a traveling WIP bag!
Motif D – Full Granny Square (Make 6, joining on Round 4)
First Motif
Rnd 1 With smaller hook and Yarn G, MR. beg dc, [ch1, 2dc] 3 times, 1dc, ss in beg dc. [8 dc, 4 sps]
Rnd 2 Beg dc in ch-sp, [ch1, 3dc in same sp, 3dc in next sp] 4 times omitting final dc, ss in beg dc, cut yarn. [24 dc, 4 sps]
Rnd 3 Join Yarn F with ss in any corner sp, beg dc in same sp, [ch1, 3dc in same sp, sk2, 3dc between next 2 dc, 3dc in ch-sp] 4 times omitting final dc, ss in beg dc. [36 dc, 4 sps]
Rnd 4 [(1sc, ch1, 1sc) in corner st, 9sc] 4 times, ss in first sc, cut yarn. [44 sc, 4 sps]
Second through sixth motifs
Rnds 1-3 Work as for First Motif.
Rnd 4 [(1sc, ch1, 1sc) in corner sp, 9sc] 3 times, 1sc in corner sp, PLT in adjacent corner sp, ch1, 1sc in same corner sp on motif in progress, 9sc, ss in first sc, cut yarn. [44 sc, 4 sps]
Photos show joining to a half motif, but the process is the same.

–

–

–
Motif E – Half Granny Square (Make 2, joining on Row 4)
Row 1 (WS) With Yarn G and smaller hook, MR, beg dc, 3dc, ch1, 4dc, turn. [8 dc, 1 sp]
Row 2 Beg dc, 3dc between first and second st, (3dc, ch1, 3dc) in ch-sp, 3dc between next to last and last dc, 1dc in final st, cut yarn. [14 dc, 1 sp]
Row 3 Continuing on RS, join Yarn F with ss in first st, beg dc in same st, 3dc between first and second st, 3dc between next 2 3-dc groups, (3dc, ch1, 3dc) in ch-sp, 3dc between next 2 3-dc groups, 3dc between next to last and last dc, 1dc in final st, turn. [20 dc, 1 sp]
Row 4 (1sc, ch1, 1sc) in first st, 9sc, 1sc in corner sp, PLT in adjacent corner sp of full granny square, ch1, 1sc in same corner sp on motif in progress, 9sc, (1sc, ch1, 1sc) in final st, cut yarn. [24 sc, 3 sp]

–

–

–
Full and Half Granny Square Charts

–
Granny Square Strip Complete!
Chevron Strip No. 1
Note: I recommend using the chart, written instruction, and images together for clarity.
Chevron Strip No. 1 Chart/Guide

–
Base Triangle (Make 7)
Rows 1-3 With Yarn F, work as for first 3 rows of Half Granny Square above, turning work after every row, and do not change color to Yarn G, cut yarn. Row 1 is the RS.

–

–

–
Begin working chevron rows:
Row 1 (RS) This Row will connect the Base Triangles together. Turn all Base Triangles RS facing. Join yarn F with ss in beg dc of first Base Triangle, 1sc in same st, [9sc, (1sc, ch9, ss in previous sc, 1sc) in ch-sp, 10dc, ch9, ss in previous sc, 1sc in beg dc of next Base Triangle] 7 times omitting final ch9 and sc, cut yarn. [154 sc, 13 ch-9 lps]

–

–

–
Row 2 Note: Keep ch-9 lps at RS of work. With RS still facing, join Yarn G in first st, sc2tog over same and next st, [9sc, 3sc in back loops of ss, 10sc, sc2tog over next 2sc, 1sc in next st] 6 times, 9sc, 3sc in back loops of ss, 9sc, sc2tog, turn. [159 sc, 8 sc2tog]

–

–

–

–

–

–
Row 3 (WS) Beg dc2tog over first 2 sts, * [3dc in next sc, sk2] 3 times, (3dc, ch1, 3dc) in next sc, [sk2, 3dc in next st] 3 times, sk5, rep from * 6 times omitting final sk5, dc2tog over final 2 sc, turn. [2 dc2tog, 168 dc, 7 sps]

–

–

–

–
Row 4 Beg dc in first st, [3dc between 2 3-dc groups 3 times, (3dc, ch1, 3dc) in ch-sp, 3dc between 2 3-dc groups 3 times] 7 times, 1dc in final st, turn. [170 dc, 7 sps]

–
Row 5 Join Yarn F with ss in first st, sc2tog over next 2 sts, [10sc, 1sc in ch-sp, ch3, ss in same ch-sp AND in ch-9 lp from Row 1 treating them as one, 1sc in same ch-sp, 11sc, ch3, ss between 2 3-dc groups AND in ch-9 lp from Row 1 treating them as one, ch3, sk1, 1sc] 6 times, 10sc, 1sc in ch-sp, ch3, ss as before to anchor ch-9 lp, 1sc in same ch-sp, 10sc, sc2tog, ignore final st, turn. [166 sc, 2 sc2tog, 26 sp, 13 ss]
–

–

–

–

–

–

–
A Quick View from the Front Side

–

–
Row 6 Sc2tog over first 2 sts, [10sc, ss through both of next 2 ch-3 sps, ch9, ss in back lps of previous ss, 11sc, ss through both ch-3 sps, ch9, ss in back lps of previous ss, sk1, 1sc] 6 times, 10sc, ss through both ch3 sps, ch9, ss in back lps of previous ss, 10sc, sc2tog over final 2 sts, cut yarn, turn. [152 sc, 13 ch-9 lps, 13 ss, 2 sc2tog]

–

–

–

–

–
Rows 7-9 With WS facing, join Yarn G with ss in first st, repeat Rows 2-4 keeping ch-9 lps at RS of work on Row 7. Photo 1 shows where to place the 3sc at the “Peak”, and photo 2 shows the sc2tog decrease at the “Valley”, cut yarn.

–

–

–

–

–
Row 10 With WS facing, join Yarn F, and repeat Row 5, turn.
Row 11 Join to Granny Square Strip. Work exactly as for Row 6, but after every st, PLT join to corresponding st on Granny Square Strip. Every time you approach a peak or a valley, slip st both chain 3 loops to close and continue to join in every stitch. Photos below show joining of Chevron Strip No. 2, but the process is identical.

–
Chevron Strip No. 1 is complete!
Chevron Strip No. 2
Work exactly as for Chevron Strip No. 1, and join to opposite side of Granny Square Strip.

–

–
Chevron Strip No. 2 is complete!
Now you will have a complete rectangle, ready to join. Make sure it is the same width as the other panels.
Join top of Chevron Strip No. 1 to bottom side of Flower Panel 2
Row 1 Holding Chevron Strip with WS facing, join Yarn F in first st, 120sc evenly across, making sure to use 17 sts per Base Triangle, turn.
Row 2 [1sc, PLT] 120 times, cut yarn.

Now all panels are joined together and you’re ready to start the border.
Work Border
Rnd 1 With larger hook, join Yarn A in upper right corner of blanket, just before a short side, [3sc in corner st, 121sc evenly across short side, 3sc in corner st, 157sc evenly across long side] 2 times, ss in first sc. [568 sc]
Rnd 2 [3sc in corner st, 123sc, 3sc in corner st, 159sc] 2 times, ss in first sc. [576 sc]
Rnd 3 Beg dc in corner st, [ch3, 3dc in same corner st, (sk2, 3dc in next st) across to next corner, 3dc in corner st] 4 times omitting final dc, ss in beg dc. [588 dc, 4 sps]
Rnd 4 Beg dc in corner sp, [ch3, 1dc in same corner sp, (ch1, sk1, 1dc) across to next corner, 1dc in corner sp] 4 times omitting final dc, ss in beg dc.

–

–
Rnd 5 Beg dc in corner sp, * 11dc in same corner sp, [sk 1 dc and 1 ch-sp, 7sc, sk 1 ch-sp and 1 dc, 8dc in next ch-sp] across until 6 dc remain on side, sk 1 dc and 1 ch-sp, 7sc, 1dc in corner sp, rep from * 3 times omitting final dc, ss in beg dc. [416 dc, 350 sc]

–

–

–
Rnd 6 Change to smaller hook, beg tr in same st as ss join, * [picot, 1tr] 11 times, [sk3, 1sc, sk3, 1tr in first dc, (picot, 1tr) 7 times] across until 7 sts remain on side, sk3, 1sc, sk3, 1tr in next dc, rep from * 3 times omitting final tr, ss in beg tr, cut yarn and weave ends.

–

–

–
Border Chart

–
Finishing
Weave all remaining ends, and block blanket if desired.
Yay! All done! Give yourself a fist bump!
Copyright Information
No pattern or other material may be reproduced — mechanically, electronically, or by any other means, including photocopying — without written permission of Rachele Carmona. This applies to all content on CypressTextiles.net, BabyLoveBrand.net, and all other sites used by Rachele Carmona including social media. Paid patterns are for personal use only. You may sell your finished crocheted items, but do not use my photos to sell your items.
RACHELE CARMONA
Crochet Designer & Fiber Artist
The PDF version of this pattern is available on Etsy and Ravelry, and both Large and Small blanket versions are included in the purchase. (PDF in US and UK Terms included – 4 PDFs total).
Happy crafting,
Rachele C.
You may also enjoy:
- Treble Scallop Edging – Free Crochet Pattern
- VVCAL 2016 – Free Crochet Blanket Pattern
- Happy Little Tree – Free Crochet Blanket Pattern
Support My Work
You’re supporting by just being here! You can read my blog (Start Here!), like and comment on socials, and message me for a chat. All of this supports my work free of charge!
- Affiliate links – Shopping through my links supports me at no additional cost to you as I get a small commission through my affiliates. Jimmy Beans Wool // WoolWarehouse // Amazon.com
- Buy my pattern book – I wrote a super neat crochet blanket pattern book, published under Penguin Random House. You can buy it here!
- Browse my self-published patterns – I have over a hundred patterns on Etsy and Ravelry
- Creative Art Blanket Course – Check it out on Teachable
Where to Find Me
- Instagram: @cypresstextiles
- Facebook Page: CypressTextiles
- YouTube Channel: Rachele Carmona
- Pinterest: CypressTextiles
- Tumblr: CypressTextiles
- Etsy: CypressTextiles
- Ravelry: Rachele Carmona
- Teachable: Creative Art Blanket Course