
Hello, gorgeous! Today I have a special post for you as I know you may have been waiting for the Shine Bright Blanket Crochet Pattern to be released. Well, it’s finally here!
The Shine Bright Blanket is a quilt-inspired piece that will keep you entertained through the whole construction process. Whether you use 2 colors or many, Shine Bright is certain to become a go-to throw pattern.
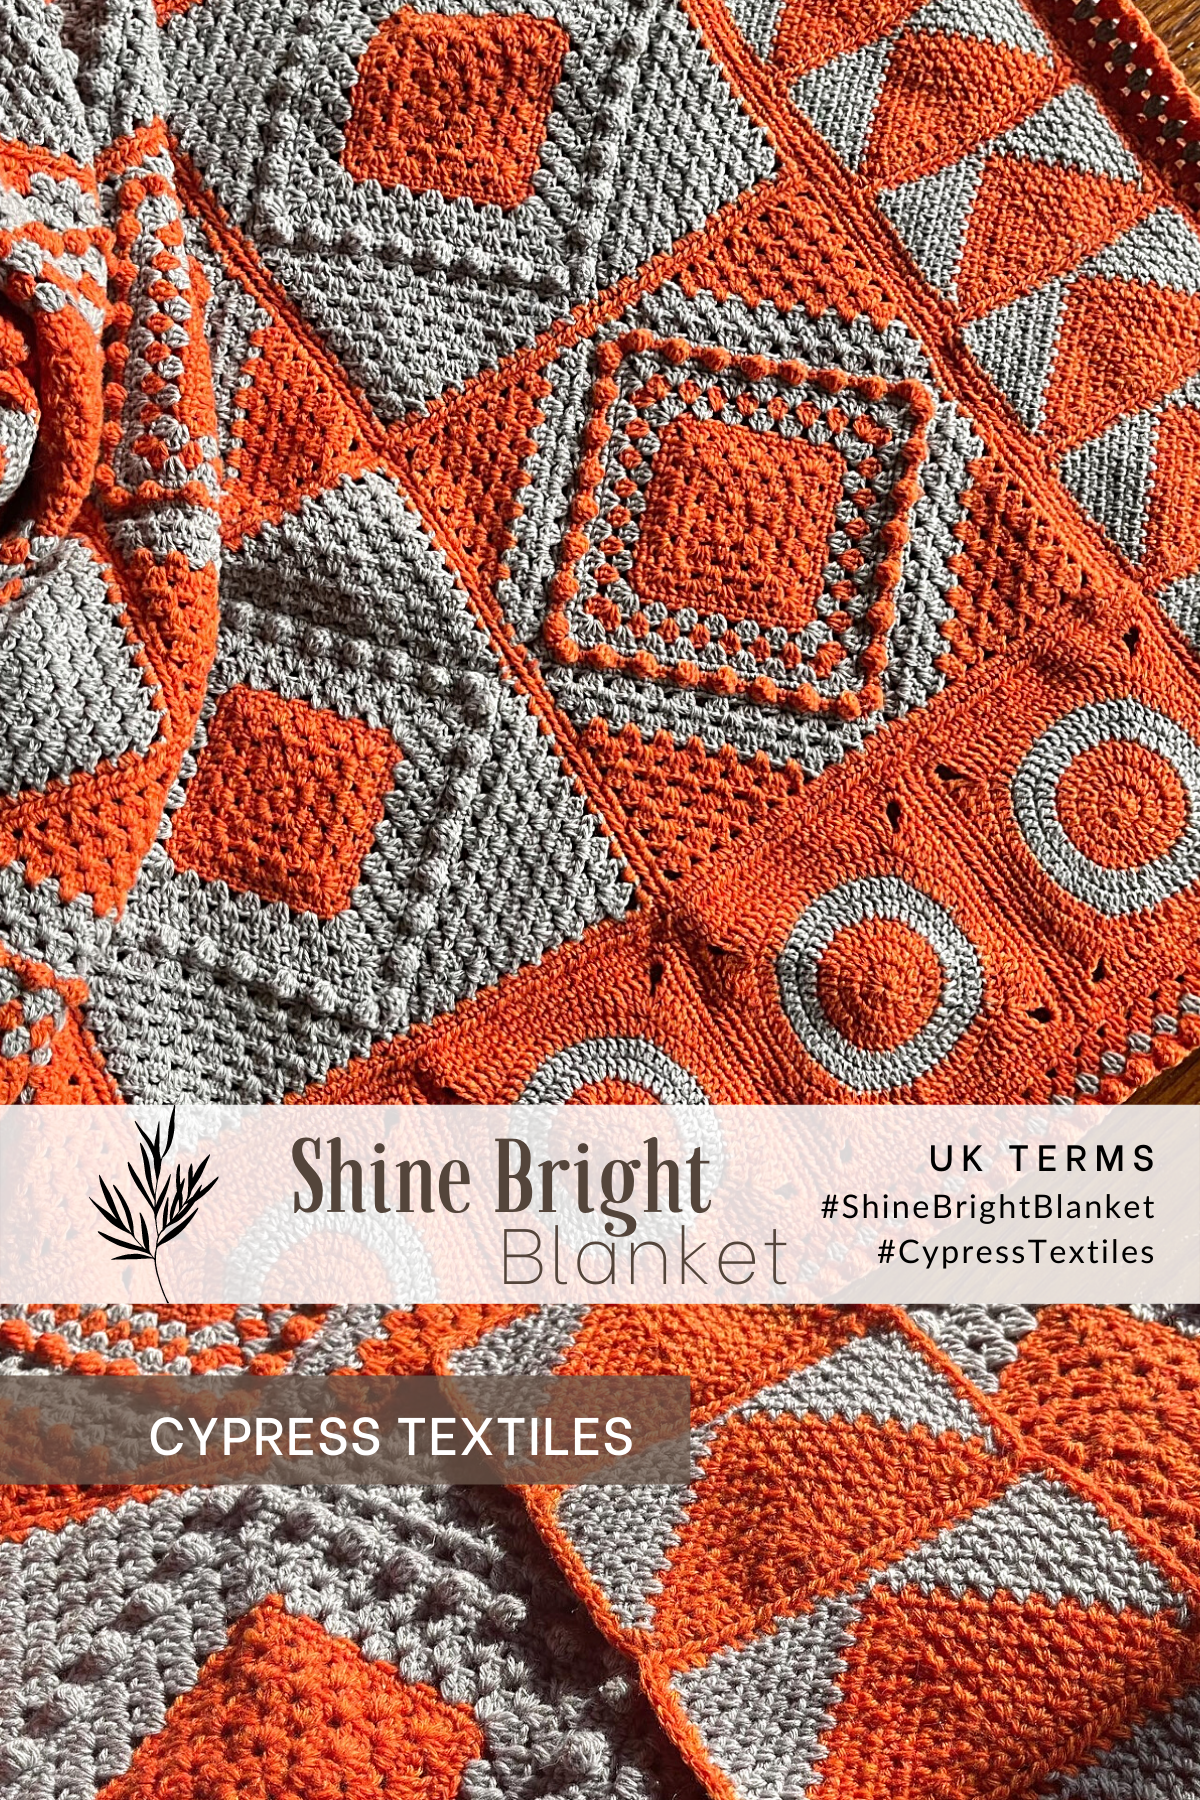
Social Media
- Instagram, Facebook, Twitter, Pinterest, Etsy, Ravelry: CypressTextiles
- Hashtags #ShineBrightBlanket #CypressTextiles
Related Links
- Full FO Reveal
- WIP sharing
- Yarn arrival
- Find an ad-free, easy print PDF version on Etsy // Ravelry or see below for the free pattern.

Project Details
- Skill Level Adventurous Beginner
- Measurements Blanket measures 122cm/48in square
- Tension First 6 Rows of Motif 1 = 10.75cm/4.25in, unblocked

Materials
- Scheepjes Metropolis, (75% Extra Fine Merino Wool, 25% Nylon), 50g/200m, (No. 074 x 8 balls, 071 x 5 balls)
- 2.5mm hook and stitch markers
Yarn + Affiliate Links
Shop Metropolis Yarn through this link to support CypressTextiles at no additional cost to you! WoolWarehouse

Stitch Guide – UK Terminology
Click here for US Terms!
- beg beginning
- beg dtr beginning double treble crochet: (1dc, 2ch) – counts as 1 dtr
- beg tr beginning treble crochet: (1dc, 1ch) – counts as 1 tr
- bobble * yoh, insert hook into indicated st, pull up lp, draw yarn through 2 lps, rep from * 3 times, yoh, draw yarn through all 5 lps
- chN chain N number of times
- dc double crochet
- dtr double treble crochet
- htr half treble crochet
- MR make ring: slip knot, ch3, ss in third ch from hook
- rem remaining
- rep repeat
- RS Right Side
- sp space or chain space
- ss slip stitch
- st stitch
- tr treble crochet
- yoh yarn over hook
Repeats and Brackets
- Square brackets [ ] are used for small repeats: 4dc, [2dc, 3tr, 2dc] 2 times
- Asterisks *are used for repeats that include small repeats: *5dc, [1ch, 1dc] 3 times in next ch, rep from * 3 times
- Round brackets ( ) are used when a string of stitches are worked into the same spot: (3tr, 3ch, 3tr) in next st
Tips and Notes
- Weave your ends after each time you cut the yarn to avoid having to do them all at the end.
- 3dc = 1dc in next 3 sts, 3dc in next st = make 3dc all in the next st
- To get a neater result, I do not “chain up” for the first dc of the round/row. Jump straight into making the first dc.
- Stitch Counts are given at the end of rows where necessary, in the following format: [12 dc, 3 sp]
- Read Stitch Guide to clarify any abbreviations.
Rachele Carmona is the designer behind CypressTextiles.net. She lives in Texas with her husband and their four children. You can find her on all social media @cypresstextiles.

Instructions
Note: Motifs are worked complete and whip stitched together following included directions.

Center Panel
Motif 1 (Make 5)

Note: Instructions include to cut yarn for color change on rounds, but you may carry yarn up where possible to weave fewer ends.
Diamond Center
Round 1 (RS) With Yarn No. 074, MR, beg tr, [ch1, 2tr] 3 times, ch1, 1tr, ss in beg tr, ss in first ch, turn. [8 tr, 4 sp]
Round 2 Beg trin ch-sp, [ch1, 3tr in same sp, 3tr in next sp] 4 times omitting final tr, ss in beg tr, ss in first ch, turn. [24 tr, 4 sp]
Rounds 3-5 Beg tr in ch-sp, [ch1, 3tr in same sp, 3tr between all 3-tr groups across to next corner, 3tr in corner sp] 4 times omitting final tr, ss in beg tr, ss in first ch, turn. [60 tr, 4 sp]
Round 6 With RS still facing, [3dc in first sp, 1dc in all sts across] 4 times, ss in first dc, cut yarn and weave ends. [72 dc]
Round 7 With Yarn No. 071, ss in corner dc, beg tr in same st, * ch1, 3tr in same st, [sk2, 3tr] 5 times, 3tr in next corner dc, rep from * 3 times omitting final tr, ss in beg tr, cut yarn and weave ends. [84 tr, 4 sp]
Round 8 With Yarn No. 074, ss in corner sp, beg tr in same sp, [ch1, 3tr in same sp, 3tr between all 3-tr groups across to next corner, 3tr in corner sp] 4 times omitting final r, ss in beg tr, cut yarn and weave ends. [96 tr, 4 sp]
Round 9 With Yarn No. 071, work as for Round 8, but do not cut yarn. [108 tr, 4 sp]
Round 10 Rep Round 6, turn, cut yarn and weave ends. [120 dc]
Note: On Round 11, “bobble” is created on RS when the dc following the bobble is worked. Ensure that bobble pops up on RS of work.
Round 11 (WS) With Yarn No. 074, ss in corner st, * 3dc in corner st, [bobble, 3dc] 7 times, bobble, rep from * 3 times, ss in first dc, cut yarn and weave ends, turn. [32 bobble, 96 dc]
Round 12 (RS) With Yarn No. 071, ss in corner st, [3dc in corner st, 1dc in all sts across] 4 times, ss in first dc, do not cut yarn, do not turn. Proceed to Fill Triangles section. [136 dc]
Fill Triangles
Note: 4 Fill Triangles will square off the diamond center.

Row 1 Continuing with Yarn No. 071, beg tr in corner dc, [sk2, 3tr in next st] 5 times, sk3, [3tr in next st, sk2] 5 times, 1tr in next corner dc, turn. [32 tr]
Row 2 Beg tr in first tr, 3tr between all 3-tr groups across to end, 1tr in final tr, turn. [29 tr]
Row 3 Rep Row 2, cut yarn and weave ends. [26 tr]
Row 4 With Yarn No. 074, ss in first tr, beg tr in same st, and continue working as for Row 2. [23 tr]
Rows 5-10 Rep Row 2. [5 tr]
Row 11 Beg tr in first tr, 1tr in final tr, cut yarn and weave ends.
Joining Yarn No. 071 in next corner dc, repeat Fill Triangle on rem 3 sides of Diamond Center.
Motif Border Round With Yarn No. 074, [3dc in corner st, mark this st as corner; treating all tr as ch-sps, 2dc in 11 sps, 2dc in corner dc from Round 12 of Diamond Center, 2dc in 11 sps] 4 times, ss in first dc, cut yarn leaving 2 arm’s length tail for joining and weave all rem ends. [196 dc]
Motif 2 (Make 4)
Work as for Motif 1, omitting all color changes after changing to Yarn No. 071. Work Motif Border Round in Yarn No. 074.

Whip Stitch Motifs to Form Center Panel
Important note: Do not pull yarn tail to tighten whip sts. Let the whip sts rest flush and snug against the joined edge. When motifs are opened flat, they can be seen, giving a neat and subtle handmade look.
- Hold 2 motifs with wrong sides together, and use the long tail of one of the motifs.
- Pull the long tail through the center dc of both motifs, back to front.
- Insert the hook front to back through both loops of the next st to the left, on both motifs.
- Grab the long tail and pull it all the way through to the front of the piece, allowing the whip st to rest flush against the top edge of the motifs.
- Repeat steps 3 and 4 across, inserting the hook through both motifs from front to back in the next st to the left, and pulling the yarn through to the front.
- When the next corner is reached, if there are no more subsequent sides to join, you can weave the excess tail, cutting it down if necessary.
- If there are more sides to join, do so, then cut yarn shorter if needed and weave in.
Center Panel Border Round With Yarn No. 074, ss in corner st, [3dc in corner st, 1dc in all sts across, being sure to work a dc into both dc corners where 2 squares meet] 4 times, ss in first dc, cut yarn and weave ends. [604 dc]
Outer Panel
Motif 3 (Make 26)
Note: This motif has no discernible RS or WS.

Base Triangle
Row 1 With Yarn No. 074, MR, [1dc, ch1] 3 times, 1dc, turn. [4 dc, 3 sp]
Row 2 [(1dc, ch1, 1dc) in ch-sp, ch1] 3 times omitting final ch1, turn. [6 dc, 5 sp]
Rows 3-10 * (1dc, ch1, 1dc) in corner ch-sp, [ch1, 1dc in next ch-sp] across to next corner ch-sp, ch1, rep from * once, (1dc, ch1, 1dc) in final ch-sp, cut yarn and weave ends. [22 dc, 21 sp]

Fill Triangles
Row 1 With Yarn No. 071 ss in bottom corner ch-sp, 1dc in same sp, [ch1, 1dc in next ch-sp] across to end, turn. [11 dc, 10 sp]
Rows 2-10 1dc in first ch-sp, [ch1, 1dc in next ch-sp] across to end.
Row 11 1dc in ch-sp, cut yarn and weave ends.
Rep Fill Triangle on second side of Base Triangle beginning in opposite bottom corner ch-sp.
Motif Border Round With Yarn No. 074, ss in top right corner st, [3sc in corner st, 1sc in 20sc across to next corner, 3sc in corner st, 1sc in 9 sc across to next corner st] 2 times, ss in first sc, cut yarn, leaving long tail to whip st. [70 sc]
Whip Stitch Motifs Together using long tail, making a “7” shape as shown in image.

Motif 4 (Make 14)

Round 1 With Yarn No. 074, MR, beg tr, 11 tr, ss in beg tr. [12 tr]
Round 2 (Beg tr, 1tr) in next st, 2tr in 11 sts, ss in beg tr. [24 tr]
Round 3 (Beg tr, 1tr) in next st, [1tr, 2tr in next st] 11 times, 1tr, ss in beg tr, cut yarn and weave ends. [36 tr]
Round 4 With Yarn No. 071, ss in next st, (beg tr, 1tr) in same st, [2tr, 2tr in next st] 11 times, 2tr, ss in beg tr. [48 tr]
Round 5 (Beg tr, 1tr) in next st, [3tr, 2tr in next st] 11 times, 3tr, ss in beg tr, cut yarn and weave ends. [60 tr]
Round 6 With Yarn No. 074, ss in next st, (beg tr, 1tr) in same st, [4tr, 2tr in next st] 11 times, 4tr, ss in beg tr. [72 tr]
Round 7 Beg dtr in next st, [ch3, 2dtr in same st, 2dtr, 2tr, 2htr, 5dc, 2htr, 2tr, 2dtr, 2dtr in next st] 4 times omitting final dtr, ss in beg dtr. [32 dtr, 16 tr, 16 htr, 20 dc, 4 sp]
Round 8 [5dc in corner sp, 21dc] 4 times, ss in first dc. [104 dc]
Round 9 [3dc in corner st, 25dc] 4 times, ss in first dc, cut yarn leaving long tail for joining. [112 dc]
Whip St Motif 4 together using long tail and join to Motif 3 to make a square as shown in image.

Outer Panel Border Round
Note: This Round is shown in blue in the “Whip St Motif 4” image.
With Yarn No. 074, ss in bottom right inside corner of Outer Panel, [1dc in each st across to next corner, being sure to make 1dc in both corner dc sts where 2 Motif 4 squares meet; 1dc in corner] 2 times, [1dc in each st across to next corner of Motif 3, 2dc in corner dc of Motif 3, 3dc in corner st of next Motif 3, continue across, making 1dc in every st of Motif 3, making 2dc in each corner, 1dc in corner] 2 times, ss in first dc, cut yarn and weave ends.
Whip Stitch Outer Panel to Center Panel
Place 12 stitch markers around Center Panel Border Round, and 12 stitch markers around Outer Panel Border Round, using the Schematic at the beginning of the pattern as a guide.
Using no more than 3-4 ft of Yarn No. 074 at a time, whip st Outer Panel to Inner Panel, working 2 whip stitches into 1 st where necessary, in order to join the pieces together evenly between stitch markers so that the piece lies flat.
Blanket Border
Round 1 With Yarn No. 074, ss in top right corner dc, 3dc in corner st, 1dc in each st across, putting 1dc in both dc corner sts where 2 Motif 3 rectangles meet; 1dc in each st across Motif 4 to corner st, 3dc in corner st, 1dc in each st across to next blanket corner, putting 1dc in both dc corner sts where 2 Motif 3 rectangles meet; 1dc across each st of Motif 4 as for prev side, 1dc in each st of Motif 3, 3dc in corner st, 1dc in each st across next Motif 3 motif corner st, 2dc in motif corner st, 2dc in next Motif 3 corner st, 1dc in each st of motif, 2dc in next 2 motif corner sts, continue across in this manner until first blanket corner is reached, ss in first dc.
Round 2 Beg tr in corner st, * ch1, 3tr in same st, [sk2, 3tr in next st] across to next corner, 3tr in corner st, rep from * 3 times omitting final tr, ss in beg tr.
Round 3 Beg tr in ch-sp, * ch1, 3tr in same sp, 3tr between each 3-tr groups across to next corner, 3tr in corner sp, rep from * 3 times omitting final tr, ss in beg tr, cut yarn and weave ends.
Round 4 With Yarn No. 071, ss in corner sp, beg tr in corner sp, * ch1, 3tr in same sp, 3tr between each 3-tr groups across to next corner, 3tr in corner sp, rep from * 3 times omitting final tr, ss in beg tr, cut yarn and weave ends.
Round 5 With Yarn No. 074, rep Round 4, do not cut yarn, turn.
Round 6 * 1dc in corner sp, 1dc, [bobble, 2dc] across to next corner omitting final dc, rep from * 3 times, ss in first dc, cut yarn and weave all rem ends. Blanket is complete!

Copyright Information
No pattern or other material may be reproduced — mechanically, electronically, or by any other means, including photocopying — without written permission of Rachele Carmona. This applies to all content on CypressTextiles.net, BabyLoveBrand.net, and all other sites used by Rachele Carmona including social media. Paid patterns are for personal use only. You may sell your finished crocheted items with credit to CypressTextiles for the pattern where appropriate.
Pin this Pattern

I hope you enjoy this pattern! It was one of the most fun blankets I have ever made, even though it was a lot of joining – totally worth it!