Hello, lovely crafter! I hope you had a great week, and are in for a relaxing weekend or at least squeezing in time to get some hooky in. I have a special post for you today! A super fun blanket inspired by mixed textiles, long walks on the beach, and nautical nonsense. My Seaglass Blanket! Now coming to you in a free format.
Seaglass Blanket
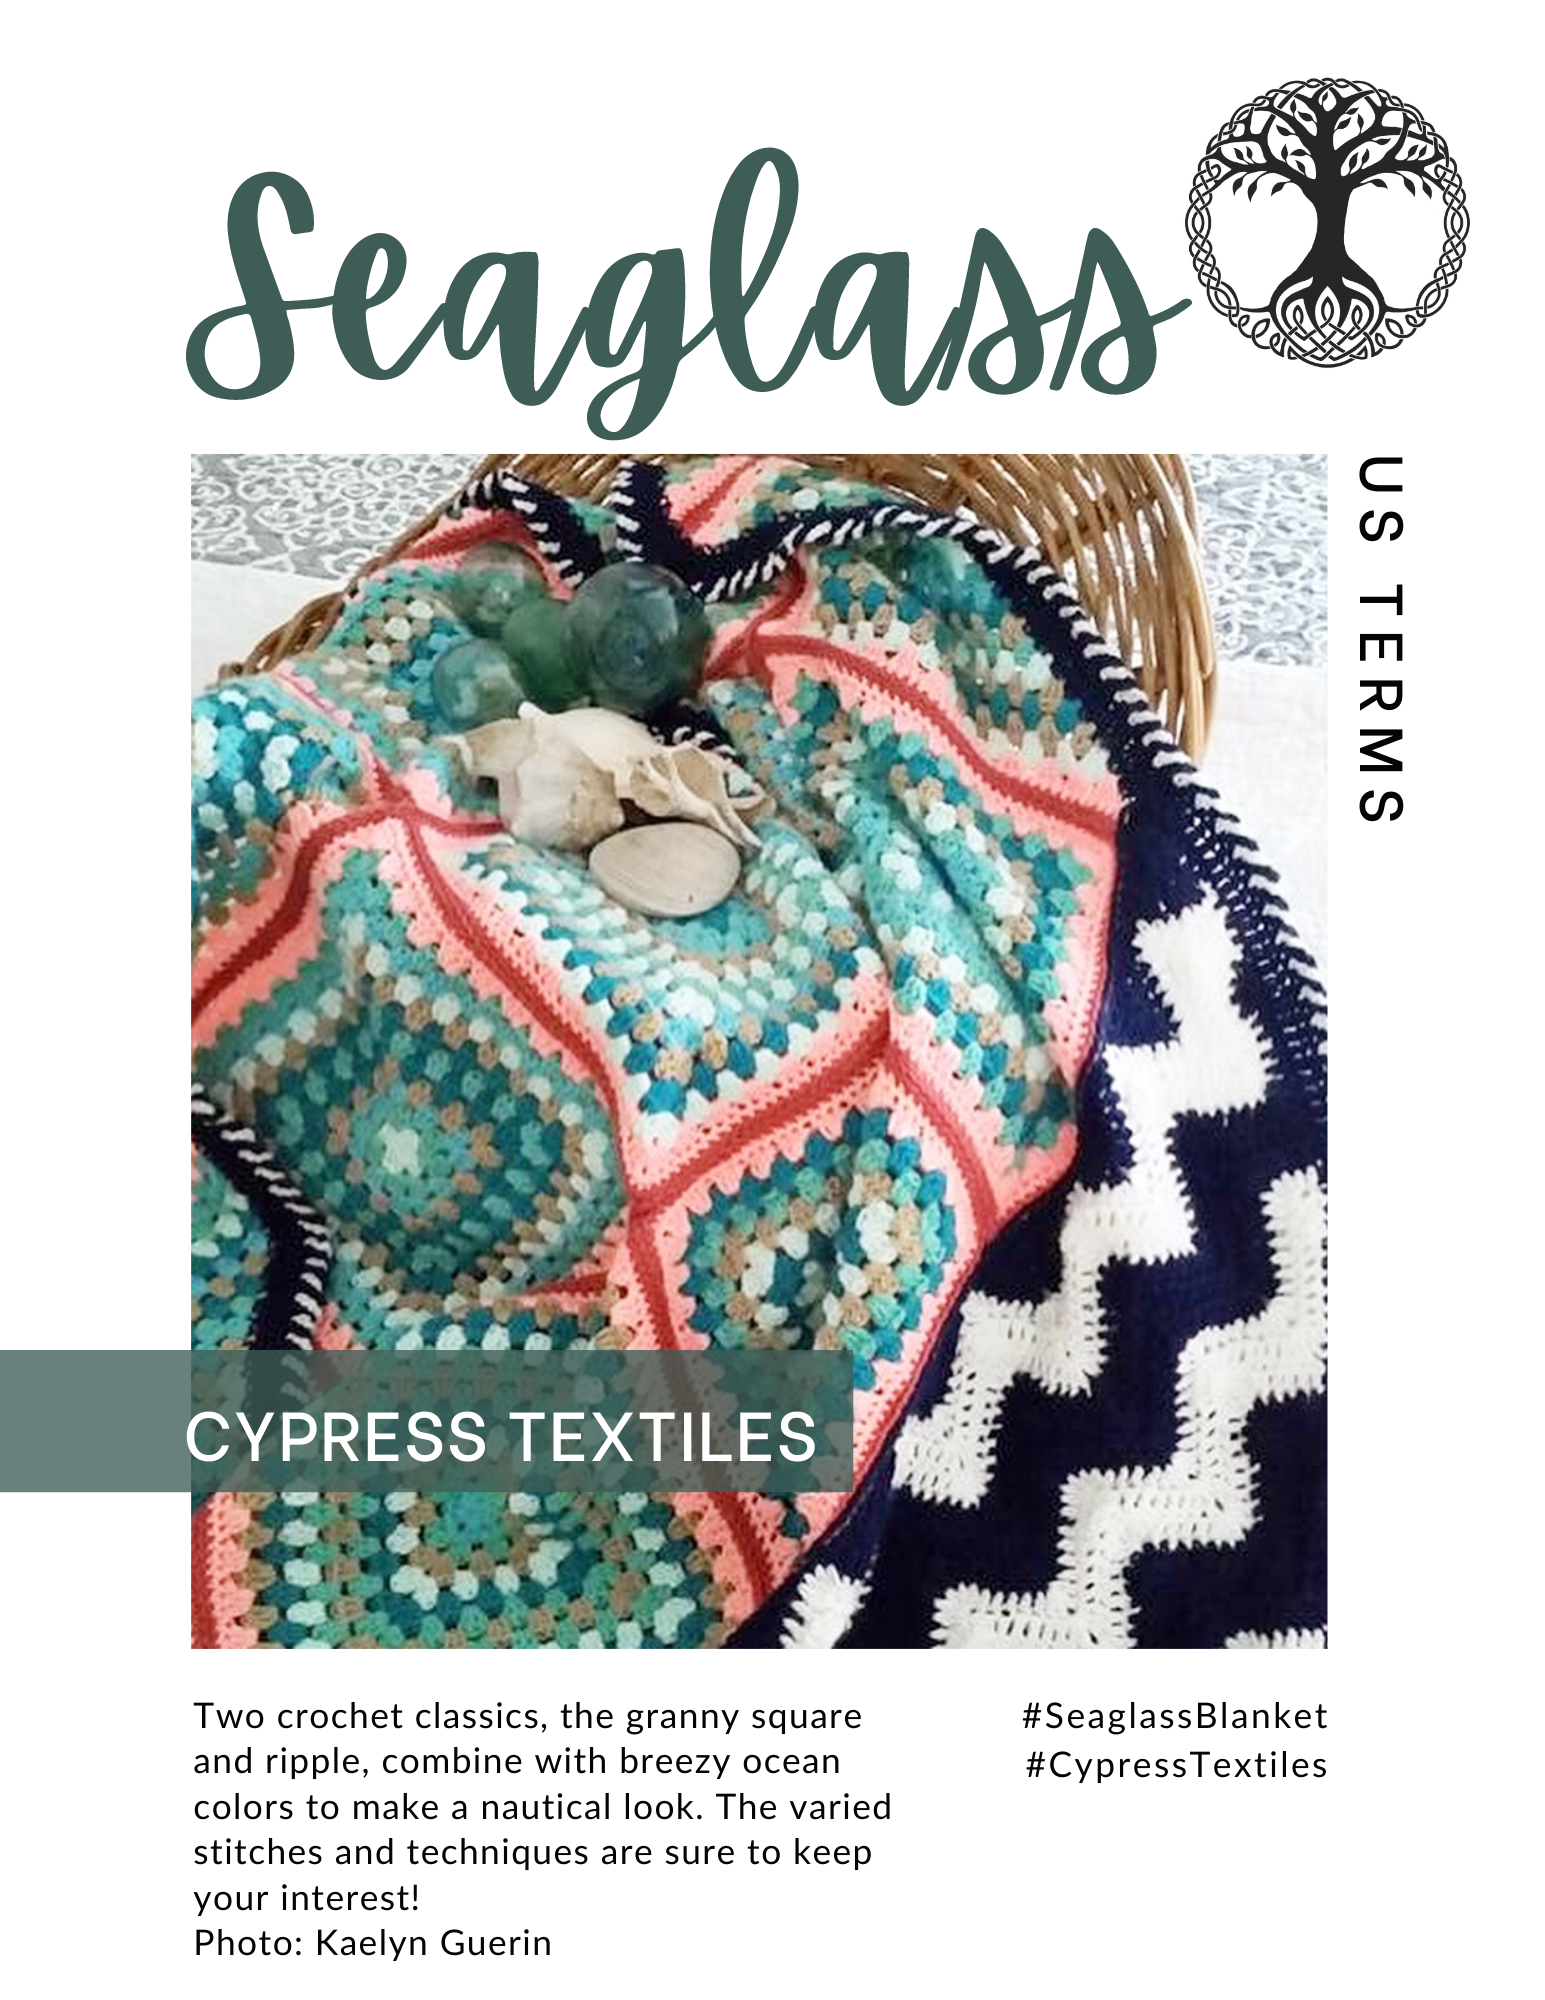
My Seaglass Crochet Blanket Pattern is the perfect mix of neatly constructed large granny squares and my typical pattern twist – a chevron corner.
I am so pleased to give this pattern to you in an updated free version. Below, you will find it in US Terms. Click here for the UK Terms free version!
PDF Version
Find this pattern in a condensed ad-free PDF for a small fee in my Etsy Shop and on Ravelry. Pattern PDFs for US and UK Terms are both included in the purchase.
All of the photography and the sample blanket were done by the amazingly talented Kaelyn Guerin of iiirdwind and Haus Guerin.

Social Media
Social Media Instagram, Facebook, Twitter, Pinterest, Etsy, Ravelry: CypressTextiles
Hashtags #SeaglassBlanket #CypressTextiles

Materials
- Size 4.5mm hook for blanket body and 4mm hook used in border
- Tapestry needle for joining and weaving ends
Yarn + Affiliate Links
Scheepjes Colour Crafter Yarn – 2 Balls each of the following colors
- Yarn A: 1820
- Yarn B: 1725
- Yarn C: 1722
- Yarn D: 1065
- Yarn E: 1020
- Yarn F: 1132
- Yarn G: 1723
- Yarn H: 2005
- Yarn I: 1001
Shopping through these links supports CypressTextiles, at no additional cost to you! Deramores // WoolWarehouse
Or find a Scheepjes retailer close to you!

Skill Level adventurous beginner
Measurements 42in X 42in (Gauge is not necessary for this project.)
Stitch Guide (US Terms)
- beg beginning
- beg dc beginning double crochet: sc, ch1 – counts as 1 dc
- bet between
- ch(s) chain(s)
- ch-sp(s) chain space(s)
- ch-1 sp(s) chain 1 space(s): number denotes number of chains in chain space
- dc double crochet
- dc4tog (yoh, insert hook in next st, yoh, pull up lp, yoh, draw yarn through 2 lps) 4 times, yoh, draw yarn through 5 lps
- dc5tog (yoh, insert hook in next st, yoh, pull up lp, yoh, draw yarn through 2 lps) 5 times, yoh, draw yarn through 6 lps
- MR Make Ring: slip knot, ch3, ss in third ch from hook to make ring
- rep(s) repeat(s)
- RS right side
- sc single crochet
- ss(s) slip stitch(es)
- st(s) stitch(es)
- WS wrong side
- yoh yarn over hook
Repeat and Bracket Guide
Square brackets [ ] are used for small repeats: 4dc, [2dc, 3tr, 2dc] 2 times
Asterisks *are used for repeats that include small repeats: *5dc, [1ch, 1dc] 3 times in next ch, rep from * 3 times
Round brackets ( ) are used when a string of stitches are worked into the same spot: (3tr, 3ch, 3tr) in next st
Tips and Notes
- Weave your ends after each time you cut the yarn to avoid having to do them all at the end.
- To get a neater result, I do not “chain up” for the first sc of the round/row. Jump straight into the first sc.
Pin this Pattern!

Instructions
All Motifs are worked using Yarns A-E randomly for rounds 1-11 (changing color for every round as shown in the photos). For rounds 12-14, the yarn color is specified. Motifs are joined using a slip stitch technique which will be described in the pattern. After the granny square section is complete, a chevron corner is added and a simple border completes this breezy and fun piece.
Schematic
Note: Green and red dots will be referenced later in the pattern.
Motif A (Make 7)
Rnd 1 (RS) Using first yarn color and larger hook, MR, beg dc, (ch1, 3dc) 3 times, ch1, 2dc, ss in beg dc, cut yarn, turn.
Rnd 2 Join next color with ss in any ch-sp, beg dc in same ch-sp, (ch1, 3dc in same ch-sp, 3dc in next ch-sp) 4 times omitting final dc, ss in beg dc, cut yarn, turn.
Rnds 3-11 Join next color with ss in any ch-sp, beg dc in same ch-sp, (ch1, 3dc in same ch-sp, 3dc bet all 3-dc groups across to next corner, 3dc in corner sp) 4 times omitting final dc, ss in beg dc, cut yarn and weave ends.
Rnd 12 With RS still facing, join Yarn F with ss in any corner sp, work as for Rnd 3, do not cut yarn, do not turn.
Rnd 13 (3sc in ch-sp, 1sc in all sts across to next ch-sp) 4 times, ss in first sc, cut yarn.
Rnd 14 With RS facing, join Yarn G with ss in any corner st, (3sc in corner st, 1sc in all sts across to next corner st) 4 times, ss in first st, cut yarn and weave ends.

Motif B (Make 1)
Row 1 (RS) Using first color, MR, beg dc, ch1, 3dc, ch1, 1dc, cut yarn, turn.
Row 2 Join new color with ss in first ch-sp, (beg dc, ch1, 3dc) in same sp, (3dc, ch1, 1dc) in next ch-sp, cut yarn, turn.
Rows 3-11 Join new color with ss in first ch-sp, (beg dc, ch1, 3dc) in same sp, 3dc bet 3-dc groups across to next ch-sp, (3dc, ch1, 1dc) in final sp, cut yarn, turn.
Row 12 With RS facing, join Yarn F with ss in first st, work as for Row 3, do not cut yarn, turn.
Row 13 2sc in ch-sp, 1sc in all sts across to next ch-sp, 2sc in ch-sp, cut yarn, turn.
Row 14 Join Yarn G with ss in first st, 2sc in same st, 1sc in all sts across to final st, 2sc in final st, cut yarn and weave all ends.
Motif C (Make 6)
Row 1 (RS) Using first color, MR, beg dc, (ch1, 3dc) 2 times, ch1, 1dc, cut yarn, turn.
Row 2 Join next color with ss in first ch-sp, (beg dc, ch1, 3dc) in same sp, (3dc, ch1, 3dc) in next ch-sp, (3dc, ch1, 1dc) in final ch-sp, cut yarn, turn.
Rows 3-11 Join next color with ss in first ch-sp, (beg dc, ch1, 3dc) in same sp, 3dc bet all 3-dc groups across to next ch-sp, (3dc, ch1, 3dc) in ch-sp, 3dc bet all 3-dc groups across to ch-sp, (3dc, ch1, 1dc) in final ch-sp, cut yarn, turn.
Row 12 With RS facing, join Yarn F with ss in first st, work as for Row 3, do not cut yarn, turn.
Row 13 2sc in first ch-sp, 1sc in all sts across to next ch-sp, 3sc in ch-sp, 1sc in all sts across to next ch-sp, 2sc in ch-sp, cut yarn, turn.
Row 14 Join Yarn G with ss in first st, 2sc in same st, 1sc in all sts across to corner st, 3sc in corner st, 1sc in all sts across to final st, 2sc in final st, cut yarn and weave ends.

Join Motifs with Flat Zipper Join
Arrange motifs as shown in Schematic. Starting in top right corner, pick up first 2 adjacent motifs, and locate back loop of right-most st on final rnd/row on both motifs. Insert hook front to back through back loop only (BLO) of the first motif, and then back to front through BLO of the second motif.
Using Yarn G, yoh, pull yarn through, then ss to join yarn (first photo below). Insert hook from front to back through BLO of next st on right hand side motif, and also front to back through BLO of next st on left hand side Motif (second photo below). Yoh, draw yarn through all 3 lps.
Next, insert hook first through BLO of next st on left hand side motif, and then through BLO of next st on right hand side Motif (third photo below). Yoh, draw yarn through all 3 lps.

Continue in this manner, alternating inserting hook first through BLO of right motif and then through BLO of left motif, yoh, draw yarn through 3 lps, then left motif/right motif, yoh, draw yarn through 3 lps. This alternating right/left, then left/right creates a very stable and straight Zipper Join which will look like the fourth photo below.
When the end of two Motifs is reached, pick up the next Motifs along the diagonal and join them in the same manner, working to the edge of the blanket. Cut yarn and finish off when the edge is reached, and work the next diagonal. Repeat along the opposing diagonals to finish joining all pieces.
Note: I learned this joining technique through a tutorial called “Completely Flat ‘Zipper’ Method” by Dedri Uys on her website LookAtWhatIMade.net.
Here are a few more photos of the Flat Zipper join in action:

Chevron Corner
Join Yarn G with ss in center of zipper join where green circle indicates on Schematic. 1sc in same spot, 39sc evenly across square, and then 40sc evenly across each of next 2 squares until spot indicated by red circle is reached. Final sc will be placed in zipper join at location of red spot. Cut yarn and weave ends. [120 sc]
Base Triangle (Make 10)
Row 1 (WS) Using Yarn H, MR, beg dc, 8dc, turn.
Row 2 (Beg dc, 1dc) in first st, 3dc, 5dc in next st, 3dc, 2dc in final st, cut yarn on all Base Triangles except for tenth one. After Row 2 of tenth base triangle is worked, do not cut yarn.
Join Base Triangles
With RS facing, hold tenth base triangle so that the bottom edge is up, 12sc evenly across bottom edge, 12sc across bottom edge of next base triangle, continue across bottom edge of all rem base triangles, do not cut yarn. [120 sc]
Tip: When working sc sts across the bottom edge, work into the sts, not around them to eliminate gaping holes.
Attach string of base triangles to blanket body
Align working yarn with green circle on schematic, matching up 120 sc, ss in BLO of first st at green circle, work Flat Zipper Join, joining all 120sc to attach base triangles to blanket body, cut yarn and weave ends.
Work chevron
Row 1 With RS facing, join Yarn I with ss in 8th st on Row 2 of first base triangle. Beg dc in same st, 5dc, dc4tog, (5dc, 5dc in next st, 5dc, dc4tog) 8 times, 6dc, turn.
Row 2 Beg dc, 3dc, dc5tog, * 5dc, 5dc in next st, 5dc, dc5tog * 8 times, 4dc, turn.
Row 3 Beg dc, 1dc, dc5tog, rep from * to * (as noted in Rnd 2) 8 times, 2dc, cut yarn, turn.
Row 4 Join Yarn H with ss in first st, beg dc, dc4tog, rep from * to * 8 times, cut yarn, turn.
Row 5 With RS facing, rejoin Yarn H with ss in peak st of right-most chevron, beg dc, 5dc, dc5tog, rep from * to * 6 times, 6dc, turn. Note: Rem sts will be unworked.
Row 6 Beg dc, 3dc, dc5tog, rep from * to * 6 times, 4dc, cut yarn, turn.
Row 7 Join Yarn I with ss in first st, beg dc, 1dc, dc5tog, rep from * to * 6 times, 2dc, turn.
Row 8 Beg dc, dc4tog, rep from * to * 6 times, cut yarn, turn.
Row 9 Rejoin Yarn I with ss in center st of right-most chevron, beg dc, 5dc, dc5tog, rep from * to * 4 times, 6dc, cut yarn, turn.
Row 10 Join Yarn H with ss in first st, beg dc, 3dc, dc5tog, rep from * to * 4 times, 4dc, turn.
Row 11 Beg dc, 1dc, dc5tog, rep from * to * 4 times, 2dc, turn.
Row 12 Beg dc, dc4tog, rep from * to * 4 times, cut yarn, turn.
Row 13 Join Yarn I with ss in center st of right-most chevron, beg dc, 5dc, dc5tog, rep from * to * 2 times, 6dc, turn.
Row 14 Beg dc, 3dc, dc5tog, rep from * to* 2 times, 4dc, turn.
Row 15 Beg dc, 1dc, dc5tog, rep from * to * 2 times, 2dc, cut yarn, turn.
Row 16 Join Yarn H with ss in first st, beg dc, dc4tog, rep from * to * 2 times, cut yarn, turn.
Row 17 With RS facing, rejoin Yarn H with ss in center st of right-most chevron, beg dc, 5dc, dc5tog, 6dc, turn.
Row 18 Beg dc, 3dc, dc5tog, 4dc, turn.
Row 19 Beg dc, 1dc, dc5tog, 2dc, turn.
Row 20 Beg dc, dc4tog, cut yarn and weave all ends. Note: Top of dc4tog counts as corner of blanket.
Work blanket border
Rnd 1 With RS facing, continuing in Yarn H, [3sc in corner st, 136sc evenly across side] 4 times, ss in first st.
Rnd 2 (Beg dc, ch2, 2dc) in in corner sc, * 1dc in all sts across to next corner st, (2dc, ch2, 2dc) in corner st, rep from * 3 times, omitting final corner on last rep, 1dc in first corner to complete it, ss in first st.
Rnd 3 [3sc in corner sp, 1sc in all sts to next corner sp] 4 times, ss in first st.
Rnd 4 With RS facing, using smaller hook and still using Yarn H, 1sc in corner st, ch4, remove lp from hook and drop Yarn H. Using Yarn I, ss in second sc of blanket, ch4, remove lp from hook and drop yarn. Replace lp of Yarn H on hook, bring the ch-4 of Yarn H in front of the ch-4 of Yarn I, 1sc into the next st on the blanket, ch4, remove lp from hook and drop yarn. Replace lp of Yarn I on hook and, bringing the ch-4 in front of the ch-4 of Yarn H, 1sc in next st of blanket. Rep around the blanket in this manner, alternating colors as you go, ss in first sc, cut yarn and weave all ends.
Your Seaglass Blanket is complete. Give yourself a fist bump!
Creative Tip
Mix stash yarns for a fresh look! Shown here in variegated yarns joined with a shiny gold.

Copyright Information
No pattern or other material may be reproduced — mechanically, electronically, or by any other means, including photocopying — without written permission of Rachele Carmona. This applies to all content on CypressTextiles.net, BabyLoveBrand.net, and all other sites used by Rachele Carmona including social media. Paid patterns are for personal use only. You may sell your finished crocheted items.
RACHELE CARMONA
Crochet Designer & Fiber Artist
I hope you enjoyed the Seaglass Crochet Blanket pattern! It was so fun to update this hidden gem pattern. If you start/finish the blanket, be sure to hashtag it on socials: #SeaglassBlanket and #CypressTextiles so I will see it and share in my stories/pages!
Happy crafting,
Rachele C.