
Hello, gorgeous crafter! Let me tell you a story. One day I became absolutely obsessed with the idea of turning printed tessellation designs into crochet blankets and a few sketches later, this blanket design was born!
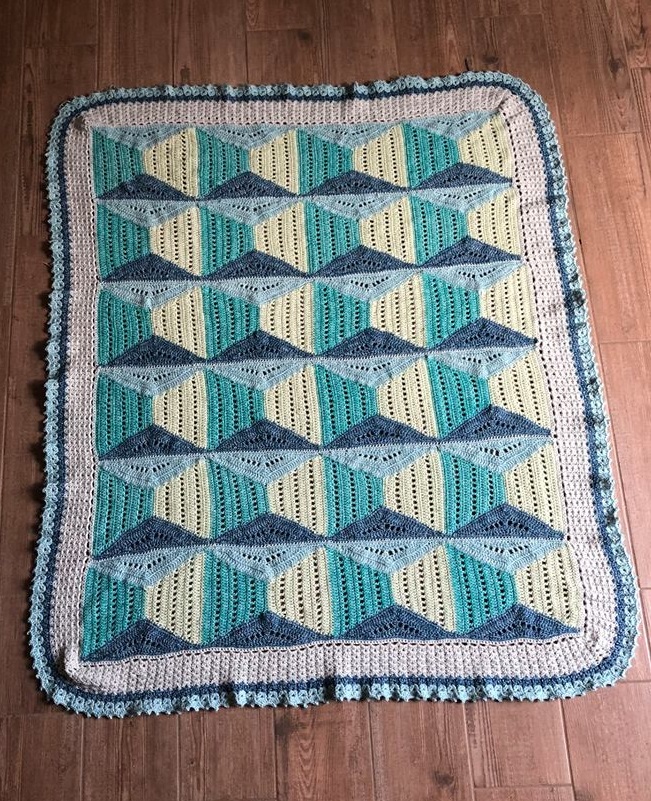
Dimensions is a 3D illusion piece, so you should choose your colors accordingly if you want the 3D effect. (You can see what I mean if you look at the photo of the blanket laid flat.) Otherwise, have at it! Go wild! And enjoy this fun make.
Read more about the production of this pattern here on this post!
Share Your Progress!
Join the other crafters who have made Dimensions.
- Instagram, Facebook, Twitter, Pinterest, Ravelry: CypressTextiles
- Hashtags: #DimensionsBlanket #CypressTextiles
Note: Sample blanket and all photography are by the talented and lovely Andrea Grimaldi. We can all agree, her doggo Nesta is the real beauty here.

Yarn: Scheepjes Stone Washed
Fiber content: (78% Cotton, 22% Acrylic; 50g/130m)
You will need the following colors in the the quantities listed.
- Yarn A: 814 x 4
- Yarn B: 815 x 4
- Yarn C: 819 x 4
- Yarn D: 805 x 4
- Yarn E: 813 x 4
Shop Stone Washed
To shop this yarn, click below – I will receive a small commission on any purchase made, at no additional cost to you. Every little bit helps to support my work.
More Color Combinations
To keep the 3 Dimensional effect, you can use some of the suggest color combinations below!

From left to right, top to bottom, here are the color numbers for these four suggested combos. You will need 4 balls of each, plus 4 balls of background color (total 20 balls of Stone Washed).
- 820, 836, 835, 807
- 801, 831, 833, 832
- 819, 817, 812, 806
- 808, 810, 830, 803

Notions and Sizing
- US size 4.25mm hook for blanket body / US size 3.75mm hook for border
- Finished piece measures 42x52in and is easily resized

Stitch Guide (US Terms)
- 2dccl (yoh, insert hook into sp, yoh, pull up lp, draw yarn through 2 lps) 2 times, yoh, draw yarn through 3 all lps
- 2trcl * yoh 2 times, insert hook in st/sp, yoh, pull up lp, (yoh, draw yarn through 2 lps) 2 times, rep from * 1 time in same st/sp, yoh, draw yarn through all 3 lps
- ch chain
- beg beginning
- beg dc (sc, ch 1) – counts as 1 dc
- beg dc2tog beginning dc 2 together: beg dc, dc in next st (note: beg dc does not count as a st in this case)
- beg split dc3tog beg dc, sk 1, dc (note: beg dc does not count as a st here)
- beg tr (sc, ch2) – counts as 1 tr
- dc double crochet
- dc2tog dc 2 together: (yoh, insert hook in next st/sp, yoh, pull up lp, yoh, draw through 2 lps) 2 times, yoh, draw through all 3 lps
- dc3tog dc 3 together: (yoh, insert hook in next st/sp, yoh, pull up lp, yoh, draw through 2 lps) 3 times, yoh, draw through all 4 lps
- dc5tog dc 5 together: (yoh, insert hook in next st/sp, yoh, pull up lp, yoh, draw through 2 lps) 5 times, yoh, draw through all 6 lps
- lp(s) loop(s)
- rem remaining
- rep repeat
- RS/WS right side/wrong side of work
- sc single crochet
- sk skip
- sp space
- split dc3tog *yoh, insert hook in next st/sp, yoh, pull up lp, yoh, draw through 2 lps** sk 1, rep from * to ** 1 time, yoh, draw through all 3 lps
- ss slip stitch
- st(s) stitch(es)
- yoh yarn over hook

Instructions
Note: Six short horizontal panels are made as follows: the portions labeled B and C in the schematic are worked first, in a continuous strip from the right side to the left side of the blanket. Then, the triangle gaps labeled D and E are filled in across the strip and an sc row is worked across the top and bottom edges of the strip to complete the panel with a neat edge. Panels are joined with color A, and a simple border is added to complete the piece.

Panel (Make 6)
Center portion of panel
Row 1 (WS) With Yarn B, sl knot, ch 32, sc in second st from hook, and in all 31 rem chs, turn. [31 sc]
Row 2 Beg dc2tog, dc in all sts across to final 2 sts, dc2tog, turn. [2 dc2tog, 27 dc]
Row 3 Sc in all sts, turn. [29 sc]
Row 4 Beg split dc3tog, (ch 1, sk 1, dc) across to final 3 sts, ch 1, split dc3tog, turn. [2 split dc3tog, 11 dc, 12 ch-sp]
Row 5 Rep Row 3, turn. [25 sc]
Rows 6-15 Rep Rows 2-5 2 times, then work Rows 2 and 3 once more, do not turn, cut yarn. [11 sc on Row 15]
Mark the beg dc2tog of Row 14 (mark the dc, not the beg dc)
Row 16 (WS) With Yarn C, ss in first st, rep Row 3, turn. [11 sc]
Row 17 (Beg dc, dc) in first st, dc across to final st, 2 dc, turn. [13 dc]
Row 18 Rep Row 3, turn. [13 sc]
Row 19 (Beg dc, ch 1, dc) in first st, (ch 1, sk 1, dc) across to final st, ch 1, dc in same st as last dc, turn. [9 dc, 8 ch-sp]
Row 20 Rep Row 3, turn. [17 sc]
Rows 21-30 Rep Rows 17-20 2 times, then work Rows 17 and 18 once more, do not turn, cut yarn. [31 sc on Row 30]
Row 31 Using Yarn B, ss in first st, 31 sc, turn.
Rows 32-120 Rep Rows 2-31 2 times, and then Rows 2-30 1 time. Continue to fill triangle gaps.
Fill triangle gaps
Row 1 With RS facing and using Yarn D, ss in side bars of final sc on Row 1 from “Center portion of panel.” Sc in same st, and sc 24 sts evenly across, placing final sc in marked st, (insert hook inside bars of sc on next row, pull up lp) 2 times, yoh draw through all 3 lps. Sc 25 sts evenly across, placing final sc in side bars of final sc on Row 30, turn. [1 decrease at center, 50 sc]
Row 2 Sk 1, ss in 2 sts, 2 sc, 2 hdc, 17 dc, dc3tog, 17 dc, 2 hdc, 2 sc, turn. [1 dc3tog, 34 dc, 4 hdc, 4 sc]
Row 3 Sk 1, ss in 2 sts, 2 sc, 2 hdc, 12 dc, dc5tog, 12 dc, 2 hdc, 2 sc, turn. [1 dc5tog, 24 dc, 4 hdc, 4 sc]
Row 4 Sk 1, ss in 2 sts, 2 sc, 2 hdc, (dc, ch 1, sk 1) 4 times, dc3tog, (ch 1, sk 1, dc) 4 times, 2 hdc, 2 sc, turn. [1 dc5tog, 8 dc, 4 hdc, 4 sc]
Row 5 Sk 1, ss in 2 sts, 2 sc, 2 hdc, 4 dc, dc3tog, 4 dc, 2 hdc, 2 sc, cut yarn.
Rep for rem 3 triangle gaps on this side, and then rotate panel to fill lower 4 triangle gaps in the same manner, using Yarn E. Continue to edge top and bottom.
Edge top and bottom
With panel RS facing and using Yarn D, ss in top right corner. Sc in all sts across to top left corner (including all slipped sts), cut yarn. Rotate piece, join Yarn E with a ss in the top right corner, sc in all sts across, being sure that you have the same amount of sts as the opposite side, cut yarn. 1 panel is complete.
Make remaining 5 panels.


Sew 6 panels together to form blanket body
Using Yarn A, whip st panels together to form blanket body as shown in schematic.
To whip st the pieces:
- Cut a long length of yarn, about 2 arm lengths if you like.
- Holding panels with wrong sides together, ss with Yarn A through both loops of first st on both panels, insert hook in next st front to back through both panels, treating them as one, being sure to go through both loops of sts.
- Grab yarn and pull entire length of yarn through to the front side.
- Repeat across, pulling yarn to the front side in each stitch, sewing the panels together.
Note: Let the whip sts rest along the top edge of the seam, and do not “cinch” the sts tight. When you open the panels, and lie flat, you should see the nice neat sts.
Add Border
Rnd 1 Using Yarn A and smaller hook, ss in top right corner, (3sc in corner, sc evenly across being sure to make a multiple of 3) 4 times, ss in first sc.
Rnd 2 * (Sc, ch3, sc) in corner st, (ch3, sk2, sc) across to corner, ch3, rep from * 3 times, ss in first sc.
Rnds 3-7 Ss in first ch, (sc, dc in sp) – counts as a 2dccl here, * ch3, 2dccl in same sp, (2dccl, ch2, 2dccl) in all sps across to next corner sp, 2dccl in corner sp, rep from * 3 times omitting final 2dccl, ss in dc st, cut yarn after rnd 7.
Rnd 8 Using Yarn D, ss in top right corner sp of blanket, (beg tr, tr) in sp – counts as first 2trcl, * (ch2, 2trcl) 3 times in same sp, (2trcl, ch2, 2trcl) in all sps to next corner, 2trcl in corner sp, rep from * 3 times omitting final 2trcl, sk beg tr, ss in tr, cut yarn.
Rnd 9 Using Yarn E, ss in top right corner sp of blanket, repeat Rnd 3, do not cut yarn.
Rnd 10 Beg dc in corner sp (dc, ch3, ss in third ch from hook, 3dc) in same sp, (2dc, ch3, ss in third ch from hook, 3dc) in all sps around to beginning, ss in beg dc, cut yarn.
Yay! All done! Weave ends, block, and give yourself a fist bump!
Note: Sample blanket and all photography are by the talented and lovely Andrea Grimaldi.

Copyright Information
No pattern or other material may be reproduced — mechanically, electronically, or by any other means, including photocopying — without written permission of Rachele Carmona. This applies to all content on CypressTextiles.net, BabyLoveBrand.net, and all other sites used by Rachele Carmona. Paid patterns are for personal use only. You may sell your finished crocheted items, but do not use my photos to sell your items.
Thank you!! Your support means the world, and I am living the dream of practicing my art while putting food on the table, all because you guys and gals enjoy my designs. Wild, huh? Well, I’m forever grateful. 🙂
Happy crafting as always,
Rachele C.
2 Comments