


I’m so pleased to bring you all the Moon Landing Blanket free pattern!
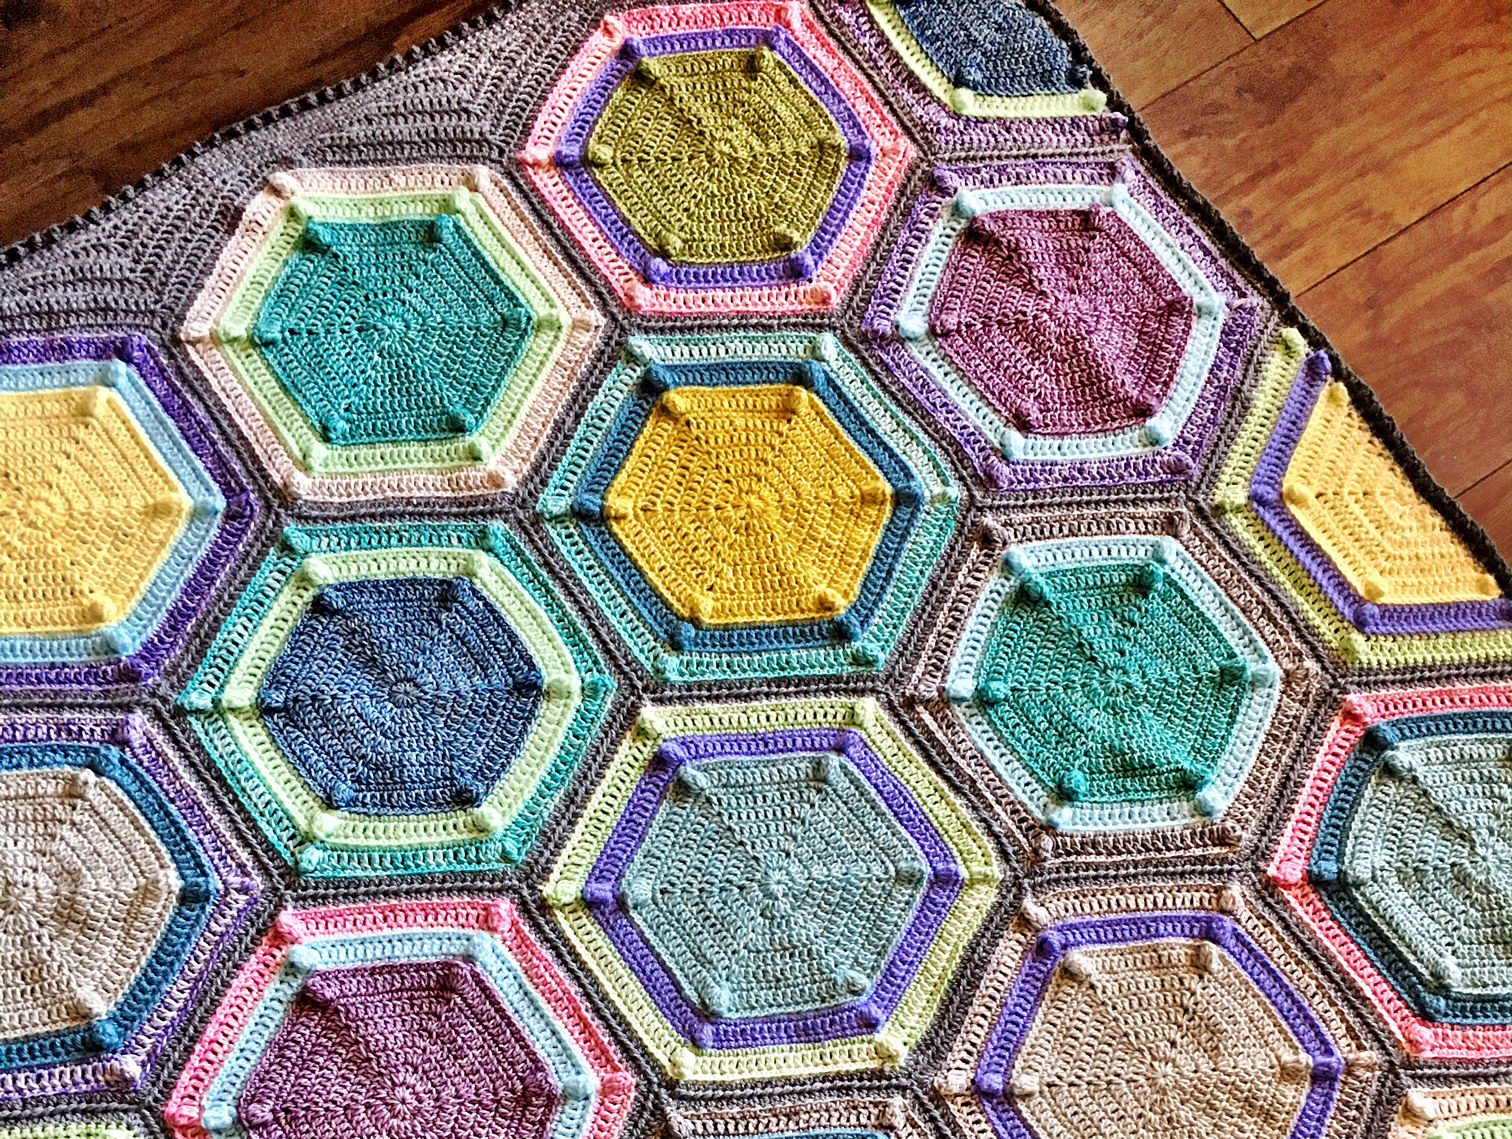
Named for its resemblance to moon boots and for those outlandish bobbles, Moon Landing is a unique hexagon blanket that you can make using three different yarn types of a similar weight. Of course the same yarn can also be used throughout. This piece is perfect for any space from a newborn’s crib to a college dorm room. With clever color choice, anyone will enjoy this modern and striking blanket design.
Pattern
Find the ad-free, easy to print Pattern PDF for a small fee on
RAVELRY//Etsy//Craftsy//LoveCrochet.com
You can also find this pattern on AllFreeCrochetAfghanPatterns.
Or scroll down for the free pattern!
 Allow me to introduce my newest FO: the Moon Landing Blanket!
Features:
- Bold, large hexagons with color rings worked through BLO for a beautifully neat layered look
- Bobbled corners that reach out to each other creating a diamond visual
- PLT join using HDC instead of SC which gives a wider band of color between motifs
- 3 Different yarn types (see below!) with varying textures and makeups, all the same care instruction for easy wash
- My first blanket with hexagons placed in this “sideways” orientation! Half hexies are on the long sides of the piece – never done it that way before!

Yarns used (all Scheepjes brand):
- Inner hexagon color – Stone Washed
- First color ring and join/border – Colour Crafter
- Second color ring – Softfun Aquarel

Full free pattern coming soon – Should be finished with it by next week!
Hope y’all enjoy this one! It’s for my cuter than ever 3yo cousin – adopted from Ethiopia ❤️❤️ Can’t wait for her to snuggle in it! I made her brother a blanket for last Christmas (Zendoodle Blanket No. 2) and finally I’m able to gift her one too.

Huge thank you to all the people in my life (that includes YOU!) who let me live my dream and craft cozy blankets for others to wrap themselves in ❤️❤️
I’ve been interviewed by Christine of ChristineGuestDesigns.com – check out the interview here! It’s been lovely meeting new crafters by participating in the Ravelry Giftalong 2016. Thank you so much, Tatiana of Lilla Björn Crochet for pointing out this event to me.
November 30 is the last day to get 25% off of all my patterns in my Ravelry Shop using code: giftalong2016!

Related links:
- Beautiful blanket with bobbles – Marlize Blanket by Haak Maar Raak
- Gorgeous Hexagon Blanket by Happy in Red
- Stone Washed piece – Linen Stitch Manghan by Dedri Uys
Do y’all have as much trouble naming your projects as I do?? I meditate and ruminate and contemplate and deliberate, and then at the end of it all, the name I choose has to “grow on me” before I start to love it.
Shown here is one of the first hexie prototypes for this blanket.

Sometimes you can just name a blanket based on its form, and that makes it easy. “Popcorn Hexagon Blanket” was almost the name of this piece, but I thought it was so boring and cold, especially for a cute pattern that’s about to form epic popcorn diamonds when I join more motifs… So that means sometimes you have to name a piece based on what it looks like and how it makes you feel! Difficuuuuult…
But here goes..
What my WIP reminds me of:
- 60s Space Age

- 2 words: Space boots.

- Salt water taffy!!

Maybe I’ll call it the Space Taffy Moon blanket. For now I’m just calling it “Moon Landing.”

While working on this WIP, I generated a small froggy graveyard… Shown below are the odds and ends that were frogged, cut, and otherwise abandoned in the interest of decent pattern design..

Once I got past the frustrating frog phase, I got to this:

The radiant and shining phase. Oooooo, aaaaaahhhhhh.
Yes it looks exactly the same as the pic at the beginning of this post. But! It is not the same.. On previous attempts, the center portion of the motif puffed out. And I redid the popcorn too. Plus, I couldn’t decide on which Back Loops Only method I liked, but I came full circle on that one..
…..And now I’m here! The crank-out-the-hexies phase.

That bright pink Softfun Aquarel in the other photos was bothering me. I took it out… Put it back in… Took it out… No it needs the color pop.. Put it back in… too briiiiiight!
Then I thought of something. Aquarel is a fading yarn that shifts through shades of light to dark, so decided I could compromise by cutting out the darkest pink sections of yarn.
Check out the dark pink at the bottom center of the photo below. I think it’ll work! Now it looks like a pale pink that is better suited to the overall palette. Hurrah!

Can’t wait to join this bad boy!! Final reveal coming soon!

Disclosure: This post contains affiliate links, which means I receive a small commission if you make a purchase using the links marked with an asterisk*. It doesn’t cost you anything extra, and it helps keep CypressTextiles going!
Make it! Read more about the three yarns I used for this project and where to order them in the happy mail Yarn post.
Huge thank you to everyone for being so enthusiastic about this pattern and pushing me to finally finish it. All it took was carving about 10 hours out of my busy day to complete it and share with you lovely lot. Thank you and I hope you enjoy making it!
materials list
- Yarn – DK Weight – 3
- Shown here: Scheepjes Brand – Yarn A – Stone Washed (8 balls), Yarn B – Colour Crafter (4 balls), Yarn C – Softfun Aquarel (6 balls)
- Notions
- US Size 4mm and 5mm hooks
- Large tapestry needle for weaving ends

stitch guide (US Terminology)
- ch = chain
- Beg HDC = Beg DC = (SC, Ch 1) – note: Counts as a HDC/DC
- BLO = Back Loops Only – note: I work through both back loops. It takes time but is much stronger.
- DC = Double Crochet
- HDC = Half Double Crochet
- rem = remaining
- rep = repeat
- RS = Right Side
- SC = Single Crochet
- sl st = slip stitch
- sk = skip
- st = stitch
- TR = Treble Crochet
- WS = Wrong Side

instructions
Note: This blanket is constructed of several full and half hexagon motifs, joined together continuously with a border which squares off all sides.

full hexagon (make 17)
Rnd 1 Using size 4mm hook and Yarn A, ch 3, sl st in third ch from hook to make ring. All in ring: Beg HDC, ch 1, (2 HDC, ch 1) 5 times, join with sl st in top of Beg HDC. [12 HDC, 6 ch]
Rnd 2 (Beg DC, ch 1, DC) in first ch sp, (2 DC in next st, sk 1, (DC, ch 1, DC) in next ch) 5 times, 2 DC in next st, join with sl st in top of Beg DC. [24 DC, 6 ch]
Rnd 3 (Beg DC, ch 1, DC) in first ch sp, (DC in all sts to next ch sp, (DC, ch 1, DC) in ch sp) 5 times, DC to first corner, join with sl st in top of Beg DC. [36 DC, 6 ch]
Rnds 4-6 Rep Rnd 3. St count after Rnd 6: [72 DC, 6 ch]
Rnd 7 3 SC in first ch sp, SC in all sts around, placing 3 SC in 5 rem ch sps. Join with sl st in first SC. [90 SC]
Rnd 8 Switch to Size 5mm hook. (Beg DC, 6DC) in center SC of 3SC corner (or “corner SC”) – Beg Shell made, * DC in all sts across to next corner SC, 7 DC in corner SC – Shell made, rep from * 4 times, DC to Beg Shell, Join with sl st in top of Beg DC. [6 Shell, 84 DC]
Rnd 9 Insert hook in both second and sixth st of Beg Shell, SC through both layers to close Shell creating Bobble. * SC across to next Shell, SC in first st of Shell, make Bobble, SC in last st of Shell, rep from * 4 times, SC across to Beg Shell, SC in first st of Beg Shell, join with sl st to first SC cut yarn and finish off. [102 SC]
Tip: When you work the SC that closes the Shell to make the Bobble, be sure to insert hook front to back through the second SC, and back to front through the sixth SC. This may be intuitive, but I want to be clear.
Rnd 10 Change to Yarn B. Working through BLO, 3SC in corner SC, SC in all sts around, placing 3 SC in 5 rem corner SC, join with sl st in first SC. [114 SC]
Rnd 11 Rep Rnd 8 [6 Shell, 108 DC]
Rnd 12 Rep Rnd 9 [126 SC]
Rnd 13 Change to Yarn C. Rep Rnd 10 [138 SC]
Rnd 14 Rep Rnd 8 [6 Shell, 132 DC]
Rnd 15 Rep Rnd 9, BUT instead of working only 1 SC to close Shell, work 3 SC through both layers. [162 SC]

half hexagon (make 6)
Row 1 (WS) Using size 4mm hook and Yarn A, ch 3, sl st in third ch from hook to make ring. All in ring: Beg HDC, ch 1, (2 HDC, ch 1) 3 times, HDC, turn work. [8 HDC, 4 ch]
Row 2 (Beg DC, ch 1, DC) in first ch sp, (2 DC in next st, sk 1, (DC, ch 1, DC) in next ch) 3 times, turn work. [14 DC, 4 ch]
Row 3 (Beg DC, ch 1, DC) in first ch sp, (DC in all sts to next ch sp, (DC, ch 1, DC) in ch sp) 3 times, turn work. [20 DC, 4 ch]
Rows 4-6 Rep Row 3. St count after Row 6: [38 DC, 4 ch]
Row 7 2 SC in first ch sp, (SC across to ch sp, 3 SC in ch sp) twice, sc across to ch sp, 2 SC in ch sp, turn work. [46 SC]
Row 8 Switch to Size 5mm hook. (Beg DC, 6DC) in first SC – Beg Shell made, * DC in all sts across to next corner SC, 7 DC in corner SC – Shell made, rep from * once more, DC to final SC, make Shell in final SC, turn work. [4 Shell, 42 DC]
Row 9 Insert hook in both second and sixth st of Beg Shell, SC through both layers to close Shell creating Bobble. * SC across to next Shell, SC in first st of Shell, make Bobble, SC in last st of Shell, rep from * once more, SC across to Shell, SC in first st of Shell, make Bobble, cut yarn and finish off, turn work. [52 SC]
Row 10 Change to Yarn B. Working through BLO, 2SC in first SC, SC in all sts across, placing 3 SC in next 2 corner SC and 2 SC in the final st, turn work. [58 SC]
Row 11 Rep Row 8 [4 Shell, 54 DC]
Row 12 Rep Row 9 [64 SC]
Row 13 Change to Yarn C. Rep Rnd 10 [70 SC]
Row 14 Rep Row 8 [4 Shell, 66 DC]
Row 15 Rep Row 9, BUT instead of working only 1 SC to close Shell, work 2 SC through both layers on first and fourth Shell, and 3 SC through both layers on second and third Shell. [82 SC]
joining the full hexagons
Note: This is a CONTINUOUS JOIN, which means you will start and finish the join in the same place, and work around the piece in a continuous manner, leaving only first and final ends to weave, and creating a very neat and tidy join with high integrity. I will spell everything out as much as possible, but if you’ve never worked a “CJAYG”, I suggest you do a tiny bit of research to at least get the gist. I have lots of free info and tutorials on my website. This join also makes use of a maneuver that I invented called “PLT Join” I will explain it here, but you can find more info at that link as well.
Prepare motifs: Lay out all 17 full hexagon motifs as shown in Joining Schematic above. Motifs are numbered in the order they are joined to the piece. With 5mm hook, join Yarn B in the corner SC at the spot indicated. Continuous red line marks joining path.
Motif 1: Working through BLO throughout entire join, 3 HDC in same corner st – Corner made. HDC across side 1, make Corner, HDC across side 2, make Corner, HDC across side 3, make Corner, HDC across side 4 to corner st, work 2 HDC in corner st.
Motif 2: HDC in corner st at green circle in schematic. PLT as follows: Release loop from hook, insert hook front to back in final HDC on Motif 1, replace loop on hook, Pull Loop Through to front of work. HDC in same corner st on Motif 2, PLT in corresponding HDC st on Motif 1. Continue across Side 1 of Motif 2 in this manner, working (HDC, PLT in corresponding st on completed motif) across to join Side 4 of Motif 1 and Side 1 of Motif 2 together. When you reach the next corner, the last st that will be PLT joined to Motif 1 is the second HDC of that corner. Work the third HDC of the corner, and continue across Sides 2-4 without joining. Final st of Motif 2 will be the second HDC of the corner after Side 4.
Motif 3: Work as for Motif 2, stopping after Side 3.
Motif 4: HDC in corner st at spot marked with orange circle, PLT, HDC in same st, PLT, work across Side 5, joining to Side 3 of Motif 3. Stop after second HDC of next corner.
Motif 5: HDC in corner st at spot marked with turquoise circle, PLT in corner of Motif 3, and join Side 5 to Side 2 of Motif 3. At corner marked with purple circle, make center HDC and PLT through both center HDC of corners on Motif 2 and Motif 3. Make third HDC of same corner, and continue down Side 6, joining it to Side 3 of Motif 2.
Motif 6: Work across Sides 5 and 6 as for Motif 5.
Motif 7: Work across Side 5 as for Motif 5 and continue around Sides 1-4 without joining.
Motif 6: Work as for Motif 2.
Motif 5: Work as for Motif 2.
Motif 4: Work as for Motif 2, stopping after Side 2. Two rows of Full Hexagons are now joined together.
Motifs 8-10: Work up the Motifs, joining sides 5 and 6 onto the piece, and then working around each hexagon down the piece, joining adjacent sides, and stopping after Side 3 of Motif 8.
Motif 11-17: Work as for Motifs 4-10. When you get down to the corner marked with a yellow circle on Motif 15, it is time to work across the bottom side and up the right hand side.
HDC across all lower edges of Motif 15, 11, 8, 4, and 3. Be sure to complete the corners where 3 hexagons meet. After completing Side 4 of Motif 3, make Corner, and continue up to the Starting Point Join with sl st in first HDC. Cut yarn and finish off.
Attach Half Hexagons: Place half hexagons in 6 spots as shown on first photo on Page 3. As before, join along adjacent sides of half hexagons to connect them to the piece. Only center half hex on either side will have all 3 Sides Joined. Now you have zig-zag top and bottom edges, and straight side edges.

work the border
Straighten zig-zag edges
Row 1 (RS) Using size 5mm hook, join Yarn B with a sl st in corner before short, zig-zag side. SC in same and following st, * HDC in following 3 sts, DC in following 20 sts, DC in far left HDC of corner on next hexagon and in next 19 sts, HDC in next 3 sts, SC in next 3 sts, rep from * 3 times, making SC in only final 2 sts, turn work.
Row 2 SC in first 5 sts, * HDC in next 3 sts, DC in next 16 sts, sk 2, DC in next 16 sts, HDC in next 3 sts, SC in next 9 sts, rep rom * 3 times, making SC in only final 5 sts, turn work.
Row 3 SC in first 8 sts, * HDC in next 3 sts, DC in next 8 sts, sk 2, DC in next 8 sts, HDC in next 3 sts, SC in next 15 sts, rep from * 3 times, making SC in only 8 final sts, turn work.
Row 4 SC in first 11 sts * HDC in next 2 sts, DC, sk 2, DC, HDC in next 2 sts, SC in next 21 sts, rep from * 3 times, making SC in only final 11 sts, cut yarn and finish off.

Final border
Rnd 1 (RS) Join Yarn B in any corner. 3 SC in same corner, work SC evenly around, making 3 SC in 3 more corners, join with sl st to first SC. Be sure to count that opposing sides have identical amount of SC.
Rnd 2 Change to smaller hook for Rnds 2 and 3. 3 SC in corner st, SC all around, putting 3 SC in 3 more corners, join with sl st in first SC, turn work.
Rnd 3 (WS) (SC, TR, SC) all in corner st – Corner made, (TR in next st, SC in next st) across to next corner, make Corner, continue in this manner with rem 3 sides and corners, join with sl st in first SC, cut yarn and finish off.
Note: Working SC, TR on the WS of the piece should create tiny “bobbles” on the RS. Check final photo on pages 5 and 6 to see bobble border.
DONE! YAY!

Rachele C.