
Hello, lovely crafter! Today I want to show you what I have been working on while everyone is busy with the Colour Lab CAL Part 1 and Part 2. First, I want to show off a few of the many, many WIPs that you can find in the Scheepjes International Facebook Group, and then I will reveal my project. And here’s a hint: it is made using the beloved Whirl yarn!
If you’ve been hanging around my website lately, you have seen the Colour Lab CAL blanket that I made, below, probably a million times. But, there was a voice in my head a while back that said I just had to see it made in Whirl yarn! I just love the color-fade, and I know so many crafters love it, too. Not to mention the fuzz-buzz – squeeeeee!

Related Links
If you have not seen this project yet, here are all of the quick links so that you can see more and get started!
- The Scheepjes website page for the CAL
- Scheepjes official Tips and Tricks PDF
- My Tips and Tricks Post US Terms with some photo tutorials of tricky stitches
- My Tips and Tricks Post UK Terms with some photo tutorials of tricky stitches
- Scheepjes International Facebook Group
- Scheepjes Dutch Facebook Group
- YouTube videos for the CAL (Videos are in UK Terms): Right-Handed // Left-Handed
- Ravelry Pattern Page
- Colour Lab CAL Blog Posts UK Terms: Main Page, Part 1, Part 2, Part 3, Part 4, Part 5, Part 6, Part 7, Part 8, Bonus Project
- Colour Lab CAL Blog Posts US Terms: Main Page, Part 1, Part 2, Part 3, Part 4, Part 5, Part 6, Part 7, Part 8, Bonus Project
- USA: Jimmy Beans Wool Metropolis Kit / Scrumptious Kit
- UK/Worldwide: WoolWarehouse Metropolis Kit / Scrumptious Kit
Where to Find Me
- Instagram: @cypresstextiles
- Facebook Page: CypressTextiles
- YouTube Channel: Rachele Carmona
- Pinterest: CypressTextiles
- Tumblr: CypressTextiles
- Etsy: CypressTextiles
- Ravelry: Rachele Carmona
- Teachable: Creative Art Blanket Course
Some Colour Lab CAL WIPs
I am very touched and feeling super proud of how many folks are joining in with the Colour Lab CAL over in the Scheepjes Facebook Groups. It truly has blown me away how many crafters are participating, and everyone’s work is so beautiful.
You have certainly seen my write that my favorite thing about hosting a Crochet-Along is seeing the wide variety of blankets that get made, and looking at the amazing spin that each person puts into their project. It’s such a personal thing to pour part of yourself into a blanket design, and I was so pleased that Scheepjes kept this element in my Colour Lab CAL design.
Instead of just showing the sample colorways, they have challenged everyone to create their own color layout, and I’ve been floored looking at all of the possibilities. Here are just a few of them, and it was so hard to choose just a few, but you should really check out the Facebook groups linked above to see them all!
First up! Don’t you just love these greens? This project is by the talented Esther Dijkstra of It’s all in a Nutshell, who has provided the tutorial videos for the CAL. (Videos are in UK Terms): Right-Handed // Left-Handed
This is from Part 1 of the CAL. Esther is using Metropolis Yarn. (aff)

And here is Esther’s Part 2! This is what really drew me to her project. These colors together really make the shapes sing. I can’t wait to see this project come together.

This next one is by a busy bee who already has Part 1 and Part 2 finished and joined, and I may even say she has her ends woven in as well! I just loved these colors and layout.

Oooh I love this next WIP! The yarn is so subtle and hazy. It’s just an absolute treasure, and makes me want to break out some similar stash yarn to create something with this heathered effect.

Okay, this next project just absolutely jumped out at me from the screen. That color-fade on Part 1! Oh my goodness! And then the gorgeous purples and pinks. It’s going to be a stunner! Yarn is Scheepjes Catona.

This final sample looks like a Valentine’s Day blanket and I am so here for it! How pretty is this??

And those are all the Colour Lab CAL WIPs I had time to present today, but trust me when I say I have loved every single project that has been shared! Keep sharing them 🙂
Lemon Cassis Cream Whirl Yarn
For my Whirl project, I am using three of the Lemon Cassis Cream Whirl yarn and then what I think will end up to me about 6-7 Whirlettes. Here is what the Lemon Cassis Cream Whirl looks like.

Order Whirl Yarn
These are all affiliate links and shopping through them will gain me a small commission. It is a great way to support my work at no additional cost to you!
Find the 3 x 220g balls of Scheepjes Whirl Lemon Cassis Cream (or color of your choice) at one of these shops.
Order Whirlette Yarn
Find the 6-7 x 100g balls of Whirlette No. 860 Ice (or color of your choice) at one of these shops.
Of course you can also search for a retailer near you by clicking this link to the Scheepjes Shop page!
My Whirl Colour Lab CAL!
And now to show you my work in progress! I will definitely be updating this page, and I will show you how it’s coming along as I go.
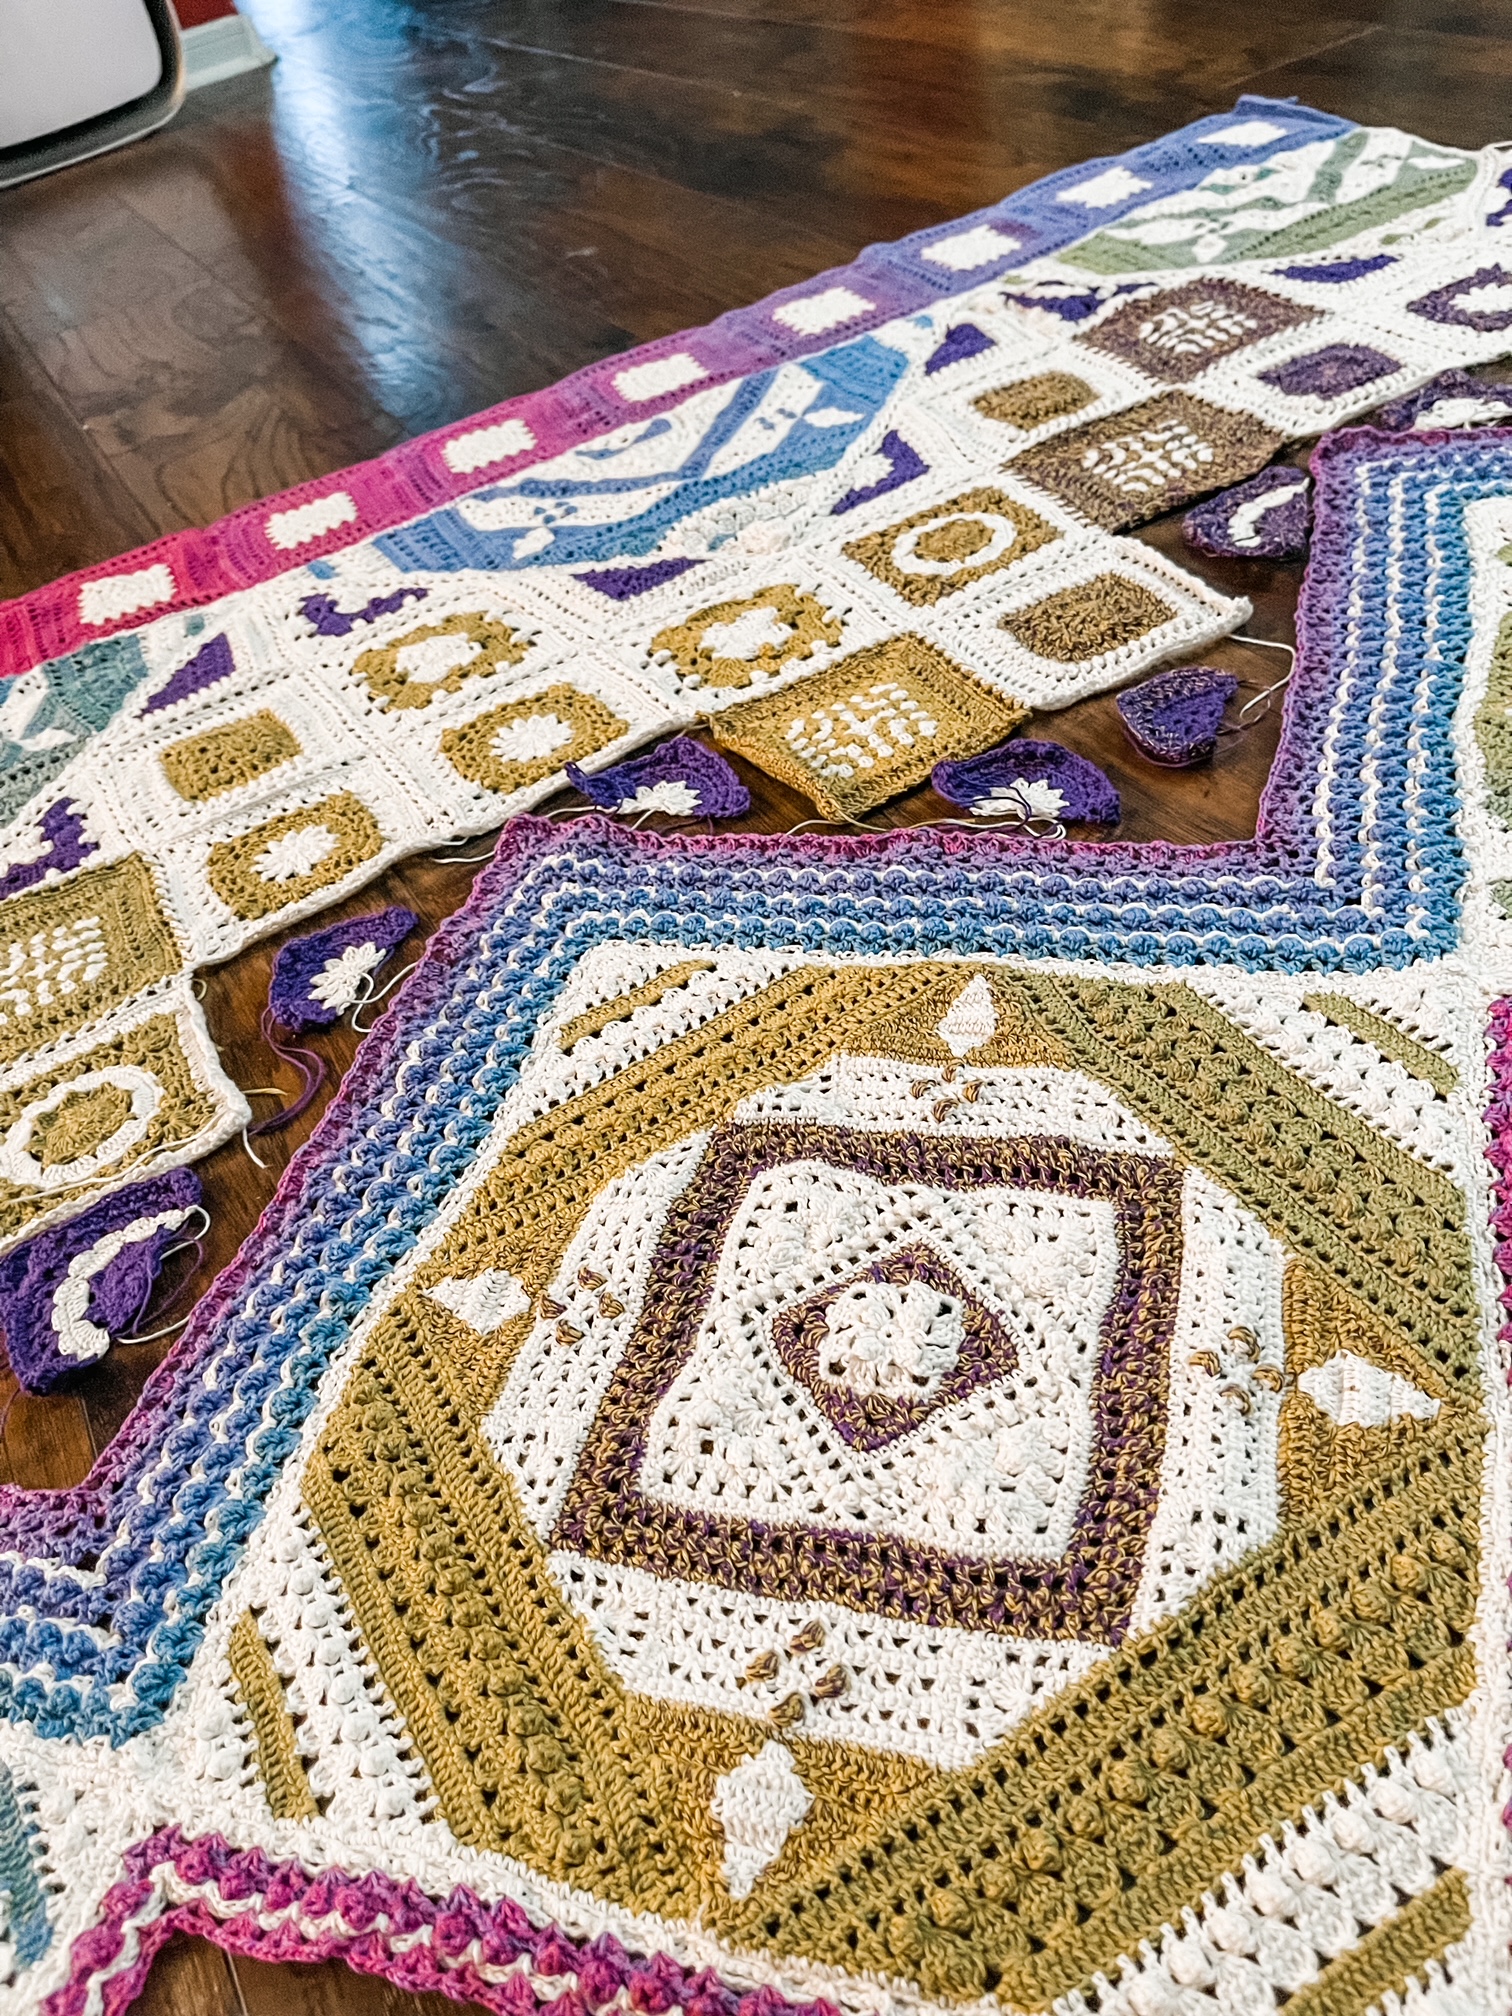
So far, I have finished Parts 1, 2, and 3, and I just have a little more of Part 4 to go. The reason I am dragging my feet with Part 4 is that I just have the white part of the little purple triangles, and that is just not as interesting as using the colorful Whirl. But I will get to it soon!
I also have Part 5 finished and I am just finishing up Part 6. Then all I will have left are Parts 7 and 8, and I can show you how it looks in the end!

Doesn’t it look amazing with the fading colors of Whirl? So how did I decide on color placement? Well, there are some folks in the Facebook groups using Whirl for their Colour Lab CAL, and it seems like everyone has their own incredible strategy for how they will use it.
I came up with my own Whirl and Whirlette layout, and as you can see I am switching up whether I use the Whirl where there is color or grey on the schematic. I will color in my own chart for you once I am done in case you want to recreate this project, you can see where I placed the Whirl yarn.

There is also the decision of what order to work the pieces in so that you get the color fade of the Whirl just how you want it in the blanket. I will also let you know here what order I worked the pieces. I really tried to maintain the actual pattern as closely as possible so as not to create confusion.
Let me take the blanket part by part and tell you how I am working up my project. Of course I will add to it as I go! I’ll let you know in future posts if I have updated it, and also on my socials.
Part 1
For Part 1, I worked the center squares in Whirlette, and the outer portion in Whirl. I simply worked from left to right as indicated in the pattern, which is why there is this gorgeous face from pink to blue across the top of the blanket.
Pretty straight forward! On to Part 2.

Part 2
On this part there are 3 motifs, Center, Left Hand Side, and Right Hand Side. I worked the Center Motif first, which is why it is more blue.
You can see in the photos where I have placed the Whirl and Whirlette.

Next, I worked up the Left Hand Side motif. On this one, the fading of the green began. Gorgeous, and already there have been lots of Fuzz-Buzz moments – exciting!

Lastly but not leastly, I made the Right Hand Side motif. Some yellow is making an appearance already toward the end of the motif!

Part 3
Part 3 are these full squares going in a zig-zag across the blanket. I made and joined all of these squares in the order that they appear in the pattern, from left to right. Note: The purple triangles are Part 4.
You can see how I chose to place the Whirl and Whirlette on the squares, and I really enjoyed making the grannies with the Whirl on the outer portion, just to break up the white of the join.
Here is the yellow coloring…

Moving toward a slow fade to purple…

And then solid purple squares at the end. You know purple does not photograph, but I did my best to capture the warm purple of this yarn. It looks very blueish here, but it is warmer in real life.

Look at these incredible color-fades, I’m telling you every time I use Whirl, I fall more in love with it! Let’s look at Part 4.
Part 4
You can see all of the solid purple triangles right under Part 2, going across the blanket. It was at this time that I ran out of the first Whirl. For all of the parts so far, I used 1 Whirl, working from the center. You can tell this because the center of Lemon Cassis Cream is pink.
This Whirl ends on a rich purple, and I decided to work the next Whirl from the outside when I ran out of the first one. This way, the colors would fade in the opposite direction.

So, as I mentioned before, these bottom triangles of Part 4 are not yet finished because all they are missing are the white portion and joining on. But you can see the left hand side still has solid purple.

The right hand side is starting to show the yellow.

Here’s a closeup of how it looks with the yellow fading in.

Part 5
For this part I did something a little different. I designed this blanket with the preference in mind that the two large squares would be similar in their colors, so I didn’t want to risk running into a big color fade difference in the two squares and having them look completely unalike.
Now mind you, many of the color layouts that people have created for the CAL have these two squares looking completely different, and that is A-Okay! It’s just a preference, and they all look amazing.
But, I want to tell you how I made my 2 large squares of Part 5. I worked them both at the same time, switching back and forth after each section so that the Whirl was fairly evenly spread between the two motifs.
Here is the motif on the left:

And here is the motif on the right. You can see the green started fading in on this motif, but I still love how the center purples tie them together.

When I was done with the two squares, I made the small left hand side motif.

Then I made the small motif on the right hand side, and some of the blue is coming in! That’s all for Part 5!

Part 6
I know the blanket is amazing so far, but this may be one of my favorite features of the blanket. Part 6 is just a back-and-forth section, designed to give you a break from all of the motifs. But just look at how the colors are distributed for the Whirl. How perfect is this fade?

I can’t get over it! Reminds me of a mermaid tail.

I am still working on the back-and-forth rows on the bottom edge, and I just love how pink these stripes are.

Here’s all that I have left of my second Whirl, and when I start the third one, I will pull from the center, so that I can continue with the pink.

Soon, I will jump back into this project and work on Parts 7 and 8. I don’t quite know yet how I will go about the color placement for them yet, especially for Part 7, but I will update you and post my layout for this blanket here as well.
For now, my last Whirl for this project is waiting for me!

And here’s my sweet Whirlette.

Another view of this beauty.

And one last pic. Swooooon!

Whirls on the Side
Okay, confession time: I may have a problem – although some may say it’s more of a solution lol – but I bought 3 more Whirls to make something new. I couldn’t resist trying to mix 3 colors in the same blanket, and I truly can’t wait to work up a new design for you!
These colors are:

And another view of them. I may have taken many more photos of these beauties, so be glad I am only showing two here! Watch this space for a new design with these lovelies.

More of My Whirl Designs
Over the years since Whirl was released, I made a couple of designs using the gorgeous yarn. Check them out, as they are freebies.
Rebecca Mobius Scarf
This first one is called the Rebecca Mobius Scarf. I used the color 755 – Blueberry Bambam. You can find this pattern FREE on my website by clicking this link!

And here is Rebecca herself, my eldest daughter, when she was probably 10 years old, modelling the scarf for me!

Gloria Blanket
The other project that I designed and used Whirl for is my Gloria Blanket. I used the color 769 – Blackberry Mint Chip. Side note, this is my number 1 favorite Whirl colorway. You can find this pattern FREE on my website by clicking this link!

Well, I want to say thank you so much for checking out my Whirl version of the Colour Lab CAL! I have enjoyed showing you, and hope you loved it.
Happy crafting!
Rachele C.
The Art of Crochet Blankets (affiliate)
Support My Work
You’re supporting by just being here! You can read my blog (Start Here!), like and comment on socials, and message me for a chat. All of this supports my work free of charge!
- Affiliate links – Shopping through my links supports me at no additional cost to you as I get a small commission through my affiliates. Jimmy Beans Wool // WoolWarehouse // Amazon.com
- Buy my pattern book – I wrote a super neat crochet blanket pattern book, published under Penguin Random House. You can buy it here!
- Browse my self-published patterns – I have over a hundred patterns on Etsy and Ravelry
- Creative Art Blanket Course – Check it out on Teachable