
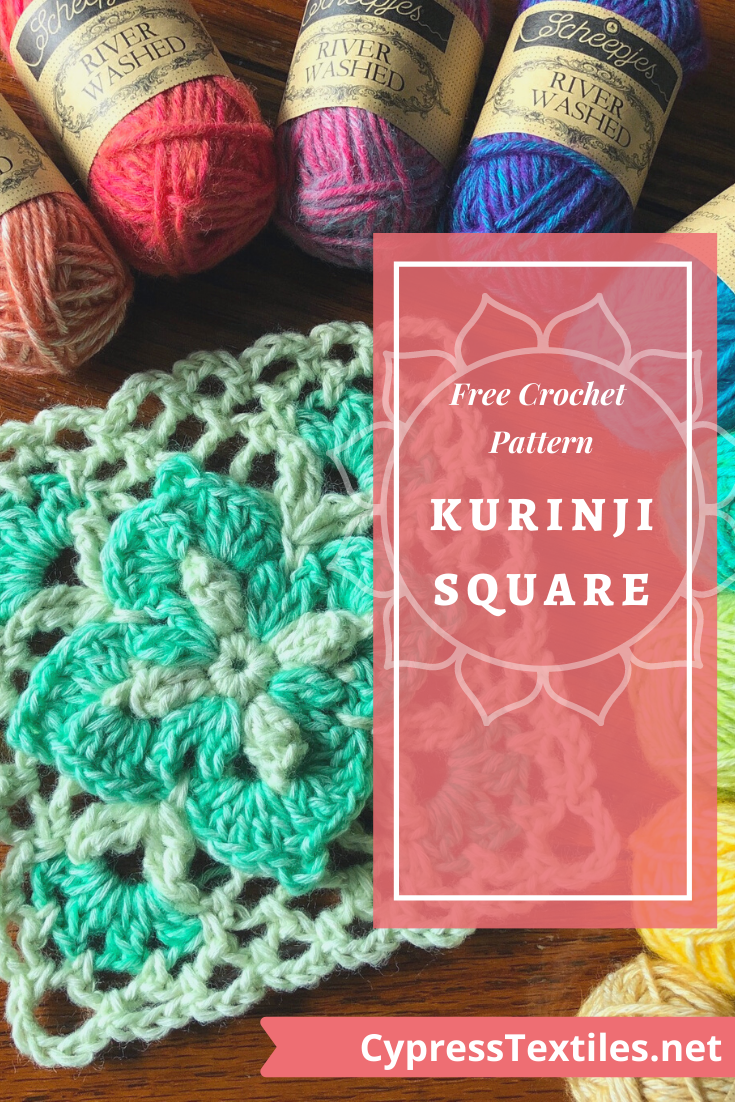
Hello, again! Today it hit me that I haven’t planned anything for Granny Square Day (August 15th)! So I decided to craft a little square that you can make with 10g of Catona or Stone Washed / River Washed. It has a little color-work too.
This is a square to savor the moment. It’s a square to slow down and love the process. If you’re looking for something quick and zippy, this may not be the one. Of course, after a few, it gets faster because you’ll memorize the pattern, but it’s just not a super fast make, in my opinion. So, this one won’t be for everybody, and that’s okay.
Heads up, I have another Granny Square Day surprise for you tomorrow!! It’s a big one!
Social Media Sharing
Hashtag #kurinjisquare / #grannysquareday2020 / #cypresstextiles
Of course, if you have made any of my VVCAL squares, you can post them on Granny Square Day, August 15, and hashtag #vvcal / #grannysquareday2020 / #cypresstextiles
I just wanted to exercise my design muscles on a nice lacy square for you! I started with my Vienna Square from the 2020 VVCAL as a jump off point, and then just let the creativity flow!

And with that fantastic introduction – lol – I present the Kurinji Square! Named after a flower which only blooms about every 12 years.. I deliberately searched through flowers which are slow to bloom to find a name for this square, because I wanted to honor the patient process.
I have step by step photos for you and I try to explain every detail of construction! But many will benefit from a video, so I will produce one as soon as possible, and add it here. Remember, I decided to design this on the fly today! So I did my best. I really do love this square and I hope you do too.


I plan to make a blanket using a bunch of extra 10g balls of Stone Washed and River Washed that I have from various Colour Packs I have partially used in the past. Stay Tuned!


Kurinji Square
Enjoy the slow process of crafting this lacy floral square. Kurinji Square looks best in 2 colors, and is described with the color changes included. You can make 2 squares using 2 x 10g balls of Catona or Stone Washed / River Washed. You can also make 10 squares with 2 x 50g balls of that same yarn.
The pattern is a little rough, but it works! Ask questions in the comments, but a video is coming soon!
Details and Materials
- Square measures 5in, unblocked (I won’t block before joining, but you may decide to.)
- To make 2 squares, you need 10g each of 2 colors of Scheepjes Catona or Stone Washed or River Washed.
- If you want to make just 1 square, I recommend having 6g each of 2 colors, just to be sure you have enough.
- 3.5mm hook
Order Yarn
Order from these affiliate links to support CypressTextiles at no additional cost to you, or head to the Scheepjes website to find a retailer near you!
Scheepjes Catona 10g Colour Pack (Makes 109 2-color squares)
Scheepjes Catona 50g Balls
Scheepjes Stone Washed / River Washed 10g Colour Pack (Makes 58 2-color squares)
Scheepjes Stone Washed 50g Balls
Color Planning
I have 2 suggestions for using color in this square.
- You can choose 2 colors and then just switch them for your 2 squares, so you would use Yarn A for the first color on the first square, and then Yarn B for the first color on the second square.
- Or, you can put your colors in order, and then use them in a line. For example, let’s say you are using 5 colors, just to simplify. Yarns A, B, C, D, and E. Here are how you can use the colors:
- Square 1: First color – A, Second color – B
- Square 2: First color – B, Second color – C
- Square 3: First color – C, Second color – D
- Square 4: First color – D, Second color – E
- Square 5: First color – E, Second color – A
That will allow you to vary your color use throughout the piece, instead of having a lot of predictability with 2 squares using the same 2 colors.
Stitch Guide (US Terms)
Scroll down for UK Terms.
- 2dccl 2 dc cluster: (yoh, insert hook in st indicated, yoh, pull up lp, yoh, draw yarn through 2 lps on hook) 2 times, yoh, draw yarn through all 3 lps on hook
- 2trcl * yoh 2 times, insert hook in st indicated, (yoh, pull up lp, yoh, draw yarn through 2 lps on hook) 2 times, rep from * 1 time, yoh, draw yarn through all 3 lps on hook
- pcorn 4dc in st/sp indicated release lp from hook, insert hook front to back through first dc, grab lp, pull lp to front to close popcorn
- beg 2dccl (beg dc, dc) all in same st/sp – counts as 1 2dccl
- beg dc (sc, ch1) – counts as 1 dc
- beg pcorn (beg dc, 3dc) in st/sp indicated release lp from hook, insert hook front to back through beg dc, grab lp, pull lp to front to close popcorn
- ch chain
- dc double crochet
- lp loop
- MR (make ring) ch3, ss in third ch from hook
- picot ch3, sc in top side of previous dc
- rem remaining
- rep repeat
- sc single crochet
- ss slip stitch
- sk skip
- sp space
- st stitch
- tr treble crochet
- yoh yarn over hook
Instructions
Tip: To avoid having a lot of work when you are finished with the square, weave your ends after each time you cut the yarn.
Rnd 1 Using first color, MR, 8sc, ss in first sc. [8 sc]

Rnd 2 Beg pcorn in next st, (ch10, sk1, pcorn) 3 times, ch10, ss in first ch after beg pcorn, cut yarn and weave ends. [4 pcorn, 4 sp]

Rnd 3 Join second color with ss in one of the skipped sts from Rnd 1, beg 2dccl in same st, (ch2, 2dccl in same st, ch5, 2dccl in next skipped st) 4 times omitting final 2dccl, ss in beg 2dccl. [8 2dccl, 8 sp]
Note: In the photos below, I haven’t cut the first color yet, but I did that afterward.


Rnd 4 Ch2, pull the pcorn forward, and slide the ch-5 sp backward, so you can work into a portion of the ch-10 sp close to the pcorn. In the first photo below, I am ready to make a dc in the ch-10 sp. 5dc in the ch-10 sp, (picot, 5dc in the next ch-10 sp, keeping these dc sts close to the pcorn, ch1, pull the next pcorn through the ch-5 sp, 5dc in the ch-10 sp) 4 times omitting final 5dc, ss in beg dc, cut yarn and weave ends. [4 picot, 40 dc, 4 sp]


Rnd 5 (Insert your hook through the ch-2 sp from Rnd 3, under the ch-1 sp from Rnd 4, AND under the floating portion of the 10-ch sp – red arrows below, join the first color with ss around these 3 ch-sps, treating them as 1, sc in the same place, (ch4, sc in the ch-5 sp from Rnd 3 – purple arrows below, ch4) 4 times, ss in first sc. [8 sc, 8 sp]
I didn’t get a final photo of this round – whoops! I will point out this round a bit later on!

Rnd 6 Ss in first 2 chs, sc in ch-4 sp, * ch3, sc in next ch-4 sp, ch3, (2trcl, ch3, 2trcl) in next sc, ch3, sc in next ch4-sp, rep from * 3 times omitting final sc, ss in first sc. [8 2trcl, 8 sc, 16 sp]

Here is the back of the square at this point! I haven’t woven in ends, because this square took a lot of frogging, but you should weave them in as you go.

And since I forgot that photo earlier, here below you can see the 8 sc of Rnd 5. Yay!

Rnd 7 Ss in first ch, tilt picot toward you and look for the 2 bars of the sc that you closed the picot with from Rnd 4, * insert hook in those 2 bars of the sc AND under the ch-3 sp from Rnd 6, make an sc here to “anchor” the picot to the ch-3 sp, ch3, sc in next ch-3 sp changing color to second color by pulling second color through on the last step of the sc, working over the dropped first color, 2dccl in next ch-3 sp, (ch2, 2dccl in same sp) 3 times, changing back to first color on final step of last 2dccl, drop second color and cut yarn, sc in next ch-3 sp, ch3, rep from * 3 times omitting final sc, ss in first sc. [16 2dccl, 12 sc, 20 sp]
Weave in all 8 cut ends of the second color. You are done with the second color at this point.


Rnd 8 Ss in first ch, sc in same ch-3 sp, * ch3, sc between next sc and 2dccl, (ch3, sc in next ch-3 sp) 3 times, ch3, sc between next 2dccl and sc, (ch3, sc in next ch-3 sp) 2 times, rep from * 3 times omitting final sc, ss in first sc. [28 sc, 28 sp]


Rnd 9 Ss in first ch, sc in same ch-3 sp, * (ch3, sc in next sp) 2 times, ch5, (sc in next ch-3 sp, ch3) 4 times, sc in next ch-3 sp, rep from * 3 times omitting final sc, ss in first sc, cut yarn and weave in all ends. [28 sc, 28 sp]
Yay! You’re done!

To join blocks: Join on the final round, in the center ch of each ch-sp around. You can use a flat braid style join.
Stitch Guide (UK Terms)
Scroll up for US Terms.
- 2trcl (yoh, insert hook in st indicated, yoh, pull up lp, yoh, draw yarn through 2 lps on hook) 2 times, yoh, draw yarn through all 3 lps on hook
- 2dtrcl * yoh 2 times, insert hook in st indicated, (yoh, pull up lp, yoh, draw yarn through 2 lps on hook) 2 times, rep from * 1 time, yoh, draw yarn through all 3 lps on hook
- pcorn 4tr in st/sp indicated release lp from hook, insert hook front to back through first tr, grab lp, pull lp to front to close popcorn
- beg 2trcl (beg tr, tr) all in same st/sp – counts as 1 2trcl
- beg tr (dc, ch1) – counts as 1 tr
- beg pcorn (beg tr, 3tr) in st/sp indicated release lp from hook, insert hook front to back through beg tr, grab lp, pull lp to front to close popcorn
- ch chain
- dc double crochet
- dtr double treble crochet
- lp loop
- MR (make ring) ch3, ss in third ch from hook
- picot ch3, dc in top side of previous tr
- rem remaining
- rep repeat
- ss slip stitch
- sk skip
- sp space
- st stitch
- tr treble crochet
- yoh yarn over hook
Instructions
Tip: To avoid having a lot of work when you are finished with the square, weave your ends after each time you cut the yarn.
Rnd 1 Using first color, MR, 8dc, ss in first dc. [8 dc]
Rnd 2 Beg pcorn in next st, (ch10, sk1, pcorn) 3 times, ch10, ss in first ch after beg pcorn, cut yarn and weave ends. [4 pcorn, 4 sp]
Rnd 3 Join second color with ss in one of the skipped sts from Rnd 1, beg 2trcl in same st, (ch2, 2trcl in same st, ch5, 2trcl in next skipped st) 4 times omitting final 2trcl, ss in beg 2trcl. [8 2trcl, 8 sp]
Note: In the photos below, I haven’t cut the first color yet, but I did that afterward.
Rnd 4 Ch2, pull the pcorn forward, and slide the ch-5 sp backward, so you can work into a portion of the ch-10 sp close to the pcorn. In the first photo below, I am ready to make a tr in the ch-10 sp. 5tr in the ch-10 sp, (picot, 5tr in the next ch-10 sp, keeping these tr sts close to the pcorn, ch1, pull the next pcorn through the ch-5 sp, 5tr in the ch-10 sp) 4 times omitting final 5tr, ss in beg tr, cut yarn and weave ends. [4 picot, 40 tr, 4 sp]
Rnd 5 (Insert your hook through the ch-2 sp from Rnd 3, under the ch-1 sp from Rnd 4, AND under the floating portion of the 10-ch sp – red arrows below, join the first color with ss around these 3 ch-sps, treating them as 1, dc in the same place, (ch4, dc in the ch-5 sp from Rnd 3 – purple arrows below, ch4) 4 times, ss in first dc. [8 dc, 8 sp]
I didn’t get a final photo of this round – whoops! I will point out this round a bit later on!
Rnd 6 Ss in first 2 chs, dc in ch-4 sp, * ch3, dc in next ch-4 sp, ch3, (2dtrcl, ch3, 2dtrcl) in next dc, ch3, dc in next ch4-sp, rep from * 3 times omitting final dc, ss in first dc. [8 2dtrcl, 8 dc, 16 sp]
Here is the back of the square at this point! I haven’t woven in ends, because this square took a lot of frogging, but you should weave them in as you go.
And since I forgot that photo earlier, here below you can see the 8 dc of Rnd 5. Yay!
Rnd 7 Ss in first ch, tilt picot toward you and look for the 2 bars of the dc that you closed the picot with from Rnd 4, * insert hook in those 2 bars of the dc AND under the ch-3 sp from Rnd 6, make an dc here to “anchor” the picot to the ch-3 sp, ch3, dc in next ch-3 sp changing color to second color by pulling second color through on the last step of the dc, working over the dropped first color, 2trcl in next ch-3 sp, (ch2, 2trcl in same sp) 3 times, changing back to first color on final step of last 2trcl, drop second color and cut yarn, dc in next ch-3 sp, ch3, rep from * 3 times omitting final dc, ss in first dc. [16 2trcl, 12 dc, 20 sp]
Weave in all 8 cut ends of the second color. You are done with the second color at this point.
Rnd 8 Ss in first ch, dc in same ch-3 sp, * ch3, dc between next dc and 2trcl, (ch3, dc in next ch-3 sp) 3 times, ch3, dc between next 2trcl and dc, (ch3, dc in next ch-3 sp) 2 times, rep from * 3 times omitting final dc, ss in first dc. [28 dc, 28 sp]
Rnd 9 Ss in first ch, dc in same ch-3 sp, * (ch3, dc in next sp) 2 times, ch5, (dc in next ch-3 sp, ch3) 4 times, dc in next ch-3 sp, rep from * 3 times omitting final dc, ss in first dc, cut yarn and weave in all ends. [28 dc, 28 sp]
Yay! You’re done!
To join blocks: Join on the final round, in the center ch of each ch-sp around. You can use a flat braid style join.

Hope you enjoy this square! And have a fabulous Granny Square Day! Enjoy posting your squares!
Happy Crafting as always,
Rachele C.
6 Comments