
Let it Go Blanket Pattern

Find my Let it Go crochet blanket pattern in an ad-free, easy to print PDF for a small fee on:
Ravelry // Craftsy // Etsy // LoveCrochet.com
Or scroll down for the free pattern!
Introduction
After spending so much time staring longingly at my Scheepjes Stone Washed and River Washed XL Cutie Pie Pack (some pretty pics!), I finally decided to design something for it. One of my goals for 2018 is to have a no-waste spirit, so I wanted to use every inch of yarn. I thought a fun and quirky granny square blanket would be perfect. Join as-you-go to make sure nothing is wasted, and of course since this blanket is in the Relaxghan Series (designed with peace in mind), I had to give it a special, peaceful name. So the Let it Go blanket was born. Read more about the process here!
I already can’t wait to show you all what I’ve designed for this pack. Hint: it’s an incredibly easy, but so beautiful project. but first, let me spoil you with pics of this Colour Pack by Scheepjes.
This Colour Pack is destined to become the fifth Relaxghan in the series of six free crochet blankets designed with peace in mind. See links below for all that info!
The blanket will be called “Let it Go” – as all of the blankets have a relaxation theme, and sometimes we have extra “stuff” we are carrying around and we really need to just take a deep breath and let it go…

Information (All the deets!)
Related Links for Let it Go
- WIP post of Let it Go
- Let it Go Relaxghan free pattern! (Includes Written and Video instruction)
Related Links for Relaxghans
- Blog Post: Relaxghans: Six free crochet blanket patterns designed with peace in mind.
- Ravelry Link: Relaxghans Ebook
Related Links for the Stone Washed/River Washed Cutie Pie Colour Pack
- Wool Warehouse*
- Knotty House*
- Black Sheep Wools*
- Browse other Scheepjes retailers – including brick and mortar shops!
- My thoughts on Stone Washed yarn – full review

Design Direction
These tiny 15g colors are completely gorgeous, and incite inspiration like you would not believe. I actually got going on the shop sample for this design and finished it all in one day except for the border. I could not stop picking up those teeny skeins and using them up! I popped a podcast on my phone, and got rolling. Since this is a no-waste project, in the spirit of my No-Waste 2018 mentality, I am using the motif remnants to create the border.
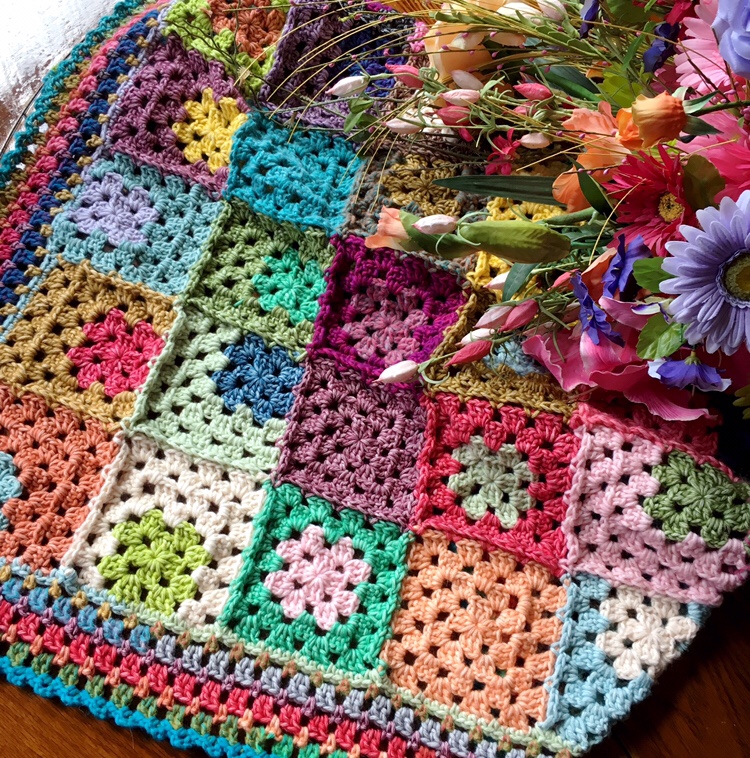
Think of the photo above as the “before photo” lol – and scroll down to see the after photo… I won’t reveal the blanket today, as the pattern is not quite done, but check out a sneak peek below!

During the WIP creation process, I got through a ton of the skeins and decided I better take photo before I was all done. That’s how quick it went!

Here’s that “after photo” lol – I felt so energized by working this blanket so quickly.
Total side note: Working this quickly reminds me of my custom blanket days, when I used to create 2 blankets per week. Still can’t believe I made over 300 custom blankets in the 4 years that I did custom work. It was a wonderful time making blankets that I knew people all around the world would be snuggling under. But I was really pleased to expand my business to designing blankets full time. I do have a few ready to ship pieces available these days, but it’s just the shop samples, AKA blanket design prototypes.

Back to these little yarn balls. Storing the yarn remnants like this is optional, but highly encouraged – it’s just a cute overload! The future of these cutie pies is to be tied together and used for the blanket border. Amazing! I can’t wait to show you all 🙂
Happy crafting!
Rachele C.

* This post contains affiliate links. Shop through them to support CypressTextiles so I can continue to produce fun hooky content!
Steps to achieve peace: Order this color pack. Wait patiently while writing a list of all the thing you ought to just let go. Marvel at the colors of these teeny 10g skeins of yarn upon the pack’s arrival. Then dive into this free pattern while that list of “let-it-go”s just gets up… and goes.
Design Direction
It starts with a pile of tiny two-round granny squares, and it ends with a gorgeous placement of colors, decided without a care in the world. The colors all look incredible together. There’s no need to stress over color placement. After all, crochet is supposed to de-stress you, not re-stress you.
And the Relaxghan Series is designed with peace in mind. Just take a deep breath, and Let it Go.

Color-Love
I do have a big secret – this blanket is almost finished actually. It just needs the border – but I don’t want to give it all away just yet. So here’s just a little taste of the work in progress! I cannot tell you how addictive it was working with all this color! You get every shade of the Stone Washed and River Washed yarns, without a huge commitment from your pocketbook.
Read More
Related Links for Let it Go
- Read more about this yarn pack – pretty photos!
- Let it Go Relaxghan free pattern! (Includes written and video instruction)
Related Links for Relaxghans
- Blog Post: Relaxghans: Six free crochet blanket patterns designed with peace in mind.
- Ravelry Link: Relaxghans Ebook
Related Links for the Stone Washed/River Washed Cutie Pie Colour Pack
My affiliate links to wherever you enjoy yarn shopping 🙂
- Wool Warehouse*
- Knotty House*
- Black Sheep Wools*
- Browse other Scheepjes retailers – including brick and mortar shops!
- My thoughts on Stone Washed yarn – full review

Peaceful Placement
The crazy random placement is key! This pattern includes four motifs. Effortlessly select random colors knowing that it’s going to come out awesome. And yes! There are even some solid granny squares in there just in case you get tired of making the two-color squares. I’m talking zero stress here! You will love it! 🙂

I cannot wait to show y’all the finished piece once it has the border and gets a good photo shoot! Stay tuned 🙂
In the meantime, you know, I have played with River Washed Yarn before! And I couldn’t resist making some awesome squares at that time, either…

Happy crafting, y’all!
Rachele C.
* This Post has affiliate links marked with an asterisk. Shopping through these links helps support CypressTextiles because I use the commissions to pay my website fees. And it doesn’t cost you anything extra! Wahoooo!!

Materials
- Yarn: Scheepjes “Stone Washed and River Washed XL Cutie Pie Colour Pack” (70% Cotton, 30% Acrylic; 50 x 15g balls, 22.5m) // Qty: 1 Colour Pack (Total: 750g aran weight yarn)
- Shop this Colour Pack: Wool Warehouse (affiliate), and other Scheepjes retailers
- Hook: US Size 5.5mm for blanket body, and US Size 4.25mm for border.
- Find this pattern as an ad-free, easy print 6-page PDF file for a small fee ($2) on ETSY | RAVELRY | CRAFTSY | LoveCrochet.com (includes video tutorial links)

Pattern
Key Stitch Descriptions (US)
- ch chain
- beg beginning
- beg dc (sc, ch 1) – counts as 1 dc
- lp(s) loop(s)
- MR make ring: Sl knot, ch 3, ss in third ch from hook to make ring
- rep repeat
- RS/WS right side/wrong side of work
- sc single crochet
- sk skip
- sp space
- ss slip stitch
- st(s) stitch(es)
- tr treble crochet
- yoh yarn over hook

Schematic


Instructions
Note: Use larger hook for entire blanket body. Small squares are made, and then Motifs are worked form them. Square 1 (top left) is worked complete, then squares are worked join as-you-go until body is complete, then a border is added using the smaller hook.

Blanket Body

Small Granny Square (Make 38)
Note: Use a different color (randomly) from the Colour Pack for each Small Granny Square.
Video Tutorial
Rnd 1 MR, beg dc, (ch3, 3dc) 3 times, ch3, 2dc, ss in beg dc. [12 dc, 4 sp]
Rnd 2 Ss in first ch, beg dc in sp, (ch3, 3dc in same sp, ch1, 3dc in next sp) 4 times omitting final st, ss in beg dc, cut yarn. [24 dc, 8 sp]
Note: Set the partial yarn balls from the small granny squares to the side. We will use them in our Motifs.

Square No. 1 (See numbered squares on schematic)
Note: This motif is a full granny square and will use a full Cutie Pie ball.
Motif A
Step 1 Using a new Cutie Pie ball, make a small granny square, but do not cut your yarn after Rnd 2.
Step 2 Make 2 more Rnds as follows:
Video Tutorial
Rnd 3 Ss in first 2 chs, turn to WS of work, beg dc in sp, * ch3, 3dc in same sp, (ch1, 3dc in next sp) 2 times, rep from * 3 times omitting final st, ss in beg dc. [36 dc, 12 sp]
Rnd 4 Ss in first 2 chs, turn to RS of work, beg dc in sp, * ch3, 3dc in same sp, (ch1, 3dc in next sp) 3 times, rep from * 3 times omitting final st, ss in beg dc, cut yarn. [48 dc, 16 sp]
Note: Set the tiny partial yarn ball to the side. We will use these remnants for the border later on.

Square No. 2
Note: This is Motif B, rotated so that the small granny square is in the top right corner.
Motif B
Video Tutorial
Note: The tutorial above shows 2 sides joined. If only one side is required, then leave one side worked plain as needed.
Row 1 Holding any small granny square with WS facing, and using one of the partial yarn balls from the small granny squares, ss in any corner sp, (beg dc, 2dc) in same sp, ch1, 3dc in next sp, ch1, (3dc, ch3, 3dc) in corner, (ch1, 3dc in next sp) 2 times, turn. [18 dc, 5 sp]
Row 2(RS) Beg dc in first st, (ch1, 3dc in next sp) 2 times, ch1, (3dc, ch3, 3dc) in corner, (ch1, 3dc in next sp) 2 times, ch1, dc in final st, turn. [20 dc, 7 sp]
Row 3 (Beg dc, 2dc) in sp, (ch1, 3dc in next sp) 2 times, ch1, (3dc, ch3, 3dc) in corner sp, (ch1, 3dc in next sp) 3 times, turn. [24 dc, 7 sp]
Row 4 Beg dc in first st, hold Square 1 with small granny square at top edge, join as-you-go to the right-hand side of Square 1 (see schematic) as follows: (holding motifs with wrong sides together, insert hook back to front in final sp of Row 2 on Square 1, ss in sp to join, 3dc in next sp on motif in progress) 4 times, ch1, ss in corner sp of Square 1 to join, ch1, 3dc in same sp on motif in progress, (ch1, 3dc in next sp) 3 times, ch1, dc in final st, cut yarn. [26 dc, 1 joined side, 1 plain side]
The Joined Side represents how squares will be joined throughout the entire blanket. Join in the order that they appear on the schematic.
Note: Set the tiny partial yarn ball to the side. We will use these remnants for the border later on.

Square No. 3
Note: This is Motif B, rotated so that the small granny square is along the bottom edge.
Motif B
Video Tutorial
Step 1 Work 2 rows on one side of the small granny square as follows:
Row 1 Holding any small granny square with WS facing, and using one of the partial yarn balls from the small granny squares, ss in any corner sp, (beg dc, 2dc) in same sp, (ch1, 3dc in next sp) 2 times, turn. [9 dc, 2 sp]
Row 2 (RS) Beg dc in first st, (ch1, 3dc in next sp) 2 times, ch1, dc in final st, cut yarn. [8 dc, 3 sp]
Step 2 Work around 3 sides as follows:
Row 1 Hold small granny square with WS facing, and with the 2 rows from Step 1 along the left-hand side. Using the same partial yarn ball from Step 1, ss in the top right corner sp of the small granny square, (beg dc, 2dc) in same sp, (ch1, 3dc in next sp) 2 times, ch1, treating dc and ch1 as a corner sp, (3dc, ch3, 3dc) in this “sp”, ch1, 3dc in next sp, ch1, (3dc, ch3, 3dc) in next “corner sp”, (ch1, 3dc in next sp) 3 times, turn. [33 dc, 10 sp]
Row 2 Beg dc in first st, (ch1, 3dc in next sp) 3 times, ch1, (3dc, ch3, 3dc) in corner sp, (ch1, 3dc in next sp) 2 times, ch1, (3dc, ch3, 3dc) in corner sp, (ch1, 3dc in next sp) 3 times, ch1, dc in final st, cut yarn. [38 dc, 13 sp]
Note: Set the tiny partial yarn ball to the side. We will use these remnants for the border later on.
Square No. 4
Note: This is Motif B again, rotated so that the small granny square is along the top edge.
Work as for Square 3, but join on the third side, leaving the first and second sides worked plain, without joining. Keep leaving the small partial ball of yarn to the side in a container or bag.

Square No. 5
Note: This motif is worked just like Motif A, but Rounds 3 and 4 are added onto a small granny square.
Motif D
Rnd 3 Holding a small granny square with WS facing, using one of the partial balls left over from the small granny squares, ss in any corner sp, beg dc in sp, * ch3, 3dc in same sp, (ch1, 3dc in next sp) 2 times, rep from * 3 times omitting final st, ss in beg dc. [36 dc, 12 sp]
Rnd 4 Ss in first 2 chs, turn to RS of work, beg dc in sp, * ch3, 3dc in same sp, (ch1, 3dc in next sp) 3 times, rep from * 3 times omitting final st, ss in beg dc, cut yarn. [48 dc, 16 sp]
This is what I did with all of my tiny little yarn balls as I finished Motifs B, C, and D. Motif A uses a fresh new Cutie Pie, but the same little amount of yarn will be left over.
When all 49 of the motifs are finished, you will be left with 49 tiny remnants like the ones in the photo above, plus 1 full Cutie Pie that was never used, since there are 50 balls in the Colour Pack.
Blanket Border
Prepare remnants for border using the 3 photos below as a guide.

1) Gather your tiny 49 remnant balls and your full Cutie Pie yarn ball.

2) Put the remnants in order how you would like them to be worked for the border. You can randomize them or place them in a certain order if you like.

3) Using a type of surgeon’s knot (below), start knotting the remnants end to end and making a big yarn ball. I trim the ends short, and you can also weave them in. You will use this yarn ball for your border yarn so that no yarn goes to waste.
Surgeon’s knot – My preferred method
This diagram from wolfandiron.com illustrates the Surgeon’s Knot that I use. It is a square knot, but with an extra pass on one side to secure it. It will hold very tightly as long as it is seated properly.

Begin blanket border

Rnd 1 Using remnant yarn ball and smaller hook, ss in any corner sp of the blanket body, * 3sc in corner, (sc in 15 sts/sps, sc in next sp, sc2tog as follows: insert hook in same sp, yoh, pull up lp, insert hook in next sp, yoh, pull up lp, yoh, draw yarn through 3 lps, sc in same sp) across 7 squares, until next corner is reached, rep from * 3 times, ss in first sc.

Rnd 2 * (Sc, ch3, sc) in corner sc, (ch3, sk 2, sc) across to next corner, ch3, rep from * 3 times, ss in first sc.
Rnd 3 Ss in first ch, (beg dc, ch3, 2dc) in same sp, * (ch1, 2dc in next sp) across to next corner, ch1, (2dc, ch3, 2dc) in corner sp, rep from * 3 times omitting final corner, 2dc in first corner to complete it, ss in beg dc.
Rnd 4 * (Sc, ch3, sc) in corner sp, (ch3, sc in next sp) across to next corner, ch3, rep from * 3 times, ss in first sc.

Rnds 5-7 Rep Rnds 3 and 4, then 3 again.
Rnd 8 (Sc, ch3, sc) in all sps around, ss in first sc, cut yarn.
Yay! All done! Weave ends, block, and give yourself a fist bump!


