
Yay! It’s all done! The first of 6 free crochet blankets in my Relaxghan series. Look forward to a new free crochet blanket pattern on the last day of the month, every month through July 2018.
Pattern PDF
Find the Unbothered crochet blanket pattern in an ad-free, easy to print PDF version on:
You can also find this pattern on AllFreeCrochetAfghanPatterns.
Or scroll down for the free pattern!
New blanket alert! And the first in a series of free blanket patterns. See my Relaxghans intro post for all the deets on this series.

The pattern calls for 15-17g balls of remnants, but I actually used these Scheepjes | Cahlista* 15g balls from the Colour Pack*, and also added in a few full-size skeins of Cahlista that I had on-hand from a different project.
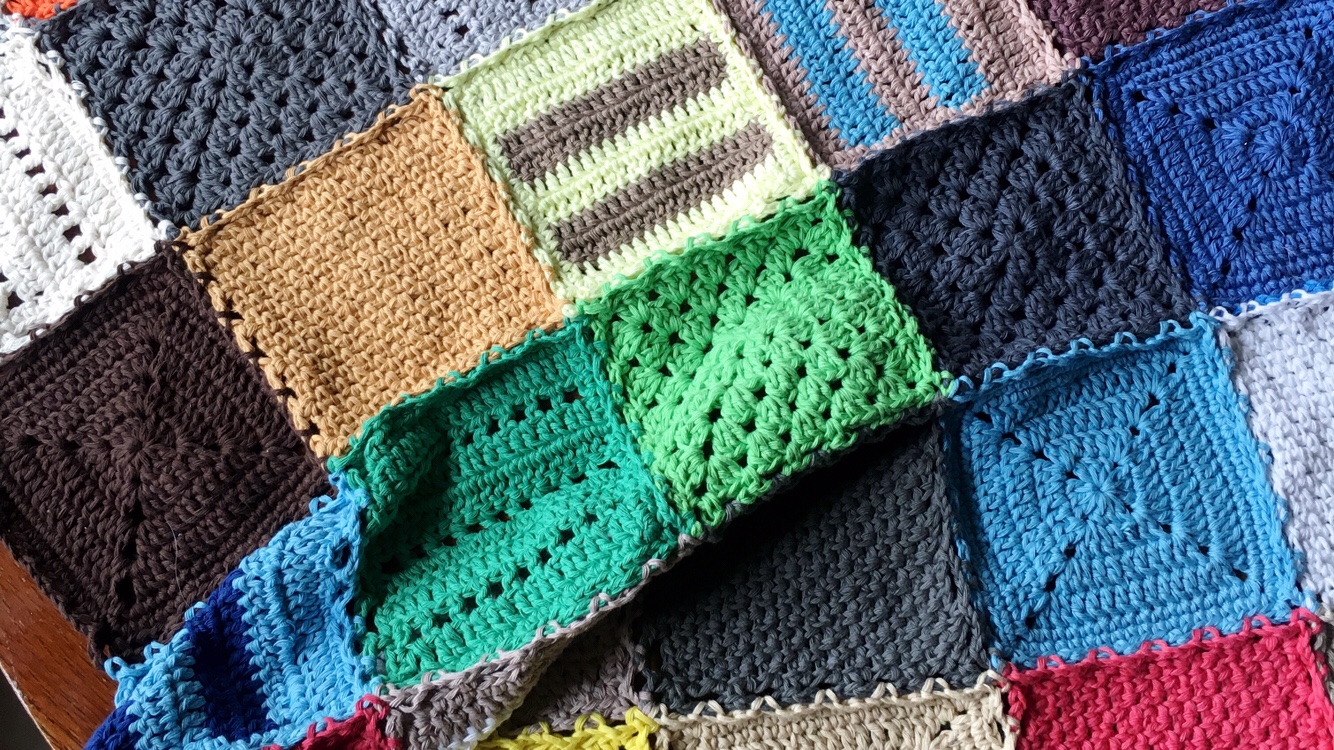
Used a simple ch-3 space JAYG and really did not pay attention to which way the squares were rotated as I joined. The eyelet stripes, and the color stripes are any which way, and I love it. Also, muted, pastel, neutral, bright, neon…. Yep, it’s all in there.
In the photo below, I was apparently in the mood to start a square, abandon it, and start another, just going with the flow. Also had some fun with placement planning, but nothing too heavy. Just pure peace.

Lounging on the breakfast nook table, all finished. If I had the time to make this blanket a hundred more times, I would. There’s just enough variety in the squares not to get bored, and the simplicity allows for Supernatural binge-watching as I work. It doesn’t get any better! This may just become my go-to blanket for using up random leftover balls of yarn.

And just casually relaxing here. Yes this yarn is as buttery soft as it looks. Aran weight cotton that’s still fluffy is the bee’s knees.

Where to buy Scheepjes yarns (affiliate links*):
- Worldwide – Wool Warehouse
- Canada – Knotty House
- UK – Black Sheep Wools
- Other Scheepjes retailers

* A note on Affiliate links: Your shopping through these links will provide me a small commission and helps support CypressTextiles so I can continue to create fiber funsies! And it costs you nothing extra! 🙂
Related links
- Pattern PDF on Ravelry
- Relaxghans series intro post
- FO reveal of Unbothered (yummy pics and al the deets)
- Scheepjes Cahlista Yarn (affiliate)
Hope y’all enjoy this one! See all the individual square motifs below 🙂

Info
First in a series of six “Relaxghans”, Unbothered (named for the completely haphazard color choices and square orientation) is a stash buster and a remnant eater made of five different square patterns, all joined as you go. A super simple, no-waste border edges the piece, and when it’s all finished, you’ll have a soft and cozy reminder of the peaceful vibes you felt in the making process. Divine.
I follow hashtags: #UnbotheredBlanket #CypressTextiles
Yarn
Scheepjes “Cahlista” (100% Natural Cotton; 50g/85m)
700-750g Cahlista. I used random colors that I had on-hand leftover from several projects. Each square will take a maximum of 15-17g of yarn, depending on your tension. The multicolored square will take 17g total (2 colors).
Notions and Sizing
- US Size 4.25mm (G) hook (or 4.5mm), Tapestry needle for weaving ends
- Gauge Motif measures about 5-5.5in
- Measurements Finished piece measures about 32x37in, and is easily resized by using larger gauge yarn and hook, or by making more motifs.
Key Stitch Descriptions (US)
- ch chain
- beg beginning
- beg dc (sc, ch 1) – counts as 1 dc
- dc double crochet
- lp(s) loop(s)
- rep repeat
- RS/WS right side/wrong side of work
- sc single crochet
- sk skip
- sp space
- ss slip stitch
- st(s) stitch(es)
- yoh yarn over hook
Schematic

Joining

Instructions
Note: Squares are worked according to the Schematic, and joined as you go on the final round to make the blanket body.
A very simple border is added using the remnants, so there is no wasted yarn.
Joining
Refer to the Joining Model on the previous page. The first square of the blanket is the only square that is worked completely, without any joining. All subsequent squares will need to be joined on any adjacent sides, during the final round.
Note the blue lines on the Schematic indicating the sides that will need to be used for joining. I suggest working row by row, from left to right, and top to bottom, until all seven rows of squares are all joined. You will notice in the pattern instructions that the final round of each motif consists of chain-3 spaces.
When you are working a joining side, during every chain-3 space on that side (starting with the corner, and ending with the next corner), you will slip st in the adjacent ch-sp on the completed motif instead of working the second chain. So it goes: ch 1, ss in adjacent ch-sp on completed motif, ch 1, and continue. Refer to the Joining Model to see these slipped stitches.
When the fourth square is joined on to complete a 4-square patch, and you are working the corner, you will simply ss in the corner above, and the corner to the left, ignoring the diagonal corner. Notice on the Model that there are 2 slip sts
on the corner of the fourth square. If you work consistently in rows, the corners will look great!
Joining will not be mentioned in the motif instructions, but please know that you will be joining on the final round. Also,
you can use any alternate join that you’d like! If there is a certain method you prefer, you can just omit the final round,
and do it your way. Perfection!
Granny Square

Rnd 1 Sl knot, ch 3, ss in third ch from hook to make ring. All in ring: Beg dc, (ch 2, 2 dc) 3 times, ch 2, dc, ss in beg dc. [8 dc, 4 ch-sp]
Rnd 2 Ss in first ch of ch-sp, (beg dc, ch 2, 3 dc) all in same ch-sp, (3 dc, ch 2, 3 dc) in next 3 chsps, 2 dc in first ch-sp to complete corner, ss in beg dc. [24 dc, 4 ch-sp]
Rnds 3-5 Ss in first ch of ch-sp, (beg dc, ch 2, 3 dc) all in same ch-sp, * 3 dc between all 3-dc “groups” across to next ch-sp, Note: there is no chain to work into, so just squeeze the 3 dc in between. (3 dc, ch 2, 3 dc) in ch-sp, rep from *
3 times omitting final corner, 2 dc in first ch-cp to complete corner, ss in beg dc. [On Rnd 5: 60 dc, 4 ch-sp]
Rnd 6 * (Sc, ch 3, sc) in ch-sp, (ch 3, sc between 3-dc groups) 4 times, ch 3, rep from * 3 times, ss in first sc. [24 sc, 24 ch-sp]
Solid Granny Square

Rnd 1 Sl knot, ch 3, ss in third ch from hook to make ring. All in ring: Beg dc, (ch 1, 3 dc) 3 times, ch 1, 2 dc, ss in beg dc. [12 dc, 4 ch-sp]
Rnd 2 (Beg dc, ch 2, 2 dc) all in same ch-sp, (dc in 3 sts, (2 dc, ch 2, 2 dc) in next ch-sp), 3 times, dc in first ch-sp to complete corner, ss in beg dc. [28 dc, 4 ch-sp]
Rnds 3 and 4 Ss in first ch of ch-sp, (beg dc, ch 2, 2 dc) all in same ch-sp, * dc in all sts to next ch-sp, (2 dc, ch 2, 2 dc) in ch-sp, rep from * 3 times omitting final corner, dc in first ch-sp to complete corner, ss in beg dc. [On Rnd 4: 60 dc, 4 ch-sp]
Rnds 5 and 6 (3 sc in corner, sc in all sts to next corner) 4 times, ss in first sc. [On Rnd 6: 80 sc]
Rnd 7 * (Sc, ch 3, sc) in corner, (ch 3, sc) 4 times evenly across side, ch 3, rep from * 3 times, ss in first sc. [24 sc, 24 ch-sp]
Stripey Square

Row 1 (RS) Sl knot, ch 21, dc in fourth ch from hook and in all rem 17 chs, turn. [19 dc] Note: turning ch counts as 1 dc.
Row 2 Beg dc, dc in 18 sts, changing to the second color on the final dc by pulling the new color through the 2 loops on the final step of the st, turn. [19 dc]
Row 3 Drop first color – do not work over it – and continue with second color. Rep Row 2.
Row 4 Rep Row 2, changing back to the first color in the same manner, and just carrying the yarn up. These “floats” at the side will be covered by the border round of the motif.
Rows 5-9 Rep Row 2, changing color as shown in the photo. Cut second color after Row 8.
Sc Border Rnd: Continue with first color, ch 1 and pull ch closed to secure st, (3 sc in corner, work 17 sc evenly across side to next corner) 4 times, ss in first sc, do not turn. [80 sc]
Joining Rnd: * (Sc, ch 3, sc) in corner, (ch 3, sc) 4 times evenly across side, ch 3, rep from * 3 times, ss in first sc. [24 sc, 24 ch-sp]
Eyelet Square

Row 1 (RS) Sl knot, ch 21, dc in fourth ch from hook and in all rem 17 chs, turn. [19 dc] Note: turning ch counts as 1 dc.
Row 2 Beg dc, (ch 1, sk 1, dc) 9 times, turn. [10 dc, 9 ch-sp]
Rows 3 and 4 Beg dc, dc in all 18 sts/sps across, turn. [19 dc]
Rows 5-9 Rep Rows 2-4 1 time, and then Rows 2 and 3 1 time. End on RS row.
Sc Border Rnd: Ch 1 and pull ch closed to secure st, (3 sc in corner, work 17 sc evenly across side to next corner) 4 times, ss in first sc, do not turn. [80 sc]
Joining Rnd: * (Sc, ch 3, sc) in corner, (ch 3, sc) 4 times evenly across side, ch 3, rep from * 3 times, ss in first sc. [24 sc, 24 ch-sp]
Linen Stitch Square

Row 1 (RS) Sl knot, ch 26, sc in fourth ch from hook, (ch 1, sk 1, sc in next ch) 11 times, turn. [12 sc, 11 ch-sp, 1 turning ch]
Rows 2-21 (Ch 1, sc in ch-sp) 12 times, placing final sc in turning ch from previous row, turn. [12 sc, 12 ch-sp]
Note: “turning chain” for these rows is the first ch from the previous row.
Joining Rnd: * (Sc, ch 3, sc) in corner, (ch 3, sc) 4 times evenly across side, ch 3, rep from * 3 times, ss in first sc. [24 sc, 24 ch-sp]
Note: Please do not stress over st placement of the sc sts on this round. Refer to photo, and just get them evenly spaced. It’ll look wonderful 🙂

Border
Note: use remnants left over from motifs, and any other spare yarn you have. I use surgeon’s knots to secure the yarns and make 1 big remnant ball. Head to YouTube to seek tutorials for surgeon’s knot, or any other secure knot for use in for example, fishing, etc. After I make the knot, I cut the ends short.
Rnd 1 Ss in top right corner to join yarn, * (sc, ch 3, sc) in corner, (ch 3, sc in next ch-sp) across to next corner, ch 3, rep from * 3 times, ss in first sc.
Rnd 2 (5 sc in corner ch-sp, 4 sc in all ch-sps across to next corner) 4 times, ss in first st.
Rnds 3 and 4 Sc in all sts to corner, (3 sc in corner, sc in all sts to next corner) 4 times, working up to first st on fourth side, ss in first sc. Cut yarn after Rnd 4.
Yay! All done! Weave ends and give yourself a fist bump!
Note: Despite what I just said, I did not weave ends for this project. I tied off all the ends using Surgeon’s Knots and then cut them off to about 2mm. It is so liberating and I have not had any ends come loose yet, even after washing. Bless.